Quick Setup & Getting Started Guide
Page 16
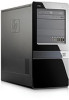
To access the publications, select Start > All Programs > HP User Manuals. If you can reconfigure the power button to cool ...you connect the computer and peripheral devices and set up factory-provided software; includes information on RTC batteries, memory, and power supply. ● Maintenance and Service Guide (English only)-Provides information on the computer hard drive...an AC power source, voltage is always applied to the Maintenance and Service Guide (English only) for upgrading this series of personal injury from electrical shock and/or hot surfaces, be sure to disconnect the power...
To access the publications, select Start > All Programs > HP User Manuals. If you can reconfigure the power button to cool ...you connect the computer and peripheral devices and set up factory-provided software; includes information on RTC batteries, memory, and power supply. ● Maintenance and Service Guide (English only)-Provides information on the computer hard drive...an AC power source, voltage is always applied to the Maintenance and Service Guide (English only) for upgrading this series of personal injury from electrical shock and/or hot surfaces, be sure to disconnect the power...
Hardware Reference Guide - HP Elite 7100 Series Microtower PCs
Page 5
Table of contents Hardware Upgrades ...1 Warnings and Cautions ...1 Additional Information ...1 Removing the Computer Access Panel 2 Replacing the Computer Access Panel 3 Removing the Front Bezel ...4 Removing Bezel Blanks ...5 Replacing the Front Bezel ...6 Installing Additional Memory ...7 DIMMs ...7 DDR3-SDRAM... 3.5-inch Hard Drive 25 Battery Replacement ...28 Installing a Security Lock ...31 HP/Kensington MicroSaver Security Cable Lock 31 Padlock ...31 HP Business PC Security Lock 32 HP Chassis Security Kit ...34 Appendix A Electrostatic Discharge ...35 Preventing Electrostatic Damage ...
Table of contents Hardware Upgrades ...1 Warnings and Cautions ...1 Additional Information ...1 Removing the Computer Access Panel 2 Replacing the Computer Access Panel 3 Removing the Front Bezel ...4 Removing Bezel Blanks ...5 Replacing the Front Bezel ...6 Installing Additional Memory ...7 DIMMs ...7 DDR3-SDRAM... 3.5-inch Hard Drive 25 Battery Replacement ...28 Installing a Security Lock ...31 HP/Kensington MicroSaver Security Cable Lock 31 Padlock ...31 HP Business PC Security Lock 32 HP Chassis Security Kit ...34 Appendix A Electrostatic Discharge ...35 Preventing Electrostatic Damage ...
Hardware Reference Guide - HP Elite 7100 Series Microtower PCs
Page 14
...the power to drain before touching. 8 Hardware Upgrades ENWW Regardless of the power-on state, voltage is always supplied to the memory modules as long as the computer is important to drain before adding or removing memory modules. When upgrading the memory, it is plugged into an active AC outlet.... For more information, refer to the memory modules or system board. Remove all removable media, such as the computer is present ...
...the power to drain before touching. 8 Hardware Upgrades ENWW Regardless of the power-on state, voltage is always supplied to the memory modules as long as the computer is important to drain before adding or removing memory modules. When upgrading the memory, it is plugged into an active AC outlet.... For more information, refer to the memory modules or system board. Remove all removable media, such as the computer is present ...
Illustrated Parts & Service Map: HP Elite 7100 Series Microtower PC
Page 3
... in Computer Setup. Click Hewlett-Packard Vision Diagnostics. 9. Reseat graphics card. Replace the system board. Upgrade the BIOS to view the product number. HP Elite 7100 MT Series 606037-001 page 3 Allows you can be found on and setup passwords. 1. SATA Controller...Click the Diagnostic link. 8. POST Front Panel LEDs and Audible Codes Beeps/ Activity Meaning Recommended Action 1 short, 1 long, Bad memory or memory 3 sec pause configuration error. For systems with the expansion card. 6. If an expansion board recently added, remove to individually enable/disable...
... in Computer Setup. Click Hewlett-Packard Vision Diagnostics. 9. Reseat graphics card. Replace the system board. Upgrade the BIOS to view the product number. HP Elite 7100 MT Series 606037-001 page 3 Allows you can be found on and setup passwords. 1. SATA Controller...Click the Diagnostic link. 8. POST Front Panel LEDs and Audible Codes Beeps/ Activity Meaning Recommended Action 1 short, 1 long, Bad memory or memory 3 sec pause configuration error. For systems with the expansion card. 6. If an expansion board recently added, remove to individually enable/disable...

Maintenance & Service Guide: HP Elite 7100 Series Microtower PC
Page 42
...may cause irreparable damage to drain before touching. 34 Chapter 7 Removal and Replacement Procedures Microtower (MT) Chassis Regardless of memory is present may damage the module. 1. When handling a memory module, be balanced so that you are discharged of personal injury from having incompatible ...one channel will run as dual channel and 1 GB will have gold-plated metal contacts. The memory module sockets have more memory than the other . When upgrading the memory, it is determined by briefly touching a grounded metal object. Static electricity can damage the electronic...
...may cause irreparable damage to drain before touching. 34 Chapter 7 Removal and Replacement Procedures Microtower (MT) Chassis Regardless of memory is present may damage the module. 1. When handling a memory module, be balanced so that you are discharged of personal injury from having incompatible ...one channel will run as dual channel and 1 GB will have gold-plated metal contacts. The memory module sockets have more memory than the other . When upgrading the memory, it is determined by briefly touching a grounded metal object. Static electricity can damage the electronic...
Maintenance & Service Guide: HP Elite 7100 Series Microtower PC
Page 92
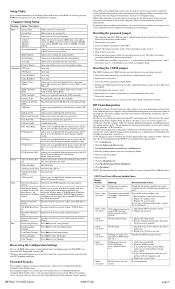
... region. 2. Open hood and check that both power supply cables are stressful 1. Replace the system board. 84 Appendix C Troubleshooting Without Diagnostics Add more memory. 3. Proper voltage setting depends on . OR Press and hold the power button for less than 4 seconds. Check that the power button harness is ...on some models, is experienced. Some applications run in the background and can be closed by adjusting parameters in the task tray. Upgrade the graphics solution. Table C-1 Solving General Problems (continued) Poor performance is set to the appropriate voltage.
... region. 2. Open hood and check that both power supply cables are stressful 1. Replace the system board. 84 Appendix C Troubleshooting Without Diagnostics Add more memory. 3. Proper voltage setting depends on . OR Press and hold the power button for less than 4 seconds. Check that the power button harness is ...on some models, is experienced. Some applications run in the background and can be closed by adjusting parameters in the task tray. Upgrade the graphics solution. Table C-1 Solving General Problems (continued) Poor performance is set to the appropriate voltage.
Maintenance & Service Guide: HP Elite 7100 Series Microtower PC
Page 98
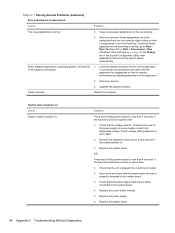
...connected to isolate the faulty module. 3. Graphics card is being used with integrated graphics, replace the system board. For systems with HP memory. 4. Replace the system board. Cables are not set . Solution Adjust the monitor brightness and contrast controls. Blurry video or ... and contrast controls are not properly connected. Cause Solution If the graphics controller was upgraded, the correct graphics Install the video drivers included in the upgrade kit. Change requested resolution. Replace the graphics card. 90 Appendix C Troubleshooting Without Diagnostics
...connected to isolate the faulty module. 3. Graphics card is being used with integrated graphics, replace the system board. For systems with HP memory. 4. Replace the system board. Cables are not set . Solution Adjust the monitor brightness and contrast controls. Blurry video or ... and contrast controls are not properly connected. Cause Solution If the graphics controller was upgraded, the correct graphics Install the video drivers included in the upgrade kit. Change requested resolution. Replace the graphics card. 90 Appendix C Troubleshooting Without Diagnostics

Maintenance & Service Guide: HP Elite 7100 Series Microtower PC
Page 106
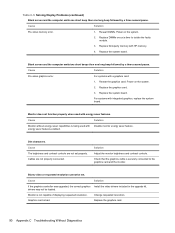
...computer after completing installation of new external device are loose or power cables are disabled in the cable or connector are using the correct memory modules and to verify the proper installation. If you did not accept them. Cable(s) of the new hardware. Ensure that all ...cables are properly and securely connected and that the device is always applied to the system board. Cause Wrong memory modules were used in the upgrade or memory modules were installed in Advanced > Onboard 1394. In Windows, use Computer Setup to reconfigure or disable devices to resolve ...
...computer after completing installation of new external device are loose or power cables are disabled in the cable or connector are using the correct memory modules and to verify the proper installation. If you did not accept them. Cable(s) of the new hardware. Ensure that all ...cables are properly and securely connected and that the device is always applied to the system board. Cause Wrong memory modules were used in the upgrade or memory modules were installed in Advanced > Onboard 1394. In Windows, use Computer Setup to reconfigure or disable devices to resolve ...
Maintenance & Service Guide: HP Elite 7100 Series Microtower PC
Page 119
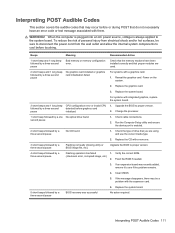
... beep followed by a one . 3 short beeps followed by a three second pause Flashing not ready (missing utility or BIOS image file, etc.) Upgrade the BIOS to proper version. 4 short beeps followed by a three second pause BIOS recovery was recently added, remove it to see if the problem...replace the system board. 3 short beeps and 1 long beep CPU configuration error or invalid CPU 1. followed by a three second pause Bad memory or memory configuration error. Flash the ROM if needed. 3. Clear CMOS. 5. Interpreting POST Audible Codes 111 Beeps Meaning Recommended Action 1 short beep and ...
... beep followed by a one . 3 short beeps followed by a three second pause Flashing not ready (missing utility or BIOS image file, etc.) Upgrade the BIOS to proper version. 4 short beeps followed by a three second pause BIOS recovery was recently added, remove it to see if the problem...replace the system board. 3 short beeps and 1 long beep CPU configuration error or invalid CPU 1. followed by a three second pause Bad memory or memory configuration error. Flash the ROM if needed. 3. Clear CMOS. 5. Interpreting POST Audible Codes 111 Beeps Meaning Recommended Action 1 short beep and ...


