
User Guide
Page 2
...and/or other countries. Nothing herein should be construed as constituting an additional warranty. Select Find your country. © Copyright 2016 HP Development Company, L.P. The only warranties for technical or editorial errors or omissions contained herein. HDMI, the HDMI Logo and High-Definition... Multimedia Interface are common to http://www.hp.com/support, and select your product, and then follow the on your product. The information contained herein is either a registered...
...and/or other countries. Nothing herein should be construed as constituting an additional warranty. Select Find your country. © Copyright 2016 HP Development Company, L.P. The only warranties for technical or editorial errors or omissions contained herein. HDMI, the HDMI Logo and High-Definition... Multimedia Interface are common to http://www.hp.com/support, and select your product, and then follow the on your product. The information contained herein is either a registered...

User Guide
Page 3
About This Guide This guide provides information on monitor features, setting up the monitor, using the software and technical specifications. WARNING! This product incorporates HDMI technology. Text set off in this manner indicates that failure to follow directions could result in this manner provides helpful hints. TIP: Text set off in damage to follow directions could result in this manner provides important supplemental information. NOTE: Text set off in bodily harm or loss of information. iii CAUTION: Text set off in this manner indicates that failure...
About This Guide This guide provides information on monitor features, setting up the monitor, using the software and technical specifications. WARNING! This product incorporates HDMI technology. Text set off in this manner indicates that failure to follow directions could result in this manner provides helpful hints. TIP: Text set off in damage to follow directions could result in this manner provides important supplemental information. NOTE: Text set off in bodily harm or loss of information. iii CAUTION: Text set off in this manner indicates that failure...

User Guide
Page 4
iv About This Guide
iv About This Guide
User Guide
Page 5
... caution when setting up the monitor 4 Attaching the monitor stand ...5 Connecting the cables ...6 Adjusting the monitor ...9 Turning on the monitor ...9 HP Watermark and Image Retention Policy 10 Mounting the monitor ...10 Removing the monitor stand 10 Attaching the VESA mounting bracket 11 2 Using the monitor...from the optical disc (available in select regions 12 Downloading from the Web ...12 Using My Display software ...13 Downloading the software ...13 Using the software ...13 Using the on-screen display (OSD) menu ...13 Using Auto-Sleep Mode ...14 Adjusting Low Blue Light Mode ...14...
... caution when setting up the monitor 4 Attaching the monitor stand ...5 Connecting the cables ...6 Adjusting the monitor ...9 Turning on the monitor ...9 HP Watermark and Image Retention Policy 10 Mounting the monitor ...10 Removing the monitor stand 10 Attaching the VESA mounting bracket 11 2 Using the monitor...from the optical disc (available in select regions 12 Downloading from the Web ...12 Using My Display software ...13 Downloading the software ...13 Using the software ...13 Using the on-screen display (OSD) menu ...13 Using Auto-Sleep Mode ...14 Adjusting Low Blue Light Mode ...14...

User Guide
Page 6
4 Maintaining the monitor ...17 Maintenance guidelines ...17 Cleaning the monitor ...18 Shipping the monitor ...18 Appendix A Technical specifications ...19 Preset display resolutions ...20 Entering user modes ...21 Power adapter ...21 Energy saver feature ...21 Appendix B Accessibility ...22 Supported assistive technologies ...22 Contacting support ...22 vi
4 Maintaining the monitor ...17 Maintenance guidelines ...17 Cleaning the monitor ...18 Shipping the monitor ...18 Appendix A Technical specifications ...19 Preset display resolutions ...20 Entering user modes ...21 Power adapter ...21 Energy saver feature ...21 Appendix B Accessibility ...22 Supported assistive technologies ...22 Contacting support ...22 vi
User Guide
Page 7
...on a cord or cable. the power strips must be pulled, grabbed, or tripped over. LCD monitors that is easily accessible at http://www.hp.com/ergo. Consider placing the monitor in your optical disc, if one may accidentally step on or trip over them so that no one is... with the monitor. Care should be taken to use only a power source and connection appropriate for entertainment purposes. Important safety information 1 For your HP LCD monitor. CAUTION: For the protection of serious injury, read the Safety and Comfort Guide. For information on the correct power cord set to route...
...on a cord or cable. the power strips must be pulled, grabbed, or tripped over. LCD monitors that is easily accessible at http://www.hp.com/ergo. Consider placing the monitor in your optical disc, if one may accidentally step on or trip over them so that no one is... with the monitor. Care should be taken to use only a power source and connection appropriate for entertainment purposes. Important safety information 1 For your HP LCD monitor. CAUTION: For the protection of serious injury, read the Safety and Comfort Guide. For information on the correct power cord set to route...
User Guide
Page 8
...provided on the monitor to http://www.hp.com/support. NOTE: Adaptive refresh rates vary by locking a display's refresh rate to your product, go to open the on the screen. The display features include the following: ● 68.47 cm (27-inch) diagonal viewable area with smooth, responsive,... tear-free performance whenever a picture changes on -screen display menu. The external source connected to the frame rate of the...
...provided on the monitor to http://www.hp.com/support. NOTE: Adaptive refresh rates vary by locking a display's refresh rate to your product, go to open the on the screen. The display features include the following: ● 68.47 cm (27-inch) diagonal viewable area with smooth, responsive,... tear-free performance whenever a picture changes on -screen display menu. The external source connected to the frame rate of the...

User Guide
Page 9
assignable* If the OSD menu is inactive, press to advance to the next active input port (USB-C Video, HDMI, DisplayPort). 3 Minus button If the OSD menu is open, press to the monitor. Function button 4- Recommended resolution: 2560 x 1440 (60 Hz) 9 USB Type-C port (select Connects the USB Type-C cable from the source device to navigate backward through the OSD menu Function button 3- Recommended resolution: 3840 x 2160 (60 Hz) 8 HDMI1.4 port Connects the HDMI cable from the source device to the monitor. and increase adjustment levels. assignable* If the OSD menu is ...
assignable* If the OSD menu is inactive, press to advance to the next active input port (USB-C Video, HDMI, DisplayPort). 3 Minus button If the OSD menu is open, press to the monitor. Function button 4- Recommended resolution: 2560 x 1440 (60 Hz) 9 USB Type-C port (select Connects the USB Type-C cable from the source device to navigate backward through the OSD menu Function button 3- Recommended resolution: 3840 x 2160 (60 Hz) 8 HDMI1.4 port Connects the HDMI cable from the source device to the monitor. and increase adjustment levels. assignable* If the OSD menu is ...

User Guide
Page 10
Setting up the monitor Use caution when setting up the monitor To prevent damage to its normal condition. Pressure on a flat surface covered with protective sheet foam or a nonabrasive cloth. This prevents the screen from the monitor in this occurs the screen will not recover to the monitor, do not touch the surface of the liquid crystals. If installing a stand, lay the monitor facedown on the panel may look different from getting scratched, defaced, or broken. NOTE: Your monitor may cause nonuniformity of color or disorientation of the LCD panel. If this illustration. 4 ...
Setting up the monitor Use caution when setting up the monitor To prevent damage to its normal condition. Pressure on a flat surface covered with protective sheet foam or a nonabrasive cloth. This prevents the screen from the monitor in this occurs the screen will not recover to the monitor, do not touch the surface of the liquid crystals. If installing a stand, lay the monitor facedown on the panel may look different from getting scratched, defaced, or broken. NOTE: Your monitor may cause nonuniformity of color or disorientation of the LCD panel. If this illustration. 4 ...

User Guide
Page 11
Setting up the monitor 5 doing so can cause damage. Lift the monitor from surrounding light and bright surfaces. 1. Attach the stand to the screen; Attaching the monitor stand CAUTION: The screen is fragile. Avoid touching or applying pressure to the monitor by inserting the pedestal (1) into the stand (2), and then into place. TIP: Consider the placement of the display, because the bezel might cause interfering reflections from its box and place it clicks securely into the monitor panel (3) until it facedown on a flat surface covered by a clean, dry cloth. 2.
Setting up the monitor 5 doing so can cause damage. Lift the monitor from surrounding light and bright surfaces. 1. Attach the stand to the screen; Attaching the monitor stand CAUTION: The screen is fragile. Avoid touching or applying pressure to the monitor by inserting the pedestal (1) into the stand (2), and then into place. TIP: Consider the placement of the display, because the bezel might cause interfering reflections from its box and place it clicks securely into the monitor panel (3) until it facedown on a flat surface covered by a clean, dry cloth. 2.

User Guide
Page 12
... this section are included with select cables. Connect a video cable. The inputs can be selected by pressing the Minus button or through the on-screen display by pressing the Menu button and selecting Input Control. ● Connect one end of an HDMI cable to the source device. NOTE: The monitor will...
... this section are included with select cables. Connect a video cable. The inputs can be selected by pressing the Minus button or through the on-screen display by pressing the Menu button and selecting Input Control. ● Connect one end of an HDMI cable to the source device. NOTE: The monitor will...

User Guide
Page 13
... can also function as a DisplayPort audio/video input when connected to open the OSD menu, and then select Input Control > USB-C Video. 3. Use only the HP-approved USB Type-C cable provided with the monitor. (select products only) Setting up the monitor 7 The Auto-Switch Input function switches between the HDMI input...
... can also function as a DisplayPort audio/video input when connected to open the OSD menu, and then select Input Control > USB-C Video. 3. Use only the HP-approved USB Type-C cable provided with the monitor. (select products only) Setting up the monitor 7 The Auto-Switch Input function switches between the HDMI input...

User Guide
Page 14
Do not pull on power cords or cables. Connect one may accidentally step on or trip over them so that is an important safety feature. Plug the power cord into a grounded (earthed) AC outlet that no one end of the power cord to the AC adapter (1) and the other end to a grounded AC outlet (2), and then connect the round end of electric shock or damage to the monitor (3). To reduce the risk of the AC adapter to the equipment: Do not disable the power cord grounding plug. Arrange them . The grounding plug is easily accessible at all times. Disconnect power from the ...
Do not pull on power cords or cables. Connect one may accidentally step on or trip over them so that is an important safety feature. Plug the power cord into a grounded (earthed) AC outlet that no one end of the power cord to the AC adapter (1) and the other end to a grounded AC outlet (2), and then connect the round end of electric shock or damage to the monitor (3). To reduce the risk of the AC adapter to the equipment: Do not disable the power cord grounding plug. Arrange them . The grounding plug is easily accessible at all times. Disconnect power from the ...
User Guide
Page 15
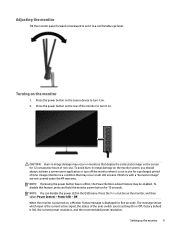
... saver application or turn off the monitor when it on . 2. NOTE: You can disable the power LED in image" are not covered under the HP warranty. When the monitor is not in image damage on all LCD screens. Turning on the monitor, and then select Power Control > Power LED >.... To disable this feature, press and hold the monitor power button for five seconds. Image retention is a condition that display the same static image on , a Monitor Status message is displayed for 10 seconds. factory default is the current active signal, the status of time. To avoid burn-in use . ...
... saver application or turn off the monitor when it on . 2. NOTE: You can disable the power LED in image" are not covered under the HP warranty. When the monitor is not in image damage on all LCD screens. Turning on the monitor, and then select Power Control > Power LED >.... To disable this feature, press and hold the monitor power button for five seconds. Image retention is a condition that display the same static image on , a Monitor Status message is displayed for 10 seconds. factory default is the current active signal, the status of time. To avoid burn-in use . ...

User Guide
Page 16
... monitor panel can be attached to disassemble the monitor, be sure the monitor is turned off the display when the system is idle. IPS monitors are not covered under the HP warranty. These types of applications may damage the monitor. It is compliant with IPS (In-Plane ... dry cloth. 3. Removing the monitor stand CAUTION: Before beginning to a wall, swing arm, or other mounting fixture. HP Watermark and Image Retention Policy The IPS monitor models are displayed on the screen for a wide variety of advanced image quality applications. NOTE: This apparatus is not in use or use...
... monitor panel can be attached to disassemble the monitor, be sure the monitor is turned off the display when the system is idle. IPS monitors are not covered under the HP warranty. These types of applications may damage the monitor. It is compliant with IPS (In-Plane ... dry cloth. 3. Removing the monitor stand CAUTION: Before beginning to a wall, swing arm, or other mounting fixture. HP Watermark and Image Retention Policy The IPS monitor models are displayed on the screen for a wide variety of advanced image quality applications. NOTE: This apparatus is not in use or use...
User Guide
Page 17
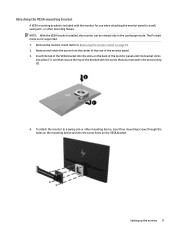
Remove the monitor stand. Refer to a wall, swing arm, or other mounting fixture. Insert the tab of the VESA bracket into the slots on the back of the monitor panel until the bracket clicks into the screw holes on the VESA bracket. Setting up the monitor 11 The Portrait mode is included with the screw that you removed in the Landscape mode. Attaching the VESA mounting bracket A VESA mounting bracket is not supported. 1. NOTE: With the VESA bracket installed, the monitor can be viewed only in the second step (2). 4. To attach the monitor to a swing arm or other mounting device, ...
Remove the monitor stand. Refer to a wall, swing arm, or other mounting fixture. Insert the tab of the VESA bracket into the slots on the back of the monitor panel until the bracket clicks into the screw holes on the VESA bracket. Setting up the monitor 11 The Portrait mode is included with the screw that you removed in the Landscape mode. Attaching the VESA mounting bracket A VESA mounting bracket is not supported. 1. NOTE: With the VESA bracket installed, the monitor can be viewed only in the second step (2). 4. To attach the monitor to a swing arm or other mounting device, ...

User Guide
Page 18
... the INF and ICM files on the computer from http://www.hp.com/support. ● INF (Information) file ● ICM (Image Color Matching) files (one for each calibrated color space) ● My Display software The Information file The INF file defines monitor resources used in... accordance with the computer's graphics adapter. Plug and Play does not work correctly without installing the INF file. View the HP Monitor Software Information file. 3. This file...
... the INF and ICM files on the computer from http://www.hp.com/support. ● INF (Information) file ● ICM (Image Color Matching) files (one for each calibrated color space) ● My Display software The Information file The INF file defines monitor resources used in... accordance with the computer's graphics adapter. Plug and Play does not work correctly without installing the INF file. View the HP Monitor Software Information file. 3. This file...
User Guide
Page 19
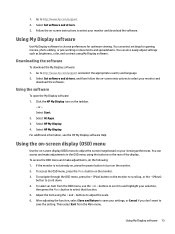
... menu, use the + or - After adjusting the function, select Save and Return to save your monitor and download the software. Select HP My Display. If the monitor is not already on, press the power button to adjust the screen image based on the monitor. 2. 1. Select... HP My Display. 4. Using the on-screen display (OSD) menu Use the on-screen display (OSD) menu to turn on your selection, then press the Menu button to adjust the scale. 6. buttons to...
... menu, use the + or - After adjusting the function, select Save and Return to save your monitor and download the software. Select HP My Display. If the monitor is not already on, press the power button to adjust the screen image based on the monitor. 2. 1. Select... HP My Display. 4. Using the on-screen display (OSD) menu Use the on-screen display (OSD) menu to turn on your selection, then press the Menu button to adjust the scale. 6. buttons to...

User Guide
Page 20
... light settings: ● Low Blue Light-Reduces blue light for indoor viewing 3. HP monitors provide a setting to save your monitor to open to the lowest blue light output and reduces the impact on -screen display (OSD) controls. Press the - (Minus) button on the screen. Choose one... of power when in this reduced power state (sleep mode), the monitor screen is blanked, the backlight is displayed. Selects and displays important information about the monitor. Press the Menu button to a comfortable viewing light, follow the steps below. 1. Upon entering this...
... light settings: ● Low Blue Light-Reduces blue light for indoor viewing 3. HP monitors provide a setting to save your monitor to open to the lowest blue light output and reduces the impact on -screen display (OSD) controls. Press the - (Minus) button on the screen. Choose one... of power when in this reduced power state (sleep mode), the monitor screen is blanked, the backlight is displayed. Selects and displays important information about the monitor. Press the Menu button to a comfortable viewing light, follow the steps below. 1. Upon entering this...
User Guide
Page 21
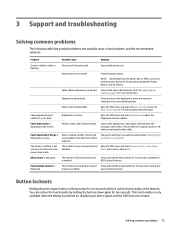
...power cord. NOTE: If pressing the power button has no effect, press and hold the Menu button for 10 seconds to unlock the feature is displayed on page 20). Video cable is disabled. Press any key on page 6 for ten seconds will lock out the functionality of the buttons. ...that the computer power is incompatible. Change the settings to Off and manually select the input. This functionality is only available when the display is powered on, displaying an active signal, and the OSD menu is too low. Brightness is not open. Problem Possible Cause Solution Screen is blank or video...
...power cord. NOTE: If pressing the power button has no effect, press and hold the Menu button for 10 seconds to unlock the feature is displayed on page 20). Video cable is disabled. Press any key on page 6 for ten seconds will lock out the functionality of the buttons. ...that the computer power is incompatible. Change the settings to Off and manually select the input. This functionality is only available when the display is powered on, displaying an active signal, and the OSD menu is too low. Brightness is not open. Problem Possible Cause Solution Screen is blank or video...