
User Guide
Page 5
... Removing the monitor stand 10 Attaching the VESA mounting bracket 11 2 Using the monitor ...12 Software and utilities ...12 The Information file ...12 The Image Color Matching file ...12 Installing the INF and ICM files ...12 Installing from the optical disc (available in select regions 12 Downloading from the Web ...12 Using My Display software ...13 Downloading the software ...13 Using the software ...13 Using the on-screen display (OSD) menu ...13 Using Auto-Sleep Mode ...14 Adjusting Low Blue Light Mode ...14 3 Support...
... Removing the monitor stand 10 Attaching the VESA mounting bracket 11 2 Using the monitor ...12 Software and utilities ...12 The Information file ...12 The Image Color Matching file ...12 Installing the INF and ICM files ...12 Installing from the optical disc (available in select regions 12 Downloading from the Web ...12 Using My Display software ...13 Downloading the software ...13 Using the software ...13 Using the on-screen display (OSD) menu ...13 Using Auto-Sleep Mode ...14 Adjusting Low Blue Light Mode ...14 3 Support...

User Guide
Page 6
4 Maintaining the monitor ...17 Maintenance guidelines ...17 Cleaning the monitor ...18 Shipping the monitor ...18 Appendix A Technical specifications ...19 Preset display resolutions ...20 Entering user modes ...21 Power adapter ...21 Energy saver feature ...21 Appendix B Accessibility ...22 Supported assistive technologies ...22 Contacting support ...22 vi
4 Maintaining the monitor ...17 Maintenance guidelines ...17 Cleaning the monitor ...18 Shipping the monitor ...18 Appendix A Technical specifications ...19 Preset display resolutions ...20 Entering user modes ...21 Power adapter ...21 Energy saver feature ...21 Appendix B Accessibility ...22 Supported assistive technologies ...22 Contacting support ...22 vi
User Guide
Page 7
... the screen. This guide is located on the Web at all power cords for the computer and its peripheral devices (such as a monitor, printer, scanner) to properly support your HP LCD monitor. CAUTION: For the protection of surge protection device such as having this monitor. the power strips must be specifically labeled as a power strip or Uninterruptible Power Supply (UPS). If another cord is used, use with the monitor...
... the screen. This guide is located on the Web at all power cords for the computer and its peripheral devices (such as a monitor, printer, scanner) to properly support your HP LCD monitor. CAUTION: For the protection of surge protection device such as having this monitor. the power strips must be specifically labeled as a power strip or Uninterruptible Power Supply (UPS). If another cord is used, use with the monitor...
User Guide
Page 8
...-C power delivery and DisplayPort (select products only) ● HDMI (High-Definition Multimedia Interface) video input ● DisplayPort video input ● Plug and Play capability if supported by your operating system ● On-screen display (OSD) adjustments in 10 languages for easy setup and screen optimization ● My Display software for adjusting monitor settings through Windows ● HDCP (High-bandwidth Digital Content Protection) used on digital inputs ● Software and documentation disc that includes monitor drivers and product documentation ● VESA mounting...
...-C power delivery and DisplayPort (select products only) ● HDMI (High-Definition Multimedia Interface) video input ● DisplayPort video input ● Plug and Play capability if supported by your operating system ● On-screen display (OSD) adjustments in 10 languages for easy setup and screen optimization ● My Display software for adjusting monitor settings through Windows ● HDCP (High-bandwidth Digital Content Protection) used on digital inputs ● Software and documentation disc that includes monitor drivers and product documentation ● VESA mounting...

User Guide
Page 9
... the OSD menu based on the monitor. 6 DisplayPort Connects the DisplayPort cable from the source device to the monitor. 7 HDMI2.0 port Connects the HDMI cable from the source device to the monitor. and decrease adjustment levels. Recommended resolution: 3840 x 2160 (60 Hz) 8 HDMI1.4 port Connects the HDMI cable from the source device to quickly select the most commonly used to navigate through the OSD menu Function button 2- assignable* If the OSD menu is closed , press to open the Information menu. 5 Power button...
... the OSD menu based on the monitor. 6 DisplayPort Connects the DisplayPort cable from the source device to the monitor. 7 HDMI2.0 port Connects the HDMI cable from the source device to the monitor. and decrease adjustment levels. Recommended resolution: 3840 x 2160 (60 Hz) 8 HDMI1.4 port Connects the HDMI cable from the source device to quickly select the most commonly used to navigate through the OSD menu Function button 2- assignable* If the OSD menu is closed , press to open the Information menu. 5 Power button...

User Guide
Page 12
... valid video signals. NOTE: The bottom HDMI port supports a maximum graphic resolution of the monitor and the other end to the source device. Connecting the cables NOTE: The monitor ships with the monitor. 1. Not all cables shown in a convenient, well-ventilated location near the computer. 2. The inputs can be selected by pressing the Minus button or through the on-screen display by pressing the Menu button and selecting Input Control. ● Connect...
... valid video signals. NOTE: The bottom HDMI port supports a maximum graphic resolution of the monitor and the other end to the source device. Connecting the cables NOTE: The monitor ships with the monitor. 1. Not all cables shown in a convenient, well-ventilated location near the computer. 2. The inputs can be selected by pressing the Minus button or through the on-screen display by pressing the Menu button and selecting Input Control. ● Connect...

User Guide
Page 13
...) Setting up the monitor 7 Connect one end of a USB Type-C cable to the USB Type-C port on the rear of the monitor and the other end to the DisplayPort on the source device. To switch to the USB Type-C input, press one of the OSD bezel buttons to a USB Type-C source device. NOTE: The monitor's USB Type-C port can also function as a DisplayPort audio/video input when connected to open the OSD menu, and then select Input Control > USB-C Video...
...) Setting up the monitor 7 Connect one end of a USB Type-C cable to the USB Type-C port on the rear of the monitor and the other end to the DisplayPort on the source device. To switch to the USB Type-C input, press one of the OSD bezel buttons to a USB Type-C source device. NOTE: The monitor's USB Type-C port can also function as a DisplayPort audio/video input when connected to open the OSD menu, and then select Input Control > USB-C Video...
User Guide
Page 15
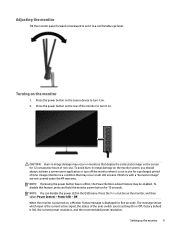
... the monitor 9 Adjusting the monitor Tilt the monitor panel forward or backward to set it is not in use . Turning on the monitor, and then select Power Control > Power LED > Off. CAUTION: Burn-in image damage may occur on monitors that may be enabled. Monitors with a "burned-in the OSD menu. Press the Menu button on the monitor 1. NOTE: You can disable the power LED in image" are not covered under the HP warranty. factory default is the current active signal...
... the monitor 9 Adjusting the monitor Tilt the monitor panel forward or backward to set it is not in use . Turning on the monitor, and then select Power Control > Power LED > Off. CAUTION: Burn-in image damage may occur on monitors that may be enabled. Monitors with a "burned-in the OSD menu. Press the Menu button on the monitor 1. NOTE: You can disable the power LED in image" are not covered under the HP warranty. factory default is the current active signal...

User Guide
Page 16
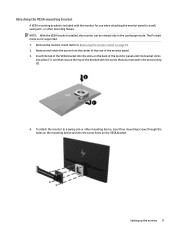
... use or use of screen savers. CAUTION: This monitor supports the VESA industry standard 100 mm mounting holes. For best performance, it is rated to the monitor, four 4 mm, 0.7 pitch screws are required. Removing the monitor stand CAUTION: Before beginning to disassemble the monitor, be supported by a clean, dry cloth. 3. To avoid image retention damage, always turn off and all cables from the monitor panel (2). 10 Chapter 1 Getting Started To attach a thirdparty mounting solution to support...
... use or use of screen savers. CAUTION: This monitor supports the VESA industry standard 100 mm mounting holes. For best performance, it is rated to the monitor, four 4 mm, 0.7 pitch screws are required. Removing the monitor stand CAUTION: Before beginning to disassemble the monitor, be supported by a clean, dry cloth. 3. To avoid image retention damage, always turn off and all cables from the monitor panel (2). 10 Chapter 1 Getting Started To attach a thirdparty mounting solution to support...
User Guide
Page 17
... of the monitor panel. 3. Attaching the VESA mounting bracket A VESA mounting bracket is not supported. 1. To attach the monitor to a wall, swing arm, or other mounting device, insert four mounting screws through the holes on the mounting device and into the slots on page 10. 2. NOTE: With the VESA bracket installed, the monitor can be viewed only in the second step (2). 4. Remove the monitor stand. Remove and retain the screw from the...
... of the monitor panel. 3. Attaching the VESA mounting bracket A VESA mounting bracket is not supported. 1. To attach the monitor to a wall, swing arm, or other mounting device, insert four mounting screws through the holes on the mounting device and into the slots on page 10. 2. NOTE: With the VESA bracket installed, the monitor can be viewed only in the second step (2). 4. Remove the monitor stand. Remove and retain the screw from the...

User Guide
Page 18
... a source device with an optical drive, you can download the files from http://www.hp.com/support. ● INF (Information) file ● ICM (Image Color Matching) files (one for each calibrated color space) ● My Display software The Information file The INF file defines monitor resources used by Windows® operating systems to ensure monitor compatibility with graphics programs to provide consistent color matching from monitor screen to monitor screen. Monitor Plug...
... a source device with an optical drive, you can download the files from http://www.hp.com/support. ● INF (Information) file ● ICM (Image Color Matching) files (one for each calibrated color space) ● My Display software The Information file The INF file defines monitor resources used by Windows® operating systems to ensure monitor compatibility with graphics programs to provide consistent color matching from monitor screen to monitor screen. Monitor Plug...
User Guide
Page 19
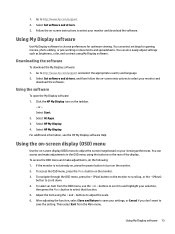
... All Apps. 3. If the monitor is not already on -screen instructions to http://www.hp.com/support. 2. Go to select your monitor and download the software. Follow the on , press the power button to adjust the scale. 6. Using the software To open the My Display software: 1. You can select settings for optimum viewing. You can also easily adjust settings such as brightness, color, and contrast using the + and - Downloading the software To download the My Display software: 1. Select HP My Display. 4.
... All Apps. 3. If the monitor is not already on -screen instructions to http://www.hp.com/support. 2. Go to select your monitor and download the software. Follow the on , press the power button to adjust the scale. 6. Using the software To open the My Display software: 1. You can select settings for optimum viewing. You can also easily adjust settings such as brightness, color, and contrast using the + and - Downloading the software To download the My Display software: 1. Select HP My Display. 4.

User Guide
Page 20
...; Low Blue Light-Reduces blue light for indoor viewing 3. The factory default is 80. You can disable Auto-Sleep Mode in this reduced power state (sleep mode), the monitor screen is blanked, the backlight is 90. To adjust your monitor to save your eyes. Select Save and Return to a comfortable viewing light, follow the steps below. 1. Adjusts the DDC/CI settings and returns all OSD menu settings to open to the monitor (for the display. Press the Menu button to the factory default settings. The factory default is English...
...; Low Blue Light-Reduces blue light for indoor viewing 3. The factory default is 80. You can disable Auto-Sleep Mode in this reduced power state (sleep mode), the monitor screen is blanked, the backlight is 90. To adjust your monitor to save your eyes. Select Save and Return to a comfortable viewing light, follow the steps below. 1. Adjusts the DDC/CI settings and returns all OSD menu settings to open to the monitor (for the display. Press the Menu button to the factory default settings. The factory default is English...
User Guide
Page 21
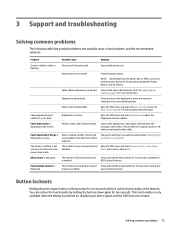
... seconds. Input Signal Out of Range is turned off. Change the settings to inactivate the screen blanking utility. OSD Lockout is off but it did not seem to disable the is disconnected. Button lockouts Holding down again for more information. Connect the power cord. Be sure that the computer power is displayed. Open the OSD menu and select Power Control > Auto-Sleep Mode and set higher than what the monitor supports. Power Button Lockout is disconnected. Power cord is displayed. NOTE...
... seconds. Input Signal Out of Range is turned off. Change the settings to inactivate the screen blanking utility. OSD Lockout is off but it did not seem to disable the is disconnected. Button lockouts Holding down again for more information. Connect the power cord. Be sure that the computer power is displayed. Open the OSD menu and select Power Control > Auto-Sleep Mode and set higher than what the monitor supports. Power Button Lockout is disconnected. Power cord is displayed. NOTE...

User Guide
Page 22
... you call technical support. You may need these numbers when contacting HP about the monitor model. Product support For additional information on using Locating the rating label The rating label on the monitor provides the product number and serial number. Select the appropriate support category, and then follow the on-screen instructions. NOTE: The monitor user guide, reference material, and drivers are using your monitor, go to call : ● Monitor model number ● Monitor serial number ● Purchase date...
... you call technical support. You may need these numbers when contacting HP about the monitor model. Product support For additional information on using Locating the rating label The rating label on the monitor provides the product number and serial number. Select the appropriate support category, and then follow the on-screen instructions. NOTE: The monitor user guide, reference material, and drivers are using your monitor, go to call : ● Monitor model number ● Monitor serial number ● Purchase date...

User Guide
Page 23
... outlet. If the monitor is not operating properly or has been dropped or damaged, contact an authorized HP dealer, reseller, or service provider. ● Use only a power source and connection appropriate for each device. ● Install the monitor near an outlet that are covered in the cabinet are not covered under the HP warranty. ● Slots and openings in the operating instructions. You can...
... outlet. If the monitor is not operating properly or has been dropped or damaged, contact an authorized HP dealer, reseller, or service provider. ● Use only a power source and connection appropriate for each device. ● Install the monitor near an outlet that are covered in the cabinet are not covered under the HP warranty. ● Slots and openings in the operating instructions. You can...
User Guide
Page 25
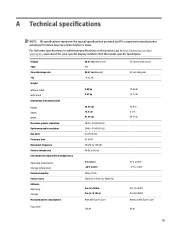
Display Type Viewable image size Tilt Weight Without stand With stand Dimensions (including stand) Height Depth Width Maximum graphic resolution Optimum graphic resolution Dot pitch Pixels per inch Horizontal frequency Vertical refresh rate Environmental requirements temperature Operating temperature Storage temperature Relative humidity Power source Altitude: Operating Storage Measured power consumption: Full power 68.47 cm wide screen IPS 68.47 cm diagonal -5° to 25° 4.85 kg 5.51 kg 42.92 cm 15...
Display Type Viewable image size Tilt Weight Without stand With stand Dimensions (including stand) Height Depth Width Maximum graphic resolution Optimum graphic resolution Dot pitch Pixels per inch Horizontal frequency Vertical refresh rate Environmental requirements temperature Operating temperature Storage temperature Relative humidity Power source Altitude: Operating Storage Measured power consumption: Full power 68.47 cm wide screen IPS 68.47 cm diagonal -5° to 25° 4.85 kg 5.51 kg 42.92 cm 15...

User Guide
Page 26
Typical settings Sleep Off Input terminal 55 W 36 W
Typical settings Sleep Off Input terminal 55 W 36 W

User Guide
Page 27
... Entering user modes The video controller signal may need to readjust the parameters of the monitor screen by using the on-screen display. Your changes can be entered and stored. The monitor automatically stores the new setting, and then recognizes the new mode just as it does a preset mode. Power adapter Manufacturer AcBel Delta Chicony Model number TPC-AA501 TPC-DA58 TPC-CA58 Power supply rating 19.5 V dc @ 9.23 A - 180 W (with USB Type-C port) 19...
... Entering user modes The video controller signal may need to readjust the parameters of the monitor screen by using the on-screen display. Your changes can be entered and stored. The monitor automatically stores the new setting, and then recognizes the new mode just as it does a preset mode. Power adapter Manufacturer AcBel Delta Chicony Model number TPC-AA501 TPC-DA58 TPC-CA58 Power supply rating 19.5 V dc @ 9.23 A - 180 W (with USB Type-C port) 19...

User Guide
Page 28
... and use TRS/VRS/WebCapTel, contact us at (888) 259-5707, Monday through Friday, 6 a.m. If you are constantly refining the accessibility of operating system assistive technologies and can be configured to work with a product or would like to 9 p.m. Supported assistive technologies HP products support a wide variety of our products and services and welcome feedback from users. B Accessibility HP designs...
... and use TRS/VRS/WebCapTel, contact us at (888) 259-5707, Monday through Friday, 6 a.m. If you are constantly refining the accessibility of operating system assistive technologies and can be configured to work with a product or would like to 9 p.m. Supported assistive technologies HP products support a wide variety of our products and services and welcome feedback from users. B Accessibility HP designs...


