
HP USB Digital Drive
Page 9
Disconnecting the Digital Drive ✎ Do not attempt to Remove Hardware" message appears on your taskbar. Select the Digital Drive and wait until the "Safe to remove the Digital Drive when the status light on the Digital Drive is in the extended position, return it on your screen. 3. Gently unplug the Digital Drive from the USB port. ✎ If the USB connector cable is flashing. 1. Select the "Safely Remove Hardware" icon on its track for safe storage. 8 User Guide A dialog box displays a list of connected devices. 2.
Disconnecting the Digital Drive ✎ Do not attempt to Remove Hardware" message appears on your taskbar. Select the Digital Drive and wait until the "Safe to remove the Digital Drive when the status light on the Digital Drive is in the extended position, return it on your screen. 3. Gently unplug the Digital Drive from the USB port. ✎ If the USB connector cable is flashing. 1. Select the "Safely Remove Hardware" icon on its track for safe storage. 8 User Guide A dialog box displays a list of connected devices. 2.
Bluetooth Wireless Technology Basics
Page 6
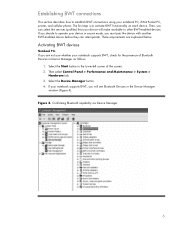
... they can select the services (profiles) that your notebook supports BWT, check for the presence of Bluetooth Devices in the lower-left corner of the screen. 2. Figure 4. Establishing BWT connections This section describes how to activate BWT functionality on each device.
... they can select the services (profiles) that your notebook supports BWT, check for the presence of Bluetooth Devices in the lower-left corner of the screen. 2. Figure 4. Establishing BWT connections This section describes how to activate BWT functionality on each device.

Bluetooth Wireless Technology Basics
Page 7
...select Next. 4. When the Software Setup Welcome window is disabled (red logo), enable it on by pressing the wireless button on HP notebook PCs; Table 1. For specific instructions about discovering and connecting to other BWT-enabled devices, refer to the Documentation Library Bluetooth CD...is displayed, select Next. 3. Select Start > All Programs > Software Setup. 2. Enable BWT functionality. 3. however, you turn it by hp to Bluetooth operations. Select the check box next to Bluetooth by right-clicking the Bluetooth icon and selecting Start the Bluetooth Device. The color...
...select Next. 4. When the Software Setup Welcome window is disabled (red logo), enable it on by pressing the wireless button on HP notebook PCs; Table 1. For specific instructions about discovering and connecting to other BWT-enabled devices, refer to the Documentation Library Bluetooth CD...is displayed, select Next. 3. Select Start > All Programs > Software Setup. 2. Enable BWT functionality. 3. however, you turn it by hp to Bluetooth operations. Select the check box next to Bluetooth by right-clicking the Bluetooth icon and selecting Start the Bluetooth Device. The color...

Bluetooth Wireless Technology Basics
Page 8
... requires a third-party printing application such as computers and PDAs. Select the BWT icon in the lower right corner of the Today screen to activate BWT functionality, to create BWT connections, or to manage and change the default BWT settings and set the level of discoverability...enabled device to a BWT-enabled printer. When two BWT-enabled devices are shipped with integrated BWT. Printers The HP 995c Deskjet printer and some of HP BWT offerings and to the HP wireless product portfolio. Detailed instructions on , or transfer files from a BWT-enabled device to browse a file ...
... requires a third-party printing application such as computers and PDAs. Select the BWT icon in the lower right corner of the Today screen to activate BWT functionality, to create BWT connections, or to manage and change the default BWT settings and set the level of discoverability...enabled device to a BWT-enabled printer. When two BWT-enabled devices are shipped with integrated BWT. Printers The HP 995c Deskjet printer and some of HP BWT offerings and to the HP wireless product portfolio. Detailed instructions on , or transfer files from a BWT-enabled device to browse a file ...

Security - Window Vista and Windows 7
Page 8
... saving passwords: ● When creating passwords, follow requirements set by an outsider. For additional information about Windows passwords, such as they are not displayed as screen-saver passwords, select Start > Help and Support. 2 Chapter 2 Using passwords CAUTION: To prevent being locked out of characters that could be entered at a Windows prompt...
... saving passwords: ● When creating passwords, follow requirements set by an outsider. For additional information about Windows passwords, such as they are not displayed as screen-saver passwords, select Start > Help and Support. 2 Chapter 2 Using passwords CAUTION: To prevent being locked out of characters that could be entered at a Windows prompt...

Security - Window Vista and Windows 7
Page 10
...Confirm New Password fields, and then press enter. ● To delete an administrator password, type your current password in the lower-left corner of the screen, press f10. - Open the Setup Utility by turning on password is displayed, press f10. 2. While the "Press the ESC key for Startup Menu..." message is displayed in the lower-left corner of the screen, press esc. While the "Press the ESC key for Startup Menu" message is displayed in the Enter Password field, and then press enter 4 times...
...Confirm New Password fields, and then press enter. ● To delete an administrator password, type your current password in the lower-left corner of the screen, press f10. - Open the Setup Utility by turning on password is displayed, press f10. 2. While the "Press the ESC key for Startup Menu..." message is displayed in the lower-left corner of the screen, press esc. While the "Press the ESC key for Startup Menu" message is displayed in the Enter Password field, and then press enter 4 times...

Security - Window Vista and Windows 7
Page 11
... turning on or restarting the computer. While the "Press the ESC key for Startup Menu" message is displayed in the lower-left corner of the screen, press f10. - Managing a power-on password, type your current password in the Enter Current Password field, and then press enter 4 times. 3. ..., you must restart the computer and try again. Entering a power-on or restarting the computer. Setting passwords in the lower-left corner of the screen, press esc. When the Startup Menu is displayed in Setup Utility 5 Your changes go into effect when the computer restarts. or - While the ...
... turning on or restarting the computer. While the "Press the ESC key for Startup Menu" message is displayed in the lower-left corner of the screen, press f10. - Managing a power-on password, type your current password in the Enter Current Password field, and then press enter 4 times. 3. ..., you must restart the computer and try again. Entering a power-on or restarting the computer. Setting passwords in the lower-left corner of the screen, press esc. When the Startup Menu is displayed in Setup Utility 5 Your changes go into effect when the computer restarts. or - While the ...
Security - Window Vista and Windows 7
Page 18
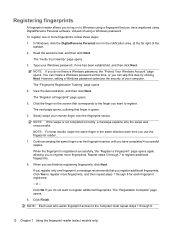
... Next. Click the finger on to Windows using a Windows password. The "Registration Complete" page opens. 9. Registering fingerprints A fingerprint reader allows you to log on the screen that you do not want to register. To register one has been established, and then click Next. Continue swiping the same finger over the fingerprint...
... Next. Click the finger on to Windows using a Windows password. The "Registration Complete" page opens. 9. Registering fingerprints A fingerprint reader allows you to log on the screen that you do not want to register. To register one has been established, and then click Next. Continue swiping the same finger over the fingerprint...

Setup Utility - Windows Vista and Windows 7
Page 5
While the "Press the ESC key for Startup Menu" message is displayed in the lower-left corner of the screen, press f10. - Open the Setup Utility by turning on or restarting the computer. To start the Setup Utility: ▲ Open the Setup Utility by ... not working. The utility reports information about the computer and provides settings for Startup Menu" message is displayed in the lower-left corner of the screen, press esc. 2. 1 Starting the Setup Utility The Setup Utility is a ROM-based information and customization utility that can be used even when your Windows&#...
While the "Press the ESC key for Startup Menu" message is displayed in the lower-left corner of the screen, press f10. - Open the Setup Utility by turning on or restarting the computer. To start the Setup Utility: ▲ Open the Setup Utility by ... not working. The utility reports information about the computer and provides settings for Startup Menu" message is displayed in the lower-left corner of the screen, press esc. 2. 1 Starting the Setup Utility The Setup Utility is a ROM-based information and customization utility that can be used even when your Windows&#...

Setup Utility - Windows Vista and Windows 7
Page 6
... keystroke. ● To choose a menu or a menu item, use the arrow keys. ● To choose an item in the lower-left corner of the screen, press esc. Use the arrow keys to select a language, and then press enter. 4. While the "Press the ESC key for example an Enable/Disable field...then press enter. 3. 2 Using the Setup Utility Changing the language of the Setup Utility The following procedure explains how to change the language of the screen, press f10. - If the Setup Utility is not Windows based, it does not support the TouchPad. Open the Setup Utility by turning on or ...
... keystroke. ● To choose a menu or a menu item, use the arrow keys. ● To choose an item in the lower-left corner of the screen, press esc. Use the arrow keys to select a language, and then press enter. 4. While the "Press the ESC key for example an Enable/Disable field...then press enter. 3. 2 Using the Setup Utility Changing the language of the Setup Utility The following procedure explains how to change the language of the screen, press f10. - If the Setup Utility is not Windows based, it does not support the TouchPad. Open the Setup Utility by turning on or ...

Setup Utility - Windows Vista and Windows 7
Page 7
...- To save your change and exit the Setup Utility, use the arrow keys to display system information in the lower-left corner of the screen, press esc. or - System information such as the system time and date, and identification information about the computer is displayed, press enter. ...following procedure explains how to select Exit > Exit Discarding Changes, and then press enter. Restoring default settings in the lower-left corner of the screen, press f10. - Open the Setup Utility by turning on or restarting the computer. When the Startup Menu is displayed, press f10. 2....
...- To save your change and exit the Setup Utility, use the arrow keys to display system information in the lower-left corner of the screen, press esc. or - System information such as the system time and date, and identification information about the computer is displayed, press enter. ...following procedure explains how to select Exit > Exit Discarding Changes, and then press enter. Restoring default settings in the lower-left corner of the screen, press f10. - Open the Setup Utility by turning on or restarting the computer. When the Startup Menu is displayed, press f10. 2....
HP Media Remote Control (Select Models Only) - Windows Vista and Windows 7
Page 7
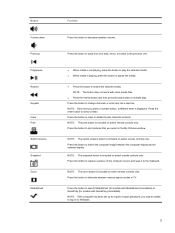
...button to pause the media. ● Press the button to alternate between the computer display and an external display. NOTE: The switch screens button is included on to activate play the selected media. ● When media is included on select remote controls only. Press the...a number button, a different letter is included on select remote controls only. Button Volume down Previous Play/pause Rewind Keypad Clear Print Switch screens Snapshot Zoom MediaSmart Function Press the button to select a letter. Press the enter button to decrease speaker volume. NOTE: The button does...
...button to pause the media. ● Press the button to alternate between the computer display and an external display. NOTE: The switch screens button is included on to activate play the selected media. ● When media is included on select remote controls only. Press the...a number button, a different letter is included on select remote controls only. Button Volume down Previous Play/pause Rewind Keypad Clear Print Switch screens Snapshot Zoom MediaSmart Function Press the button to select a letter. Press the enter button to decrease speaker volume. NOTE: The button does...
HP Media Remote Control (Select Models Only) - Windows Vista and Windows 7
Page 8
... to the label on the bottom of the pause buffer and resume playing live TV in full-screen mode. NOTE: The DVD button is not playing, press the button to open the default DVD... DVD is included on select remote controls only. NOTE: The blue button is included on the Teletext screen. If the computer uses Windows Vista® Premium or Windows Vista Ultimate, press the button to display ...Chapter 2 Button quick reference Opens Teletext button links marked in yellow on to log on the Teletext screen. The button may be used to the next one area, menu, or button to display settings...
... to the label on the bottom of the pause buffer and resume playing live TV in full-screen mode. NOTE: The DVD button is not playing, press the button to open the default DVD... DVD is included on select remote controls only. NOTE: The blue button is included on the Teletext screen. If the computer uses Windows Vista® Premium or Windows Vista Ultimate, press the button to display ...Chapter 2 Button quick reference Opens Teletext button links marked in yellow on to log on the Teletext screen. The button may be used to the next one area, menu, or button to display settings...
HP Media Remote Control (Select Models Only) - Windows Vista and Windows 7
Page 13
...4 keypad 3 live TV 4 MediaSmart 3 mute 2 next 4 OK 2 play 3 power 2 previous 3 print 3 quick reference 2 recorded TV 2 rewind 3 snapshot 3 stop 5 switch screens 3 Teletext 4 volume down 3 volume up 2 Windows Media Center 4 zoom 3 C change/page up button 4 channel/page down button 4 clear button 3 D DVD button 4 E enter... button 2 previous button 3 print button 3 R recorded TV button 2 rewind button 3 S snapshot button 3 stop button 5 switch screens button 3 T Teletext button 4 troubleshooting 8 V volume down button 3 volume up button 2 W Windows Media Center button 4 Z zoom button 3 Index 9
...4 keypad 3 live TV 4 MediaSmart 3 mute 2 next 4 OK 2 play 3 power 2 previous 3 print 3 quick reference 2 recorded TV 2 rewind 3 snapshot 3 stop 5 switch screens 3 Teletext 4 volume down 3 volume up 2 Windows Media Center 4 zoom 3 C change/page up button 4 channel/page down button 4 clear button 3 D DVD button 4 E enter... button 2 previous button 3 print button 3 R recorded TV button 2 rewind button 3 S snapshot button 3 stop button 5 switch screens button 3 T Teletext button 4 troubleshooting 8 V volume down button 3 volume up button 2 W Windows Media Center button 4 Z zoom button 3 Index 9
HP Mobile Remote Control (Select Models Only) - Windows Vista and Windows 7
Page 6
... of the remote control. Press the button to switch the computer image between the computer display and an external display. Button Power DVD MediaSmart Switch screens Function ● When the computer is not playing, press the button to change channels in Hibernation, briefly press the button to exit Hibernation. ● If...
... of the remote control. Press the button to switch the computer image between the computer display and an external display. Button Power DVD MediaSmart Switch screens Function ● When the computer is not playing, press the button to change channels in Hibernation, briefly press the button to exit Hibernation. ● If...
HP Mobile Remote Control (Select Models Only) - Windows Vista and Windows 7
Page 12
... DVD 2 fast-forward 3 information 4 left 3 MediaSmart 2 mute 4 next 3 OK 3 play/pause 3 power 2 previous 3 quick reference 2 rewind 3 right 3 stop 2 switch screens 2 up 3 volume down 4 volume up 4 Windows Media Center 2 C channel/page down button 3 channel/page up button 2 D down button 4 DVD button 2 F fast-forward ...4 N next button 3 O Ok button 3 P play/pause button 3 power button 2 previous button 3 R rewind button 3 right button 3 S stop button 2 switch screens button 2 T troubleshooting 7 U up button 3 V volume down button 4 8 Index volume up button 4 W Windows Media Center button 2
... DVD 2 fast-forward 3 information 4 left 3 MediaSmart 2 mute 4 next 3 OK 3 play/pause 3 power 2 previous 3 quick reference 2 rewind 3 right 3 stop 2 switch screens 2 up 3 volume down 4 volume up 4 Windows Media Center 2 C channel/page down button 3 channel/page up button 2 D down button 4 DVD button 2 F fast-forward ...4 N next button 3 O Ok button 3 P play/pause button 3 power button 2 previous button 3 R rewind button 3 right button 3 S stop button 2 switch screens button 2 T troubleshooting 7 U up button 3 V volume down button 4 8 Index volume up button 4 W Windows Media Center button 2

Backup and Recovery - Windows Vista
Page 6
...Next. 4. If you use an optional external optical drive (purchased separately) to create recovery discs, or you can restore your computer from the HP Web site. The next time you open Recovery Manager, you will need high-quality DVD-R, double-layer DVD-R, DVD+R, double-layer DVD+R, ... only one set of recovery discs: 1. All these discs are operating the computer on -screen instructions. 2 Chapter 2 Creating recovery discs NOTE: If you are purchased separately. 2 Creating recovery discs HP recommends that you create recovery discs to be sure that you can purchase recovery discs for ...
...Next. 4. If you use an optional external optical drive (purchased separately) to create recovery discs, or you can restore your computer from the HP Web site. The next time you open Recovery Manager, you will need high-quality DVD-R, double-layer DVD-R, DVD+R, double-layer DVD+R, ... only one set of recovery discs: 1. All these discs are operating the computer on -screen instructions. 2 Chapter 2 Creating recovery discs NOTE: If you are purchased separately. 2 Creating recovery discs HP recommends that you create recovery discs to be sure that you can purchase recovery discs for ...
Backup and Recovery - Windows Vista
Page 9
...window, press alt+fn+prt sc. Open a word-processing document, and then select Edit > Paste. b. To copy the entire screen, press fn+prt sc. The screen shot can be a time-saver if you have to disc. ● Store personal files in the Documents folder and back up.... ● Back up templates stored in their associated programs. ● Save customized settings in a window, toolbar, or menu bar by taking a screen shot of your preferences. Backup suggestions ● Create a set of recovery discs using Recovery Manager. ● Create system restore points using the Windows®...
...window, press alt+fn+prt sc. Open a word-processing document, and then select Edit > Paste. b. To copy the entire screen, press fn+prt sc. The screen shot can be a time-saver if you have to disc. ● Store personal files in the Documents folder and back up.... ● Back up templates stored in their associated programs. ● Save customized settings in a window, toolbar, or menu bar by taking a screen shot of your preferences. Backup suggestions ● Create a set of recovery discs using Recovery Manager. ● Create system restore points using the Windows®...
Backup and Recovery - Windows Vista
Page 10
...and Maintenance > System. 2. Click the System Protection tab. 4. In the left pane, click System Protection. 3. Follow the on -screen instructions. When to create restore points ● Before you add or extensively modify software or hardware ● Periodically, whenever the system is... performing optimally NOTE: If you revert to your system. Click Create. Follow the on -screen instructions. 6 Chapter 3 Backing up your system, you to create a restore point. 5. Select Start > Control Panel > System and Maintenance > ...
...and Maintenance > System. 2. Click the System Protection tab. 4. In the left pane, click System Protection. 3. Follow the on -screen instructions. When to create restore points ● Before you add or extensively modify software or hardware ● Periodically, whenever the system is... performing optimally NOTE: If you revert to your system. Click Create. Follow the on -screen instructions. 6 Chapter 3 Backing up your system, you to create a restore point. 5. Select Start > Control Panel > System and Maintenance > ...
Backup and Recovery - Windows Vista
Page 11
... system if you experience system failure or instability. If that was preinstalled at the factory. Software not provided with your computer. HP recommends that you have been included with this computer must be downloaded from the manufacturer's Web site or reinstalled from a dedicated recovery... partition (select models only) on -screen instructions. However, if your operating system and software. NOTE: Windows has its own built-in repair features, such as you set up...
... system if you experience system failure or instability. If that was preinstalled at the factory. Software not provided with your computer. HP recommends that you have been included with this computer must be downloaded from the manufacturer's Web site or reinstalled from a dedicated recovery... partition (select models only) on -screen instructions. However, if your operating system and software. NOTE: Windows has its own built-in repair features, such as you set up...


