Wireless (Select Models Only) - Windows Vista
Page 19
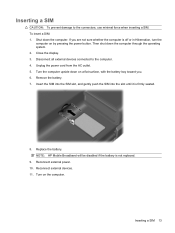
... pressing the power button. Insert the SIM into the SIM slot, and gently push the SIM into the slot until it is not replaced. 9. NOTE: HP Mobile Broadband will be disabled if the battery is firmly seated. 8. If you . 6. Unplug the power cord from the AC outlet. 5. Reconnect external devices. 11. Remove the... the computer. Disconnect all external devices connected to the connectors, use minimal force when inserting a SIM. Inserting a SIM CAUTION: To prevent damage to the computer. 4. Replace the battery.
... pressing the power button. Insert the SIM into the SIM slot, and gently push the SIM into the slot until it is not replaced. 9. NOTE: HP Mobile Broadband will be disabled if the battery is firmly seated. 8. If you . 6. Unplug the power cord from the AC outlet. 5. Reconnect external devices. 11. Remove the... the computer. Disconnect all external devices connected to the connectors, use minimal force when inserting a SIM. Inserting a SIM CAUTION: To prevent damage to the computer. 4. Replace the battery.
Wireless (Select Models Only) - Windows Vista
Page 20
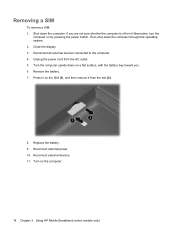
... the computer is off or in Hibernation, turn the computer on the computer. 14 Chapter 3 Using HP Mobile Broadband (select models only) Reconnect external devices. 11. Replace the battery. 9. Reconnect external power. 10. Close the display. 3. Unplug the power cord from the slot ...(2). 8. Turn on by pressing the power button. If you . 6. Then shut down the computer. Remove the battery. 7. Disconnect all external devices ...
... the computer is off or in Hibernation, turn the computer on the computer. 14 Chapter 3 Using HP Mobile Broadband (select models only) Reconnect external devices. 11. Replace the battery. 9. Reconnect external power. 10. Close the display. 3. Unplug the power cord from the slot ...(2). 8. Turn on by pressing the power button. If you . 6. Then shut down the computer. Remove the battery. 7. Disconnect all external devices ...
HP Media Remote Control (Select Models Only) - Windows Vista
Page 11
... and Support > User Guides. On the back of the remote control, slide the battery compartment cover in Help and Support. To reduce potential safety issues, use only the battery provided with the computer, a replacement battery provided by HP, or a compatible battery purchased from HP. Dispose of the arrow (1), and then lift the cover to the instructions in...
... and Support > User Guides. On the back of the remote control, slide the battery compartment cover in Help and Support. To reduce potential safety issues, use only the battery provided with the computer, a replacement battery provided by HP, or a compatible battery purchased from HP. Dispose of the arrow (1), and then lift the cover to the instructions in...
HP Media Remote Control (Select Models Only) - Windows Vista
Page 13
4 Troubleshooting Try the following solutions if your remote control does not function properly: ● Be sure that you have a clear line of sight from the remote control to the infrared port on the computer or optional docking device. ● Be sure that you are within range of the infrared port on the computer or optional docking device. ● Be sure that you are using the remote control with a supported computer or optional docking device. 9 Replace the battery if necessary. ● Be sure that the battery is properly installed and has a charge.
4 Troubleshooting Try the following solutions if your remote control does not function properly: ● Be sure that you have a clear line of sight from the remote control to the infrared port on the computer or optional docking device. ● Be sure that you are within range of the infrared port on the computer or optional docking device. ● Be sure that you are using the remote control with a supported computer or optional docking device. 9 Replace the battery if necessary. ● Be sure that the battery is properly installed and has a charge.

HP Mobile Remote Control (Select Models Only) - Windows Vista
Page 9
... potential safety issues, use only the battery provided with the computer, a replacement battery provided by HP, or a compatible battery purchased from HP. To access the notices, select Start > Help and Support > User Guides. Dispose of the remote control, lift the battery compartment cover (1) and remove it (2). 2. On the back of used batteries according to the instructions in the...
... potential safety issues, use only the battery provided with the computer, a replacement battery provided by HP, or a compatible battery purchased from HP. To access the notices, select Start > Help and Support > User Guides. Dispose of the remote control, lift the battery compartment cover (1) and remove it (2). 2. On the back of used batteries according to the instructions in the...

HP Mobile Remote Control (Select Models Only) - Windows Vista
Page 11
Replace the battery if necessary. ● Be sure that you are using the remote control with a supported computer or optional docking device. 7 4 Troubleshooting Try the following solutions if your remote control does not function properly: ● Be sure that you have a clear line of the infrared port on the computer or optional docking device. ● Be sure that you are within range of sight from the remote control to the infrared port on the computer or optional docking device. ● Be sure that the battery is properly installed and has a charge.
Replace the battery if necessary. ● Be sure that you are using the remote control with a supported computer or optional docking device. 7 4 Troubleshooting Try the following solutions if your remote control does not function properly: ● Be sure that you have a clear line of the infrared port on the computer or optional docking device. ● Be sure that you are within range of sight from the remote control to the infrared port on the computer or optional docking device. ● Be sure that the battery is properly installed and has a charge.
Power Management - Windows Vista
Page 12
... hotkey or reconnect the AC adapter. If the computer contains a charged battery and is running on battery power. To increase display brightness, use only the battery provided with the computer, a replacement battery provided by HP, or a compatible battery purchased from the computer. 2 Using battery power When a charged battery is in the computer and the computer is not plugged into...
... hotkey or reconnect the AC adapter. If the computer contains a charged battery and is running on battery power. To increase display brightness, use only the battery provided with the computer, a replacement battery provided by HP, or a compatible battery purchased from the computer. 2 Using battery power When a charged battery is in the computer and the computer is not plugged into...
Power Management - Windows Vista
Page 25
short the external contacts on a battery; Do not expose a battery to the Regulatory, Safety and Environmental Notices for this computer. Replace the battery only with a battery approved for battery disposal information. Refer to temperatures above 60˚C (140˚F). Disposing of a used battery WARNING! or dispose of fire or burns, do not disassemble, crush, or puncture a battery; To reduce the risk of a battery in fire or water. Disposing of a used battery 19
short the external contacts on a battery; Do not expose a battery to the Regulatory, Safety and Environmental Notices for this computer. Replace the battery only with a battery approved for battery disposal information. Refer to temperatures above 60˚C (140˚F). Disposing of a used battery WARNING! or dispose of fire or burns, do not disassemble, crush, or puncture a battery; To reduce the risk of a battery in fire or water. Disposing of a used battery 19
Power Management - Windows Vista
Page 26
... only the AC adapter provided with the computer, a replacement AC adapter provided by HP, or a compatible AC adapter purchased from HP. ● Approved AC adapter ● Optional docking device or expansion product Connect the computer to battery power. ● The display brightness is turned on, the battery meter icon in the notification area changes appearance...
... only the AC adapter provided with the computer, a replacement AC adapter provided by HP, or a compatible AC adapter purchased from HP. ● Approved AC adapter ● Optional docking device or expansion product Connect the computer to battery power. ● The display brightness is turned on, the battery meter icon in the notification area changes appearance...
Power Management - Windows Vista
Page 28
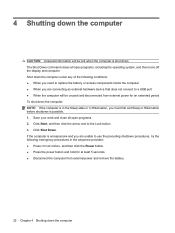
...then click the arrow next to a USB port ● When the computer will be unused and disconnected from external power and remove the battery. 22 Chapter 4 Shutting down the computer Save your work and close all open programs. 2. 4 Shutting down the computer CAUTION: Unsaved information...computer is unresponsive and you are unable to use the preceding shutdown procedures, try the following conditions: ● When you need to replace the battery or access components inside the computer ● When you must first exit Sleep or Hibernation before shutdown is shut down the computer: NOTE...
...then click the arrow next to a USB port ● When the computer will be unused and disconnected from external power and remove the battery. 22 Chapter 4 Shutting down the computer Save your work and close all open programs. 2. 4 Shutting down the computer CAUTION: Unsaved information...computer is unresponsive and you are unable to use the preceding shutdown procedures, try the following conditions: ● When you need to replace the battery or access components inside the computer ● When you must first exit Sleep or Hibernation before shutdown is shut down the computer: NOTE...

Drives - Windows Vista
Page 22
.... 4. Save your work. 2. If you , loosen the 2 hard drive cover screws (1). 16 Chapter 4 Replacing the hard drive Shut down the computer through the operating system. Remove the battery from the AC outlet. 5. With the hard drive bay toward you are not sure whether the computer is on... drive while the computer is off or in Hibernation. Unplug the power cord from the computer. 7. To remove the hard drive: 1. 4 Replacing the hard drive CAUTION: To prevent information loss or an unresponsive system: Shut down on by pressing the power button. Turn the computer upside...
.... 4. Save your work. 2. If you , loosen the 2 hard drive cover screws (1). 16 Chapter 4 Replacing the hard drive Shut down the computer through the operating system. Remove the battery from the AC outlet. 5. With the hard drive bay toward you are not sure whether the computer is on... drive while the computer is off or in Hibernation. Unplug the power cord from the computer. 7. To remove the hard drive: 1. 4 Replacing the hard drive CAUTION: To prevent information loss or an unresponsive system: Shut down on by pressing the power button. Turn the computer upside...
Memory Modules - Windows Vista
Page 7
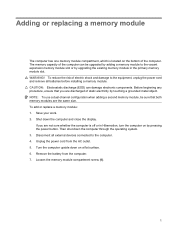
Save your work. 2. Disconnect all batteries before installing a memory module. Remove the battery from the AC outlet. 5. NOTE: To use a dual-channel configuration when adding a second memory module, be upgraded by adding a memory module to the computer. 4. ... operating system. 3. CAUTION: Electrostatic discharge (ESD) can be sure that you are not sure whether the computer is located on a flat surface. 6. Adding or replacing a memory module The computer has one memory module compartment, which is off or in the primary memory module slot. To reduce the risk of the...
Save your work. 2. Disconnect all batteries before installing a memory module. Remove the battery from the AC outlet. 5. NOTE: To use a dual-channel configuration when adding a second memory module, be upgraded by adding a memory module to the computer. 4. ... operating system. 3. CAUTION: Electrostatic discharge (ESD) can be sure that you are not sure whether the computer is located on a flat surface. 6. Adding or replacing a memory module The computer has one memory module compartment, which is off or in the primary memory module slot. To reduce the risk of the...
Memory Modules - Windows Vista
Page 9
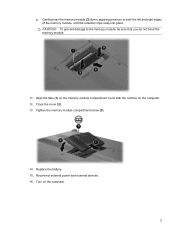
Gently press the memory module (3) down, applying pressure to the memory module, be sure that you do not bend the memory module. 11. Tighten the memory module compartment screw (3). 14. Close the cover (2). 13. Replace the battery. 15. Reconnect external power and external devices. 16. c. CAUTION: To prevent damage to both the left and right edges of the memory module, until the retention clips snap into place. Turn on the computer. 12. Align the tabs (1) on the memory module compartment cover with the notches on the computer. 3
Gently press the memory module (3) down, applying pressure to the memory module, be sure that you do not bend the memory module. 11. Tighten the memory module compartment screw (3). 14. Close the cover (2). 13. Replace the battery. 15. Reconnect external power and external devices. 16. c. CAUTION: To prevent damage to both the left and right edges of the memory module, until the retention clips snap into place. Turn on the computer. 12. Align the tabs (1) on the memory module compartment cover with the notches on the computer. 3
Notebook Tour - Windows Vista
Page 17
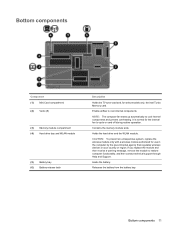
...or region. Bottom components 11 Enable airflow to cool internal components and prevent overheating. CAUTION: To prevent an unresponsive system, replace the wireless module only with a wireless module authorized for the internal fan to restore computer functionality, and then contact technical ...support through Help and Support. If you replace the module and then receive a warning message, remove the module to cycle on and off during routine operation. Releases the battery from the battery bay. Holds the battery. Contains the memory module slots. Holds the hard...
...or region. Bottom components 11 Enable airflow to cool internal components and prevent overheating. CAUTION: To prevent an unresponsive system, replace the wireless module only with a wireless module authorized for the internal fan to restore computer functionality, and then contact technical ...support through Help and Support. If you replace the module and then receive a warning message, remove the module to cycle on and off during routine operation. Releases the battery from the battery bay. Holds the battery. Contains the memory module slots. Holds the hard...
HP Pavilion dv5 Entertainment PC - Maintenance and Service Guide
Page 6
... and transporting guidelines 47 Workstation guidelines 47 Equipment guidelines 48 Unknown user password 49 Component replacement procedures 50 Service tag ...50 Computer feet ...51 Battery ...52 Webcam/microphone module 53 Optical drive ...55 TV tuner module ...57 RTC battery ...59 Memory module ...60 Hard drive ...62 WLAN module ...65 Switch cover and keyboard...
... and transporting guidelines 47 Workstation guidelines 47 Equipment guidelines 48 Unknown user password 49 Component replacement procedures 50 Service tag ...50 Computer feet ...51 Battery ...52 Webcam/microphone module 53 Optical drive ...55 TV tuner module ...57 RTC battery ...59 Memory module ...60 Hard drive ...62 WLAN module ...65 Switch cover and keyboard...

HP Pavilion dv5 Entertainment PC - Maintenance and Service Guide
Page 24
Releases the battery from the battery bay. CAUTION: To prevent an unresponsive system, replace the wireless module only with a wireless module authorized for select models only, the Intel Turbo Memory card. It is normal for the internal fan to ... by the governmental agency that regulates wireless devices in your country or region. If you replace the module and then receive a warning message, remove the module to cycle on and off during routine operation. Holds the battery. NOTE: The computer fan starts up automatically to cool internal components. Contains the memory module...
Releases the battery from the battery bay. CAUTION: To prevent an unresponsive system, replace the wireless module only with a wireless module authorized for select models only, the Intel Turbo Memory card. It is normal for the internal fan to ... by the governmental agency that regulates wireless devices in your country or region. If you replace the module and then receive a warning message, remove the module to cycle on and off during routine operation. Holds the battery. NOTE: The computer fan starts up automatically to cool internal components. Contains the memory module...
HP Pavilion dv5 Entertainment PC - Maintenance and Service Guide
Page 47
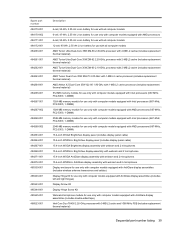
... 485339-001 485340-001 485343-001 485344-001 485345-001 486523-001 Description 6-cell, 55-Wh, 2.55-Ah Li-ion battery for use with all computer models 6-cell, 47-Wh, 2.55-Ah Li-ion battery for use only with computer models equipped with AMD processors 6-cell, 55-Wh, 2.55-Ah Li-ion... Screw Kit Display Hinge Screw Kit Webcam/microphone module for use only with computer models equipped with AntiGlare display assemblies (includes double-sided tape) Intel Core Duo T8400 2.26-GHz processor with 3-MB L2 cache and 1066-MHz FSB (includes replacement thermal material) Sequential part number listing 39
... 485339-001 485340-001 485343-001 485344-001 485345-001 486523-001 Description 6-cell, 55-Wh, 2.55-Ah Li-ion battery for use with all computer models 6-cell, 47-Wh, 2.55-Ah Li-ion battery for use only with computer models equipped with AMD processors 6-cell, 55-Wh, 2.55-Ah Li-ion... Screw Kit Display Hinge Screw Kit Webcam/microphone module for use only with computer models equipped with AntiGlare display assemblies (includes double-sided tape) Intel Core Duo T8400 2.26-GHz processor with 3-MB L2 cache and 1066-MHz FSB (includes replacement thermal material) Sequential part number listing 39

HP Pavilion dv5 Entertainment PC - Maintenance and Service Guide
Page 51
... Power cord for use in Argentina Power cord for use in India RTC battery Fan/heat sink assembly for use only with computer models equipped with AMD processors and graphics subsystems with UMA memory (includes replacement thermal material) Fan/heat sink assembly for use only with computer models equipped... material) Fan/heat sink assembly for use only with computer models equipped with AMD processors and graphics subsystems with discrete memory (includes replacement thermal material) Screw Kit Display Cable Kit for use with WXGA BrightView display panels Cable Kit NOTE: See Cable Kit on page ...
... Power cord for use in Argentina Power cord for use in India RTC battery Fan/heat sink assembly for use only with computer models equipped with AMD processors and graphics subsystems with UMA memory (includes replacement thermal material) Fan/heat sink assembly for use only with computer models equipped... material) Fan/heat sink assembly for use only with computer models equipped with AMD processors and graphics subsystems with discrete memory (includes replacement thermal material) Screw Kit Display Cable Kit for use with WXGA BrightView display panels Cable Kit NOTE: See Cable Kit on page ...

HP Pavilion dv5 Entertainment PC - Maintenance and Service Guide
Page 57
... system. 2. If you are unsure whether the computer is off or in Hibernation, turn the computer on page 59). 6. Preliminary replacement requirements 49 Disconnect the power from the computer by first unplugging the power cord from the AC outlet and then unplugging the AC adapter... from the computer. 4. Replace the RTC battery and reassemble the computer. 8. Remove the battery (see RTC battery on , and then shut it down the computer. All passwords and all external devices connected to the ...
... system. 2. If you are unsure whether the computer is off or in Hibernation, turn the computer on page 59). 6. Preliminary replacement requirements 49 Disconnect the power from the computer by first unplugging the power cord from the AC outlet and then unplugging the AC adapter... from the computer. 4. Replace the RTC battery and reassemble the computer. 8. Remove the battery (see RTC battery on , and then shut it down the computer. All passwords and all external devices connected to the ...

HP Pavilion dv5 Entertainment PC - Maintenance and Service Guide
Page 60
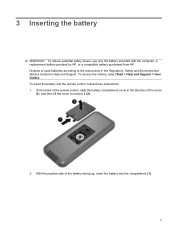
... the computer, follow these steps: 1. Slide the battery release latch (1) to the computer. 3. Pivot the battery (2) upward and remove it down the computer. To insert the battery, insert the rear edge of the battery downward until it is off or in Hibernation, turn... to release the battery. 3. If you are unsure whether the computer is seated. Remove the battery: 1. The battery release latch automatically locks the battery into the battery bay and pivot the front edge of the battery into place. 52 Chapter 4 Removal and replacement procedures Shut down through...
... the computer, follow these steps: 1. Slide the battery release latch (1) to the computer. 3. Pivot the battery (2) upward and remove it down the computer. To insert the battery, insert the rear edge of the battery downward until it is off or in Hibernation, turn... to release the battery. 3. If you are unsure whether the computer is seated. Remove the battery: 1. The battery release latch automatically locks the battery into the battery bay and pivot the front edge of the battery into place. 52 Chapter 4 Removal and replacement procedures Shut down through...


