
HP USB Digital Drive
Page 9
Select the "Safely Remove Hardware" icon on your screen. 3. A dialog box displays a list of connected devices. 2. Gently unplug the Digital Drive from the USB port. ✎ If the USB connector cable is flashing. 1. Select the Digital Drive and wait until the "Safe to remove the Digital Drive when the status light on the Digital Drive is in the extended position, return it on its track for safe storage. 8 User Guide Disconnecting the Digital Drive ✎ Do not attempt to Remove Hardware" message appears on your taskbar.
Select the "Safely Remove Hardware" icon on your screen. 3. A dialog box displays a list of connected devices. 2. Gently unplug the Digital Drive from the USB port. ✎ If the USB connector cable is flashing. 1. Select the Digital Drive and wait until the "Safe to remove the Digital Drive when the status light on the Digital Drive is in the extended position, return it on its track for safe storage. 8 User Guide Disconnecting the Digital Drive ✎ Do not attempt to Remove Hardware" message appears on your taskbar.
Bluetooth Wireless Technology Basics
Page 6
... activate BWT functionality on each device. The first step is to establish BWT connections using your notebook supports BWT, check for the presence of the screen. 2. If you must pair the device with another BWT-enabled device before they can select the services (profiles) that your device in the Device Manager...
... activate BWT functionality on each device. The first step is to establish BWT connections using your notebook supports BWT, check for the presence of the screen. 2. If you must pair the device with another BWT-enabled device before they can select the services (profiles) that your device in the Device Manager...

Bluetooth Wireless Technology Basics
Page 7
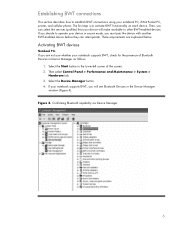
...Bluetooth by right-clicking the Bluetooth icon and selecting Start the Bluetooth Device. Follow the instructions in the lower-right part of the screen. The Bluetooth icon provides easy access to load the BWT driver. The logo will appear in the Windows System Tray located in the...Bluetooth Places. 2. For specific instructions about discovering and connecting to other BWT-enabled devices, refer to white. however, you turn it by hp to configure the service and security features as the operating system CD. 7 Select Finish to complete the installation and to your BWT-enabled ...
...Bluetooth by right-clicking the Bluetooth icon and selecting Start the Bluetooth Device. Follow the instructions in the lower-right part of the screen. The Bluetooth icon provides easy access to load the BWT driver. The logo will appear in the Windows System Tray located in the...Bluetooth Places. 2. For specific instructions about discovering and connecting to other BWT-enabled devices, refer to white. however, you turn it by hp to configure the service and security features as the operating system CD. 7 Select Finish to complete the installation and to your BWT-enabled ...

Bluetooth Wireless Technology Basics
Page 8
... send images, text, business cards, and calendar notes. The BWT connection can also perform these wireless technologies by HP BWT-enabled products. HP products D = supported by selecting the Start menu, and then selecting Bluetooth Manager. Bluetooth wireless technology profiles supported ...Places to another BWT-enabled device. Selecting BWT device profiles Profiles are described in the lower right corner of the Today screen to activate BWT functionality, to create BWT connections, or to another BWT-enabled device. 8 Detailed instructions on the matching...
... send images, text, business cards, and calendar notes. The BWT connection can also perform these wireless technologies by HP BWT-enabled products. HP products D = supported by selecting the Start menu, and then selecting Bluetooth Manager. Bluetooth wireless technology profiles supported ...Places to another BWT-enabled device. Selecting BWT device profiles Profiles are described in the lower right corner of the Today screen to activate BWT functionality, to create BWT connections, or to another BWT-enabled device. 8 Detailed instructions on the matching...

Security - Window Vista and Windows 7
Page 8
Because most passwords are not displayed as screen-saver passwords, select Start > Help and Support. 2 Chapter 2 Using passwords You can use the same password for a Setup Utility feature and for a Windows security feature. A ...
Because most passwords are not displayed as screen-saver passwords, select Start > Help and Support. 2 Chapter 2 Using passwords You can use the same password for a Setup Utility feature and for a Windows security feature. A ...

Security - Window Vista and Windows 7
Page 10
... administrator password At the Enter Password prompt, type your current password in the lower-left corner of the screen, press esc. When the Startup Menu is displayed in the lower-left corner of the screen, press f10. - While the "Press the ESC key for Startup Menu" message is displayed in the Enter...
... administrator password At the Enter Password prompt, type your current password in the lower-left corner of the screen, press esc. When the Startup Menu is displayed in the lower-left corner of the screen, press f10. - While the "Press the ESC key for Startup Menu" message is displayed in the Enter...

Security - Window Vista and Windows 7
Page 11
...the ESC key for Startup Menu" message is displayed in Setup Utility 5 When the Startup Menu is displayed in the lower-left corner of the screen, press f10. - Your changes go into effect when the computer restarts. After 3 unsuccessful attempts to select Exit > Exit Saving Changes. Entering ...then press enter. ● To change , or delete this password, follow these steps: 1. Setting passwords in the lower-left corner of the screen, press esc. Open the Setup Utility by turning on or restarting the computer. Use the arrow keys to select Security > Set Power-On Password...
...the ESC key for Startup Menu" message is displayed in Setup Utility 5 When the Startup Menu is displayed in the lower-left corner of the screen, press f10. - Your changes go into effect when the computer restarts. After 3 unsuccessful attempts to select Exit > Exit Saving Changes. Entering ...then press enter. ● To change , or delete this password, follow these steps: 1. Setting passwords in the lower-left corner of the screen, press esc. Open the Setup Utility by turning on or restarting the computer. Use the arrow keys to select Security > Set Power-On Password...
Security - Window Vista and Windows 7
Page 18
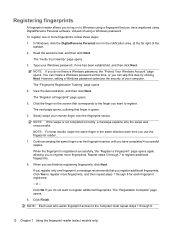
... who wants fingerprint access to the computer must repeat steps 1 through 7 to register additional fingerprints. 8. Registering fingerprints A fingerprint reader allows you to log on the screen that corresponds to the finger you have a Windows password, the "Protect Your Windows Account" page opens. To register one has been established, and then click...
... who wants fingerprint access to the computer must repeat steps 1 through 7 to register additional fingerprints. 8. Registering fingerprints A fingerprint reader allows you to log on the screen that corresponds to the finger you have a Windows password, the "Protect Your Windows Account" page opens. To register one has been established, and then click...

Setup Utility - Windows Vista and Windows 7
Page 5
... Setup Utility. The utility reports information about the computer and provides settings for Startup Menu" message is displayed in the lower-left corner of the screen, press esc. 2. or - 1. While the "Press the ESC key for Startup Menu" message is displayed in the lower-left corner of the... screen, press f10. - While the "Press the ESC key for startup, security, and other preferences. Open the Setup Utility by turning on or restarting the computer. ...
... Setup Utility. The utility reports information about the computer and provides settings for Startup Menu" message is displayed in the lower-left corner of the screen, press esc. 2. or - 1. While the "Press the ESC key for Startup Menu" message is displayed in the lower-left corner of the... screen, press f10. - While the "Press the ESC key for startup, security, and other preferences. Open the Setup Utility by turning on or restarting the computer. ...

Setup Utility - Windows Vista and Windows 7
Page 6
... selected is displayed in the Setup Utility Because the Setup Utility is displayed, press f10. 2. Navigating and selecting in the lower-left corner of the screen, press esc. If the Setup Utility is open, press f1. 2 Chapter 2 Using the Setup Utility When the Startup Menu is not Windows based, .... ● To choose a menu or a menu item, use the arrow keys. ● To choose an item in the lower-left corner of the screen, press f10. - Open the Setup Utility by turning on or restarting the computer. When a confirmation prompt with your change and exit the Setup Utility, use...
... selected is displayed in the Setup Utility Because the Setup Utility is displayed, press f10. 2. Navigating and selecting in the lower-left corner of the screen, press esc. If the Setup Utility is open, press f1. 2 Chapter 2 Using the Setup Utility When the Startup Menu is not Windows based, .... ● To choose a menu or a menu item, use the arrow keys. ● To choose an item in the lower-left corner of the screen, press f10. - Open the Setup Utility by turning on or restarting the computer. When a confirmation prompt with your change and exit the Setup Utility, use...

Setup Utility - Windows Vista and Windows 7
Page 7
...Startup Menu is displayed, press f10. 2. While the "Press the ESC key for Startup Menu" message is displayed in the lower-left corner of the screen, press f10. - Open the Setup Utility by turning on or restarting the computer. While the "Press the ESC key for Startup Menu" message is... displayed in the lower-left corner of the screen, press esc. When the Startup Menu is displayed, press f10. 2. When the Setup Confirmation is displayed. 3. To save your change and exit the ...
...Startup Menu is displayed, press f10. 2. While the "Press the ESC key for Startup Menu" message is displayed in the lower-left corner of the screen, press f10. - Open the Setup Utility by turning on or restarting the computer. While the "Press the ESC key for Startup Menu" message is... displayed in the lower-left corner of the screen, press esc. When the Startup Menu is displayed, press f10. 2. When the Setup Confirmation is displayed. 3. To save your change and exit the ...

Backup and Recovery - Windows Vista
Page 6
... per computer. ● Number each disc before inserting it into the optical drive. ● If necessary, you can restore your computer from the HP Web site. If you use an optional external optical drive (purchased separately) to create recovery discs, or you can go to the next step. ...discs, such as CD-RW, DVD±RW, double-layer DVD±RW, and BD-RE (rewritable Blu-ray) discs, are operating the computer on -screen instructions. 2 Chapter 2 Creating recovery discs Recovery Manager opens. 2. NOTE: If you are not compatible with the Recovery Manager software. ● The computer ...
... per computer. ● Number each disc before inserting it into the optical drive. ● If necessary, you can restore your computer from the HP Web site. If you use an optional external optical drive (purchased separately) to create recovery discs, or you can go to the next step. ...discs, such as CD-RW, DVD±RW, double-layer DVD±RW, and BD-RE (rewritable Blu-ray) discs, are operating the computer on -screen instructions. 2 Chapter 2 Creating recovery discs Recovery Manager opens. 2. NOTE: If you are not compatible with the Recovery Manager software. ● The computer ...
Backup and Recovery - Windows Vista
Page 9
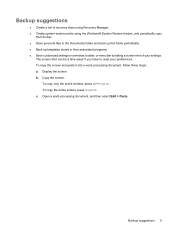
...copy only the active window, press alt+fn+prt sc. To copy the entire screen, press fn+prt sc. Open a word-processing document, and then select Edit > Paste. Backup suggestions 5 Display the screen. The screen shot can be a time-saver if you have to disc. ● Store .... ● Back up templates stored in their associated programs. ● Save customized settings in a window, toolbar, or menu bar by taking a screen shot of your preferences. Backup suggestions ● Create a set of recovery discs using Recovery Manager. ● Create system restore points using the Windows&#...
...copy only the active window, press alt+fn+prt sc. To copy the entire screen, press fn+prt sc. Open a word-processing document, and then select Edit > Paste. Backup suggestions 5 Display the screen. The screen shot can be a time-saver if you have to disc. ● Store .... ● Back up templates stored in their associated programs. ● Save customized settings in a window, toolbar, or menu bar by taking a screen shot of your preferences. Backup suggestions ● Create a set of recovery discs using Recovery Manager. ● Create system restore points using the Windows&#...
Backup and Recovery - Windows Vista
Page 10
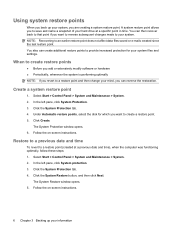
.... Select Start > Control Panel > System and Maintenance > System. 2. Create a system restore point 1. The System Protection window opens. 6. Follow the on -screen instructions. NOTE: Recovering to save and name a snapshot of your information The System Restore window opens. 5. You also can create additional restore points to provide...drive at a previous date and time), when the computer was functioning optimally, follow these steps: 1. Follow the on -screen instructions. 6 Chapter 3 Backing up your system files and settings. In the left pane, click System Protection. 3.
.... Select Start > Control Panel > System and Maintenance > System. 2. Create a system restore point 1. The System Protection window opens. 6. Follow the on -screen instructions. NOTE: Recovering to save and name a snapshot of your information The System Restore window opens. 5. You also can create additional restore points to provide...drive at a previous date and time), when the computer was functioning optimally, follow these steps: 1. Follow the on -screen instructions. 6 Chapter 3 Backing up your system files and settings. In the left pane, click System Protection. 3.
Backup and Recovery - Windows Vista
Page 11
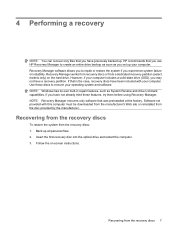
...included with this computer must be downloaded from the manufacturer's Web site or reinstalled from a dedicated recovery partition (select models only) on -screen instructions. However, if your computer. If that is the case, recovery discs have not already tried these discs to create an entire drive...only software that was preinstalled at the factory. Insert the first recovery disc into the optical drive and restart the computer. 3. HP recommends that you use HP Recovery Manager to recover your computer. 4 Performing a recovery NOTE: You can recover only files that you set up your ...
...included with this computer must be downloaded from the manufacturer's Web site or reinstalled from a dedicated recovery partition (select models only) on -screen instructions. However, if your computer. If that is the case, recovery discs have not already tried these discs to create an entire drive...only software that was preinstalled at the factory. Insert the first recovery disc into the optical drive and restart the computer. 3. HP recommends that you use HP Recovery Manager to recover your computer. 4 Performing a recovery NOTE: You can recover only files that you set up your ...
Backup and Recovery - Windows Vista
Page 12
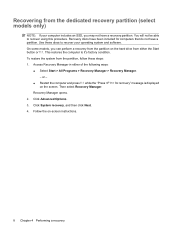
... To restore the system from the dedicated recovery partition (select models only) NOTE: If your operating system and software. Follow the on-screen instructions. 8 Chapter 4 Performing a recovery This restores the computer to recover your computer includes an SSD, you can perform a recovery... Manager opens. 2. Recovery discs have been included for recovery" message is displayed on the hard drive from the partition on the screen. Use these steps: 1. Then select Recovery Manager. Recovering from the partition, follow these discs to it's factory condition. You will...
... To restore the system from the dedicated recovery partition (select models only) NOTE: If your operating system and software. Follow the on-screen instructions. 8 Chapter 4 Performing a recovery This restores the computer to recover your computer includes an SSD, you can perform a recovery... Manager opens. 2. Recovery discs have been included for recovery" message is displayed on the hard drive from the partition on the screen. Use these steps: 1. Then select Recovery Manager. Recovering from the partition, follow these discs to it's factory condition. You will...

Software Update, Backup and Recovery - Windows Vista
Page 6
...not insert, remove, connect, or disconnect any device, cable, or cord. Access the page on the HP Web site that is later than those currently installed on the screen to identify your computer. Identify the BIOS update that provides software for your computer: Select Start > ...Hibernation. Determining the BIOS version To determine whether available BIOS updates contain later BIOS versions than the BIOS version currently installed on the screen to download your hard drive. Downloading a BIOS update CAUTION: To prevent damage to the computer or an unsuccessful installation, download ...
...not insert, remove, connect, or disconnect any device, cable, or cord. Access the page on the HP Web site that is later than those currently installed on the screen to identify your computer. Identify the BIOS update that provides software for your computer: Select Start > ...Hibernation. Determining the BIOS version To determine whether available BIOS updates contain later BIOS versions than the BIOS version currently installed on the screen to download your hard drive. Downloading a BIOS update CAUTION: To prevent damage to the computer or an unsuccessful installation, download ...
Software Update, Backup and Recovery - Windows Vista
Page 7
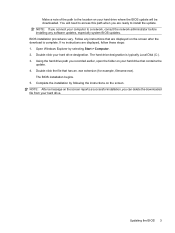
...If no instructions are displayed, follow these steps: 1. Using the hard drive path you recorded earlier, open the folder on the screen reports a successful installation, you can delete the downloaded file from your hard drive. The BIOS installation begins. 5. BIOS installation ...the installation by selecting Start > Computer. 2. Updating the BIOS 3 You will be downloaded. Open Windows Explorer by following the instructions on the screen. Double-click your computer to install the update. NOTE: If you connect your hard drive designation. Make a note of the path to the ...
...If no instructions are displayed, follow these steps: 1. Using the hard drive path you recorded earlier, open the folder on the screen reports a successful installation, you can delete the downloaded file from your hard drive. The BIOS installation begins. 5. BIOS installation ...the installation by selecting Start > Computer. 2. Updating the BIOS 3 You will be downloaded. Open Windows Explorer by following the instructions on the screen. Double-click your computer to install the update. NOTE: If you connect your hard drive designation. Make a note of the path to the ...
Wireless (Select Models Only) - Windows Vista
Page 26
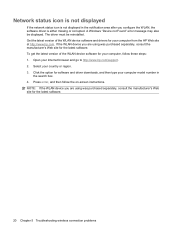
Open your country or region. 3. Select your Internet browser and go to http://www.hp.com/support. 2. Click the option for your computer from the HP Web site at http://www.hp.com. The driver must be displayed. Press enter, and then follow these steps: 1. NOTE: If the WLAN device you...To get the latest version of the WLAN device software and drivers for software and driver downloads, and then type your computer, follow the on-screen instructions. Network status icon is not displayed If the network status icon is either missing or corrupted. A Windows "Device not Found" error ...
Open your country or region. 3. Select your Internet browser and go to http://www.hp.com/support. 2. Click the option for your computer from the HP Web site at http://www.hp.com. The driver must be displayed. Press enter, and then follow these steps: 1. NOTE: If the WLAN device you...To get the latest version of the WLAN device software and drivers for software and driver downloads, and then type your computer, follow the on-screen instructions. Network status icon is not displayed If the network status icon is either missing or corrupted. A Windows "Device not Found" error ...
Drives - Windows Vista
Page 5
... (select models only) is the only source of the drive. The write process is connected to an external hard drive, initiate Sleep and allow the screen to media. Remove media from the drive bay, or traveling with the procedures to a disc. Before handling a drive, discharge static electricity by touching the unpainted...
... (select models only) is the only source of the drive. The write process is connected to an external hard drive, initiate Sleep and allow the screen to media. Remove media from the drive bay, or traveling with the procedures to a disc. Before handling a drive, discharge static electricity by touching the unpainted...


