
Service Manual
Page 7
5 Functional Overview (more ' HP DesignJet 200/220 Service Manual) Introduction 5Ć2 Loading Sheet Media 5Ć2 Loading Roll Media on the DesignJet 330 and 350C 5Ć4 Roll Media 5Ć5 Removing Static Charge from the Media 5Ć5 Gripping the Media 5Ć5 Pinch... 5Ć6 Carriage Guidance 5Ć6 Positional Feedback 5Ć6 Detecting the Lines and Media Edges 5Ć7 Line Sensor 5Ć7 Providing Ink 5Ć7 Print Cartridges 5Ć7 Distance between Carriage and Media 5Ć7 Producing an Image 5Ć8 PrintĆMode Characteristics 5Ć8 Servicing the...
5 Functional Overview (more ' HP DesignJet 200/220 Service Manual) Introduction 5Ć2 Loading Sheet Media 5Ć2 Loading Roll Media on the DesignJet 330 and 350C 5Ć4 Roll Media 5Ć5 Removing Static Charge from the Media 5Ć5 Gripping the Media 5Ć5 Pinch... 5Ć6 Carriage Guidance 5Ć6 Positional Feedback 5Ć6 Detecting the Lines and Media Edges 5Ć7 Line Sensor 5Ć7 Providing Ink 5Ć7 Print Cartridges 5Ć7 Distance between Carriage and Media 5Ć7 Producing an Image 5Ć8 PrintĆMode Characteristics 5Ć8 Servicing the...
Service Manual
Page 36
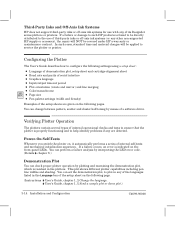
...a software driver. If a failure or damage to the use with any of its DesignJet series plotters or printers. Configuring the Plotter The User's Guide describes how to help ... the following settings using a setup sheet : D Language of demonstration plot, setup sheet and cartridgeĆalignment sheet D Baud rate and parity of serial interface D Graphics language D Input/output...Inks and OffĆAxis Ink Systems HP does not support thirdĆparty inks or offĆaxis ink systems for use of thirdĆparty inks or offĆaxis ink systems (or any other nonĆsupported HP...
...a software driver. If a failure or damage to the use with any of its DesignJet series plotters or printers. Configuring the Plotter The User's Guide describes how to help ... the following settings using a setup sheet : D Language of demonstration plot, setup sheet and cartridgeĆalignment sheet D Baud rate and parity of serial interface D Graphics language D Input/output...Inks and OffĆAxis Ink Systems HP does not support thirdĆparty inks or offĆaxis ink systems for use of thirdĆparty inks or offĆaxis ink systems (or any other nonĆsupported HP...
Service Manual
Page 49
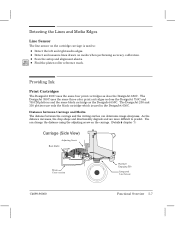
...and Media Edges Line Sensor The line sensor on media when performing accuracy calibration. The DesignJet 350C uses the same three color print cartridges as does the DesignJet 750C and 755CM plotters and the same black cartridge as does the DesignJet 650C. As the distance increases, the drop shape and directionality degrade and are more...262;90000 Functional Overview 5Ć7 You can determine image sharpness. D Scan the setup and alignment sheets. 330 350C D Find the platen roller reference mark. Providing Ink Print Cartridges The DesignJet 250C uses the same four print...
...and Media Edges Line Sensor The line sensor on media when performing accuracy calibration. The DesignJet 350C uses the same three color print cartridges as does the DesignJet 750C and 755CM plotters and the same black cartridge as does the DesignJet 650C. As the distance increases, the drop shape and directionality degrade and are more...262;90000 Functional Overview 5Ć7 You can determine image sharpness. D Scan the setup and alignment sheets. 330 350C D Find the platen roller reference mark. Providing Ink Print Cartridges The DesignJet 250C uses the same four print...
Service Manual
Page 53
... side of the plotter. Although the primers for the DesignJet 230/250C and DesignJet 330/350C look identical, their characteristics are now located on the ink separator to suck ink from the nozzles. Installing the incorrect primer can damage the cartridges or reduce the servicing of the DesignJet 650C, with some differences. Spittoon A single, redesigned spittoon is...
... side of the plotter. Although the primers for the DesignJet 230/250C and DesignJet 330/350C look identical, their characteristics are now located on the ink separator to suck ink from the nozzles. Installing the incorrect primer can damage the cartridges or reduce the servicing of the DesignJet 650C, with some differences. Spittoon A single, redesigned spittoon is...

Service Manual
Page 64
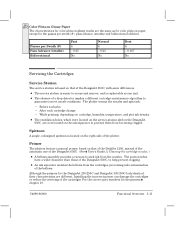
C4699Ć90000 Removing the Cartridge Caps and Wiper Blades WARNING You are likely to get ink on your hands while performing the following procedure. 3 Peel the cartridge caps and/or the wiper blades from the top of the service station, and remove them from the plotter. 1 Open the top cover of the plotter. 2 Move the cartridge carriage to the right, out of the serviceĆstation area. 6Ć6 Removal and Replacement Reassembling: Ensure that the cartridge caps are clean, the wipers straight, and the openings clear.
C4699Ć90000 Removing the Cartridge Caps and Wiper Blades WARNING You are likely to get ink on your hands while performing the following procedure. 3 Peel the cartridge caps and/or the wiper blades from the top of the service station, and remove them from the plotter. 1 Open the top cover of the plotter. 2 Move the cartridge carriage to the right, out of the serviceĆstation area. 6Ć6 Removal and Replacement Reassembling: Ensure that the cartridge caps are clean, the wipers straight, and the openings clear.
Service Manual
Page 72
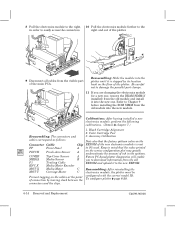
... of the new electronics module is reset A to 0% used. Keep in mind that the factory spittoon value on the floor of ink in order to easily access the connectors. A Future PCĆbased plotter diagnostics will enable MEDIA Media Sensor B you are changing...the amount of the plotter. Calibrations: After having installed a new B electronics module, perform the following calibrations. (Details ' chapter 7.) A 1. Color Cartridge Test Reassembling: The connectors and 3. Reassembling: Slide the module into the new one , remove the DRAM SIMM(if installed) from the old module ...
... of the new electronics module is reset A to 0% used. Keep in mind that the factory spittoon value on the floor of ink in order to easily access the connectors. A Future PCĆbased plotter diagnostics will enable MEDIA Media Sensor B you are changing...the amount of the plotter. Calibrations: After having installed a new B electronics module, perform the following calibrations. (Details ' chapter 7.) A 1. Color Cartridge Test Reassembling: The connectors and 3. Reassembling: Slide the module into the new one , remove the DRAM SIMM(if installed) from the old module ...
Service Manual
Page 86
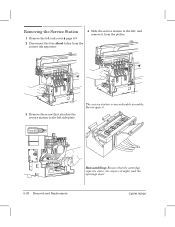
Do not open it from the plotter. 3 Remove the screw that the cartridge caps are clean, the wipers straight, and the openings clear. Torx-20 6Ć28 Removal and Replacement Reassembling: Ensure that attaches the service station to the left , and remove it . The service station is one orderable assembly. Removing the Service Station 1 Remove the left endĆcover ' page 6Ć9. 2 Disconnect the four short tubes from the primer ink separator. 4 Slide the service station to the left sideĆplate. C4699Ć90000
Do not open it from the plotter. 3 Remove the screw that the cartridge caps are clean, the wipers straight, and the openings clear. Torx-20 6Ć28 Removal and Replacement Reassembling: Ensure that attaches the service station to the left , and remove it . The service station is one orderable assembly. Removing the Service Station 1 Remove the left endĆcover ' page 6Ć9. 2 Disconnect the four short tubes from the primer ink separator. 4 Slide the service station to the left sideĆplate. C4699Ć90000

Service Manual
Page 96
WARNING In the following step, take care not to spill ink from the connector on the carriage. 7 Pull the top of the carriage up. 9 Rest the top of the carriage on the top of the cartridge carriage by pulling them slightly outwards. 8 Disconnect the trailing cable from the carriage. 6Ć38 Removal and Replacement C4699Ć90000 6 Release the two indicated clips on the trailingĆcable guide.
WARNING In the following step, take care not to spill ink from the connector on the carriage. 7 Pull the top of the carriage up. 9 Rest the top of the carriage on the top of the cartridge carriage by pulling them slightly outwards. 8 Disconnect the trailing cable from the carriage. 6Ć38 Removal and Replacement C4699Ć90000 6 Release the two indicated clips on the trailingĆcable guide.

Service Manual
Page 119
...you remove the Drive Roller or the Cartridge Carriage, take care to determine the GO and NO GO sides: NO GO GO C4699Ć90000 Calibrations and Adjustments 7Ć11 If the distance between the carriage and the media is too small, ink smears on the media. Adjusting the Carriage...ĆtoĆMedia Distance It is very important that the distance between the cartridge nozzles and the media is within the tolerances allowed. Incorrect installation may also ...
...you remove the Drive Roller or the Cartridge Carriage, take care to determine the GO and NO GO sides: NO GO GO C4699Ć90000 Calibrations and Adjustments 7Ć11 If the distance between the carriage and the media is too small, ink smears on the media. Adjusting the Carriage...ĆtoĆMedia Distance It is very important that the distance between the cartridge nozzles and the media is within the tolerances allowed. Incorrect installation may also ...
Service Manual
Page 164
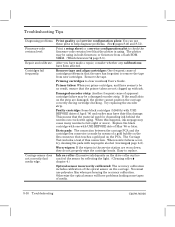
...seems to be no result, ensure that the user has forgotten to fail (eight or more). Priming cartridges to replace. If the small slots on the strip are not clogged up with ink. When this connection. You must use these plots to check the firmwareĆcode revision level that touches...that the plotter is using in the service station are worn down, they do not properly wipe the cartridge heads. When nozzle failures occur, try cleaning the pads with aging. Ink on roller: Excessive ink deposits on the driveĆroller surface can fool the sensor by means of April '96 and ...
...seems to be no result, ensure that the user has forgotten to fail (eight or more). Priming cartridges to replace. If the small slots on the strip are not clogged up with ink. When this connection. You must use these plots to check the firmwareĆcode revision level that touches...that the plotter is using in the service station are worn down, they do not properly wipe the cartridge heads. When nozzle failures occur, try cleaning the pads with aging. Ink on roller: Excessive ink deposits on the driveĆroller surface can fool the sensor by means of April '96 and ...

Service Manual
Page 167
The ink dries in briskly. Instead, load the media so that the trailing cable is then not able to loading media correctly every time. Media not Loading. .... Excessive loading force: When you push the media into the plotter with too much force, too large a buckle forms in the service station, so the cartridges are shifted to the right. 2 During media loading, the line sensor on the trick to correctly grasp the media and misaligns it into the entry...
The ink dries in briskly. Instead, load the media so that the trailing cable is then not able to loading media correctly every time. Media not Loading. .... Excessive loading force: When you push the media into the plotter with too much force, too large a buckle forms in the service station, so the cartridges are shifted to the right. 2 During media loading, the line sensor on the trick to correctly grasp the media and misaligns it into the entry...

Service Manual
Page 183
... Yellow, Black.) Factory Spittoon: (The estimated level of times each cartridge has been replaced. Typical value = 75.) Bench Run Maximum X-Axis... switched on.) Number of Color Plots: Number of Black Plots: Number of Pens: (Number of ink in the spittoon. Incorrect if you have cleared the EEROM.) Number of Bail Errors: Number of ...calibration. Less than 0.9 means the drive-roller radius is for the DesignJet 230 and 250C The service configuration plot contains the following information: DesignJet 230/250C Service Configuration Plot Firmware Release: X.XX.XX SPROC release: X.X ...
... Yellow, Black.) Factory Spittoon: (The estimated level of times each cartridge has been replaced. Typical value = 75.) Bench Run Maximum X-Axis... switched on.) Number of Color Plots: Number of Black Plots: Number of Pens: (Number of ink in the spittoon. Incorrect if you have cleared the EEROM.) Number of Bail Errors: Number of ...calibration. Less than 0.9 means the drive-roller radius is for the DesignJet 230 and 250C The service configuration plot contains the following information: DesignJet 230/250C Service Configuration Plot Firmware Release: X.XX.XX SPROC release: X.X ...

Service Manual
Page 184
... (This should be less than 102. Cyan, Magenta, Yellow, Black.) Factory Spittoon: (The estimated level of times each cartridge has been replaced. Typical value = 52.) Encoder-Tests Maximum Y-Axis (Carriage-Axis) PWM: (This should be less than... 65. 330 350C Service Configuration Plot for the DesignJet 330 and 350C The service configuration plot contains the following information: DesignJet 330/350C Service Configuration Plot Firmware Release: X.XX.XX SPROC release: X.X (Servo...: Number of Black Plots: Number of Pens: (Number of ink in the spittoon.
... (This should be less than 102. Cyan, Magenta, Yellow, Black.) Factory Spittoon: (The estimated level of times each cartridge has been replaced. Typical value = 52.) Encoder-Tests Maximum Y-Axis (Carriage-Axis) PWM: (This should be less than... 65. 330 350C Service Configuration Plot for the DesignJet 330 and 350C The service configuration plot contains the following information: DesignJet 330/350C Service Configuration Plot Firmware Release: X.XX.XX SPROC release: X.X (Servo...: Number of Black Plots: Number of Pens: (Number of ink in the spittoon.
Service Manual
Page 188
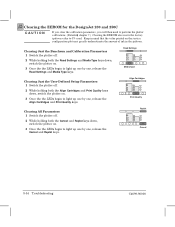
... that the value printed on . 3 Once the the LEDs begin to light up one by one, release the Align Cartridges and Print Quality keys. Align Cartridges Print Quality Clearing All Parameters 1 Switch the plotter off . 2 While holding both the Read Settings and Media Type keys...Replot keys down , switch the plotter on the service configuration plot may greatly underestimate the amount of ink in the spittoon. 230 250C Clearing the EEROM for the DesignJet 230 and 250C CAUTION If you clear the calibration parameters, you will then need to perform the plotter calibrations. (Details...
... that the value printed on . 3 Once the the LEDs begin to light up one by one, release the Align Cartridges and Print Quality keys. Align Cartridges Print Quality Clearing All Parameters 1 Switch the plotter off . 2 While holding both the Read Settings and Media Type keys...Replot keys down , switch the plotter on the service configuration plot may greatly underestimate the amount of ink in the spittoon. 230 250C Clearing the EEROM for the DesignJet 230 and 250C CAUTION If you clear the calibration parameters, you will then need to perform the plotter calibrations. (Details...

Service Manual
Page 191
...Fault Some types of the small slots on the nozzle plate D An electrical contact is placed. The ink doesn't spread out sufficiently around the desired dot position. D Perform accuracy calibration D Reseat cartridge caps in area fills. (PrintĆQuality Plot ' page 8Ć56, 1. - Banding may...test for banding, use HP polyester inkjet film. Banding Symptoms Random dark or light bands in service station. D Some of media have a coating that it is faulty in manufacture of the drive roller. Nozzle Checkout.) D The ink drops of one of the plotter cartridge chutes, so that ...
...Fault Some types of the small slots on the nozzle plate D An electrical contact is placed. The ink doesn't spread out sufficiently around the desired dot position. D Perform accuracy calibration D Reseat cartridge caps in area fills. (PrintĆQuality Plot ' page 8Ć56, 1. - Banding may...test for banding, use HP polyester inkjet film. Banding Symptoms Random dark or light bands in service station. D Some of media have a coating that it is faulty in manufacture of the drive roller. Nozzle Checkout.) D The ink drops of one of the plotter cartridge chutes, so that ...
Service Manual
Page 192
D If the problem is occurring in black area fills on the development of a new set of inks. Solutions One or both of sprayed ink located around the point at which the required dot is working on color plots printed in the future for the largeĆformat ... cartridges are positioned too far from the media. D Laminated and under office light: After about 20 days. D Under office light: After about 24 days. Solution Adjust the nozzleĆto light. D Use a more suitable media type. Colors become important in Normal printĆquality mode, then use of HP DesignJet 250C ...
D If the problem is occurring in black area fills on the development of a new set of inks. Solutions One or both of sprayed ink located around the point at which the required dot is working on color plots printed in the future for the largeĆformat ... cartridges are positioned too far from the media. D Laminated and under office light: After about 20 days. D Under office light: After about 24 days. Solution Adjust the nozzleĆto light. D Use a more suitable media type. Colors become important in Normal printĆquality mode, then use of HP DesignJet 250C ...

Service Manual
Page 194
... heads. These cannot be avoided. 8Ć60 Troubleshooting C4699Ć90000 Cartridge Fault One or more of the print cartridges is running out of ink. (Typically the inks of media, you may notice some drawings (for various reasons, including: D Badly seated cartridge. Ink Smearing Symptoms Ink smears on a cartridge are used at different rates.) Solution Replace the print...
... heads. These cannot be avoided. 8Ć60 Troubleshooting C4699Ć90000 Cartridge Fault One or more of the print cartridges is running out of ink. (Typically the inks of media, you may notice some drawings (for various reasons, including: D Badly seated cartridge. Ink Smearing Symptoms Ink smears on a cartridge are used at different rates.) Solution Replace the print...

Service Manual
Page 195
... with no cyan or yellow shadows. it should not overlap the outer color. Pen-to each other . Media Fault D The ink is incompatible with no magenta or yellow shadows. 5. - Product Fault The cartridges are in the paper, creating a spider web" effect. D Use better quality media. D If you are plotting on the plot...
... with no cyan or yellow shadows. it should not overlap the outer color. Pen-to each other . Media Fault D The ink is incompatible with no magenta or yellow shadows. 5. - Product Fault The cartridges are in the paper, creating a spider web" effect. D Use better quality media. D If you are plotting on the plot...

Service Manual
Page 244
... calibration. addressable dpiąA resolution higher than the nominal value of raster images on the media. cartridgeąPrint cartridge (pen). checksumąA programming method used to minimize data errors when data are transferred. ... (...Part of a definition from The Harper Collins Dictionary of ink on the media. depletionąThe selective reduction ... per second). Acoustic. acąAlternating current. Customer EngineersąHP field support engineers.
... calibration. addressable dpiąA resolution higher than the nominal value of raster images on the media. cartridgeąPrint cartridge (pen). checksumąA programming method used to minimize data errors when data are transferred. ... (...Part of a definition from The Harper Collins Dictionary of ink on the media. depletionąThe selective reduction ... per second). Acoustic. acąAlternating current. Customer EngineersąHP field support engineers.

Service Manual
Page 246
...;Carriage LED. mąMeter(s) marginąPart of the media on which the plotter is incapable of printing. Parity is pumped to the cartridges from right to right, or from a reservoir that the media advances between a computer and a peripheral device. mediaĆsensor calibrationą...MediaĆlength calibration. LANąLocal Area Network. MIOąModular Input/Output. offĆaxis ink systemąA system whereby ink is used to it will receive all data already in the order in the plotter mechanisms. mediaĆjam leverą...
...;Carriage LED. mąMeter(s) marginąPart of the media on which the plotter is incapable of printing. Parity is pumped to the cartridges from right to right, or from a reservoir that the media advances between a computer and a peripheral device. mediaĆsensor calibrationą...MediaĆlength calibration. LANąLocal Area Network. MIOąModular Input/Output. offĆaxis ink systemąA system whereby ink is used to it will receive all data already in the order in the plotter mechanisms. mediaĆjam leverą...


