HP Jetdirect External Print Server Products - External USB Compatibility
Page 1
... J7942G en3700 10/100TX USB 2.0 External Print server In 2009, the J6035G 175X print server will be discontinued. whitepaper HP Jetdirect External USB Compatibility May 2009 Introduction There have been some printers have changed regarding external print servers and printers they connect to. This white paper addresses those questions and provides a list of...
... J7942G en3700 10/100TX USB 2.0 External Print server In 2009, the J6035G 175X print server will be discontinued. whitepaper HP Jetdirect External USB Compatibility May 2009 Introduction There have been some printers have changed regarding external print servers and printers they connect to. This white paper addresses those questions and provides a list of...
HP Jetdirect External Print Server Products - External USB Compatibility
Page 2
...backward compatible with these USB network-capable HP printers, AIO's, and MFP's: HP Business Inkjet 2300, 2600, 2800, and 3000; The ew2400 and the en3700 which are USB 2.0 Hi-Speed will break down the supported printers for each HP USB Jetdirect print server. Many devices ...set of the newer USB printers cannot be sure your firmware on Laserjet MFP's. HP Officejet Pro K550, K850, K5300, K5400 and 8000 Print and Windows based scanning: HP Color LaserJet CM1015mfp and CM1017mfp Print only: HP Color LaserJet CM3530mfp, CM4730mfp, CM6030mfp, CM6040mfp, 4730mfp; HP Designjet Z2100, Z3100, ...
...backward compatible with these USB network-capable HP printers, AIO's, and MFP's: HP Business Inkjet 2300, 2600, 2800, and 3000; The ew2400 and the en3700 which are USB 2.0 Hi-Speed will break down the supported printers for each HP USB Jetdirect print server. Many devices ...set of the newer USB printers cannot be sure your firmware on Laserjet MFP's. HP Officejet Pro K550, K850, K5300, K5400 and 8000 Print and Windows based scanning: HP Color LaserJet CM1015mfp and CM1017mfp Print only: HP Color LaserJet CM3530mfp, CM4730mfp, CM6030mfp, CM6040mfp, 4730mfp; HP Designjet Z2100, Z3100, ...

HP Jetdirect External Print Server Products - External USB Compatibility
Page 3
... Also works with these USB network-capable HP printers: HP Business Inkjet 1000, 1100, 1200, 2280, 2300, 2600, 2800, 3000; HP Deskjet 1180c, 1220c, 1280, 5150, 5550, 5650, 6122, 9300c, 9600c, 9650, 9670, 9680, and 9800 series; HP LaserJet M3027mfp*, M3035mfp*, M4345mfp*, M5025mfp*, M5035mfp*, M9040mfp*, M9050mfp*,3050*; HP Color Inkjet cp1160 and cp1700; HP Officejet D, G series, K80/K80xi, and 9100 series...
... Also works with these USB network-capable HP printers: HP Business Inkjet 1000, 1100, 1200, 2280, 2300, 2600, 2800, 3000; HP Deskjet 1180c, 1220c, 1280, 5150, 5550, 5650, 6122, 9300c, 9600c, 9650, 9670, 9680, and 9800 series; HP LaserJet M3027mfp*, M3035mfp*, M4345mfp*, M5025mfp*, M5035mfp*, M9040mfp*, M9050mfp*,3050*; HP Color Inkjet cp1160 and cp1700; HP Officejet D, G series, K80/K80xi, and 9100 series...
HP Jetdirect External Print Server Products - External USB Compatibility
Page 4
...-capable HP peripherals: HP Color LaserJet 4730mfp*, 9500mfp*; HP Deskjet 895 Cse/Cxi; HP Photosmart 1100, 1200, 1300, 7000**, and 8000 series; no webscan ** except HP Photosmart 7200 series printers © February 2007 Hewlett-Packard Development Company, L.P. HP Color LaserJet ...HP peripherals: HP Business Inkjet 1000, 1100, 1200, 2280, 2300, 2600, 2800, 3000; HP Deskjet 895 Cse/Cxi; HP Officejet 6100 series*; HP PSC 2110*, 2210*, 2400*, 7350, and 7550 All-in -One * printing only; HP PSC 7350, and 7550 All-in -One; HP Officejet 6100 series*; HP Color Inkjet cp1160 and cp1700; HP...
...-capable HP peripherals: HP Color LaserJet 4730mfp*, 9500mfp*; HP Deskjet 895 Cse/Cxi; HP Photosmart 1100, 1200, 1300, 7000**, and 8000 series; no webscan ** except HP Photosmart 7200 series printers © February 2007 Hewlett-Packard Development Company, L.P. HP Color LaserJet ...HP peripherals: HP Business Inkjet 1000, 1100, 1200, 2280, 2300, 2600, 2800, 3000; HP Deskjet 895 Cse/Cxi; HP Officejet 6100 series*; HP PSC 2110*, 2210*, 2400*, 7350, and 7550 All-in -One * printing only; HP PSC 7350, and 7550 All-in -One; HP Officejet 6100 series*; HP Color Inkjet cp1160 and cp1700; HP...

HP CP 1700 Series - (English) User's Guide
Page 3
...-to-peer networks 3-1 Client-server networks 3-2 Establishing a network connection 3-3 Installing printer software Installing the Windows printer software 4-1 Making copies of the software 4-2 Installing the printer driver 4-2 Installing the Macintosh printer software 4-3 Uninstalling the software 4-4 Installing the software on DOS 4-5 Installing other software 4-5 Using the Printer Printer features 5-1 Printer settings 5-2 Selecting print media 5-3 Media handling 5-5 Selecting a tray 5-5 Tips...
...-to-peer networks 3-1 Client-server networks 3-2 Establishing a network connection 3-3 Installing printer software Installing the Windows printer software 4-1 Making copies of the software 4-2 Installing the printer driver 4-2 Installing the Macintosh printer software 4-3 Uninstalling the software 4-4 Installing the software on DOS 4-5 Installing other software 4-5 Using the Printer Printer features 5-1 Printer settings 5-2 Selecting print media 5-3 Media handling 5-5 Selecting a tray 5-5 Tips...

HP CP 1700 Series - (English) User's Guide
Page 4
...the printheads 7-3 Maintaining the ink cartridges 7-4 Troubleshooting Checking the basics 8-1 Resolving printer problems 8-1 Unexpected printer shutdown 8-2 Printer is not responding (nothing prints 8-2 Printer light blinks alternating amber and green 8-3 Printer takes a long time to print 8-3 Resolving printing problems 8-4 Blank page ...is smearing 8-7 Ink is not filling the text or graphics completely 8-7 Faded or dull-colored output 8-7 Colors are printing as black and white 8-8 Colors do not line up properly 8-9 Resolving paper-feed problems 8-9 Print media is jammed 8-9...
...the printheads 7-3 Maintaining the ink cartridges 7-4 Troubleshooting Checking the basics 8-1 Resolving printer problems 8-1 Unexpected printer shutdown 8-2 Printer is not responding (nothing prints 8-2 Printer light blinks alternating amber and green 8-3 Printer takes a long time to print 8-3 Resolving printing problems 8-4 Blank page ...is smearing 8-7 Ink is not filling the text or graphics completely 8-7 Faded or dull-colored output 8-7 Colors are printing as black and white 8-8 Colors do not line up properly 8-9 Resolving paper-feed problems 8-9 Print media is jammed 8-9...

HP CP 1700 Series - (English) User's Guide
Page 5
Media is not picked up from Tray 1 or Tray 2 8-12 Media is not picked up from the front manual feed . . . 8-13 Media is not picked up from the rear manual feed . . . . 8-13 Paper output problem 8-13 Printing a diagnostic page 8-13 Resolving common Macintosh problems 8-14 Contacting customer support 8-14 HP Supplies and Accessories Accessories A-1 Supplies A-1 LCD Messages Printer Specifications ENWW iii
Media is not picked up from Tray 1 or Tray 2 8-12 Media is not picked up from the front manual feed . . . 8-13 Media is not picked up from the rear manual feed . . . . 8-13 Paper output problem 8-13 Printing a diagnostic page 8-13 Resolving common Macintosh problems 8-14 Contacting customer support 8-14 HP Supplies and Accessories Accessories A-1 Supplies A-1 LCD Messages Printer Specifications ENWW iii
HP CP 1700 Series - (English) User's Guide
Page 6
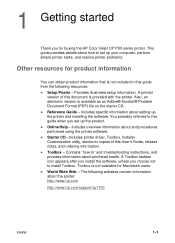
...: l Setup Poster - Contains "how-to set up your computer, perform simple printer tasks, and resolve printer problems. Other resources for product information You can obtain product information that is not available for buying the HP Color Inkjet CP1700 series printer. l World Wide Web - Toolbox is not included in this document is available as...Thank you for Macintosh users. l Reference Guide - This guide provides details about how to " and troubleshooting instructions, and provides information about the printer: http://www.hp.com http://www.hp.com/support/cp1700 ENWW 1-1
...: l Setup Poster - Contains "how-to set up your computer, perform simple printer tasks, and resolve printer problems. Other resources for product information You can obtain product information that is not available for buying the HP Color Inkjet CP1700 series printer. l World Wide Web - Toolbox is not included in this document is available as...Thank you for Macintosh users. l Reference Guide - This guide provides details about how to " and troubleshooting instructions, and provides information about the printer: http://www.hp.com http://www.hp.com/support/cp1700 ENWW 1-1

HP CP 1700 Series - (English) User's Guide
Page 7
2 Setting up In this chapter, you will learn about the components of printer 34 6 7 1 8 9 ENWW 10 12 2 5 11 1 Paper guides-Guide the print media into the printer. 2 Tray 1-Holds the print media. 3 Output tray-Collects the printed pages. 4 Front manual feed-Holds media to be fed into the printer. Printer parts and locations Front of the printer and how to the interior of the printer. 2-1 Paper width guide slides to fit the width of the paper. 5 Tray 2-Holds regular and oversized paper (optional accessory). 6 Top cover-Provides access to set up the printer.
2 Setting up In this chapter, you will learn about the components of printer 34 6 7 1 8 9 ENWW 10 12 2 5 11 1 Paper guides-Guide the print media into the printer. 2 Tray 1-Holds the print media. 3 Output tray-Collects the printed pages. 4 Front manual feed-Holds media to be fed into the printer. Printer parts and locations Front of the printer and how to the interior of the printer. 2-1 Paper width guide slides to fit the width of the paper. 5 Tray 2-Holds regular and oversized paper (optional accessory). 6 Top cover-Provides access to set up the printer.

HP CP 1700 Series - (English) User's Guide
Page 8
...of these messages, see "LCD Messages." 2 POWER light-Is always lit when the printer is initializing, cancelling a job, or turning off. 3 RESUME light-Blinks whenever the printer requires user intervention (for the printer to operate. 11 Carriage lock-Locks down the printhead access latch. 12 Tray Extension ...Lock-Unlocks to the current state of the printer and the ink levels in the individual ink cartridges. For a complete description of the printer, and buttons that you to print from its color-coded socket. 10 Hook-Connects to close an open cover.) 2-2 ENWW...
...of these messages, see "LCD Messages." 2 POWER light-Is always lit when the printer is initializing, cancelling a job, or turning off. 3 RESUME light-Blinks whenever the printer requires user intervention (for the printer to operate. 11 Carriage lock-Locks down the printhead access latch. 12 Tray Extension ...Lock-Unlocks to the current state of the printer and the ink levels in the individual ink cartridges. For a complete description of the printer, and buttons that you to print from its color-coded socket. 10 Hook-Connects to close an open cover.) 2-2 ENWW...

HP CP 1700 Series - (English) User's Guide
Page 9
... off. 5 RESUME button-Resumes current print operation after temporary interruption, for example, when adding print media to the printer. Back of printer 4 7 3 5 2 6 1 ENWW 1 Power input-Attach power cord here. 2 LIO Adaptor Slot-Install an optional HP Jetdirect print server/ Internet connector (LIO module) here. 3 Parallel port-Attach parallel cable here. 4 USB port-Attach...
... off. 5 RESUME button-Resumes current print operation after temporary interruption, for example, when adding print media to the printer. Back of printer 4 7 3 5 2 6 1 ENWW 1 Power input-Attach power cord here. 2 LIO Adaptor Slot-Install an optional HP Jetdirect print server/ Internet connector (LIO module) here. 3 Parallel port-Attach parallel cable here. 4 USB port-Attach...
HP CP 1700 Series - (English) User's Guide
Page 10
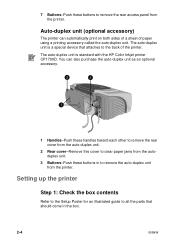
... auto-duplex unit is standard with the HP Color Inkjet printer CP1700D. The auto-duplex unit is a special device that attaches to all the parts that should come in to remove the auto-duplex unit from the printer. Auto-duplex unit (optional accessory) The printer can also purchase the auto-duplex unit ...jams from the autoduplex unit. 3 Buttons-Push these buttons to remove the rear access panel from the printer. 7 Buttons-Push these buttons in the box. 2-4 ENWW Setting up the printer Step 1: Check the box contents Refer to the Setup Poster for an illustrated guide to the back of...
... auto-duplex unit is standard with the HP Color Inkjet printer CP1700D. The auto-duplex unit is a special device that attaches to all the parts that should come in to remove the auto-duplex unit from the printer. Auto-duplex unit (optional accessory) The printer can also purchase the auto-duplex unit ...jams from the autoduplex unit. 3 Buttons-Push these buttons to remove the rear access panel from the printer. 7 Buttons-Push these buttons in the box. 2-4 ENWW Setting up the printer Step 1: Check the box contents Refer to the Setup Poster for an illustrated guide to the back of...

HP CP 1700 Series - (English) User's Guide
Page 11
...(optional accessory) Tray 2 is designed to rest directly on top of the tray. 2 Lift the printer and align the sides of Tray 1 with the sides of available supplies and accessories, see "HP Supplies and Accessories." 1 Position Tray 2 at the location where you want to complete this step if... you purchased Tray 2. You only need to place the printer. The printer is an optional accessory. Step 2: Unpack the printer Unpack the printer and remove the packing ...
...(optional accessory) Tray 2 is designed to rest directly on top of the tray. 2 Lift the printer and align the sides of Tray 1 with the sides of available supplies and accessories, see "HP Supplies and Accessories." 1 Position Tray 2 at the location where you want to complete this step if... you purchased Tray 2. You only need to place the printer. The printer is an optional accessory. Step 2: Unpack the printer Unpack the printer and remove the packing ...

HP CP 1700 Series - (English) User's Guide
Page 12
Step 4: Install the auto-duplex unit To install the auto-duplex unit, you install the auto-duplex unit. 1 At the back of the printer, push the buttons on top of the rear access panel, and pull out the rear access panel. 2-6 ENWW The rear manual feed is not available when you must first remove the pre-installed rear access panel. 3 Set the printer on both sides of Tray 2.
Step 4: Install the auto-duplex unit To install the auto-duplex unit, you install the auto-duplex unit. 1 At the back of the printer, push the buttons on top of the rear access panel, and pull out the rear access panel. 2-6 ENWW The rear manual feed is not available when you must first remove the pre-installed rear access panel. 3 Set the printer on both sides of Tray 2.

HP CP 1700 Series - (English) User's Guide
Page 13
ENWW 2-7 Use these buttons only for removing the auto-duplex unit from the printer. Step 5: Turn on the printer 1 Connect the power cord to a grounded outlet. To prevent electric shock, connect the power cord only to the printer, and plug it in. Step 6: Install the ink cartridges 1 If it . For ...information about using the auto-duplex unit, see "Two-sided printing (duplexing)." Do not press the buttons on either side of the printer until both sides snap into place. 2 Slide the auto-duplex unit into the back of the auto-duplex unit when installing it is not already...
ENWW 2-7 Use these buttons only for removing the auto-duplex unit from the printer. Step 5: Turn on the printer 1 Connect the power cord to a grounded outlet. To prevent electric shock, connect the power cord only to the printer, and plug it in. Step 6: Install the ink cartridges 1 If it . For ...information about using the auto-duplex unit, see "Two-sided printing (duplexing)." Do not press the buttons on either side of the printer until both sides snap into place. 2 Slide the auto-duplex unit into the back of the auto-duplex unit when installing it is not already...

HP CP 1700 Series - (English) User's Guide
Page 14
Follow the colored arrows to properly install the ink cartridges. 5 Press firmly on . 2 Lift the printhead cover. Step 7: Install the printheads 1 Make sure the printer is turned on each ink cartridge into its package. 4 Install each ink cartridge to release the hook from the rear. Pull the latch forward and down to ensure proper contact after installation. Open the printhead access latch by lifting it from the carriage lock. 2-8 ENWW 3 Remove each ink cartridge from its own color-coded socket.
Follow the colored arrows to properly install the ink cartridges. 5 Press firmly on . 2 Lift the printhead cover. Step 7: Install the printheads 1 Make sure the printer is turned on each ink cartridge into its package. 4 Install each ink cartridge to release the hook from the rear. Pull the latch forward and down to ensure proper contact after installation. Open the printhead access latch by lifting it from the carriage lock. 2-8 ENWW 3 Remove each ink cartridge from its own color-coded socket.

HP CP 1700 Series - (English) User's Guide
Page 15
... of the printheads does not correspond to the color sequence of the printer. 4 Remove each printhead from each printhead. Remove the protective film from its own color-coded socket. You will not close the printhead access latch. If the printhead access latch will have to use some force to close , ensure that ...
... of the printheads does not correspond to the color sequence of the printer. 4 Remove each printhead from each printhead. Remove the protective film from its own color-coded socket. You will not close the printhead access latch. If the printhead access latch will have to use some force to close , ensure that ...

HP CP 1700 Series - (English) User's Guide
Page 16
...Tray 1 (default tray): Holds up to 13 by 19 in the printer. For more detailed information on supported media, see "Selecting print media." Media type Plain Paper Tray 1 Tray 2 Front Rear manual feed manual feed Inkjet Paper Photo Paper Transparency Film Special Paper (Banner paper, restickables, iron ...initialization is paper in (330 by 483 mm).The following table summarizes the type of media you can take a few minutes. 9 Wait while the printer initializes the printheads. l Front manual feed: Holds up to 10 sheets of 20 lb (75 gsm) media. l Tray 2 (optional accessory):...
...Tray 1 (default tray): Holds up to 13 by 19 in the printer. For more detailed information on supported media, see "Selecting print media." Media type Plain Paper Tray 1 Tray 2 Front Rear manual feed manual feed Inkjet Paper Photo Paper Transparency Film Special Paper (Banner paper, restickables, iron ...initialization is paper in (330 by 483 mm).The following table summarizes the type of media you can take a few minutes. 9 Wait while the printer initializes the printheads. l Front manual feed: Holds up to 10 sheets of 20 lb (75 gsm) media. l Tray 2 (optional accessory):...

HP CP 1700 Series - (English) User's Guide
Page 17
... it . You can extend Tray 1 and Tray 2 to accommodate A3, 11 by 17 in, and 13 by grasping the handle under the front of the printer to adjust the paper width and paper length guides in the tray before loading. Also, when adding media, always remove the existing media and realign...
... it . You can extend Tray 1 and Tray 2 to accommodate A3, 11 by 17 in, and 13 by grasping the handle under the front of the printer to adjust the paper width and paper length guides in the tray before loading. Also, when adding media, always remove the existing media and realign...

HP CP 1700 Series - (English) User's Guide
Page 18
...the maximum depth. 3 Slide the paper width guide to your computer with the opening in or 15 mm thick) into the tray. HP recommends that you install the printer software from the starter CD before you removed Tray 1, reinsert it back into the tray. Do not overload the tray. 5 Pinch and...until they fit snugly against the media. Push the media in or 25 mm thick) into place. For more information about software installation, see "Installing printer software." Step 10: Connect the interface cable For Windows If your personal computer is using a USB cable. For Tray 2, remove the cover and ...
...the maximum depth. 3 Slide the paper width guide to your computer with the opening in or 15 mm thick) into the tray. HP recommends that you install the printer software from the starter CD before you removed Tray 1, reinsert it back into the tray. Do not overload the tray. 5 Pinch and...until they fit snugly against the media. Push the media in or 25 mm thick) into place. For more information about software installation, see "Installing printer software." Step 10: Connect the interface cable For Windows If your personal computer is using a USB cable. For Tray 2, remove the cover and ...


