Service Manual
Page 6
...Plotter/Printer 3Ć2 Inspecting the Plotter/Printer for Damage 3Ć5 Repacking the Plotter/Printer 3Ć5 Assembling the Legs and Media Bin (Optional 3Ć6 Installing the Plotter/Printer 3Ć10 Using the Plotter 3Ć10 DesignJet 750C/750C Plus/755CM Front Panel 3Ć10 DesignJet... Maintenance Moisture on the Plotter/Printer 4Ć2 Noisy Carriage Bushing 4Ć2 Belt Swelling 4Ć2 Cleaning the Plotter 4Ć2 General Cleaning 4Ć2 Cleaning the Drive Roller 4Ć3 Scheduled Maintenance 4Ć4 Level of Plotter Usage 4Ć4 Implementation ...
...Plotter/Printer 3Ć2 Inspecting the Plotter/Printer for Damage 3Ć5 Repacking the Plotter/Printer 3Ć5 Assembling the Legs and Media Bin (Optional 3Ć6 Installing the Plotter/Printer 3Ć10 Using the Plotter 3Ć10 DesignJet 750C/750C Plus/755CM Front Panel 3Ć10 DesignJet... Maintenance Moisture on the Plotter/Printer 4Ć2 Noisy Carriage Bushing 4Ć2 Belt Swelling 4Ć2 Cleaning the Plotter 4Ć2 General Cleaning 4Ć2 Cleaning the Drive Roller 4Ć3 Scheduled Maintenance 4Ć4 Level of Plotter Usage 4Ć4 Implementation ...
Service Manual
Page 38
...of dust accumulation, ink, and other contamination. DO NOT allow liquid to run on the Plotter/Printer Users should include the following: 1 Blow away dust accumulation with dissicant until the plotter is completely dry before using it free of the carriage, and from the slider path ... openings in an environment between 5% and 95% relative humidity. Belt Swelling To prevent new belts from the power source prior to install them in their bags with compressed air if available. 2 Clean the outer surface of plotter supplies used. Use a mild soap and water solution if necessary...
...of dust accumulation, ink, and other contamination. DO NOT allow liquid to run on the Plotter/Printer Users should include the following: 1 Blow away dust accumulation with dissicant until the plotter is completely dry before using it free of the carriage, and from the slider path ... openings in an environment between 5% and 95% relative humidity. Belt Swelling To prevent new belts from the power source prior to install them in their bags with compressed air if available. 2 Clean the outer surface of plotter supplies used. Use a mild soap and water solution if necessary...
Service Manual
Page 47
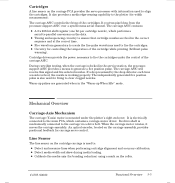
... during media loading. It also provides a media edgeĆsensing capability to the plotter (for carriage servo control. Cartridge drivers provide the power necessary to fire the cartridges under the plotter's right endcover. The independently generated fire position pulse is mounted under the control of...WarmĆup pulses are fired in the service station, the processorĆ support ASIC provides a means to the carriage via a drive belt. Line Sensor The line sensor on the roller. D Timing and sequencing circuitry to align the cartridges. It receives pixel data from the ...
... during media loading. It also provides a media edgeĆsensing capability to the plotter (for carriage servo control. Cartridge drivers provide the power necessary to fire the cartridges under the plotter's right endcover. The independently generated fire position pulse is mounted under the control of...WarmĆup pulses are fired in the service station, the processorĆ support ASIC provides a means to the carriage via a drive belt. Line Sensor The line sensor on the roller. D Timing and sequencing circuitry to align the cartridges. It receives pixel data from the ...
Service Manual
Page 86
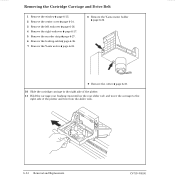
Removing the Cartridge Carriage and Drive Belt 1 Remove the window ' page 6Ć13. 2 Remove the center cover ' page 6Ć14. 3 Remove the left endcover ' page 6Ć16. 4 Remove the right endcover ' page 6&#... the YĆaxis motor holder ' page 6Ć32. 9 Remove the cutter ' page 6Ć33. 10 Slide the cartridge carriage to the right side of the plotter. 11 Hold the carriage rear bushing (mounted on the rear slider rod) and move the carriage to the right side of the...
Removing the Cartridge Carriage and Drive Belt 1 Remove the window ' page 6Ć13. 2 Remove the center cover ' page 6Ć14. 3 Remove the left endcover ' page 6Ć16. 4 Remove the right endcover ' page 6&#... the YĆaxis motor holder ' page 6Ć32. 9 Remove the cutter ' page 6Ć33. 10 Slide the cartridge carriage to the right side of the plotter. 11 Hold the carriage rear bushing (mounted on the rear slider rod) and move the carriage to the right side of the...

Service Manual
Page 87
D DropĆdetect calibration ' page 7Ć4. D LineĆsensor calibration ' page 7Ć5. C4705-90000 Removal and Replacement 6-35 D Accuracy calibration ' page 7Ć6. 12 Separate the rear bushing and spring from the carriage assembly and carefully remove the carriage assembly and main drive belt from the plotter. 13 Remove the drive belt from the carriage assembly. Calibration: After reassembling the plotter, perform: D Pen alignment test ' page 8Ć40.
D DropĆdetect calibration ' page 7Ć4. D LineĆsensor calibration ' page 7Ć5. C4705-90000 Removal and Replacement 6-35 D Accuracy calibration ' page 7Ć6. 12 Separate the rear bushing and spring from the carriage assembly and carefully remove the carriage assembly and main drive belt from the plotter. 13 Remove the drive belt from the carriage assembly. Calibration: After reassembling the plotter, perform: D Pen alignment test ' page 8Ć40.
Service Manual
Page 173
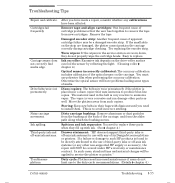
... some types of media. Drive belts wear out prematurely. In such cases, standard time and material charges will NOT be a damaged encoder strip. Noisy carriage movement. Ink spilling. Remove tape and align cartridges: One frequent cause of its DesignJet series plotters or printers. Damaged encoder strip: Another frequent... affected. If the small slots on the strip are worn down, they fill up with ink. (See ' chapter 4.) Drawer statement: HP does not support thirdĆparty inks or offĆaxis ink systems for use to remove the tape from such copiers. Diazo copiers:...
... some types of media. Drive belts wear out prematurely. In such cases, standard time and material charges will NOT be a damaged encoder strip. Noisy carriage movement. Ink spilling. Remove tape and align cartridges: One frequent cause of its DesignJet series plotters or printers. Damaged encoder strip: Another frequent... affected. If the small slots on the strip are worn down, they fill up with ink. (See ' chapter 4.) Drawer statement: HP does not support thirdĆparty inks or offĆaxis ink systems for use to remove the tape from such copiers. Diazo copiers:...
Service Manual
Page 213
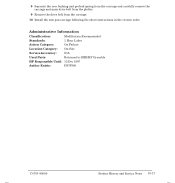
... bushing and preload spring from the carriage and carefully remove the carriage and main drive belt from the plotter. 9 Remove the drive belt from the carriage. 10 Install the new pen carriage following the above instructions in the... reverse order. Administrative Information Classification: Modification Recommended Standards: 1 Hour Labor Action Category: On Failure Location Category: OnĆSite Service Inventory: N/A Used Parts: Returned to SME/HP Grenoble HP...
... bushing and preload spring from the carriage and carefully remove the carriage and main drive belt from the plotter. 9 Remove the drive belt from the carriage. 10 Install the new pen carriage following the above instructions in the... reverse order. Administrative Information Classification: Modification Recommended Standards: 1 Hour Labor Action Category: On Failure Location Category: OnĆSite Service Inventory: N/A Used Parts: Returned to SME/HP Grenoble HP...

Service Manual
Page 219
...slider rods. 8 Separate the rear bushing and preload spring from the carriage and carefully remove the carriage and main drive belt from the plotter. 9 Remove the drive belt from the carriage. 10 Install the new pen carriage following the above instructions in the reverse order. 7 Grasp the ...carriage rear preload bushing and move the carriage to SME/HP Grenoble HP Responsible Until: 15 December 1997 Author Entity: HV/F900 C4705-...
...slider rods. 8 Separate the rear bushing and preload spring from the carriage and carefully remove the carriage and main drive belt from the plotter. 9 Remove the drive belt from the carriage. 10 Install the new pen carriage following the above instructions in the reverse order. 7 Grasp the ...carriage rear preload bushing and move the carriage to SME/HP Grenoble HP Responsible Until: 15 December 1997 Author Entity: HV/F900 C4705-...
Service Manual
Page 220
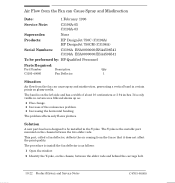
... Date: 1 February 1996 Service Note: C3196AĆ05 C3198AĆ03 Supersedes: None Products: HP DesignJet 750C (C3196A) HP DesignJet 750CM (C3198A) Serial Numbers: C3196A ESA0000000/ESA4508541 C3198A ESA0000000/ESA4508541 To be installed in certain area...between the two slider rods. The problem affects only EĆsize plotters. It is as : D Hue change. The procedure to be performed by: HPĆQualified Personnel Parts Required: Part Number Description Qty C3195Ć...slider rods and behind the carriage belt. 10-22 Product History and Service Notes C4705-90000
... Date: 1 February 1996 Service Note: C3196AĆ05 C3198AĆ03 Supersedes: None Products: HP DesignJet 750C (C3196A) HP DesignJet 750CM (C3198A) Serial Numbers: C3196A ESA0000000/ESA4508541 C3198A ESA0000000/ESA4508541 To be installed in certain area...between the two slider rods. The problem affects only EĆsize plotters. It is as : D Hue change. The procedure to be performed by: HPĆQualified Personnel Parts Required: Part Number Description Qty C3195Ć...slider rods and behind the carriage belt. 10-22 Product History and Service Notes C4705-90000

Service Manual
Page 278
...262;11 addressable dpi, GlossaryĆ2 adjustments, 7Ć2 align cartridges, 8Ć55 ammonia, causing belt damage, 8Ć55 Apple LocalTalk, 1Ć3 application notes, part number, 11Ć35 applications of plotter, 1Ć2 area fill PQ plot, service test, 8Ć35 ASIC, GlossaryĆ2 ASIC ..., 8Ć53 buttons, front panel, 3Ć10, 3Ć11 C cables, interface, 2Ć2 part numbers, 11Ć37 CAD, GlossaryĆ2 CAD Color Diagnostic plot, 9Ć15 calibrations, 7Ć1 accuracy, 7Ć6 drop detect, 7Ć4 entering, 7Ć3 line sensor, 7Ć5 menu path, 7Ć3 when...
...262;11 addressable dpi, GlossaryĆ2 adjustments, 7Ć2 align cartridges, 8Ć55 ammonia, causing belt damage, 8Ć55 Apple LocalTalk, 1Ć3 application notes, part number, 11Ć35 applications of plotter, 1Ć2 area fill PQ plot, service test, 8Ć35 ASIC, GlossaryĆ2 ASIC ..., 8Ć53 buttons, front panel, 3Ć10, 3Ć11 C cables, interface, 2Ć2 part numbers, 11Ć37 CAD, GlossaryĆ2 CAD Color Diagnostic plot, 9Ć15 calibrations, 7Ć1 accuracy, 7Ć6 drop detect, 7Ć4 entering, 7Ć3 line sensor, 7Ć5 menu path, 7Ć3 when...
Service Manual
Page 279
..., 9Ć18 code, firmware revision, 10Ć3 color PQ plot, service test, 8Ć34 Configuration Plot, Description, 8Ć56 configuring the plotter, 3Ć12 consumption, power, 2Ć2 controller, DRAM, 5Ć4 copiers, diazo, wearing belt, 8Ć55 current, electrical, 2Ć2 Cutter, ... line sensor, 5Ć9 main PCA, 5Ć8 power supply PCA, 5Ć10 description of plotter, 1Ć2 Diagnostics - self test, introduction, 8Ć2 diazo copiers, wearing belt, 8Ć55 dimensions, plotter, 2Ć3 dip, GlossaryĆ2 dirt on, carriage bushing, 4Ć2 dirty carriage bushing,...
..., 9Ć18 code, firmware revision, 10Ć3 color PQ plot, service test, 8Ć34 Configuration Plot, Description, 8Ć56 configuring the plotter, 3Ć12 consumption, power, 2Ć2 controller, DRAM, 5Ć4 copiers, diazo, wearing belt, 8Ć55 current, electrical, 2Ć2 Cutter, ... line sensor, 5Ć9 main PCA, 5Ć8 power supply PCA, 5Ć10 description of plotter, 1Ć2 Diagnostics - self test, introduction, 8Ć2 diazo copiers, wearing belt, 8Ć55 dimensions, plotter, 2Ć3 dip, GlossaryĆ2 dirt on, carriage bushing, 4Ć2 dirty carriage bushing,...
Service Manual
Page 281
HP external controller, 1Ć3 HP JetDirect EX, 1Ć3 HPĆGL, 1Ć2 HPĆGL/2, 1Ć2, GlossaryĆ3 HPĆRTL, 1Ć2, Glossary&#...55 installation and configuration, 3Ć1 installing encoder strip, 6Ć29 memory module, 6Ć8 installing the plotter, 3Ć10 Interface, types, 1Ć3 interfaces, cables, 2Ć2 part numbers, 11Ć37 K...GlossaryĆ4 calibration, 7Ć5 description, 5Ć9 Linear Encoder, 5Ć4 liquids, 6Ć3 M main drive belt, removing, 6Ć34 main PCA description, 5Ć8 removing, 6Ć9 service test, 8Ć25 mainĆ...
HP external controller, 1Ć3 HP JetDirect EX, 1Ć3 HPĆGL, 1Ć2 HPĆGL/2, 1Ć2, GlossaryĆ3 HPĆRTL, 1Ć2, Glossary&#...55 installation and configuration, 3Ć1 installing encoder strip, 6Ć29 memory module, 6Ć8 installing the plotter, 3Ć10 Interface, types, 1Ć3 interfaces, cables, 2Ć2 part numbers, 11Ć37 K...GlossaryĆ4 calibration, 7Ć5 description, 5Ć9 Linear Encoder, 5Ć4 liquids, 6Ć3 M main drive belt, removing, 6Ć34 main PCA description, 5Ć8 removing, 6Ć9 service test, 8Ć25 mainĆ...
Service Manual
Page 284
...6Ć53 fan, 6Ć12 frontĆpanel assembly, 6Ć18 left endcover, 6Ć16 main drive belt, 6Ć34 main PCA, 6Ć9 media diverter, 6Ć56 media motor (XĆAxis), 6Ć25 ...and housing, 6Ć31, 6Ć32 Y-axis motor, 6Ć32 repackaging kit, 11Ć34 repacking the plotter, 3Ć5 resolution, 1Ć4, GlossaryĆ5 revision code of firmware, 10Ć3 right endcover, removing, 6&#... PQ plot, 8Ć35 bail stepper, 8Ć49 button test, 8Ć53 carriage, 8Ć27 color PQ plot, 8Ć34 cutter, 8Ć48 drop detector, 8Ć37 edge detector, 8Ć39 ...
...6Ć53 fan, 6Ć12 frontĆpanel assembly, 6Ć18 left endcover, 6Ć16 main drive belt, 6Ć34 main PCA, 6Ć9 media diverter, 6Ć56 media motor (XĆAxis), 6Ć25 ...and housing, 6Ć31, 6Ć32 Y-axis motor, 6Ć32 repackaging kit, 11Ć34 repacking the plotter, 3Ć5 resolution, 1Ć4, GlossaryĆ5 revision code of firmware, 10Ć3 right endcover, removing, 6&#... PQ plot, 8Ć35 bail stepper, 8Ć49 button test, 8Ć53 carriage, 8Ć27 color PQ plot, 8Ć34 cutter, 8Ć48 drop detector, 8Ć37 edge detector, 8Ć39 ...
Service Manual
Page 285
...part number, 11Ć35 support services, 12Ć1 AsiaĆPacific, 12Ć8 Europe, 12Ć4 USA, 12Ć2 swelling of belt, 4Ć2 switchĆon Ć normal behavior, list of characteristics, 8Ć2 symbols, safety, x system error codes, 8Ć9 C4705-..., 6Ć39 removing, 6Ć36 training, for customer engineers, ii troubleshooting, 8Ć1 tips, 8Ć55 troubleshooting checklist, print quality, 9Ć2 troublesome plotters, 8Ć55 TTOE, service test, 8Ć29 types, media, 1Ć4 U UART, GlossaryĆ6 unpacking instructions, 3Ć2 Upgrading, Pages, 1Ć6...
...part number, 11Ć35 support services, 12Ć1 AsiaĆPacific, 12Ć8 Europe, 12Ć4 USA, 12Ć2 swelling of belt, 4Ć2 switchĆon Ć normal behavior, list of characteristics, 8Ć2 symbols, safety, x system error codes, 8Ć9 C4705-..., 6Ć39 removing, 6Ć36 training, for customer engineers, ii troubleshooting, 8Ć1 tips, 8Ć55 troubleshooting checklist, print quality, 9Ć2 troublesome plotters, 8Ć55 TTOE, service test, 8Ć29 types, media, 1Ć4 U UART, GlossaryĆ6 unpacking instructions, 3Ć2 Upgrading, Pages, 1Ć6...


