HP Printers - Supported Citrix Presentation Server environments
Page 21
PS N/A N/A N/A N/A N/A N/A N/A N/A N/A N/A N/A N/A N/A N/A N/A N/A N/A N/A N/A N/A N/A N/A N/A N/A ** 7550, 7900, 8400 and 8700 are PCL3 devices but use 3 cartridge print assemblies which are also supported. HP printer Photosmart C4100 All-in-One series Supported in Citrix environment Not Supported HP-supported drivers* PCL Host-based N/A N/A Photosmart C5100 All-in-One series Not Supported N/A N/A Photosmart C6100 All-in-One series Not Supported N/A N/A Photosmart...
PS N/A N/A N/A N/A N/A N/A N/A N/A N/A N/A N/A N/A N/A N/A N/A N/A N/A N/A N/A N/A N/A N/A N/A N/A ** 7550, 7900, 8400 and 8700 are PCL3 devices but use 3 cartridge print assemblies which are also supported. HP printer Photosmart C4100 All-in-One series Supported in Citrix environment Not Supported HP-supported drivers* PCL Host-based N/A N/A Photosmart C5100 All-in-One series Not Supported N/A N/A Photosmart C6100 All-in-One series Not Supported N/A N/A Photosmart...

HP DesignJet 700 user guide
Page 6
" go to ... Install the plotter Connect the plotter Choose media Load media Replace the cartridges See the plotter's current configuration Clear a media jam Solve print quality problems Interpret a front-panel message Order accessories go to the index at the back ...
" go to ... Install the plotter Connect the plotter Choose media Load media Replace the cartridges See the plotter's current configuration Clear a media jam Solve print quality problems Interpret a front-panel message Order accessories go to the index at the back ...

HP DesignJet 700 user guide
Page 7
... Required 1-5 Task 2: Install Memory Expansion Modules (Optional 1-6 Task 3: Switch On and Change the Language From English (Optionally) . . . . . 1-9 Task 4: Load Media 1-11 Task 5: Load the Print Cartridge(s 1-20 Task 6: Print a Demonstration Plot (Optional 1-24 Task 7: Connect the Plotter To Your Computer 1-27 Task 8: Configure the Serial Interface (Serial Interface Users Only 1-29...
... Required 1-5 Task 2: Install Memory Expansion Modules (Optional 1-6 Task 3: Switch On and Change the Language From English (Optionally) . . . . . 1-9 Task 4: Load Media 1-11 Task 5: Load the Print Cartridge(s 1-20 Task 6: Print a Demonstration Plot (Optional 1-24 Task 7: Connect the Plotter To Your Computer 1-27 Task 8: Configure the Serial Interface (Serial Interface Users Only 1-29...
HP DesignJet 700 user guide
Page 8
Contents 3 Working with Media and Cartridges Choosing Media 3-2 Five Important Points about Media Types 3-2 Supported Media Types 3-3 Physical Characteristics of Media Types 3-4 Cost And Color Support of Media Types (DesignJet 750C Plus 3-5 Combinations of Media Type and Print Quality 3-6 Typical Media Type Choices by Application 3-7 Caring For Your Media 3-9 ... To Adjust Drying Time 3-23 To Unload a Sheet After Plotting 3-24 To Remove an Unused Sheet 3-25 Replacing Cartridges 3-26 When to Replace Cartridges 3-26 Before Replacing Cartridges 3-27 To Replace a Cartridge 3-28 vi
Contents 3 Working with Media and Cartridges Choosing Media 3-2 Five Important Points about Media Types 3-2 Supported Media Types 3-3 Physical Characteristics of Media Types 3-4 Cost And Color Support of Media Types (DesignJet 750C Plus 3-5 Combinations of Media Type and Print Quality 3-6 Typical Media Type Choices by Application 3-7 Caring For Your Media 3-9 ... To Adjust Drying Time 3-23 To Unload a Sheet After Plotting 3-24 To Remove an Unused Sheet 3-25 Replacing Cartridges 3-26 When to Replace Cartridges 3-26 Before Replacing Cartridges 3-27 To Replace a Cartridge 3-28 vi

HP DesignJet 700 user guide
Page 11
... Memory 7-10 File Size and Memory Usage 7-10 To Upgrade Your Plotter with the Postscript Option 7-11 To Upgrade Your Plotter with a Network Interface 7-12 HP JetDirect Print Server 7-12 8 Maintaining the Plotter Replacing the Print Cartridge(s 8-2 Cleaning the Plotter 8-2 "Normal" Plotter Use 8-3 To Print the Service Configuration Plot 8-4 ix
... Memory 7-10 File Size and Memory Usage 7-10 To Upgrade Your Plotter with the Postscript Option 7-11 To Upgrade Your Plotter with a Network Interface 7-12 HP JetDirect Print Server 7-12 8 Maintaining the Plotter Replacing the Print Cartridge(s 8-2 Cleaning the Plotter 8-2 "Normal" Plotter Use 8-3 To Print the Service Configuration Plot 8-4 ix

HP DesignJet 700 user guide
Page 12
... You Switch On the Plotter 9-6 If Plots Do Not Stack Properly In the Bin 9-6 Solving Print Cartridge Problems 9-7 If the Access Cartridge(s) Key Does Not Work 9-7 If the Plotter Runs the Cartridge-alignment Routine Unexpectedly 9-7 If Brand New Cartridge(s) Have Problems 9-7 Clearing a Media Jam 9-8 Solving Communication Problems 9-9 If There is a Problem Communicating between Your...
... You Switch On the Plotter 9-6 If Plots Do Not Stack Properly In the Bin 9-6 Solving Print Cartridge Problems 9-7 If the Access Cartridge(s) Key Does Not Work 9-7 If the Plotter Runs the Cartridge-alignment Routine Unexpectedly 9-7 If Brand New Cartridge(s) Have Problems 9-7 Clearing a Media Jam 9-8 Solving Communication Problems 9-9 If There is a Problem Communicating between Your...
HP DesignJet 700 user guide
Page 13
... If there are Jagged Vertical or Horizontal Lines 9-18 If there are Slightly Warped Lines 9-18 If there are Color "Shadows" (DesignJet 750C Plus 9-18 If One or More Cartridges are not Printing at All 9-18 If there are Blurred Lines (Ink "Bleeds" from Lines 9-19 If there are Blotchy Areas (Uneven Fill ...Density 9-19 If the Plot Is Too Dark or the Color Too Saturated 9-19 If there Is Pronounced Banding In Area ...
... If there are Jagged Vertical or Horizontal Lines 9-18 If there are Slightly Warped Lines 9-18 If there are Color "Shadows" (DesignJet 750C Plus 9-18 If One or More Cartridges are not Printing at All 9-18 If there are Blurred Lines (Ink "Bleeds" from Lines 9-19 If there are Blotchy Areas (Uneven Fill ...Density 9-19 If the Plot Is Too Dark or the Color Too Saturated 9-19 If there Is Pronounced Banding In Area ...
HP DesignJet 700 user guide
Page 15
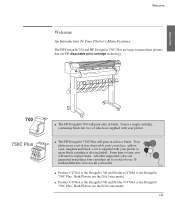
... Plotters are the E/A0-size model. a set of which are large-format inkjet plotters that use HP disposable print cartridge technology. Welcome Welcome An Introduction To Your Plotter's Main Features The HP DesignJet 700 and HP DesignJet 750C Plus are supplied with your plotter (a spare black cartridge is also included). WELCOME 700 750C Plus The HP DesignJet 700 will print only in color or black.
... Plotters are the E/A0-size model. a set of which are large-format inkjet plotters that use HP disposable print cartridge technology. Welcome Welcome An Introduction To Your Plotter's Main Features The HP DesignJet 700 and HP DesignJet 750C Plus are supplied with your plotter (a spare black cartridge is also included). WELCOME 700 750C Plus The HP DesignJet 700 will print only in color or black.

HP DesignJet 700 user guide
Page 19
Front View Window Print Cartridge(s) (Inside) ON/OFF Switch Welcome Front Panel Display Front Panel Media Lever Media-Entry Slot Roll Cover Media Bin 1835 xvii WELCOME
Front View Window Print Cartridge(s) (Inside) ON/OFF Switch Welcome Front Panel Display Front Panel Media Lever Media-Entry Slot Roll Cover Media Bin 1835 xvii WELCOME

HP DesignJet 700 user guide
Page 21
... Required 1-5 Task 2: Install Memory Expansion Modules (Optional) . . . . 1-6 Task 3: Switch On and Change the Language From English (Optional) . . . . 1-9 Task 4: Load Media 1-11 Task 5: Load the Print Cartridge(s 1-20 Task 6: Print a Demonstration Plot (Optional 1-24 Task 7: Connect the Plotter to Your Computer 1-27 Task 8: Configure the Interface (Serial interface users only) 1-29 Task...
... Required 1-5 Task 2: Install Memory Expansion Modules (Optional) . . . . 1-6 Task 3: Switch On and Change the Language From English (Optional) . . . . 1-9 Task 4: Load Media 1-11 Task 5: Load the Print Cartridge(s 1-20 Task 6: Print a Demonstration Plot (Optional 1-24 Task 7: Connect the Plotter to Your Computer 1-27 Task 8: Configure the Interface (Serial interface users only) 1-29 Task...
HP DesignJet 700 user guide
Page 22
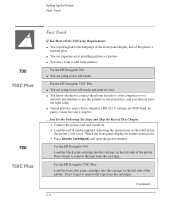
... cartridge. For the HP DesignJet 700: Load the black print-cartridge into the carriage on the left side of the plotter's internal plots. For the HP DesignJet 750C Plus: You are experienced at installing printers or plotters. Setting Up the Plotter Fast Track 700 750C Plus 700 750C Plus Fast... display for further instructions. 3 Press Access Cartridge(s) and open the plotter window. For the HP DesignJet 700: You are 9600 baud, no parity, 8 data bits and 1 stop bit. ... For the HP DesignJet 750C Plus: Load the four color print-cartridges into the carriage on the label inside the...
... cartridge. For the HP DesignJet 700: Load the black print-cartridge into the carriage on the left side of the plotter's internal plots. For the HP DesignJet 750C Plus: You are experienced at installing printers or plotters. Setting Up the Plotter Fast Track 700 750C Plus 700 750C Plus Fast... display for further instructions. 3 Press Access Cartridge(s) and open the plotter window. For the HP DesignJet 700: You are 9600 baud, no parity, 8 data bits and 1 stop bit. ... For the HP DesignJet 750C Plus: Load the four color print-cartridges into the carriage on the label inside the...

HP DesignJet 700 user guide
Page 23
For AutoCAD or Microsoft Windows applications, the driver is shipped with the plotter. SETUP 1 Setting Up the Plotter Fast Track 4 Close the plotter's window and let the plotter run its automatic cartridge-alignment procedure. 5 Switch off the plotter and your computer, connect the interface cable, and then switch them on again. 6 Choose your software vendor. 1-3 For other applications, see page 1-38 for advice, and, if necessary, contact your driver disk(s), read the instructions on the label, and follow any printed instructions accompanying the disks.
For AutoCAD or Microsoft Windows applications, the driver is shipped with the plotter. SETUP 1 Setting Up the Plotter Fast Track 4 Close the plotter's window and let the plotter run its automatic cartridge-alignment procedure. 5 Switch off the plotter and your computer, connect the interface cable, and then switch them on again. 6 Choose your software vendor. 1-3 For other applications, see page 1-38 for advice, and, if necessary, contact your driver disk(s), read the instructions on the label, and follow any printed instructions accompanying the disks.

HP DesignJet 700 user guide
Page 24
... already have all the items required. 2 Install memory expansion modules (Optional). 3 Switch on and change the language from English (Optional). 4 Load media. 5 Load the print-cartridge(s). 6 Print the demonstration plot (Optional). 7 Connect the plotter to your computer. 8 Configure the interface (Serial interface users only). 9 Set up the plotter, using the checklist...
... already have all the items required. 2 Install memory expansion modules (Optional). 3 Switch on and change the language from English (Optional). 4 Load media. 5 Load the print-cartridge(s). 6 Print the demonstration plot (Optional). 7 Connect the plotter to your computer. 8 Configure the interface (Serial interface users only). 9 Set up the plotter, using the checklist...

HP DesignJet 700 user guide
Page 25
...power cords (international options) are available. If necessary, contact your dealer or HP Sales and Support Office. Interface cable For details of HP Coated Paper (for the HP DesignJet 750C Plus) Print cartridge(s): 700 For the HP DesignJet 700: - One magenta - If you received any item in a damaged ...condition, notify the dealer or HP Sales and Support Office where you will also...
...power cords (international options) are available. If necessary, contact your dealer or HP Sales and Support Office. Interface cable For details of HP Coated Paper (for the HP DesignJet 750C Plus) Print cartridge(s): 700 For the HP DesignJet 700: - One magenta - If you received any item in a damaged ...condition, notify the dealer or HP Sales and Support Office where you will also...
HP DesignJet 700 user guide
Page 31
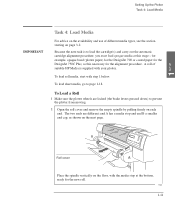
...1-11 Setting Up the Plotter Task 4: Load Media SETUP 1 IMPORTANT Task 4: Load Media For advice on the availability and use of suitable HP Media is to prevent the plotter from moving. 2 Open the roll cover and remove the empty spindle by pulling firmly on the floor, ... levers pressed down) to load the cartridge(s) and carry out the automatic cartridge alignment procedure, you must load opaque media at the bottom, ready for the alignment procedure. for example, opaque bond (plotter paper) for the DesignJet 700 or coated paper for the DesignJet 750C Plus, as shown on page 3-2. To ...
...1-11 Setting Up the Plotter Task 4: Load Media SETUP 1 IMPORTANT Task 4: Load Media For advice on the availability and use of suitable HP Media is to prevent the plotter from moving. 2 Open the roll cover and remove the empty spindle by pulling firmly on the floor, ... levers pressed down) to load the cartridge(s) and carry out the automatic cartridge alignment procedure, you must load opaque media at the bottom, ready for the alignment procedure. for example, opaque bond (plotter paper) for the DesignJet 700 or coated paper for the DesignJet 750C Plus, as shown on page 3-2. To ...
HP DesignJet 700 user guide
Page 40
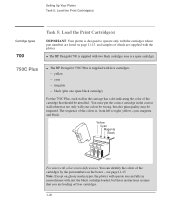
... not only will operate successfully in monochrome with two black cartridges (one spare black cartridge) For the 750C Plus, each stall in the carriage has a dot indicating the color of which are loading all four cartridges. 1-20 The HP DesignJet 700 is , from left to operate only with the cartridges whose part numbers are listed on page 11-15...
... not only will operate successfully in monochrome with two black cartridges (one spare black cartridge) For the 750C Plus, each stall in the carriage has a dot indicating the color of which are loading all four cartridges. 1-20 The HP DesignJet 700 is , from left to operate only with the cartridges whose part numbers are listed on page 11-15...
HP DesignJet 700 user guide
Page 41
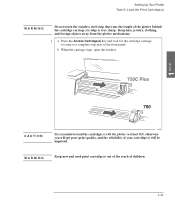
.... W A R N I O N 1849 It is very sharp. b When the carriage stops, open the window. 750C Plus 700 C A U T I N G Keep new and used print cartridge(s) out of the reach of the plotter behind the cartridge carriage; SETUP 1 Setting Up Your Plotter Task 5: Load the Print Cartridge(s) WARNING Do not touch the stainless steel strip that runs the length of...
.... W A R N I O N 1849 It is very sharp. b When the carriage stops, open the window. 750C Plus 700 C A U T I N G Keep new and used print cartridge(s) out of the reach of the plotter behind the cartridge carriage; SETUP 1 Setting Up Your Plotter Task 5: Load the Print Cartridge(s) WARNING Do not touch the stainless steel strip that runs the length of...
HP DesignJet 700 user guide
Page 42
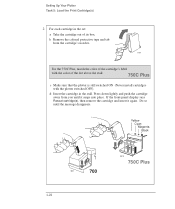
... Cartridge(s) 2 For each cartridge in the stall. d Insert the cartridge in the set: a Take the cartridge out of the dot above the stall. 750C Plus c Make sure that the plotter is still switched ON (Never install cartridges with the color of its box. Press down lightly and push the cartridge away from the cartridge's nozzles. 1754 For the 750C Plus, match the color...
... Cartridge(s) 2 For each cartridge in the stall. d Insert the cartridge in the set: a Take the cartridge out of the dot above the stall. 750C Plus c Make sure that the plotter is still switched ON (Never install cartridges with the color of its box. Press down lightly and push the cartridge away from the cartridge's nozzles. 1754 For the 750C Plus, match the color...

HP DesignJet 700 user guide
Page 43
You can throw away the small print produced during the cartridge alignment procedure. SETUP 1 1-23 When the front-panel displays STATUS / Ready, the procedure is complete. To make your cartridges last as long as possible, you should not remove them once they are loaded, never turn the plotter upside down, or ink will spill. Now that the cartridge(s) are installed, except to replace them. Setting Up Your Plotter Task 5: Load the Print Cartridge(s) C A U T I O N 3 When the cartridges are successfully installed, the plotter automatically runs the cartridge alignment procedure.
You can throw away the small print produced during the cartridge alignment procedure. SETUP 1 1-23 When the front-panel displays STATUS / Ready, the procedure is complete. To make your cartridges last as long as possible, you should not remove them once they are loaded, never turn the plotter upside down, or ink will spill. Now that the cartridge(s) are installed, except to replace them. Setting Up Your Plotter Task 5: Load the Print Cartridge(s) C A U T I O N 3 When the cartridges are successfully installed, the plotter automatically runs the cartridge alignment procedure.

HP DesignJet 700 user guide
Page 79
3 Choosing Media 3-2 Caring For Your Media 3-9 Loading Media 3-10 Unloading Media 3-22 Replacing Cartridge(s 3-26 Working With Media and Cartridge(s) 3-1 MEDIA AND 3 CARTRIDGES
3 Choosing Media 3-2 Caring For Your Media 3-9 Loading Media 3-10 Unloading Media 3-22 Replacing Cartridge(s 3-26 Working With Media and Cartridge(s) 3-1 MEDIA AND 3 CARTRIDGES


