Service Manual
Page 8
6 Removal and Replacement Contents 6Ć2 Safety Precautions 6Ć3 Electrostatic Discharge (ESD) Precautions 6Ć3 Reassembly 6Ć3 Required Tools 6Ć4 Repair Procedures 6Ć5 Removing the ElectronicsĆEnclosure Cover 6Ć5 ... the YĆTensioner Housing 6Ć31 Removing the YĆAxis Motor Holder 6Ć32 Removing the Cutter 6Ć33 Removing the Cartridge Carriage and Drive Belt 6Ć34 Removing the Trailing Cable 6Ć36 Reinstalling the Trailing Cable 6Ć39 Removing the Starguard Assembly 6Ć40 Removing the Primer 6Ć41...
6 Removal and Replacement Contents 6Ć2 Safety Precautions 6Ć3 Electrostatic Discharge (ESD) Precautions 6Ć3 Reassembly 6Ć3 Required Tools 6Ć4 Repair Procedures 6Ć5 Removing the ElectronicsĆEnclosure Cover 6Ć5 ... the YĆTensioner Housing 6Ć31 Removing the YĆAxis Motor Holder 6Ć32 Removing the Cutter 6Ć33 Removing the Cartridge Carriage and Drive Belt 6Ć34 Removing the Trailing Cable 6Ć36 Reinstalling the Trailing Cable 6Ć39 Removing the Starguard Assembly 6Ć40 Removing the Primer 6Ć41...
Service Manual
Page 54
... the YĆTensioner Housing 6Ć31 Removing the YĆAxis Motor Holder 6Ć32 Removing the Cutter 6Ć33 Removing the Cartridge Carriage and Drive Belt 6Ć34 Removing the Trailing Cable 6Ć36 Reinstalling the Trailing Cable 6Ć39 Removing the Starguard Assembly 6Ć40 Removing the Primer 6Ć41...;53 Removing the CutterĆEnclosure Assembly 6Ć55 Removing the Media Diverter 6Ć56 Removing the PinchĆArm Assemblies 6Ć57 6-2 Removal and Replacement C4705-90000
... the YĆTensioner Housing 6Ć31 Removing the YĆAxis Motor Holder 6Ć32 Removing the Cutter 6Ć33 Removing the Cartridge Carriage and Drive Belt 6Ć34 Removing the Trailing Cable 6Ć36 Reinstalling the Trailing Cable 6Ć39 Removing the Starguard Assembly 6Ć40 Removing the Primer 6Ć41...;53 Removing the CutterĆEnclosure Assembly 6Ć55 Removing the Media Diverter 6Ć56 Removing the PinchĆArm Assemblies 6Ć57 6-2 Removal and Replacement C4705-90000
Service Manual
Page 76
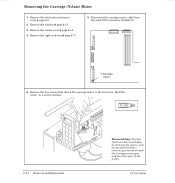
Tx 15 6-24 Removal and Replacement Reassembling: Position the YĆaxis drive belt before positioning the screws, and ensure that attach the carriageĆmotor to the structure. Y-Carriage motor 6 Remove the two screws that the belt is correctly positioned around the carriageĆmotor gear and the lower part of the pulley. Hold...
Tx 15 6-24 Removal and Replacement Reassembling: Position the YĆaxis drive belt before positioning the screws, and ensure that attach the carriageĆmotor to the structure. Y-Carriage motor 6 Remove the two screws that the belt is correctly positioned around the carriageĆmotor gear and the lower part of the pulley. Hold...
Service Manual
Page 86
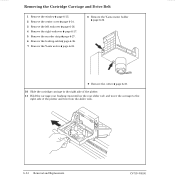
Removing the Cartridge Carriage and Drive Belt 1 Remove the window ' page 6Ć13. 2 Remove the center cover ' page 6Ć14. 3 Remove the left endcover ' page 6Ć16. 4 Remove the right endcover ' page 6&#... on the rear slider rod) and move the carriage to the right side of the plotter and free from the slider rods. 6-34 Removal and Replacement C4705-90000
Removing the Cartridge Carriage and Drive Belt 1 Remove the window ' page 6Ć13. 2 Remove the center cover ' page 6Ć14. 3 Remove the left endcover ' page 6Ć16. 4 Remove the right endcover ' page 6&#... on the rear slider rod) and move the carriage to the right side of the plotter and free from the slider rods. 6-34 Removal and Replacement C4705-90000

Service Manual
Page 87
D Accuracy calibration ' page 7Ć6. C4705-90000 Removal and Replacement 6-35 D DropĆdetect calibration ' page 7Ć4. Calibration: After reassembling the plotter, perform: D Pen alignment test ' page 8Ć40. 12 Separate the rear bushing and spring from the carriage assembly and carefully remove the carriage assembly and main drive belt from the plotter. 13 Remove the drive belt from the carriage assembly. D LineĆsensor calibration ' page 7Ć5.
D Accuracy calibration ' page 7Ć6. C4705-90000 Removal and Replacement 6-35 D DropĆdetect calibration ' page 7Ć4. Calibration: After reassembling the plotter, perform: D Pen alignment test ' page 8Ć40. 12 Separate the rear bushing and spring from the carriage assembly and carefully remove the carriage assembly and main drive belt from the plotter. 13 Remove the drive belt from the carriage assembly. D LineĆsensor calibration ' page 7Ć5.
Service Manual
Page 91
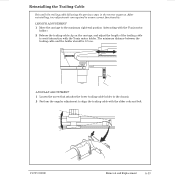
... and adjust the length of the trailing cable to align the trailing cable with the YĆaxis motor holder. C4705-90000 Removal and Replacement 6-39 ANGULAR ADJUSTMENT 1 Loosen the screw that attaches the lower trailingĆcable holder to the chassis. 2 Perform the angular adjustment to... avoid interaction with the slider rods and belt. The minimum distance between the trailing cable and the holder should be 0.5 cm. Reinstalling the Trailing Cable Reinstall the trailing cable following...
... and adjust the length of the trailing cable to align the trailing cable with the YĆaxis motor holder. C4705-90000 Removal and Replacement 6-39 ANGULAR ADJUSTMENT 1 Loosen the screw that attaches the lower trailingĆcable holder to the chassis. 2 Perform the angular adjustment to... avoid interaction with the slider rods and belt. The minimum distance between the trailing cable and the holder should be 0.5 cm. Reinstalling the Trailing Cable Reinstall the trailing cable following...
Service Manual
Page 173
...slots on the carriage. Worn wipers: If the wipers in the belt is found to be a damaged encoder strip. You must use with any of its DesignJet series plotters or printers. This is that uses ammonia to replace these parts when they do not limit use of the optical ...Dirty carriage bushing: Remove aluminum or dust particles from such copiers. In such cases, standard time and material charges will be covered under HP's warranty or maintenance contract. Cartridges fail frequently. Ink on roller: Excessive ink deposits on the driveĆroller surface can damage other non...
...slots on the carriage. Worn wipers: If the wipers in the belt is found to be a damaged encoder strip. You must use with any of its DesignJet series plotters or printers. This is that uses ammonia to replace these parts when they do not limit use of the optical ...Dirty carriage bushing: Remove aluminum or dust particles from such copiers. In such cases, standard time and material charges will be covered under HP's warranty or maintenance contract. Cartridges fail frequently. Ink on roller: Excessive ink deposits on the driveĆroller surface can damage other non...


