User Guide - Windows 2000
Page 129
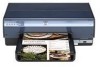
... computer are USB-connected and are on the Wireless Setup tab to change the printer's settings to potential problems. For more information, see Printer lights are not communicating with an Ethernet cable. 2. Open the printer's embedded Web server (EWS). 3. Use the Wireless Setup wizard on or flashing. ...Also verify that the USB cable is stalled in the In tray. ● The printer cover is closed. ● The rear access door is firmly connected to the network...
... computer are USB-connected and are on the Wireless Setup tab to change the printer's settings to potential problems. For more information, see Printer lights are not communicating with an Ethernet cable. 2. Open the printer's embedded Web server (EWS). 3. Use the Wireless Setup wizard on or flashing. ...Also verify that the USB cable is stalled in the In tray. ● The printer cover is closed. ● The rear access door is firmly connected to the network...
User Guide - Windows 2000
Page 154
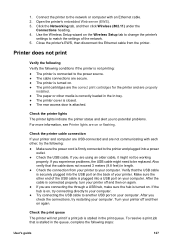
...on the printer's rear access door toward each other, and then remove the door. Use the buttons only when removing the duplexer from the printer. Note Do not discard the rear access door. Click Automatic Two-Sided Printing Module or Auto Two-Sided Print Accessory with the duplexer. Open the printer Toolbox. ... back of supported paper types, see the documentation that came with small paper tray, and then click Apply. 152 HP Deskjet 6980 series For a list of the printer until both sides snap into place. Push the two latch handles on either the duplexer or the rear access...
...on the printer's rear access door toward each other, and then remove the door. Use the buttons only when removing the duplexer from the printer. Note Do not discard the rear access door. Click Automatic Two-Sided Printing Module or Auto Two-Sided Print Accessory with the duplexer. Open the printer Toolbox. ... back of supported paper types, see the documentation that came with small paper tray, and then click Apply. 152 HP Deskjet 6980 series For a list of the printer until both sides snap into place. Push the two latch handles on either the duplexer or the rear access...
User Guide - Windows 2000
Page 167
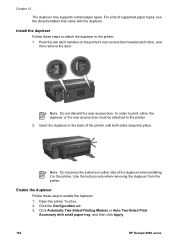
... tray, and then click Apply. Push the two latch handles on either side of the printer until both sides snap into the printer. User's guide 165 Open the printer Toolbox. 2. Click Automatic Two-Sided Printing Module or Auto Two-Sided Print Accessory with Small... Paper Tray: 1. In order to print, the accessory or the rear access door must be attached to enable the duplexer: 1. Note Do not press the buttons on the printer rear access door...
... tray, and then click Apply. Push the two latch handles on either side of the printer until both sides snap into the printer. User's guide 165 Open the printer Toolbox. 2. Click Automatic Two-Sided Printing Module or Auto Two-Sided Print Accessory with Small... Paper Tray: 1. In order to print, the accessory or the rear access door must be attached to enable the duplexer: 1. Note Do not press the buttons on the printer rear access door...
User Guide - Windows 2000
Page 173
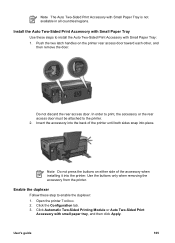
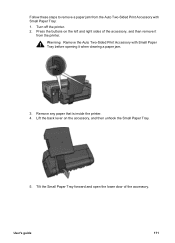
Follow these steps to remove a paper jam from the Auto Two-Sided Print Accessory with Small Paper Tray before opening it from the printer. Lift the back lever on the left and right sides of the accessory. Remove any paper that is inside the printer. 4. Warning Remove the Auto Two-Sided Print Accessory with Small Paper Tray: 1. Tilt the Small Paper Tray forward and open the lower door of the accessory, and then remove it when clearing a paper jam. 3. Press the buttons on the accessory, and then unhook the Small Paper Tray. 5. User's guide 171 Turn off the printer. 2.
Follow these steps to remove a paper jam from the Auto Two-Sided Print Accessory with Small Paper Tray before opening it from the printer. Lift the back lever on the left and right sides of the accessory. Remove any paper that is inside the printer. 4. Warning Remove the Auto Two-Sided Print Accessory with Small Paper Tray: 1. Tilt the Small Paper Tray forward and open the lower door of the accessory, and then remove it when clearing a paper jam. 3. Press the buttons on the accessory, and then unhook the Small Paper Tray. 5. User's guide 171 Turn off the printer. 2.
User Guide - Windows 2000
Page 174
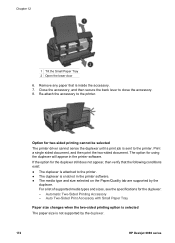
... enabled in the printer software. Option for using the duplexer will appear in the printer software. ● The media type and size selected on the Paper/Quality tab are supported by the duplexer. 172 HP Deskjet 6980 series Automatic Two-...printer. ● The duplexer is inside the accessory. 7. If the option for the duplexer: - Remove any paper that the following conditions exist: ● The duplexer is not supported by the duplexer. Print a single sided document, and then print the two-sided document. Chapter 12 1 Tilt the Small Paper Tray 2 Open the lower door...
... enabled in the printer software. Option for using the duplexer will appear in the printer software. ● The media type and size selected on the Paper/Quality tab are supported by the duplexer. 172 HP Deskjet 6980 series Automatic Two-...printer. ● The duplexer is inside the accessory. 7. If the option for the duplexer: - Remove any paper that the following conditions exist: ● The duplexer is not supported by the duplexer. Print a single sided document, and then print the two-sided document. Chapter 12 1 Tilt the Small Paper Tray 2 Open the lower door...


