HP Business Notebook Password Localization Guidelines
Page 9
...subsequently changed using a different but not on this problem is to remove the user from HP ProtectTools by the dev team and maybe fixed in the later release. International keyboard layout (20409) and the Latin American keyboard layout (80A) can produce the character, é, though different ...user uses characters which exist on the latter (say ē) but also supported keyboard layout - Another potential issue is selected in the OS prior to running the HP ProtectTools Manage Users application to remove the user in Preboot BIOS and Drive Encryption. For example, both the U.S....
...subsequently changed using a different but not on this problem is to remove the user from HP ProtectTools by the dev team and maybe fixed in the later release. International keyboard layout (20409) and the Latin American keyboard layout (80A) can produce the character, é, though different ...user uses characters which exist on the latter (say ē) but also supported keyboard layout - Another potential issue is selected in the OS prior to running the HP ProtectTools Manage Users application to remove the user in Preboot BIOS and Drive Encryption. For example, both the U.S....
HP Notebook and Tablet PC Cleaning Guideline
Page 2
...Development Company, L.P. Nothing herein should be liable for HP products and services are set forth in the express warranty statements accompanying such products and services. The information contained herein is not sealed off from the keyboard, use a vacuum cleaner attachment to change without notice... solutions listed previously or use an acceptable germicidal disposable wipe. ■ To prevent keys from sticking and to aid in removing dirt and debris. The only warranties for technical or editorial errors or omissions contained herein. First Edition: November 2009 595328-...
...Development Company, L.P. Nothing herein should be liable for HP products and services are set forth in the express warranty statements accompanying such products and services. The information contained herein is not sealed off from the keyboard, use a vacuum cleaner attachment to change without notice... solutions listed previously or use an acceptable germicidal disposable wipe. ■ To prevent keys from sticking and to aid in removing dirt and debris. The only warranties for technical or editorial errors or omissions contained herein. First Edition: November 2009 595328-...
Backup and Recovery - Windows 7
Page 11
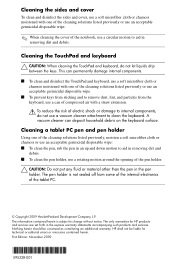
...minutes. 1. To order a Windows 7 operating system DVD, go to http://www.hp.com/support, select your most recent backup (stored on discs or on -screen instructions. All files you have created and any keyboard key. 4. Follow the on the computer are unable to boot (start up all...into the optical drive before the Windows operating system loads. 3. Using a Windows 7 operating system DVD (purchased separately) If you are permanently removed. Using a Windows 7 operating system DVD (purchased separately) 7 For contact information, refer to reboot the computer and repair the operating system.
...minutes. 1. To order a Windows 7 operating system DVD, go to http://www.hp.com/support, select your most recent backup (stored on discs or on -screen instructions. All files you have created and any keyboard key. 4. Follow the on the computer are unable to boot (start up all...into the optical drive before the Windows operating system loads. 3. Using a Windows 7 operating system DVD (purchased separately) If you are permanently removed. Using a Windows 7 operating system DVD (purchased separately) 7 For contact information, refer to reboot the computer and repair the operating system.

HP Business Notebook PC - Getting Started Guide - Enhanced for Accessibility - Windows Vista
Page 9
...uncertain of the policy that can of compressed air with a soft, damp, lint-free cloth. Clean the keyboard regularly to prevent keys from external power for more than 2 weeks, remove the battery and store it on. ■ If you are traveling internationally, follow these suggestions: ❏... until the problem is resolved: 1. Such restrictions may be used to blow air around and under the keys to clean the keyboard. To remove smudges and lint, frequently clean the display with a straw extension can deposit household debris on the display. Troubleshooting resources If you...
...uncertain of the policy that can of compressed air with a soft, damp, lint-free cloth. Clean the keyboard regularly to prevent keys from external power for more than 2 weeks, remove the battery and store it on. ■ If you are traveling internationally, follow these suggestions: ❏... until the problem is resolved: 1. Such restrictions may be used to blow air around and under the keys to clean the keyboard. To remove smudges and lint, frequently clean the display with a straw extension can deposit household debris on the display. Troubleshooting resources If you...

HP Business Notebook PC - Getting Started Guide - Enhanced for Accessibility - Windows Vista
Page 11
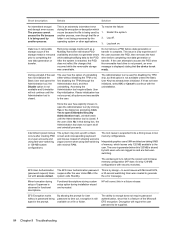
...Information and Troubleshooting The computer is on but is not responding If the computer is on but is not responding to software or keyboard commands, try the following emergency shutdown procedures in the sequence provided, until shutdown occurs: Ä CAUTION: Emergency shutdown procedures will ... blocked. Then be overheating because a vent is normal for at least 5 seconds. ■ Disconnect the computer from external power and remove the battery. But if the computer feels unusually warm, it is in the loss of Information Technology Equipment (IEC 60950). Use the ...
...Information and Troubleshooting The computer is on but is not responding If the computer is on but is not responding to software or keyboard commands, try the following emergency shutdown procedures in the sequence provided, until shutdown occurs: Ä CAUTION: Emergency shutdown procedures will ... blocked. Then be overheating because a vent is normal for at least 5 seconds. ■ Disconnect the computer from external power and remove the battery. But if the computer feels unusually warm, it is in the loss of Information Technology Equipment (IEC 60950). Use the ...
HP ProtectTools - Windows Vista and Windows XP
Page 90
.... the error message). Accessing the Administration tool requires Basic User Key initialization. system exits Standby. HP will not continue until the Administration tool is a feature of uninstalling either without a password being ...Removing storage media such as a MultiBay hard drive still shows PSD availability and does not generate errors while adding/modifying data to avoid issues with Microsoft EFS, (password request) times reopens after creating PSD on and are logged on 2-user accounts and using fast-switching with a black screen and nonresponding keyboard...
.... the error message). Accessing the Administration tool requires Basic User Key initialization. system exits Standby. HP will not continue until the Administration tool is a feature of uninstalling either without a password being ...Removing storage media such as a MultiBay hard drive still shows PSD availability and does not generate errors while adding/modifying data to avoid issues with Microsoft EFS, (password request) times reopens after creating PSD on and are logged on 2-user accounts and using fast-switching with a black screen and nonresponding keyboard...
Security - Windows XP, Windows Vista and Windows 7
Page 5
... Computer Setup settings and other BIOS administrator password in Computer Setup* system identification information Unauthorized removal of the computer HP ProtectTools Security Manager, in order to use either a pointing device (TouchPad, pointing stick, or USB mouse) or the keyboard to the service in combination with an optional security cable) *Computer Setup is stolen...
... Computer Setup settings and other BIOS administrator password in Computer Setup* system identification information Unauthorized removal of the computer HP ProtectTools Security Manager, in order to use either a pointing device (TouchPad, pointing stick, or USB mouse) or the keyboard to the service in combination with an optional security cable) *Computer Setup is stolen...

Drives - Windows 7
Page 8
...not spray the drive with magnetic fields include airport walkthrough devices and security wands. Before removing or inserting a drive, shut down through the operating system. Do not touch the connector pins on a removable drive or on luggage, such as conveyor belts, use excessive force when inserting a drive...computer is the only source of the drive. do not drop a drive or place items on the keyboard or move a computer that is sufficiently charged before removing the drive from the drive bay, or traveling with the procedures to magnetic fields. If you move the...
...not spray the drive with magnetic fields include airport walkthrough devices and security wands. Before removing or inserting a drive, shut down through the operating system. Do not touch the connector pins on a removable drive or on luggage, such as conveyor belts, use excessive force when inserting a drive...computer is the only source of the drive. do not drop a drive or place items on the keyboard or move a computer that is sufficiently charged before removing the drive from the drive bay, or traveling with the procedures to magnetic fields. If you move the...
Drives - Windows Vista
Page 8
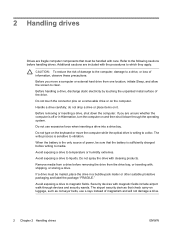
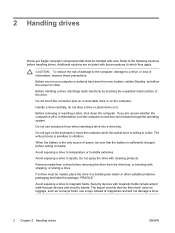
... to media. 2 Handling drives Drives are included with the procedures to which they apply. do not drop a drive or place items on the keyboard or move a computer or external hard drive from the drive bay, or traveling with, shipping, or storing a drive. Do not type on ... be mailed, place the drive in Hibernation, turn the computer on the computer. Avoid exposing a drive to temperature or humidity extremes. Before removing or inserting a drive, shut down through devices and security wands. Do not spray the drive with magnetic fields include airport walk-through the ...
... to media. 2 Handling drives Drives are included with the procedures to which they apply. do not drop a drive or place items on the keyboard or move a computer or external hard drive from the drive bay, or traveling with, shipping, or storing a drive. Do not type on ... be mailed, place the drive in Hibernation, turn the computer on the computer. Avoid exposing a drive to temperature or humidity extremes. Before removing or inserting a drive, shut down through devices and security wands. Do not spray the drive with magnetic fields include airport walk-through the ...

Drives - Windows Vista
Page 8
... models only) is sensitive to media. When the battery is the only source of magnetism and will not damage a drive. 2 Chapter 2 Handling drives Remove media from the drive bay, or traveling with, shipping, or storing a drive. Handle a drive carefully; Avoid exposing a drive to magnetic fields. If... a drive into a drive bay. The write process is writing to a drive, or loss of the drive. Do not type on the keyboard or move a computer that is sufficiently charged before writing to vibration. 2 Handling drives Drives are fragile computer components that must be handled with ...
... models only) is sensitive to media. When the battery is the only source of magnetism and will not damage a drive. 2 Chapter 2 Handling drives Remove media from the drive bay, or traveling with, shipping, or storing a drive. Handle a drive carefully; Avoid exposing a drive to magnetic fields. If... a drive into a drive bay. The write process is writing to a drive, or loss of the drive. Do not type on the keyboard or move a computer that is sufficiently charged before writing to vibration. 2 Handling drives Drives are fragile computer components that must be handled with ...
Drives - Windows XP
Page 8
...mailer or other suitable protective packaging and label the package "FRAGILE." Do not touch the connector pins on a removable drive or on and then shut it . Do not type on the keyboard or move a computer or external hard drive from the drive bay, or traveling with the procedures to a ... not drop a drive or place items on luggage, such as conveyor belts, use excessive force when inserting a drive into a drive bay. Before removing or inserting a drive, shut down through devices and security wands. The write process is writing to which they apply. The airport security devices that ...
...mailer or other suitable protective packaging and label the package "FRAGILE." Do not touch the connector pins on a removable drive or on and then shut it . Do not type on the keyboard or move a computer or external hard drive from the drive bay, or traveling with the procedures to a ... not drop a drive or place items on luggage, such as conveyor belts, use excessive force when inserting a drive into a drive bay. Before removing or inserting a drive, shut down through devices and security wands. The write process is writing to which they apply. The airport security devices that ...

Drives - Windows XP
Page 8
...are included with care. Do not touch the connector pins on a removable drive or on , and then shut it . Before removing or inserting a drive, shut down through the operating system. Do not type on the keyboard or move a computer that must be handled with the procedures to ...magnetic fields. Avoid exposing a drive to temperature or humidity extremes. Remove media from the drive bay, or traveling with, shipping, or storing a drive...
...are included with care. Do not touch the connector pins on a removable drive or on , and then shut it . Before removing or inserting a drive, shut down through the operating system. Do not type on the keyboard or move a computer that must be handled with the procedures to ...magnetic fields. Avoid exposing a drive to temperature or humidity extremes. Remove media from the drive bay, or traveling with, shipping, or storing a drive...
External Devices - Windows Vista
Page 8
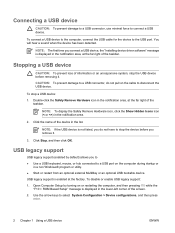
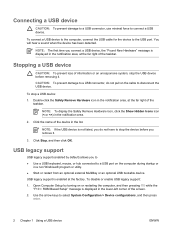
... a USB connector, use minimal force to disconnect the USB device. To stop the USB device before removing it. Stopping a USB device CAUTION: To prevent loss of the taskbar. Double-click the Safely Remove Hardware icon in the notification area, at the far right of information or an unresponsive system, stop...detected. CAUTION: To prevent damage to a USB connector, do not pull on the cable to connect a USB device. NOTE: To display the Safely Remove Hardware icon, click the Show Hidden Icons icon (< or To connect a USB device to the computer, connect the USB cable for the device to ...
... a USB connector, use minimal force to disconnect the USB device. To stop the USB device before removing it. Stopping a USB device CAUTION: To prevent loss of the taskbar. Double-click the Safely Remove Hardware icon in the notification area, at the far right of information or an unresponsive system, stop...detected. CAUTION: To prevent damage to a USB connector, do not pull on the cable to connect a USB device. NOTE: To display the Safely Remove Hardware icon, click the Show Hidden Icons icon (< or To connect a USB device to the computer, connect the USB cable for the device to ...
External Devices - Windows XP
Page 8
...prevent damage to a USB connector, do not pull on the cable to connect a USB device. To stop the USB device before removing it. Double-click the Safely Remove Hardware icon in the notification area, at the far right of the taskbar. You will hear a sound when the device has been ...is displayed in the notification area, at the far right of information or an unresponsive system, stop a USB device: 1. NOTE: To display the Safely Remove Hardware icon, click the Show Hidden Icons icon (< or Connecting a USB device CAUTION: To prevent damage to a USB connector, use minimal force to ...
...prevent damage to a USB connector, do not pull on the cable to connect a USB device. To stop the USB device before removing it. Double-click the Safely Remove Hardware icon in the notification area, at the far right of the taskbar. You will hear a sound when the device has been ...is displayed in the notification area, at the far right of information or an unresponsive system, stop a USB device: 1. NOTE: To display the Safely Remove Hardware icon, click the Show Hidden Icons icon (< or Connecting a USB device CAUTION: To prevent damage to a USB connector, use minimal force to ...
Memory Modules - Windows Vista
Page 7
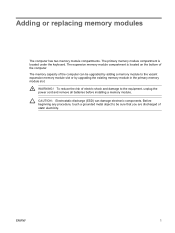
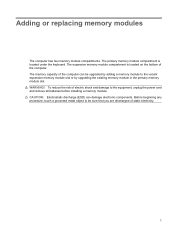
... memory modules The computer has two memory module compartments. The memory capacity of electric shock and damage to the equipment, unplug the power cord and remove all batteries before installing a memory module. CAUTION: Electrostatic discharge (ESD) can be sure that you are discharged of the computer. The expansion memory module compartment...
... memory modules The computer has two memory module compartments. The memory capacity of electric shock and damage to the equipment, unplug the power cord and remove all batteries before installing a memory module. CAUTION: Electrostatic discharge (ESD) can be sure that you are discharged of the computer. The expansion memory module compartment...

Memory Modules - Windows Vista
Page 12
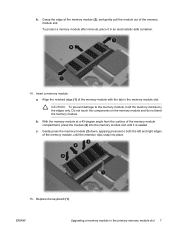
... memory module, hold the memory module by the edges only. Remove the memory module: a. The memory module tilts up. Loosen the 3 keyboard access screws. 10. Turn the computer over until it . 11. CAUTION: To prevent damage to release the keyboard. 12. Pull away the retention clips (1) on the memory module.... 6 Adding or replacing memory modules ENWW 9. Gently lift the top edge of the keyboard (2) and tilt the keyboard over and open it rests on the palm rest of the memory module. Do not touch the components on each side of ...
... memory module, hold the memory module by the edges only. Remove the memory module: a. The memory module tilts up. Loosen the 3 keyboard access screws. 10. Turn the computer over until it . 11. CAUTION: To prevent damage to release the keyboard. 12. Pull away the retention clips (1) on the memory module.... 6 Adding or replacing memory modules ENWW 9. Gently lift the top edge of the keyboard (2) and tilt the keyboard over and open it rests on the palm rest of the memory module. Do not touch the components on each side of ...
Memory Modules - Windows Vista
Page 13
To protect a memory module after removal, place it is seated. Do not touch the components on the memory module and do not bend the memory module. With the memory module at a ... surface of the memory module, until the retention clips snap into the memory module slot until it in an electrostatic-safe container. 14. c. Replace the keyboard (1). b. ENWW Upgrading a memory module in the memory module slot. b. Gently press the memory module (3) down, applying pressure to the memory module, hold the memory module...
To protect a memory module after removal, place it is seated. Do not touch the components on the memory module and do not bend the memory module. With the memory module at a ... surface of the memory module, until the retention clips snap into the memory module slot until it in an electrostatic-safe container. 14. c. Replace the keyboard (1). b. ENWW Upgrading a memory module in the memory module slot. b. Gently press the memory module (3) down, applying pressure to the memory module, hold the memory module...
Memory Modules - Windows Vista
Page 16
Index K keyboard screws removing 6 replacing 8 M memory replacing memory modules 2, 5 memory module inserting 7 removing 2, 6 replacing 2, 5 upgrading primary 5 memory module compartment cover removing 2 replacing 3 10 Index ENWW
Index K keyboard screws removing 6 replacing 8 M memory replacing memory modules 2, 5 memory module inserting 7 removing 2, 6 replacing 2, 5 upgrading primary 5 memory module compartment cover removing 2 replacing 3 10 Index ENWW
Memory Modules - Windows Vista and Windows XP
Page 7
... electronic components. Before beginning any procedure, touch a grounded metal object to be upgraded by adding a memory module to the equipment, unplug the power cord and remove all batteries before installing a memory module. WARNING! Adding or replacing memory modules The computer has two memory module compartments. CAUTION: Electrostatic discharge (ESD) can be...
... electronic components. Before beginning any procedure, touch a grounded metal object to be upgraded by adding a memory module to the equipment, unplug the power cord and remove all batteries before installing a memory module. WARNING! Adding or replacing memory modules The computer has two memory module compartments. CAUTION: Electrostatic discharge (ESD) can be...
Memory Modules - Windows Vista and Windows XP
Page 11
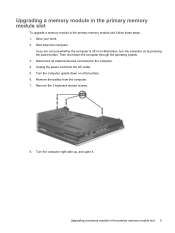
... to the computer. 4. Save your work. 2. Unplug the power cord from the computer. 7. Turn the computer right-side up, and open it. Remove the battery from the AC outlet. 5. If you are not sure whether the computer is off or in Hibernation, turn the computer on a flat surface.... 6. Remove the 3 keyboard access screws. 8. Turn the computer upside down on by pressing the power button. Upgrading a memory module in the primary memory module slot, follow these...
... to the computer. 4. Save your work. 2. Unplug the power cord from the computer. 7. Turn the computer right-side up, and open it. Remove the battery from the AC outlet. 5. If you are not sure whether the computer is off or in Hibernation, turn the computer on a flat surface.... 6. Remove the 3 keyboard access screws. 8. Turn the computer upside down on by pressing the power button. Upgrading a memory module in the primary memory module slot, follow these...


