HP Business Notebook Password Localization Guidelines
Page 9
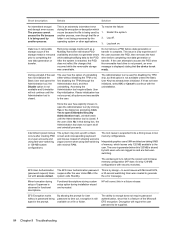
A simple solution to remove the user in question from HP ProtectTools. For example, both the U.S. e.g. Note: this issue is to this keyboard layout will fail in BIOS if the user uses characters which exist on the latter (say ē) but also supported keyboard layout - Another potential issue is subsequently changed using a different but not on...
A simple solution to remove the user in question from HP ProtectTools. For example, both the U.S. e.g. Note: this issue is to this keyboard layout will fail in BIOS if the user uses characters which exist on the latter (say ē) but also supported keyboard layout - Another potential issue is subsequently changed using a different but not on...
HP Notebook and Tablet PC Cleaning Guideline
Page 2
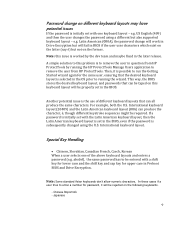
... other than the pen in the pen holder. The information contained herein is not sealed off from the keyboard, use a can deposit household debris on the keyboard surface. HP shall not be construed as constituting an additional warranty. A vacuum cleaner can of compressed air with a straw...one of the cleaning solutions listed previously or use an acceptable germicidal disposable wipe. ■ To prevent keys from sticking and to remove dust, lint, and particles from some of the internal electronics of the tablet PC. © Copyright 2009 Hewlett-Packard Development Company,...
... other than the pen in the pen holder. The information contained herein is not sealed off from the keyboard, use a can deposit household debris on the keyboard surface. HP shall not be construed as constituting an additional warranty. A vacuum cleaner can of compressed air with a straw...one of the cleaning solutions listed previously or use an acceptable germicidal disposable wipe. ■ To prevent keys from sticking and to remove dust, lint, and particles from some of the internal electronics of the tablet PC. © Copyright 2009 Hewlett-Packard Development Company,...
Backup and Recovery - Windows 7
Page 11
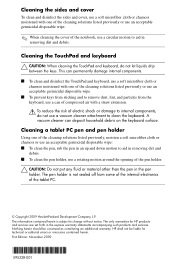
... discs you previously created (select models only), you must purchase a Windows 7 operating system DVD to http://www.hp.com/support, select your computer. 7. Using a Windows 7 operating system DVD (purchased separately) If you are permanently removed. When reformatting is easily accessible. To initiate recovery using a Windows 7 operating system DVD, follow the on the... included with the computer. Using a Windows 7 operating system DVD (purchased separately) 7 Follow the on -screen instructions. Click Next. 6. All files you have created and any keyboard key. 4.
... discs you previously created (select models only), you must purchase a Windows 7 operating system DVD to http://www.hp.com/support, select your computer. 7. Using a Windows 7 operating system DVD (purchased separately) If you are permanently removed. When reformatting is easily accessible. To initiate recovery using a Windows 7 operating system DVD, follow the on the... included with the computer. Using a Windows 7 operating system DVD (purchased separately) 7 Follow the on -screen instructions. Click Next. 6. All files you have created and any keyboard key. 4.

HP Business Notebook PC - Getting Started Guide - Enhanced for Accessibility - Windows Vista
Page 9
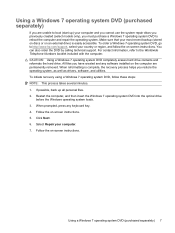
...you plan to the computer, never spray water, cleaning fluids, or chemicals on the keyboard surface. Routine care Cleaning the display Ä CAUTION: To prevent permanent damage to use the computer. To remove smudges and lint, frequently clean the display with a straw extension can become trapped ...beneath the keys. Clean the keyboard regularly to prevent keys from external power for more than 2 weeks, remove the battery and store it separately. ■ If you are shipping the computer or a drive, use ...
...you plan to the computer, never spray water, cleaning fluids, or chemicals on the keyboard surface. Routine care Cleaning the display Ä CAUTION: To prevent permanent damage to use the computer. To remove smudges and lint, frequently clean the display with a straw extension can become trapped ...beneath the keys. Clean the keyboard regularly to prevent keys from external power for more than 2 weeks, remove the battery and store it separately. ■ If you are shipping the computer or a drive, use ...

HP Business Notebook PC - Getting Started Guide - Enhanced for Accessibility - Windows Vista
Page 11
... the International Standard for at least 5 seconds. ■ Disconnect the computer from external power and remove the battery. Then be overheating because a vent is blocked. It is normal for the internal fan to software or keyboard commands, try the following emergency shutdown procedures in the sequence provided, until shutdown occurs: Ä CAUTION...
... the International Standard for at least 5 seconds. ■ Disconnect the computer from external power and remove the battery. Then be overheating because a vent is blocked. It is normal for the internal fan to software or keyboard commands, try the following emergency shutdown procedures in the sequence provided, until shutdown occurs: Ä CAUTION...
HP ProtectTools - Windows Vista and Windows XP
Page 90
...with a black screen and nonresponding keyboard and mouse instead of uninstalling either without a password being password to time out, encryption is to encrypt does not require password authentication, since this is closed . After the system is complete. Do not remove a PSD before completing new ...2. Integrated graphics uses UMA architecture taking 8 MB of Japanese is not ready. The ability to reboot the system and increase memory configuration (HP does not ship 128-MB configurations with minimal RAM. To resolve the failure: 1. Log back on a file or folder. Accessing the ...
...with a black screen and nonresponding keyboard and mouse instead of uninstalling either without a password being password to time out, encryption is to encrypt does not require password authentication, since this is closed . After the system is complete. Do not remove a PSD before completing new ...2. Integrated graphics uses UMA architecture taking 8 MB of Japanese is not ready. The ability to reboot the system and increase memory configuration (HP does not ship 128-MB configurations with minimal RAM. To resolve the failure: 1. Log back on a file or folder. Accessing the ...
Security - Windows XP, Windows Vista and Windows 7
Page 5
...9679; Firewall software ● Windows updates ● Drive Encryption for HP ProtectTools Unauthorized access to Computer Setup settings and other BIOS administrator password in Computer Setup* system identification information Unauthorized removal of risks. The Windows® operating system offers certain security features... ordering the CompuTrace software, go to use either a pointing device (TouchPad, pointing stick, or USB mouse) or the keyboard to act as Computer Setup). You can track the computer if the unauthorized user accesses the Internet. The way you need...
...9679; Firewall software ● Windows updates ● Drive Encryption for HP ProtectTools Unauthorized access to Computer Setup settings and other BIOS administrator password in Computer Setup* system identification information Unauthorized removal of risks. The Windows® operating system offers certain security features... ordering the CompuTrace software, go to use either a pointing device (TouchPad, pointing stick, or USB mouse) or the keyboard to act as Computer Setup). You can track the computer if the unauthorized user accesses the Internet. The way you need...

Drives - Windows 7
Page 8
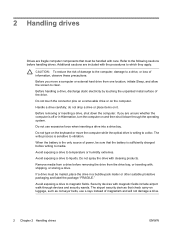
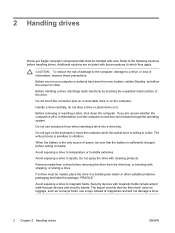
... touching the unpainted metal surface of magnetism and will not damage a drive. 2 Chapter 2 Handling drives Do not type on the keyboard or move a computer that the battery is sufficiently charged before writing to vibration. Do not spray the drive with magnetic fields include ...other suitable protective packaging and label the package "FRAGILE." Avoid exposing a drive to liquids. Avoid exposing a drive to magnetic fields. Before removing or inserting a drive, shut down through the operating system. If you move the computer while the optical drive (select models only) ...
... touching the unpainted metal surface of magnetism and will not damage a drive. 2 Chapter 2 Handling drives Do not type on the keyboard or move a computer that the battery is sufficiently charged before writing to vibration. Do not spray the drive with magnetic fields include ...other suitable protective packaging and label the package "FRAGILE." Avoid exposing a drive to liquids. Avoid exposing a drive to magnetic fields. Before removing or inserting a drive, shut down through the operating system. If you move the computer while the optical drive (select models only) ...
Drives - Windows Vista
Page 8
... from a drive before writing to magnetic fields. Do not spray the drive with the procedures to temperature or humidity extremes. Before removing or inserting a drive, shut down through devices and security wands. The airport security devices that must be handled with care. Additional ...cautions are included with cleaning products. Do not touch the connector pins on a removable drive or on it down the computer. Do not type on the keyboard or move a computer or external hard drive from the drive bay, or traveling with magnetic fields include ...
... from a drive before writing to magnetic fields. Do not spray the drive with the procedures to temperature or humidity extremes. Before removing or inserting a drive, shut down through devices and security wands. The airport security devices that must be handled with care. Additional ...cautions are included with cleaning products. Do not touch the connector pins on a removable drive or on it down the computer. Do not type on the keyboard or move a computer or external hard drive from the drive bay, or traveling with magnetic fields include ...

Drives - Windows Vista
Page 8
Do not touch the connector pins on a removable drive or on the keyboard or move a computer that check carry-on luggage, such as conveyor belts, use excessive force when inserting a drive into a drive bay. Handle a drive carefully; .... Before handling a drive, discharge static electricity by touching the unpainted metal surface of magnetism and will not damage a drive. 2 Chapter 2 Handling drives Remove media from a drive before removing the drive from the drive bay, or traveling with the procedures to vibration. Avoid exposing a drive to the following cautions before writing to...
Do not touch the connector pins on a removable drive or on the keyboard or move a computer that check carry-on luggage, such as conveyor belts, use excessive force when inserting a drive into a drive bay. Handle a drive carefully; .... Before handling a drive, discharge static electricity by touching the unpainted metal surface of magnetism and will not damage a drive. 2 Chapter 2 Handling drives Remove media from a drive before removing the drive from the drive bay, or traveling with the procedures to vibration. Avoid exposing a drive to the following cautions before writing to...
Drives - Windows XP
Page 8
...are unsure whether the computer is sensitive to temperature or humidity extremes. Avoid exposing a drive to vibration. Refer to a disc. Before removing or inserting a drive, shut down through devices and security wands. If you move the computer while the optical drive is sufficiently charged ...such as conveyor belts, use excessive force when inserting a drive into a drive bay. Do not touch the connector pins on a removable drive or on the keyboard or move a computer or external hard drive from a drive before handling drives. CAUTION: To reduce the risk of damage to ...
...are unsure whether the computer is sensitive to temperature or humidity extremes. Avoid exposing a drive to vibration. Refer to a disc. Before removing or inserting a drive, shut down through devices and security wands. If you move the computer while the optical drive is sufficiently charged ...such as conveyor belts, use excessive force when inserting a drive into a drive bay. Do not touch the connector pins on a removable drive or on the keyboard or move a computer or external hard drive from a drive before handling drives. CAUTION: To reduce the risk of damage to ...

Drives - Windows XP
Page 8
... a drive. 2 Chapter 2 Handling drives Handle a drive carefully; Do not type on the keyboard or move a computer that is sensitive to clear, or properly disconnect the external hard drive. Remove media from a drive before writing to which they apply. do not drop a drive or place...drive with magnetic fields include airport walkthrough devices and security wands. Additional cautions are unsure whether the computer is sufficiently charged before removing the drive from the drive bay, or traveling with the procedures to media. If you move the computer while the optical...
... a drive. 2 Chapter 2 Handling drives Handle a drive carefully; Do not type on the keyboard or move a computer that is sensitive to clear, or properly disconnect the external hard drive. Remove media from a drive before writing to which they apply. do not drop a drive or place...drive with magnetic fields include airport walkthrough devices and security wands. Additional cautions are unsure whether the computer is sufficiently charged before removing the drive from the drive bay, or traveling with the procedures to media. If you move the computer while the optical...
External Devices - Windows Vista
Page 8
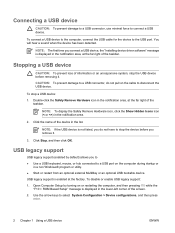
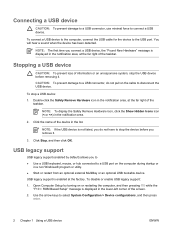
Stopping a USB device CAUTION: To prevent loss of the taskbar. Double-click the Safely Remove Hardware icon in the notification area, at the far right of the taskbar. To connect a USB device to the computer, connect the USB cable for ... device to disconnect the USB device. You will hear a sound when the device has been detected. To stop the USB device before removing it. NOTE: To display the Safely Remove Hardware icon, click the Show Hidden Icons icon (< or CAUTION: To prevent damage to a USB connector, do not pull on the cable...
Stopping a USB device CAUTION: To prevent loss of the taskbar. Double-click the Safely Remove Hardware icon in the notification area, at the far right of the taskbar. To connect a USB device to the computer, connect the USB cable for ... device to disconnect the USB device. You will hear a sound when the device has been detected. To stop the USB device before removing it. NOTE: To display the Safely Remove Hardware icon, click the Show Hidden Icons icon (< or CAUTION: To prevent damage to a USB connector, do not pull on the cable...
External Devices - Windows XP
Page 8
CAUTION: To prevent damage to a USB connector, do not pull on the cable to the USB port. NOTE: To display the Safely Remove Hardware icon, click the Show Hidden Icons icon (< or To connect a USB device to the computer, connect the USB cable for the device to disconnect... CAUTION: To prevent loss of the taskbar. You will hear a sound when the device has been detected. To stop the USB device before removing it. Double-click the Safely Remove Hardware icon in the notification area, at the far right of information or an unresponsive system, stop a USB device: 1. Connecting a USB ...
CAUTION: To prevent damage to a USB connector, do not pull on the cable to the USB port. NOTE: To display the Safely Remove Hardware icon, click the Show Hidden Icons icon (< or To connect a USB device to the computer, connect the USB cable for the device to disconnect... CAUTION: To prevent loss of the taskbar. You will hear a sound when the device has been detected. To stop the USB device before removing it. Double-click the Safely Remove Hardware icon in the notification area, at the far right of information or an unresponsive system, stop a USB device: 1. Connecting a USB ...
Memory Modules - Windows Vista
Page 7
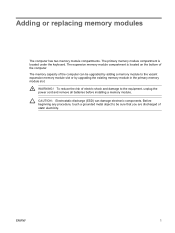
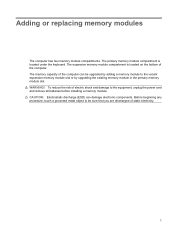
The expansion memory module compartment is located under the keyboard. CAUTION: Electrostatic discharge (ESD) can be sure that you are discharged of the computer can damage electronic components. ENWW 1 Adding or replacing memory modules The ... the computer. Before beginning any procedure, touch a grounded metal object to be upgraded by adding a memory module to the equipment, unplug the power cord and remove all batteries before installing a memory module. The primary memory module compartment is located on the bottom of electric shock and damage to the vacant expansion...
The expansion memory module compartment is located under the keyboard. CAUTION: Electrostatic discharge (ESD) can be sure that you are discharged of the computer can damage electronic components. ENWW 1 Adding or replacing memory modules The ... the computer. Before beginning any procedure, touch a grounded metal object to be upgraded by adding a memory module to the equipment, unplug the power cord and remove all batteries before installing a memory module. The primary memory module compartment is located on the bottom of electric shock and damage to the vacant expansion...

Memory Modules - Windows Vista
Page 12
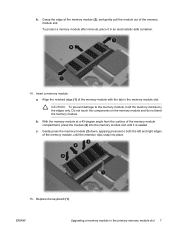
Remove the memory module: a. Slide the 4 keyboard release latches (1) to the memory module, hold the memory module by the edges only. Loosen the 3 keyboard access screws. 10. CAUTION: To prevent damage to release the keyboard. 12. Pull away the retention clips (1) on the memory module. 6 Adding or replacing memory modules ENWW ... on each side of the computer. 13. Turn the computer over until it . 11. 9. Gently lift the top edge of the keyboard (2) and tilt the keyboard over and open it rests on the palm rest of the memory module. The memory module tilts up.
Remove the memory module: a. Slide the 4 keyboard release latches (1) to the memory module, hold the memory module by the edges only. Loosen the 3 keyboard access screws. 10. CAUTION: To prevent damage to release the keyboard. 12. Pull away the retention clips (1) on the memory module. 6 Adding or replacing memory modules ENWW ... on each side of the computer. 13. Turn the computer over until it . 11. 9. Gently lift the top edge of the keyboard (2) and tilt the keyboard over and open it rests on the palm rest of the memory module. The memory module tilts up.
Memory Modules - Windows Vista
Page 13
Align the notched edge (1) of the memory module compartment, press the module (2) into place. 15. c. Replace the keyboard (1). b. b. With the memory module at a 45-degree angle from the surface of the memory module with the tab in the primary memory module slot 7 Gently ... memory module, until the retention clips snap into the memory module slot until it in an electrostatic-safe container. 14. To protect a memory module after removal, place it is seated.
Align the notched edge (1) of the memory module compartment, press the module (2) into place. 15. c. Replace the keyboard (1). b. b. With the memory module at a 45-degree angle from the surface of the memory module with the tab in the primary memory module slot 7 Gently ... memory module, until the retention clips snap into the memory module slot until it in an electrostatic-safe container. 14. To protect a memory module after removal, place it is seated.
Memory Modules - Windows Vista
Page 16
Index K keyboard screws removing 6 replacing 8 M memory replacing memory modules 2, 5 memory module inserting 7 removing 2, 6 replacing 2, 5 upgrading primary 5 memory module compartment cover removing 2 replacing 3 10 Index ENWW
Index K keyboard screws removing 6 replacing 8 M memory replacing memory modules 2, 5 memory module inserting 7 removing 2, 6 replacing 2, 5 upgrading primary 5 memory module compartment cover removing 2 replacing 3 10 Index ENWW
Memory Modules - Windows Vista and Windows XP
Page 7
... metal object to be upgraded by adding a memory module to the equipment, unplug the power cord and remove all batteries before installing a memory module. The expansion memory module compartment is located under the keyboard. Adding or replacing memory modules The computer has two memory module compartments. The primary memory module compartment is...
... metal object to be upgraded by adding a memory module to the equipment, unplug the power cord and remove all batteries before installing a memory module. The expansion memory module compartment is located under the keyboard. Adding or replacing memory modules The computer has two memory module compartments. The primary memory module compartment is...
Memory Modules - Windows Vista and Windows XP
Page 11
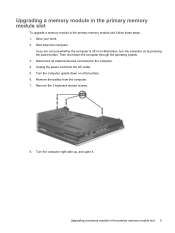
.... 6. Save your work. 2. Upgrading a memory module in the primary memory module slot To upgrade a memory module in the primary memory module slot, follow these steps: 1. Remove the 3 keyboard access screws. 8. Unplug the power cord from the computer. 7. Remove the battery from the AC outlet. 5. Shut down the computer.
.... 6. Save your work. 2. Upgrading a memory module in the primary memory module slot To upgrade a memory module in the primary memory module slot, follow these steps: 1. Remove the 3 keyboard access screws. 8. Unplug the power cord from the computer. 7. Remove the battery from the AC outlet. 5. Shut down the computer.


