
Bluetooth Wireless Technology Basics
Page 2
Therefore, Ericsson chose to use an inexpensive, low-power radio built into a radio technology that incorporate BWT. What does this mean for proprietary cabling between devices such as PDAs and notebook PCs. Exchange electronic business cards with the email application on how to develop the ... come from different manufacturers can run your presentation on the desktop PC back at Ericsson in 1998 to establish Bluetooth connections using HP products. Abstract This paper provides an overview of Bluetooth® wireless technology and instructs users on your laptop. Then, the...
Therefore, Ericsson chose to use an inexpensive, low-power radio built into a radio technology that incorporate BWT. What does this mean for proprietary cabling between devices such as PDAs and notebook PCs. Exchange electronic business cards with the email application on how to develop the ... come from different manufacturers can run your presentation on the desktop PC back at Ericsson in 1998 to establish Bluetooth connections using HP products. Abstract This paper provides an overview of Bluetooth® wireless technology and instructs users on your laptop. Then, the...
Bluetooth Wireless Technology Basics
Page 10
... that automatically synchronize contact information with another connected device by unauthorized devices. The devices remain paired even when • One of the devices is not powered on. • A service connection is interrupted or the service is stopped. • One or both of the devices are restarted. Pairing Pairing is a bonding procedure...
... that automatically synchronize contact information with another connected device by unauthorized devices. The devices remain paired even when • One of the devices is not powered on. • A service connection is interrupted or the service is stopped. • One or both of the devices are restarted. Pairing Pairing is a bonding procedure...
Installing Windows 7 on HP Compaq and EliteBook Notebook PCs
Page 3
...the target system. IMPORTANT This process will need the following steps when installing Windows 7 Beta 1. The operating system license shipped with HP PCs does not grant re-imaging and deployment rights. WARNING: IF YOU DO NOT BACK UP YOUR DATA BEFORE PROCEEDING, YOUR ... Installation when prompted Formatted: Bullets and Numbering Follow the on the system. 3. HP cannot be a technical resource for those who perform a clean installation of Microsoft Windows 7. Insert the OS DVD and power on -screen instructions for users who have the proper license to installing Microsoft Windows...
...the target system. IMPORTANT This process will need the following steps when installing Windows 7 Beta 1. The operating system license shipped with HP PCs does not grant re-imaging and deployment rights. WARNING: IF YOU DO NOT BACK UP YOUR DATA BEFORE PROCEEDING, YOUR ... Installation when prompted Formatted: Bullets and Numbering Follow the on the system. 3. HP cannot be a technical resource for those who perform a clean installation of Microsoft Windows 7. Insert the OS DVD and power on -screen instructions for users who have the proper license to installing Microsoft Windows...
Backup and Recovery - Windows XP
Page 7
... next time you select Create factory software recovery CDs or DVDs to recover the system (Highly recommended), you will be prompted to AC power during the process. ● Only one set of the recovery discs can be created per computer. ● Number each disc before ... instability or failure. To create a set of recovery discs of the full factory image. Select Start > All Programs > HP Backup & Recovery > HP Backup and Recovery Manager. 2. The recovery discs are not compatible with HP Backup & Recovery Manager. ● The computer must be connected to continue the disc creation.
... next time you select Create factory software recovery CDs or DVDs to recover the system (Highly recommended), you will be prompted to AC power during the process. ● Only one set of the recovery discs can be created per computer. ● Number each disc before ... instability or failure. To create a set of recovery discs of the full factory image. Select Start > All Programs > HP Backup & Recovery > HP Backup and Recovery Manager. 2. The recovery discs are not compatible with HP Backup & Recovery Manager. ● The computer must be connected to continue the disc creation.
Backup and Recovery - Windows XP
Page 10
...in their associated programs. ● Save customized settings in a window, toolbar, or menu bar by HP can perform backup and recovery procedures, the computer must be copied to a CD or to a DVD using HP Backup and Recovery Manager. 4 Chapter 2 Backing up your settings. Display the screen. NOTE: Drivers,... the entire screen, press fn+prt sc. To copy only the active window, press alt+fn+prt sc. c. NOTE: Before you have to external power. b. To copy the screen and paste it into a word-processing document: a. Open a word-processing document, and then select Edit > Paste. The...
...in their associated programs. ● Save customized settings in a window, toolbar, or menu bar by HP can perform backup and recovery procedures, the computer must be copied to a CD or to a DVD using HP Backup and Recovery Manager. 4 Chapter 2 Backing up your settings. Display the screen. NOTE: Drivers,... the entire screen, press fn+prt sc. To copy only the active window, press alt+fn+prt sc. c. NOTE: Before you have to external power. b. To copy the screen and paste it into a word-processing document: a. Open a word-processing document, and then select Edit > Paste. The...
Backup and Recovery - Windows XP and Windows Vista
Page 7
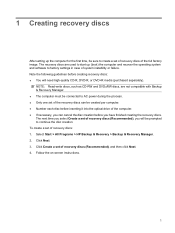
...have finished creating the recovery discs. The recovery discs are not compatible with Backup & Recovery Manager. ● The computer must be connected to AC power during the process. ● Only one set of the recovery discs can cancel the disc creation before you can be created per computer. ● ... (purchased separately). Click Create a set of recovery discs (Recommended), you select Create a set of recovery discs of recovery discs: 1. Select Start > All Programs > HP Backup & Recovery > Backup & Recovery Manager. 2. Follow the on-screen instructions. 1 Click Next. 3.
...have finished creating the recovery discs. The recovery discs are not compatible with Backup & Recovery Manager. ● The computer must be connected to AC power during the process. ● Only one set of the recovery discs can cancel the disc creation before you can be created per computer. ● ... (purchased separately). Click Create a set of recovery discs (Recommended), you select Create a set of recovery discs of recovery discs: 1. Select Start > All Programs > HP Backup & Recovery > Backup & Recovery Manager. 2. Follow the on-screen instructions. 1 Click Next. 3.
Backup and Recovery - Windows XP and Windows Vista
Page 10
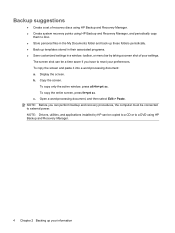
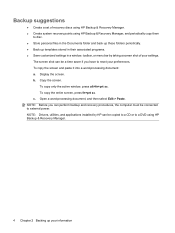
b. Backup suggestions ● Create a set of your preferences. The screen shot can be connected to external power. NOTE: Drivers, utilities, and applications installed by HP can perform backup and recovery procedures, the computer must be a time saver if you have to disc. ● Store... To copy the screen and paste it into a word-processing document: a. NOTE: Before you can be copied to a CD or to a DVD using HP Backup & Recovery Manager. 4 Chapter 2 Backing up templates stored in their associated programs. ● Save customized settings in a window, toolbar, or menu ...
b. Backup suggestions ● Create a set of your preferences. The screen shot can be connected to external power. NOTE: Drivers, utilities, and applications installed by HP can perform backup and recovery procedures, the computer must be a time saver if you have to disc. ● Store... To copy the screen and paste it into a word-processing document: a. NOTE: Before you can be copied to a CD or to a DVD using HP Backup & Recovery Manager. 4 Chapter 2 Backing up templates stored in their associated programs. ● Save customized settings in a window, toolbar, or menu ...
Software Update - Windows Vista
Page 9
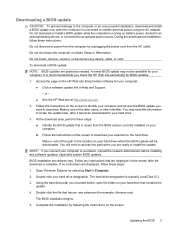
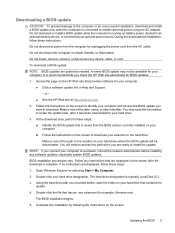
... update you check the HP Web site periodically for your computer. Follow any device, cable, or cord. The hard drive designation is running on your computer: ● Click a software update link in an optional docking device, or connected to reliable external power using the AC adapter....to locate the update later, after the download is complete. or - ● See the HP Web site at http://www.hp.com. 2. It is newer than the BIOS version currently installed on battery power, docked in Help and Support. - BIOS installation procedures vary. Double-click your hard drive...
... update you check the HP Web site periodically for your computer. Follow any device, cable, or cord. The hard drive designation is running on your computer: ● Click a software update link in an optional docking device, or connected to reliable external power using the AC adapter....to locate the update later, after the download is complete. or - ● See the HP Web site at http://www.hp.com. 2. It is newer than the BIOS version currently installed on battery power, docked in Help and Support. - BIOS installation procedures vary. Double-click your hard drive...
Software Updates - Windows XP
Page 9
... 2. Do not insert, remove, connect, or disconnect any instructions that is newer than the BIOS version currently installed on the HP Web site that you check the HP Web site periodically for example, filename.exe). Access the page on your computer: ● Click a software update link in an...want to the hard drive. NOTE: If you recorded earlier, open the folder on the screen after it has been downloaded to an optional power source. The hard drive designation is typically Local Disk (C:). 3. Double-click the file that contains the update. 4. During the download and ...
... 2. Do not insert, remove, connect, or disconnect any instructions that is newer than the BIOS version currently installed on the HP Web site that you check the HP Web site periodically for example, filename.exe). Access the page on your computer: ● Click a software update link in an...want to the hard drive. NOTE: If you recorded earlier, open the folder on the screen after it has been downloaded to an optional power source. The hard drive designation is typically Local Disk (C:). 3. Double-click the file that contains the update. 4. During the download and ...

Power Management - Windows XP
Page 5
...and exiting Standby 4 Initiating and exiting Hibernation 5 Using the Power Meter ...6 Using power schemes ...7 Viewing the current scheme 7 Selecting a different power scheme 7 Customizing power schemes 7 Setting password protection upon exiting Standby 8 4 Using battery power Finding battery information in Help and Support 10 Displaying the ...Identifying low battery levels 14 Resolving a low battery level 15 Resolving a low battery level when external power is available 15 Resolving a low battery level when a charged battery is available 15 Resolving a low battery level when no...
...and exiting Standby 4 Initiating and exiting Hibernation 5 Using the Power Meter ...6 Using power schemes ...7 Viewing the current scheme 7 Selecting a different power scheme 7 Customizing power schemes 7 Setting password protection upon exiting Standby 8 4 Using battery power Finding battery information in Help and Support 10 Displaying the ...Identifying low battery levels 14 Resolving a low battery level 15 Resolving a low battery level when external power is available 15 Resolving a low battery level when a charged battery is available 15 Resolving a low battery level when no...

Power Management - Windows XP
Page 7
... shut down the computer. ● When the computer is in Standby, press the button briefly to exit Hibernation. 1 1 Power control and light locations The following illustration and table identify and describe the power control and light locations. NOTE: Your computer may look slightly different from the illustration in Hibernation, press the button...
... shut down the computer. ● When the computer is in Standby, press the button briefly to exit Hibernation. 1 1 Power control and light locations The following illustration and table identify and describe the power control and light locations. NOTE: Your computer may look slightly different from the illustration in Hibernation, press the button...

Power Management - Windows XP
Page 8
...® shutdown procedures are fully charged. If the computer is not plugged into an external power source, the light turns off until the battery reaches a low battery level. *The 2 power lights display the same information. The light on . ● Blinking: The computer is ...9679; Green: A battery is close to turn off the computer. (2) Power lights* (2) To learn more about your power settings, select Start > Control Panel > Performance and Maintenance > Power Options. ● On: The computer is on the power button is visible only when the computer is open . When the battery reaches...
...® shutdown procedures are fully charged. If the computer is not plugged into an external power source, the light turns off until the battery reaches a low battery level. *The 2 power lights display the same information. The light on . ● Blinking: The computer is ...9679; Green: A battery is close to turn off the computer. (2) Power lights* (2) To learn more about your power settings, select Start > Control Panel > Performance and Maintenance > Power Options. ● On: The computer is on the power button is visible only when the computer is open . When the battery reaches...

Power Management - Windows XP
Page 9
... port ● When the computer will be unused and disconnected from external power and remove the battery. Then, click Shut Down > Turn Off. ● Press and hold the power button for at least 5 seconds. ● Disconnect the computer from external power for an extended period To shut down the computer, follow these steps...
... port ● When the computer will be unused and disconnected from external power and remove the battery. Then, click Shut Down > Turn Off. ● Press and hold the power button for at least 5 seconds. ● Disconnect the computer from external power for an extended period To shut down the computer, follow these steps...
Power Management - Windows XP
Page 10
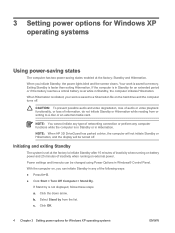
...Stand by from or writing to a hibernation file on external power. 3 Setting power options for Windows XP operating systems Using power-saving states The computer has two power-saving states enabled at the factory to memory. NOTE: When HP 3D DriveGuard has parked a drive, the computer will not ...initiate Standby or Hibernation, and the display will be changed using Power Options in Hibernation....
...Stand by from or writing to a hibernation file on external power. 3 Setting power options for Windows XP operating systems Using power-saving states The computer has two power-saving states enabled at the factory to memory. NOTE: When HP 3D DriveGuard has parked a drive, the computer will not ...initiate Standby or Hibernation, and the display will be changed using Power Options in Hibernation....
Power Management - Windows XP
Page 11
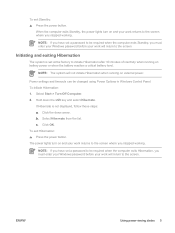
... exits Hibernation, you stopped working . Click the down the shift key and select Hibernate. Click OK. The power lights turn on external power. NOTE: If you have set at the factory to initiate Hibernation after 30 minutes of inactivity when running on...password to the screen. Select Start > Turn Off Computer. 2. Initiating and exiting Hibernation The system is not displayed, follow these steps: a. Power settings and timeouts can be required when the computer exits Standby, you stopped working . Select Hibernate from the list. c. To initiate Hibernation: ...
... exits Hibernation, you stopped working . Click the down the shift key and select Hibernate. Click OK. The power lights turn on external power. NOTE: If you have set at the factory to initiate Hibernation after 30 minutes of inactivity when running on...password to the screen. Select Start > Turn Off Computer. 2. Initiating and exiting Hibernation The system is not displayed, follow these steps: a. Power settings and timeouts can be required when the computer exits Standby, you stopped working . Select Hibernate from the list. c. To initiate Hibernation: ...

Power Management - Windows XP
Page 12
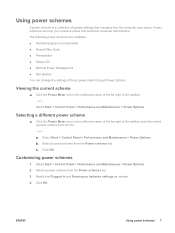
...placed in the notification area, at the far right of remaining battery charge, double-click the Power Meter icon. Select the Always show icon on battery or external power. Using the Power Meter The Power Meter is running on the taskbar check box. 4. Click Apply, and then click OK. ... Icons icon (< or Click the Advanced tab. 3. Clear the Always show the Power Meter icon in the notification area, and then click Adjust Power Properties. 2. Click Apply, and then click OK. Right-click the Power Meter icon in the notification area, follow these steps: 1. To show icon on...
...placed in the notification area, at the far right of remaining battery charge, double-click the Power Meter icon. Select the Always show icon on battery or external power. Using the Power Meter The Power Meter is running on the taskbar check box. 4. Click Apply, and then click OK. ... Icons icon (< or Click the Advanced tab. 3. Clear the Always show the Power Meter icon in the notification area, and then click Adjust Power Properties. 2. Click Apply, and then click OK. Right-click the Power Meter icon in the notification area, follow these steps: 1. To show icon on...
Power Management - Windows XP
Page 13
... of system settings that manages how the computer uses power. Customizing power schemes 1. Selecting a different power scheme ▲ Click the Power Meter icon in and Running on batteries settings as needed. 4. or - Click OK. Select a power scheme from the Power schemes list. Select a power scheme from the Power schemes list. 3. Power schemes can change the settings of the taskbar...
... of system settings that manages how the computer uses power. Customizing power schemes 1. Selecting a different power scheme ▲ Click the Power Meter icon in and Running on batteries settings as needed. 4. or - Click OK. Select a power scheme from the Power schemes list. Select a power scheme from the Power schemes list. 3. Power schemes can change the settings of the taskbar...

Power Management - Windows XP
Page 14
Right-click the Power Meter icon in the notification area, and then click Adjust Power Properties. 2. Select the Prompt for Windows XP operating systems ENWW Click Apply. 8 Chapter 3 Setting power options for password when computer resumes from standby check box. 4. Click the Advanced tab. 3. Setting password protection upon exiting Standby To set the computer to prompt for a password when the computer exits Standby, follow these steps: 1.
Right-click the Power Meter icon in the notification area, and then click Adjust Power Properties. 2. Select the Prompt for Windows XP operating systems ENWW Click Apply. 8 Chapter 3 Setting power options for password when computer resumes from standby check box. 4. Click the Advanced tab. 3. Setting password protection upon exiting Standby To set the computer to prompt for a password when the computer exits Standby, follow these steps: 1.
Power Management - Windows XP
Page 15
..., use only the battery provided with the computer, a replacement battery provided by HP, or a compatible battery purchased from HP. ENWW 9 Keeping the battery in case of a power outage. Computer battery life varies, depending on power management settings, programs running on external AC power supplied through the AC adapter, the computer switches to the computer, and...
..., use only the battery provided with the computer, a replacement battery provided by HP, or a compatible battery purchased from HP. ENWW 9 Keeping the battery in case of a power outage. Computer battery life varies, depending on power management settings, programs running on external AC power supplied through the AC adapter, the computer switches to the computer, and...

Power Management - Windows XP
Page 16
Finding battery information in Help and Support To locate battery information for your computer, select Start > Help and Support > Learn More About Your PC. 10 Chapter 4 Using battery power ENWW
Finding battery information in Help and Support To locate battery information for your computer, select Start > Help and Support > Learn More About Your PC. 10 Chapter 4 Using battery power ENWW


