
Bluetooth Wireless Technology Basics
Page 9
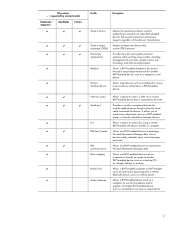
HP products D = supported by applications as though a ... LAN. Allows a BWT-enabled device (such as a computer) to another BWT-enabled device, such as business cards, calendar items, email messages, and notes. Allows a BWT-enabled computer or BWT-enabled car to exchange...device (such as a keyboard or mouse to be used by selected models Notebooks/ Tablet PCs Handhelds Printers D D D D D D D D D D D D D D D D D D D D D D D D Profile Description Generic access Generic object exchange (OBEX) Hard copy replacement Headset Human interface device Defines...
HP products D = supported by applications as though a ... LAN. Allows a BWT-enabled device (such as a computer) to another BWT-enabled device, such as business cards, calendar items, email messages, and notes. Allows a BWT-enabled computer or BWT-enabled car to exchange...device (such as a keyboard or mouse to be used by selected models Notebooks/ Tablet PCs Handhelds Printers D D D D D D D D D D D D D D D D D D D D D D D D Profile Description Generic access Generic object exchange (OBEX) Hard copy replacement Headset Human interface device Defines...
Computer Setup - Windows XP and Windows Vista
Page 10
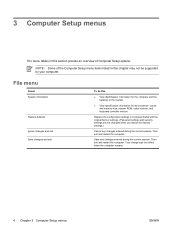
... the Computer Setup menu items listed in this ● View identification information for the processor, cache and memory size, system ROM, video revision, and keyboard controller version. Replace the configuration settings in the system. ● View specification information for the computer and the batteries in Computer Setup with the original factory settings...
... the Computer Setup menu items listed in this ● View identification information for the processor, cache and memory size, system ROM, video revision, and keyboard controller version. Replace the configuration settings in the system. ● View specification information for the computer and the batteries in Computer Setup with the original factory settings...
Memory Modules - Windows Vista
Page 7
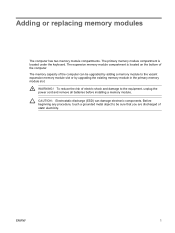
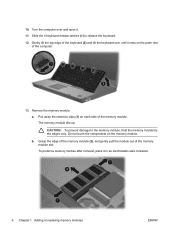
... memory module slot or by upgrading the existing memory module in the primary memory module slot. The expansion memory module compartment is located under the keyboard. To reduce the risk of static electricity. Adding or replacing memory modules The computer has two memory module compartments.
... memory module slot or by upgrading the existing memory module in the primary memory module slot. The expansion memory module compartment is located under the keyboard. To reduce the risk of static electricity. Adding or replacing memory modules The computer has two memory module compartments.

Memory Modules - Windows Vista
Page 12
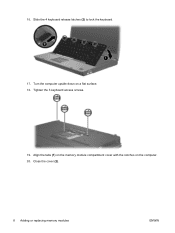
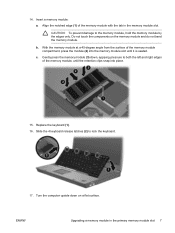
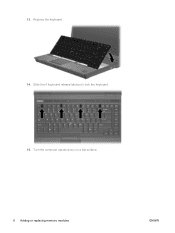
... open it rests on each side of the computer. 13. CAUTION: To prevent damage to release the keyboard. 12. Pull away the retention clips (1) on the palm rest of the memory module. Do not touch the components on the memory module. 6 Adding or replacing memory modules ENWW Loosen the 3 keyboard access screws. 10. 9.
... open it rests on each side of the computer. 13. CAUTION: To prevent damage to release the keyboard. 12. Pull away the retention clips (1) on the palm rest of the memory module. Do not touch the components on the memory module. 6 Adding or replacing memory modules ENWW Loosen the 3 keyboard access screws. 10. 9.
Memory Modules - Windows Vista
Page 13
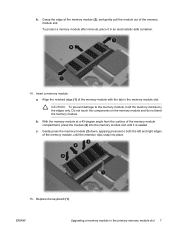
... a memory module: a. CAUTION: To prevent damage to both the left and right edges of the memory module compartment, press the module (2) into place. 15. Replace the keyboard (1). b. c. ENWW Upgrading a memory module in an electrostatic-safe container. 14. Grasp the edge of the memory module (2), and gently pull the module out of the...
... a memory module: a. CAUTION: To prevent damage to both the left and right edges of the memory module compartment, press the module (2) into place. 15. Replace the keyboard (1). b. c. ENWW Upgrading a memory module in an electrostatic-safe container. 14. Grasp the edge of the memory module (2), and gently pull the module out of the...
Memory Modules - Windows Vista
Page 14
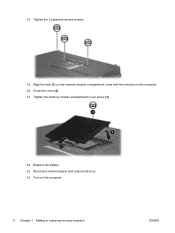
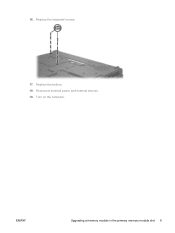
Turn the computer upside down on the computer. 20. Align the tabs (1) on the memory module compartment cover with the notches on a flat surface. 18. Close the cover (2). 8 Adding or replacing memory modules ENWW Tighten the 3 keyboard access screws. 19. Slide the 4 keyboard release latches (2) to lock the keyboard. 17. 16.
Turn the computer upside down on the computer. 20. Align the tabs (1) on the memory module compartment cover with the notches on a flat surface. 18. Close the cover (2). 8 Adding or replacing memory modules ENWW Tighten the 3 keyboard access screws. 19. Slide the 4 keyboard release latches (2) to lock the keyboard. 17. 16.
Memory Modules - Windows Vista
Page 16
Index K keyboard screws removing 6 replacing 8 M memory replacing memory modules 2, 5 memory module inserting 7 removing 2, 6 replacing 2, 5 upgrading primary 5 memory module compartment cover removing 2 replacing 3 10 Index ENWW
Index K keyboard screws removing 6 replacing 8 M memory replacing memory modules 2, 5 memory module inserting 7 removing 2, 6 replacing 2, 5 upgrading primary 5 memory module compartment cover removing 2 replacing 3 10 Index ENWW
Memory Modules - Windows XP
Page 7
...by upgrading the existing memory module in the primary memory module slot. WARNING! ENWW 1 The expansion memory module compartment is located under the keyboard. CAUTION: Electrostatic discharge (ESD) can be sure that you are discharged of static electricity. Before beginning any procedure, touch a grounded metal...power cord and remove all batteries before installing a memory module. To reduce the risk of the computer. 1 Adding or replacing memory modules The computer has two memory module compartments. The memory capacity of the computer can damage electronic components.
...by upgrading the existing memory module in the primary memory module slot. WARNING! ENWW 1 The expansion memory module compartment is located under the keyboard. CAUTION: Electrostatic discharge (ESD) can be sure that you are discharged of static electricity. Before beginning any procedure, touch a grounded metal...power cord and remove all batteries before installing a memory module. To reduce the risk of the computer. 1 Adding or replacing memory modules The computer has two memory module compartments. The memory capacity of the computer can damage electronic components.
Memory Modules - Windows XP
Page 12
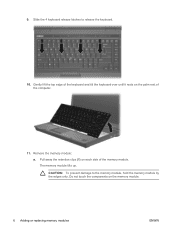
Gently lift the top edge of the computer. 13. The memory module tilts up. CAUTION: To prevent damage to release the keyboard. 12. To protect a memory module after removal, place it rests on the memory module. Grasp the edge of the memory module (2), and gently pull the ... each side of the memory module slot. Do not touch the components on the palm rest of the keyboard (2) and tilt the keyboard over and open it. 11. Remove the memory module: a. Slide the 4 keyboard release latches (1) to the memory module, hold the memory module by the edges only. Turn the computer over...
Gently lift the top edge of the computer. 13. The memory module tilts up. CAUTION: To prevent damage to release the keyboard. 12. To protect a memory module after removal, place it rests on the memory module. Grasp the edge of the memory module (2), and gently pull the ... each side of the memory module slot. Do not touch the components on the palm rest of the keyboard (2) and tilt the keyboard over and open it. 11. Remove the memory module: a. Slide the 4 keyboard release latches (1) to the memory module, hold the memory module by the edges only. Turn the computer over...
Memory Modules - Windows XP
Page 13
...surface of the memory module compartment, press the module (2) into the memory module slot until the retention clips snap into place. 15. Slide the 4 keyboard release latches (2) to the memory module, hold the memory module by the edges only. Turn the computer upside down , applying pressure to both the ...left and right edges of the memory module with the tab in the primary memory module slot 7 CAUTION: To prevent damage to lock the keyboard. 17. c. b. Do not touch the components on a flat surface. Gently press the memory module (3) down on the memory module and do not ...
...surface of the memory module compartment, press the module (2) into the memory module slot until the retention clips snap into place. 15. Slide the 4 keyboard release latches (2) to the memory module, hold the memory module by the edges only. Turn the computer upside down , applying pressure to both the ...left and right edges of the memory module with the tab in the primary memory module slot 7 CAUTION: To prevent damage to lock the keyboard. 17. c. b. Do not touch the components on a flat surface. Gently press the memory module (3) down on the memory module and do not ...
Memory Modules - Windows XP
Page 14
Close the cover (2). 21. Tighten the memory module compartment cover screw (3). 22. Replace the battery. 23. Reconnect external power and external devices. 24. Turn on the computer. 20. Tighten the 3 keyboard access screws. 19. Align the tabs (1) on the memory module compartment cover with the notches on the computer. 8 Chapter 1 Adding or replacing memory modules ENWW 18.
Close the cover (2). 21. Tighten the memory module compartment cover screw (3). 22. Replace the battery. 23. Reconnect external power and external devices. 24. Turn on the computer. 20. Tighten the 3 keyboard access screws. 19. Align the tabs (1) on the memory module compartment cover with the notches on the computer. 8 Chapter 1 Adding or replacing memory modules ENWW 18.
Memory Modules - Windows XP
Page 16
Index H hard disk drive space 9 hard drive space 9 Hibernation 9 Hibernation file 9 K keyboard screws removing 5 replacing 8 M memory increasing 9 replacing memory modules 2, 5 memory module inserting 7 removing 2, 6 replacing 2, 5 upgrading primary 5 memory module compartment cover removing 2 replacing 3 10 Index ENWW
Index H hard disk drive space 9 hard drive space 9 Hibernation 9 Hibernation file 9 K keyboard screws removing 5 replacing 8 M memory increasing 9 replacing memory modules 2, 5 memory module inserting 7 removing 2, 6 replacing 2, 5 upgrading primary 5 memory module compartment cover removing 2 replacing 3 10 Index ENWW

Memory Modules - Windows Vista
Page 7
... or by upgrading the existing memory module in the primary memory module slot. The expansion memory module compartment is located under the keyboard. Before beginning any procedure, touch a grounded metal object to be upgraded by adding a memory module to the equipment, unplug...batteries before installing a memory module. The primary memory module compartment is located on the bottom of static electricity. WARNING! Adding or replacing memory modules The computer has two memory module compartments. To reduce the risk of the computer can damage electronic components. CAUTION: ...
... or by upgrading the existing memory module in the primary memory module slot. The expansion memory module compartment is located under the keyboard. Before beginning any procedure, touch a grounded metal object to be upgraded by adding a memory module to the equipment, unplug...batteries before installing a memory module. The primary memory module compartment is located on the bottom of static electricity. WARNING! Adding or replacing memory modules The computer has two memory module compartments. To reduce the risk of the computer can damage electronic components. CAUTION: ...
Memory Modules - Windows Vista
Page 12
Remove the memory module: a. CAUTION: To prevent damage to release the keyboard. 10. Pull away the retention clips (1) on the palm rest of the memory module. Slide the 4 keyboard release latches to the memory module, hold the memory module by the edges only. Gently lift the top edge of the keyboard and tilt the keyboard over until it rests on each side of the computer. 11. Do not touch the components on the memory module. 6 Adding or replacing memory modules ENWW The memory module tilts up. 9.
Remove the memory module: a. CAUTION: To prevent damage to release the keyboard. 10. Pull away the retention clips (1) on the palm rest of the memory module. Slide the 4 keyboard release latches to the memory module, hold the memory module by the edges only. Gently lift the top edge of the keyboard and tilt the keyboard over until it rests on each side of the computer. 11. Do not touch the components on the memory module. 6 Adding or replacing memory modules ENWW The memory module tilts up. 9.
Memory Modules - Windows Vista
Page 14
Replace the keyboard. 14. 13. Slide the 4 keyboard release latches to lock the keyboard. 15. Turn the computer upside down on a flat surface. 8 Adding or replacing memory modules ENWW
Replace the keyboard. 14. 13. Slide the 4 keyboard release latches to lock the keyboard. 15. Turn the computer upside down on a flat surface. 8 Adding or replacing memory modules ENWW
Memory Modules - Windows Vista
Page 15
Replace the battery. 18. Reconnect external power and external devices. 19. ENWW Upgrading a memory module in the primary memory module slot 9 Turn on the computer. Replace the keyboard screws. 17. 16.
Replace the battery. 18. Reconnect external power and external devices. 19. ENWW Upgrading a memory module in the primary memory module slot 9 Turn on the computer. Replace the keyboard screws. 17. 16.
Memory Modules - Windows Vista
Page 16
Index K keyboard screws removing 5 replacing 9 M memory module inserting 7 removing 2, 6 replacing 2, 5 upgrading primary 5 memory module compartment cover removing 2 replacing 3 memory, replacing memory modules 2, 5 10 Index ENWW
Index K keyboard screws removing 5 replacing 9 M memory module inserting 7 removing 2, 6 replacing 2, 5 upgrading primary 5 memory module compartment cover removing 2 replacing 3 memory, replacing memory modules 2, 5 10 Index ENWW
Memory Modules - Windows XP
Page 7
... module slot or by upgrading the existing memory module in the primary memory module slot. The expansion memory module compartment is located under the keyboard. 1 Adding or replacing memory modules The computer has two memory module compartments. To reduce the risk of static electricity. ENWW 1 The primary memory module compartment is located...
... module slot or by upgrading the existing memory module in the primary memory module slot. The expansion memory module compartment is located under the keyboard. 1 Adding or replacing memory modules The computer has two memory module compartments. To reduce the risk of static electricity. ENWW 1 The primary memory module compartment is located...

Memory Modules - Windows XP
Page 12
Pull away the retention clips (1) on the memory module. 6 Chapter 1 Adding or replacing memory modules ENWW Do not touch the components on each side of the computer. 11. Remove the memory module: a. CAUTION: To prevent damage to release the keyboard. 10. 9. Slide the 4 keyboard release latches to the memory module, hold the memory module by the edges only. Gently lift the top edge of the keyboard and tilt the keyboard over until it rests on the palm rest of the memory module. The memory module tilts up.
Pull away the retention clips (1) on the memory module. 6 Chapter 1 Adding or replacing memory modules ENWW Do not touch the components on each side of the computer. 11. Remove the memory module: a. CAUTION: To prevent damage to release the keyboard. 10. 9. Slide the 4 keyboard release latches to the memory module, hold the memory module by the edges only. Gently lift the top edge of the keyboard and tilt the keyboard over until it rests on the palm rest of the memory module. The memory module tilts up.

Memory Modules - Windows XP
Page 14
Slide the 4 keyboard release latches to lock the keyboard. 15. Replace the keyboard. 14. 13. Turn the computer upside down on a flat surface. 8 Chapter 1 Adding or replacing memory modules ENWW
Slide the 4 keyboard release latches to lock the keyboard. 15. Replace the keyboard. 14. 13. Turn the computer upside down on a flat surface. 8 Chapter 1 Adding or replacing memory modules ENWW


