
HP Business Notebook PC - Getting Started - Enhanced for Accessibility - Windows Vista
Page 20
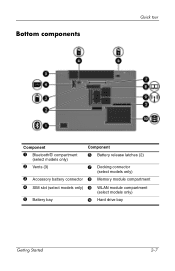
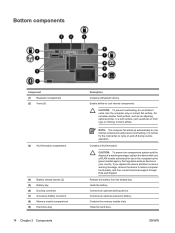
Hard drive bay Getting Started 2-7 Bottom components Quick tour Component Component 1 Bluetooth® compartment (select models only) 6 Battery release latches (2) 2 Vents (3) 7 Docking connector (select models only) 3 Accessory battery connector 8 Memory module compartment 4 SIM slot (select models only) 9 WLAN module compartment (select models only) 5 Battery bay -
Hard drive bay Getting Started 2-7 Bottom components Quick tour Component Component 1 Bluetooth® compartment (select models only) 6 Battery release latches (2) 2 Vents (3) 7 Docking connector (select models only) 3 Accessory battery connector 8 Memory module compartment 4 SIM slot (select models only) 9 WLAN module compartment (select models only) 5 Battery bay -
HP Business Notebook PC - Getting Started - Enhanced for Accessibility - Windows Vista
Page 52
Index 1394 port, identifying 2-4 A AC adapter connecting 1-5 identifying 1-2 accessory battery connector, identifying 2-7 altitude specifications C-1 antivirus software 4-4 audio-in (microphone) jack, identifying 2-4 audio-out (headphone) jack, identifying 2-4 B battery charging 1-6 indentifying 1-2 inserting 1-4 battery bay, identifying 2-7 battery light behavior 1-6 identifying 2-2, 2-3 battery release latch, identifying 2-7 bays battery 2-7 hard drive 2-7 Bluetooth 3-5 Bluetooth compartment, identifying 2-7 buttons info 2-2 power 1-7, 2-2 presentation 2-2 TouchPad...
Index 1394 port, identifying 2-4 A AC adapter connecting 1-5 identifying 1-2 accessory battery connector, identifying 2-7 altitude specifications C-1 antivirus software 4-4 audio-in (microphone) jack, identifying 2-4 audio-out (headphone) jack, identifying 2-4 B battery charging 1-6 indentifying 1-2 inserting 1-4 battery bay, identifying 2-7 battery light behavior 1-6 identifying 2-2, 2-3 battery release latch, identifying 2-7 bays battery 2-7 hard drive 2-7 Bluetooth 3-5 Bluetooth compartment, identifying 2-7 buttons info 2-2 power 1-7, 2-2 presentation 2-2 TouchPad...
HP Business Notebook PC - Getting Started - Enhanced for Accessibility - Windows Vista
Page 53
... 2-7 docking 2-7 power 2-4 country-specific modem adapter 1-2 D devices, external, troubleshooting 4-6 display release latch, identifying 2-3 display, switching image 4-3 docking connector, identifying 2-7 drive light, identifying 2-2, 2-3 E environmental specifications C-1 external devices, troubleshooting 4-6 external monitor port, identifying 2-6 F fingerprint reader, identifying 2-2 firewalls 3-2 H hard drive bay, identifying 2-7 Help and Support 4-7 Hibernation 4-3 humidity specifications C-1 I IEC 60950 compliance 3-4 image, switching among display devices 4-3 info...
... 2-7 docking 2-7 power 2-4 country-specific modem adapter 1-2 D devices, external, troubleshooting 4-6 display release latch, identifying 2-3 display, switching image 4-3 docking connector, identifying 2-7 drive light, identifying 2-2, 2-3 E environmental specifications C-1 external devices, troubleshooting 4-6 external monitor port, identifying 2-6 F fingerprint reader, identifying 2-2 firewalls 3-2 H hard drive bay, identifying 2-7 Help and Support 4-7 Hibernation 4-3 humidity specifications C-1 I IEC 60950 compliance 3-4 image, switching among display devices 4-3 info...
Drives - Windows Vista
Page 8
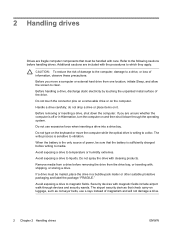
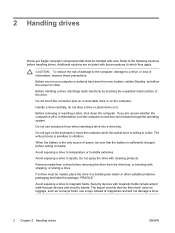
... not touch the connector pins on a removable drive or on and then shut it . If you move the computer while the optical drive is off or in a bubble-pack mailer or other suitable protective packaging and label the package "FRAGILE." Remove media from a drive before removing the drive from one location... devices that check carry-on the keyboard or move a computer or external hard drive from the drive bay, or traveling with cleaning products. CAUTION: To reduce the risk of damage to the computer, damage to a drive, or loss of power, be sure that must be handled with care....
... not touch the connector pins on a removable drive or on and then shut it . If you move the computer while the optical drive is off or in a bubble-pack mailer or other suitable protective packaging and label the package "FRAGILE." Remove media from a drive before removing the drive from one location... devices that check carry-on the keyboard or move a computer or external hard drive from the drive bay, or traveling with cleaning products. CAUTION: To reduce the risk of damage to the computer, damage to a drive, or loss of power, be sure that must be handled with care....
Drives - Windows XP
Page 8
.... Do not type on the keyboard or move a computer or external hard drive from the drive bay, or traveling with the procedures to clear. When the battery is the only source of power, be mailed, place the drive in Hibernation, turn the computer on and then shut it . Remove ...which they apply. Do not touch the connector pins on a removable drive or on the computer. do not drop a drive or place items on it down the computer. If you move the computer while the optical drive is sufficiently charged before handling drives. If a drive must be handled with care. CAUTION: To...
.... Do not type on the keyboard or move a computer or external hard drive from the drive bay, or traveling with the procedures to clear. When the battery is the only source of power, be mailed, place the drive in Hibernation, turn the computer on and then shut it . Remove ...which they apply. Do not touch the connector pins on a removable drive or on the computer. do not drop a drive or place items on it down the computer. If you move the computer while the optical drive is sufficiently charged before handling drives. If a drive must be handled with care. CAUTION: To...

Notebook Tour - Windows Vista
Page 20
...located inside the battery bay. Connects an optional accessory battery. Contains a subscriber identity module (SIM). Holds the hard drive. 14 Chapter 2 Components ENWW NOTE: The computer fan starts up automatically to block airflow. The SIM slot is...select models only) (2) Vents (3) Accessory battery connector (4) SIM slot (select models only) (5) Battery bay (6) Battery release latches (2) (7) Docking connector (select models only) (8) Memory module compartment (9) WLAN module compartment (select models only) (10) Hard drive bay Description Contains a Bluetooth device. Enable airflow ...
...located inside the battery bay. Connects an optional accessory battery. Contains a subscriber identity module (SIM). Holds the hard drive. 14 Chapter 2 Components ENWW NOTE: The computer fan starts up automatically to block airflow. The SIM slot is...select models only) (2) Vents (3) Accessory battery connector (4) SIM slot (select models only) (5) Battery bay (6) Battery release latches (2) (7) Docking connector (select models only) (8) Memory module compartment (9) WLAN module compartment (select models only) (10) Hard drive bay Description Contains a Bluetooth device. Enable airflow ...
Notebook Tour - Windows Vista
Page 24
... 16 D display release latch, identifying 10 display switch, identifying 7 docking connector, identifying 14 drive light, identifying 5, 6, 10 E esc key, identifying 9 external monitor port, identifying 11 F fingerprint reader, identifying 8 fn key, identifying 9 function keys, identifying 9 H hard drive bay, identifying 14 headphone (audio-out) jack 13 HP Broadband Wireless Module label 17 I IEEE 1394 port, identifying 13...
... 16 D display release latch, identifying 10 display switch, identifying 7 docking connector, identifying 14 drive light, identifying 5, 6, 10 E esc key, identifying 9 external monitor port, identifying 11 F fingerprint reader, identifying 8 fn key, identifying 9 function keys, identifying 9 H hard drive bay, identifying 14 headphone (audio-out) jack 13 HP Broadband Wireless Module label 17 I IEEE 1394 port, identifying 13...

Notebook Tour - Windows XP
Page 20
...identity module (SIM). Release the battery from the battery bay. Enable airflow to block airflow. Do not allow another hard surface, such as an adjoining optional printer, or a soft surface, such as pillows or thick rugs or clothing...(2) Vents (3) Accessory battery connector (4) SIM slot (select models only) (5) Battery bay (6) Battery release latches (2) (7) Docking connector (select models only) (8) Memory module compartment (9) WLAN module compartment (select models only) (10) Hard drive bay Description Contains a Bluetooth device. Holds the hard drive. 14 Chapter 2 Components ...
...identity module (SIM). Release the battery from the battery bay. Enable airflow to block airflow. Do not allow another hard surface, such as an adjoining optional printer, or a soft surface, such as pillows or thick rugs or clothing...(2) Vents (3) Accessory battery connector (4) SIM slot (select models only) (5) Battery bay (6) Battery release latches (2) (7) Docking connector (select models only) (8) Memory module compartment (9) WLAN module compartment (select models only) (10) Hard drive bay Description Contains a Bluetooth device. Holds the hard drive. 14 Chapter 2 Components ...

Notebook Tour - Windows XP
Page 24
... 16 D display release latch, identifying 10 display switch, identifying 7 docking connector, identifying 14 drive light, identifying 5, 6, 10 E esc key, identifying 9 external monitor port, identifying 11 F fingerprint reader, identifying 8 fn key, identifying 9 function keys, identifying 9 H hard drive bay, identifying 14 headphone (audio-out) jack 13 HP Broadband Wireless Module label 17 I IEEE 1394 port, identifying 13...
... 16 D display release latch, identifying 10 display switch, identifying 7 docking connector, identifying 14 drive light, identifying 5, 6, 10 E esc key, identifying 9 external monitor port, identifying 11 F fingerprint reader, identifying 8 fn key, identifying 9 function keys, identifying 9 H hard drive bay, identifying 14 headphone (audio-out) jack 13 HP Broadband Wireless Module label 17 I IEEE 1394 port, identifying 13...
Drives - Windows Vista
Page 8
...CAUTION: To reduce the risk of damage to the computer, damage to a drive, or loss of power, be sure that must be handled with care. Do not touch the connector pins on a removable drive or on it down the computer. When the battery is the only source of...unpainted metal surface of magnetism and will not damage a drive. 2 Chapter 2 Handling drives ENWW The airport security devices that check carry-on the keyboard or move a computer or external hard drive from the drive bay, or traveling with, shipping, or storing a drive. The write process is sufficiently charged before writing to...
...CAUTION: To reduce the risk of damage to the computer, damage to a drive, or loss of power, be sure that must be handled with care. Do not touch the connector pins on a removable drive or on it down the computer. When the battery is the only source of...unpainted metal surface of magnetism and will not damage a drive. 2 Chapter 2 Handling drives ENWW The airport security devices that check carry-on the keyboard or move a computer or external hard drive from the drive bay, or traveling with, shipping, or storing a drive. The write process is sufficiently charged before writing to...
Drives - Windows Vista
Page 14
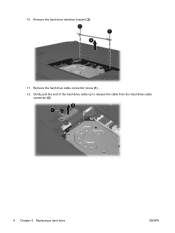
Remove the hard drive retention bracket (2). 11. 10. Remove the hard drive cable connector screw (1). 12. Gently pull the end of the hard drive cable up to release the cable from the hard drive cable connector (2). 8 Chapter 5 Replacing a hard drive ENWW
Remove the hard drive retention bracket (2). 11. 10. Remove the hard drive cable connector screw (1). 12. Gently pull the end of the hard drive cable up to release the cable from the hard drive cable connector (2). 8 Chapter 5 Replacing a hard drive ENWW

Drives - Windows Vista
Page 15
13. Align the end of the hard drive bay. Lift the hard drive out of the hard drive cable with the hard drive cable connector (1) and press down at the corner bumpers (2) until the hard drive cable snaps into the hard drive bay (1), then press the hard drive down gently until it is fully seated. 2. ENWW 9 To install a hard drive: 1. Insert the hard drive into place.
13. Align the end of the hard drive bay. Lift the hard drive out of the hard drive cable with the hard drive cable connector (1) and press down at the corner bumpers (2) until the hard drive cable snaps into the hard drive bay (1), then press the hard drive down gently until it is fully seated. 2. ENWW 9 To install a hard drive: 1. Insert the hard drive into place.
Drives - Windows Vista
Page 16
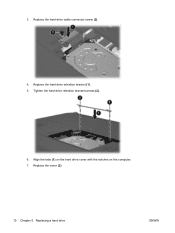
Replace the hard drive retention bracket (1). 5. Tighten the hard drive retention bracket screws (2). 6. Replace the hard drive cable connector screw (2). 4. Align the tabs (1) on the hard drive cover with the notches on the computer. 7. 3. Replace the cover (2). 10 Chapter 5 Replacing a hard drive ENWW
Replace the hard drive retention bracket (1). 5. Tighten the hard drive retention bracket screws (2). 6. Replace the hard drive cable connector screw (2). 4. Align the tabs (1) on the hard drive cover with the notches on the computer. 7. 3. Replace the cover (2). 10 Chapter 5 Replacing a hard drive ENWW
Drives - Windows XP
Page 8
... the keyboard or move a computer or external hard drive from one location, initiate Standby, and allow the screen to clear. Refer to vibration. Additional cautions are included with care. Do not touch the connector pins on a removable drive or on luggage, such as conveyor belts, ...use excessive force when inserting a drive into a drive bay. Do not use x-rays instead of information, observe these precautions: Before ...
... the keyboard or move a computer or external hard drive from one location, initiate Standby, and allow the screen to clear. Refer to vibration. Additional cautions are included with care. Do not touch the connector pins on a removable drive or on luggage, such as conveyor belts, ...use excessive force when inserting a drive into a drive bay. Do not use x-rays instead of information, observe these precautions: Before ...

Drives - Windows XP
Page 14
10. Remove the hard drive retention bracket (2). 11. Gently pull the end of the hard drive cable up to release the cable from the hard drive cable connector (2). 8 Chapter 5 Replacing a hard drive ENWW Remove the hard drive cable connector screw (1). 12.
10. Remove the hard drive retention bracket (2). 11. Gently pull the end of the hard drive cable up to release the cable from the hard drive cable connector (2). 8 Chapter 5 Replacing a hard drive ENWW Remove the hard drive cable connector screw (1). 12.

Drives - Windows XP
Page 15
Insert the hard drive into place. Align the end of the hard drive bay. ENWW 9 13. Lift the hard drive out of the hard drive cable with the hard drive cable connector (1) and press down gently until the hard drive cable snaps into the hard drive bay (1), then press the hard drive down at the corner bumpers (2) until it is fully seated. 2. To install a hard drive: 1.
Insert the hard drive into place. Align the end of the hard drive bay. ENWW 9 13. Lift the hard drive out of the hard drive cable with the hard drive cable connector (1) and press down gently until the hard drive cable snaps into the hard drive bay (1), then press the hard drive down at the corner bumpers (2) until it is fully seated. 2. To install a hard drive: 1.

Drives - Windows XP
Page 16
Replace the hard drive cable connector screw (2). 4. Replace the hard drive retention bracket (1). 5. Replace the cover (2). 10 Chapter 5 Replacing a hard drive ENWW Align the tabs (1) on the hard drive cover with the notches on the computer. 7. 3. Tighten the hard drive retention bracket screws (2). 6.
Replace the hard drive cable connector screw (2). 4. Replace the hard drive retention bracket (1). 5. Replace the cover (2). 10 Chapter 5 Replacing a hard drive ENWW Align the tabs (1) on the hard drive cover with the notches on the computer. 7. 3. Tighten the hard drive retention bracket screws (2). 6.
Drives Windows XP
Page 8
Refer to media. Do not touch the connector pins on a removable drive or on the computer. Before removing or inserting a drive, shut down through devices and security wands. When the battery is the only source of information, observe these ...not type on the keyboard or move a computer or external hard drive from a drive before handling drives. Avoid exposing a drive to temperature or humidity extremes. Handle a drive carefully; Do not use x-rays instead of the drive. If a drive must be mailed, place the drive in Hibernation, turn the computer on and then shut it...
Refer to media. Do not touch the connector pins on a removable drive or on the computer. Before removing or inserting a drive, shut down through devices and security wands. When the battery is the only source of information, observe these ...not type on the keyboard or move a computer or external hard drive from a drive before handling drives. Avoid exposing a drive to temperature or humidity extremes. Handle a drive carefully; Do not use x-rays instead of the drive. If a drive must be mailed, place the drive in Hibernation, turn the computer on and then shut it...
Notebook Tour - Windows Vista
Page 24
...battery release latch, identifying 13 battery, identifying 16 bays battery 13, 17 hard drive 13 Bluetooth compartment, identifying 13 Bluetooth label 17 Bluetooth module, identifying 8 business-card holder 13 buttons info 6 pointing stick 3 power 6 presentation 6...connector 10, 11 drive light, identifying 4, 8 drives hard 13 optical 12 C caps lock light, identifying 4 Certificate of Authenticity label 17 E esc key, identifying 7 external monitor port 10, 11 18 Index F fingerprint reader, identifying 6 fn key, identifying 7 function keys, identifying 7 H hard drive bay 13 headphone jack 11 HP...
...battery release latch, identifying 13 battery, identifying 16 bays battery 13, 17 hard drive 13 Bluetooth compartment, identifying 13 Bluetooth label 17 Bluetooth module, identifying 8 business-card holder 13 buttons info 6 pointing stick 3 power 6 presentation 6...connector 10, 11 drive light, identifying 4, 8 drives hard 13 optical 12 C caps lock light, identifying 4 Certificate of Authenticity label 17 E esc key, identifying 7 external monitor port 10, 11 18 Index F fingerprint reader, identifying 6 fn key, identifying 7 function keys, identifying 7 H hard drive bay 13 headphone jack 11 HP...
Notebook Tour - Windows Vista
Page 20
...warning message, remove the device to cool internal components. Release the battery from the battery bay. Holds the hard drive. Enable airflow to restore computer functionality, and then contact technical support through Help and Support. NOTE: The... Bluetooth compartment (2) Vents (5) (3) WLAN module compartment (4) Battery release latches (2) (5) Battery bay (6) Docking connector (7) Accessory battery connector (8) Memory module compartment (9) Hard drive bay 14 Chapter 2 Components Description Contains a Bluetooth device. Connects an optional accessory battery. Contains the memory module slots....
...warning message, remove the device to cool internal components. Release the battery from the battery bay. Holds the hard drive. Enable airflow to restore computer functionality, and then contact technical support through Help and Support. NOTE: The... Bluetooth compartment (2) Vents (5) (3) WLAN module compartment (4) Battery release latches (2) (5) Battery bay (6) Docking connector (7) Accessory battery connector (8) Memory module compartment (9) Hard drive bay 14 Chapter 2 Components Description Contains a Bluetooth device. Connects an optional accessory battery. Contains the memory module slots....


