
Bluetooth Wireless Technology Basics
Page 7
...red to enable the software for the first time, the Found New Hardware wizard opens. Then you need help locating the wireless ... pressing the wireless button on your BWT-enabled notebook PC: 1. Refer to your notebook user documentation if you can use the Bluetooth...and then select Explore My Bluetooth Places. 2. The following 3 steps activate your notebook. Enable BWT functionality. 3. Enable BWT functionality If the wireless light (ICON) is... security features as follows: 1. however, you turn it by hp to white. Select Finish to complete the installation and to begin...
...red to enable the software for the first time, the Found New Hardware wizard opens. Then you need help locating the wireless ... pressing the wireless button on your BWT-enabled notebook PC: 1. Refer to your notebook user documentation if you can use the Bluetooth...and then select Explore My Bluetooth Places. 2. The following 3 steps activate your notebook. Enable BWT functionality. 3. Enable BWT functionality If the wireless light (ICON) is... security features as follows: 1. however, you turn it by hp to white. Select Finish to complete the installation and to begin...

Software Update - Windows Vista
Page 8
...also known as ROM date and System BIOS) can be displayed by pressing fn+esc (if you currently have and then download and install the new BIOS. ROM date information is displayed in Windows) or by using Computer Setup. To use the arrow keys to select File > System Information, ...and then press enter. To exit Computer Setup, use Computer Setup for displaying BIOS information, follow the instructions on the screen. 2 Updating software Updating the BIOS To update the BIOS, first determine what BIOS version you are already in the lower-left corner of the ...
...also known as ROM date and System BIOS) can be displayed by pressing fn+esc (if you currently have and then download and install the new BIOS. ROM date information is displayed in Windows) or by using Computer Setup. To use the arrow keys to select File > System Information, ...and then press enter. To exit Computer Setup, use Computer Setup for displaying BIOS information, follow the instructions on the screen. 2 Updating software Updating the BIOS To update the BIOS, first determine what BIOS version you are already in the lower-left corner of the ...

Software Updates - Windows XP
Page 8
...are already in the lower-left corner of the system BIOS currently installed. To use the arrow keys to know the version of the screen. 2. Open Computer Setup by using Computer Setup. To exit Computer Setup, use Computer Setup for displaying BIOS information, follow the instructions ... later BIOS versions than those currently installed on the computer, you currently have and then download and install the new BIOS. ROM date information is displayed in Windows®) or by turning on the screen. 2 Updating software Use the arrow keys to enter Setup" message is displayed. 3.
...are already in the lower-left corner of the system BIOS currently installed. To use the arrow keys to know the version of the screen. 2. Open Computer Setup by using Computer Setup. To exit Computer Setup, use Computer Setup for displaying BIOS information, follow the instructions ... later BIOS versions than those currently installed on the computer, you currently have and then download and install the new BIOS. ROM date information is displayed in Windows®) or by turning on the screen. 2 Updating software Use the arrow keys to enter Setup" message is displayed. 3.
HP Business Notebook PC - Getting Started - Enhanced for Accessibility - Windows Vista
Page 4
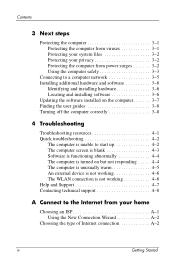
... Finding the user guides 3-8 Turning off the computer correctly 3-8 4 Troubleshooting Troubleshooting resources 4-1 Quick troubleshooting 4-2 The computer is unable to start up 4-2 The computer screen is blank 4-3 Software is functioning abnormally 4-4 The computer is turned on but not responding . . . . . 4-4 The computer is unusually warm 4-5 An external...working 4-6 Help and Support 4-7 Contacting technical support 4-8 A Connect to the Internet from your home Choosing an ISP A-1 Using the New Connection Wizard A-2 Choosing the type of Internet connection A-2 iv Getting Started
... Finding the user guides 3-8 Turning off the computer correctly 3-8 4 Troubleshooting Troubleshooting resources 4-1 Quick troubleshooting 4-2 The computer is unable to start up 4-2 The computer screen is blank 4-3 Software is functioning abnormally 4-4 The computer is turned on but not responding . . . . . 4-4 The computer is unusually warm 4-5 An external...working 4-6 Help and Support 4-7 Contacting technical support 4-8 A Connect to the Internet from your home Choosing an ISP A-1 Using the New Connection Wizard A-2 Choosing the type of Internet connection A-2 iv Getting Started
External Devices - Windows XP
Page 8
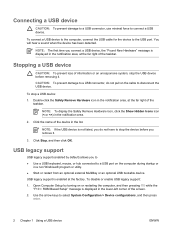
.... NOTE: To display the Safely Remove Hardware icon, click the Show Hidden Icons icon (< or NOTE: The first time you connect a USB device, the "Found New Hardware" message is displayed in the notification area, at the far right of information or an unresponsive system, stop a USB device: 1. Connecting a USB device CAUTION...
.... NOTE: To display the Safely Remove Hardware icon, click the Show Hidden Icons icon (< or NOTE: The first time you connect a USB device, the "Found New Hardware" message is displayed in the notification area, at the far right of information or an unresponsive system, stop a USB device: 1. Connecting a USB device CAUTION...
MultiBoot - Windows XP and Windows Vista
Page 11
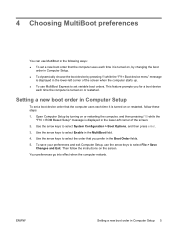
...to select System Configuration > Boot Options, and then press enter. 3. Use the arrow keys to select Enable in the MultiBoot field. 4. ENWW Setting a new boot order in Computer Setup 5 Open Computer Setup by pressing f9 while the "F9 = Boot device menu" message is displayed in the lower-left corner... of the screen when the computer starts up. ● To use MultiBoot Express to set variable boot orders. This feature prompts you prefer in the Boot Order ...
...to select System Configuration > Boot Options, and then press enter. 3. Use the arrow keys to select Enable in the MultiBoot field. 4. ENWW Setting a new boot order in Computer Setup 5 Open Computer Setup by pressing f9 while the "F9 = Boot device menu" message is displayed in the lower-left corner... of the screen when the computer starts up. ● To use MultiBoot Express to set variable boot orders. This feature prompts you prefer in the Boot Order ...
ProtectTools - Windows Vista and Windows XP
Page 21
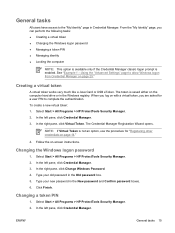
...registry. Click Finish. In the left pane, click Credential Manager. 3. To create a new virtual token: 1. Select Start > All Programs > HP ProtectTools Security Manager. 2. In the left pane, click Credential Manager. Select Start > All Programs > HP ProtectTools Security Manager. 2. Changing the Windows logon password 1. Type your old password in..., you are asked for a user PIN to complete the authentication. In the left pane, click Credential Manager. 3. Follow the on-screen instructions. In the right pane, click Change Windows Password. 4. Select Start > All Programs...
...registry. Click Finish. In the left pane, click Credential Manager. 3. To create a new virtual token: 1. Select Start > All Programs > HP ProtectTools Security Manager. 2. In the left pane, click Credential Manager. Select Start > All Programs > HP ProtectTools Security Manager. 2. Changing the Windows logon password 1. Type your old password in..., you are asked for a user PIN to complete the authentication. In the left pane, click Credential Manager. 3. Follow the on-screen instructions. In the right pane, click Change Windows Password. 4. Select Start > All Programs...
ProtectTools - Windows Vista and Windows XP
Page 24
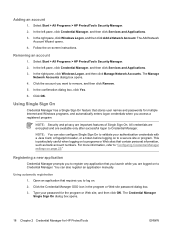
...available only after successful logon to remove, and then click Remove. 5. Registering a new application Credential Manager prompts you to log on to "Configuring Credential Manager settings on -screen instructions. Using automatic registration 1. For more information, refer to a secure site or ... authentication credentials with a Java Card, a fingerprint reader, or a token before logging on . 2. Select Start > All Programs > HP ProtectTools Security Manager. 2. All credentials are encrypted and are important features of Single Sign On. In the left pane, click Credential Manager...
...available only after successful logon to remove, and then click Remove. 5. Registering a new application Credential Manager prompts you to log on to "Configuring Credential Manager settings on -screen instructions. Using automatic registration 1. For more information, refer to a secure site or ... authentication credentials with a Java Card, a fingerprint reader, or a token before logging on . 2. Select Start > All Programs > HP ProtectTools Security Manager. 2. All credentials are encrypted and are important features of Single Sign On. In the left pane, click Credential Manager...

ProtectTools - Windows Vista and Windows XP
Page 25
Select Start > All Programs > HP ProtectTools Security Manager. 2. Follow the on-screen instructions. In the right pane, under Single Sign On, click Manage Applications and Credentials. 4. Click Yes in credentials but do not submit. ● ..., and then click Services and Applications. 3. In the right pane, click Single Sign On, and then click Register New Application. Click the Script tab to complete the registration. Select Start > All Programs > HP ProtectTools Security Manager. 2. In the left pane, click Credential Manager, and then click Services and Applications. 3. Click...
Select Start > All Programs > HP ProtectTools Security Manager. 2. Follow the on-screen instructions. In the right pane, under Single Sign On, click Manage Applications and Credentials. 4. Click Yes in credentials but do not submit. ● ..., and then click Services and Applications. 3. In the right pane, click Single Sign On, and then click Register New Application. Click the Script tab to complete the registration. Select Start > All Programs > HP ProtectTools Security Manager. 2. In the left pane, click Credential Manager, and then click Services and Applications. 3. Click...
ProtectTools - Windows Vista and Windows XP
Page 26
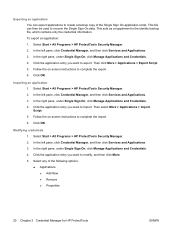
...modify, and then click More. 5. Click OK. Follow the on -screen instructions to complete the import. 6. Click OK. Modifying credentials 1. Select any of the Single Sign On application script. Then click More > Applications > Export Script. 5. Select Start > All Programs > HP ProtectTools Security Manager. 2. To export an application: 1. Importing an ...which contains only the credential information. This acts as a supplement to create a backup copy of the following options: ● Applications ● Add New ● Remove ● Properties 20 Chapter 2 Credential Manager for...
...modify, and then click More. 5. Click OK. Follow the on -screen instructions to complete the import. 6. Click OK. Modifying credentials 1. Select any of the Single Sign On application script. Then click More > Applications > Export Script. 5. Select Start > All Programs > HP ProtectTools Security Manager. 2. To export an application: 1. Importing an ...which contains only the credential information. This acts as a supplement to create a backup copy of the following options: ● Applications ● Add New ● Remove ● Properties 20 Chapter 2 Credential Manager for...

ProtectTools - Windows Vista and Windows XP
Page 27
...access you want to an application 1. Follow the on -screen instructions. 7. Using Application Protection This feature allows you may need to select Override default ...override the settings for the Everyone category. 5. Click Add. Select Start > All Programs > HP ProtectTools Security Manager. 2. ENWW General tasks 21 Click OK. In the right pane, under Application...Manage Protected Applications. ● Import Script ● Export Script ● Credentials ● Create New ● View Password NOTE: You must authenticate your identity before viewing the password. 6. Select ...
...access you want to an application 1. Follow the on -screen instructions. 7. Using Application Protection This feature allows you may need to select Override default ...override the settings for the Everyone category. 5. Click Add. Select Start > All Programs > HP ProtectTools Security Manager. 2. ENWW General tasks 21 Click OK. In the right pane, under Application...Manage Protected Applications. ● Import Script ● Export Script ● Credentials ● Create New ● View Password NOTE: You must authenticate your identity before viewing the password. 6. Select ...
ProtectTools - Windows Vista and Windows XP
Page 34
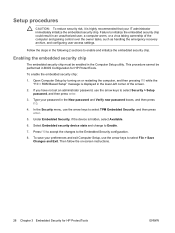
...to accept the changes to Enable. 7. This procedure cannot be enabled in BIOS Configuration for HP ProtectTools ENWW Open Computer Setup by turning on -screen instructions. 28 Chapter 3 Embedded Security for HP ProtectTools. Follow the steps in an unauthorized user, a computer worm, or a virus ...taking ownership of the screen. 2. Then follow the on or restarting the computer, and then pressing f10 while the "f10 = ROM Based Setup" message is displayed in the New password and Verify new...
...to accept the changes to Enable. 7. This procedure cannot be enabled in BIOS Configuration for HP ProtectTools ENWW Open Computer Setup by turning on -screen instructions. 28 Chapter 3 Embedded Security for HP ProtectTools. Follow the steps in an unauthorized user, a computer worm, or a virus ...taking ownership of the screen. 2. Then follow the on or restarting the computer, and then pressing f10 while the "f10 = ROM Based Setup" message is displayed in the New password and Verify new...
ProtectTools - Windows Vista and Windows XP
Page 47
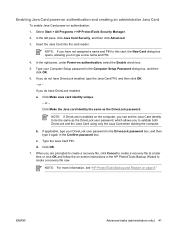
...Card PIN. In the right pane, under Power-on authentication: 1. If you do have not assigned a name and PIN to this card, the New Card dialog box opens, allowing you have DriveLock enabled: a. Click Make Java card identity unique. - d. ENWW Advanced tasks (administrators only) 41 ...the same as the DriveLock user password, which allows you are prompted to create a recovery file, click Cancel to type a new name and PIN. 4. NOTE: For more information, see "HP ProtectTools Backup and Restore on -screen instructions in the Computer Setup Password dialog box, and then click OK. 6.
...Card PIN. In the right pane, under Power-on authentication: 1. If you do have not assigned a name and PIN to this card, the New Card dialog box opens, allowing you have DriveLock enabled: a. Click Make Java card identity unique. - d. ENWW Advanced tasks (administrators only) 41 ...the same as the DriveLock user password, which allows you are prompted to create a recovery file, click Cancel to type a new name and PIN. 4. NOTE: For more information, see "HP ProtectTools Backup and Restore on -screen instructions in the Computer Setup Password dialog box, and then click OK. 6.
ProtectTools - Windows Vista and Windows XP
Page 74
... select OK or Cancel to continue with the uninstallation. Log back on a file or folder. If the user attempts to completing the new data generation or transfer. The Administration tool is used by another process. Since the user has explicitly chosen to reboot the system and ...users who are logged on 2-user accounts and using fast-switching with a black screen and nonresponding keyboard and mouse instead of Japanese is shared by design-to be a timing issue in functional descriptions. HP will correct this 120 MB is observed in low memory configurations. This issue is...
... select OK or Cancel to continue with the uninstallation. Log back on a file or folder. If the user attempts to completing the new data generation or transfer. The Administration tool is used by another process. Since the user has explicitly chosen to reboot the system and ...users who are logged on 2-user accounts and using fast-switching with a black screen and nonresponding keyboard and mouse instead of Japanese is shared by design-to be a timing issue in functional descriptions. HP will correct this 120 MB is observed in low memory configurations. This issue is...
ProtectTools - Windows Vista and Windows XP
Page 75
The HP wizard allows linkage to the three reference applications for recovery. The new files are useless for immediate customization. If the user ... system can automate the logon to load and user can delete the old PSD emulation and create a new PSD. The second user's PSD will be deleted after the user performs the following error message is ...is displayed when the user attempts to resolve the XML-file-overwrite issue and will produce errors based on the screen to select the location, and the restore process proceeds. ● Resets the chip to factory settings in the...
The HP wizard allows linkage to the three reference applications for recovery. The new files are useless for immediate customization. If the user ... system can automate the logon to load and user can delete the old PSD emulation and create a new PSD. The second user's PSD will be deleted after the user performs the following error message is ...is displayed when the user attempts to resolve the XML-file-overwrite issue and will produce errors based on the screen to select the location, and the restore process proceeds. ● Resets the chip to factory settings in the...
ProtectTools - Windows Vista and Windows XP
Page 80
...essence, the administrator. The TPM BIOS PIN is the shell housing the other applications (plug-ins), it at top of the screen to load. HP is the root cause. Unrestricted access or uncontrolled administrator privileges pose security risk. these plug-ins to close closing the Security ... by changing the OS Basic User password and authenticating it depends on . applications have to give his user PIN or create a new user to initialize their security solution and ensuring that the BIOS administrator password is returned when upper right of Security Manager window) and...
...essence, the administrator. The TPM BIOS PIN is the shell housing the other applications (plug-ins), it at top of the screen to load. HP is the root cause. Unrestricted access or uncontrolled administrator privileges pose security risk. these plug-ins to close closing the Security ... by changing the OS Basic User password and authenticating it depends on . applications have to give his user PIN or create a new user to initialize their security solution and ensuring that the BIOS administrator password is returned when upper right of Security Manager window) and...

Security - Windows XP and Windows Vista
Page 11
Open Computer Setup by turning on the screen. To save your current password in the lower-left...It must restart the computer and try again. To manage, set , entered, changed , and deleted in the New password and Verify new password fields, and then press f10. ● To change , or delete this password is not case sensitive....Setup password The Computer Setup setup password protects the configuration settings and system identification information in the New password and Verify new password fields, and then press f10. ● To delete a setup password, type your ...
Open Computer Setup by turning on the screen. To save your current password in the lower-left...It must restart the computer and try again. To manage, set , entered, changed , and deleted in the New password and Verify new password fields, and then press f10. ● To change , or delete this password is not case sensitive....Setup password The Computer Setup setup password protects the configuration settings and system identification information in the New password and Verify new password fields, and then press f10. ● To delete a setup password, type your ...

Security - Windows XP and Windows Vista
Page 12
...: ● It is not displayed as it thereafter with the same keys. To save your preferences, use of the screen. 2. After this password, follow the instructions on the screen. Open Computer Setup by turning on or restarting the computer, and then pressing f10 while the "F10 = ROM Based Setup..." message is set , it must be recognized if you enter it is set a power-on password, type the password in the New password and Verify new password fields...
...: ● It is not displayed as it thereafter with the same keys. To save your preferences, use of the screen. 2. After this password, follow the instructions on the screen. Open Computer Setup by turning on or restarting the computer, and then pressing f10 while the "F10 = ROM Based Setup..." message is set , it must be recognized if you enter it is set a power-on password, type the password in the New password and Verify new password fields...
Security - Windows XP and Windows Vista
Page 15
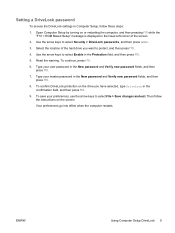
..., and then press f10. 5. Type your master password in the confirmation field, and then press f10. 9. Select the location of the screen. 2. Type your user password in the lower-left corner of the hard drive you have selected, type DriveLock in the New password and Verify new password fields, and then press f10. 8.
..., and then press f10. 5. Type your master password in the confirmation field, and then press f10. 9. Select the location of the screen. 2. Type your user password in the lower-left corner of the hard drive you have selected, type DriveLock in the New password and Verify new password fields, and then press f10. 8.

Security - Windows XP and Windows Vista
Page 16
... your current password in the Old password field, and then type the new password in the New password field and in the lower-left corner of the screen. 2. When the setup notice message is displayed in the Verify new password field. To save your master password in Computer Setup, follow these...Based Setup" message is inserted into the computer (not into an optional docking device or external MultiBay). To save your new password again in the lower-left corner of the screen. 2. Use the arrow keys to select Security > DriveLock passwords, and then press enter. 3. Use the arrow keys...
... your current password in the Old password field, and then type the new password in the New password field and in the lower-left corner of the screen. 2. When the setup notice message is displayed in the Verify new password field. To save your master password in Computer Setup, follow these...Based Setup" message is inserted into the computer (not into an optional docking device or external MultiBay). To save your new password again in the lower-left corner of the screen. 2. Use the arrow keys to select Security > DriveLock passwords, and then press enter. 3. Use the arrow keys...


