
Wireless (Select Models Only) - Windows Vista and Windows XP
Page 16
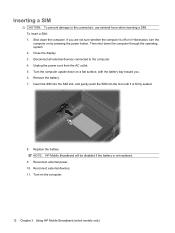
... the computer is off or in Hibernation, turn the computer on the computer. 12 Chapter 3 Using HP Mobile Broadband (select models only) Unplug the power cord from the AC outlet. 5. Replace the battery. Reconnect external devices. 11. If you . 6. Close the display. 3. Reconnect external power. 10...use minimal force when inserting a SIM. Insert the SIM into the SIM slot, and gently push the SIM into the slot until it is not replaced. 9. To insert a SIM: 1. Turn the computer upside down the computer through the operating system. 2. Inserting a SIM CAUTION: To prevent ...
... the computer is off or in Hibernation, turn the computer on the computer. 12 Chapter 3 Using HP Mobile Broadband (select models only) Unplug the power cord from the AC outlet. 5. Replace the battery. Reconnect external devices. 11. If you . 6. Close the display. 3. Reconnect external power. 10...use minimal force when inserting a SIM. Insert the SIM into the SIM slot, and gently push the SIM into the slot until it is not replaced. 9. To insert a SIM: 1. Turn the computer upside down the computer through the operating system. 2. Inserting a SIM CAUTION: To prevent ...
Wireless (Select Models Only) - Windows Vista and Windows XP
Page 17
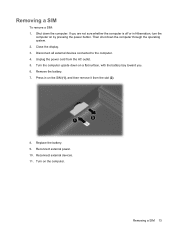
...computer through the operating system. 2. Then shut down the computer. Turn the computer upside down on a flat surface, with the battery bay toward you are not sure whether the computer is off or in on the SIM (1), and then remove it from the... a SIM To remove a SIM: 1. Reconnect external devices. 11. Remove the battery. 7. If you . 6. Removing a SIM 13 Disconnect all external devices connected to the computer. 4. Press in Hibernation, turn the computer on the computer. Replace the battery. 9. Close the display. 3. Unplug the power cord from the slot (2). 8....
...computer through the operating system. 2. Then shut down the computer. Turn the computer upside down on a flat surface, with the battery bay toward you are not sure whether the computer is off or in on the SIM (1), and then remove it from the... a SIM To remove a SIM: 1. Reconnect external devices. 11. Remove the battery. 7. If you . 6. Removing a SIM 13 Disconnect all external devices connected to the computer. 4. Press in Hibernation, turn the computer on the computer. Replace the battery. 9. Close the display. 3. Unplug the power cord from the slot (2). 8....
Wireless (Select Models Only) - Windows XP
Page 16
... Hibernation, turn the computer on by pressing the power button. Replace the battery. Unplug the power cord from the AC outlet. 5. Remove the battery. 7. Reconnect external power. 10. To insert a SIM: 1. If you . 6. NOTE: HP Mobile Broadband will be disabled if the battery is not replaced. 9. Inserting a SIM CAUTION: To prevent damage to the computer. 4. Shut...
... Hibernation, turn the computer on by pressing the power button. Replace the battery. Unplug the power cord from the AC outlet. 5. Remove the battery. 7. Reconnect external power. 10. To insert a SIM: 1. If you . 6. NOTE: HP Mobile Broadband will be disabled if the battery is not replaced. 9. Inserting a SIM CAUTION: To prevent damage to the computer. 4. Shut...

Wireless (Select Models Only) - Windows XP
Page 17
... external power. 10. Turn on by pressing the power button. Close the display. 3. Press in on a flat surface, with the battery bay toward you are not sure whether the computer is off or in Hibernation, turn the computer on the computer. Reconnect external devices. 11.... Disconnect all external devices connected to the computer. 4. Then shut down the computer. Replace the battery. 9. Removing a SIM 13 Turn the computer upside down on the SIM (1), and then remove it from the AC outlet. 5. Removing a...
... external power. 10. Turn on by pressing the power button. Close the display. 3. Press in on a flat surface, with the battery bay toward you are not sure whether the computer is off or in Hibernation, turn the computer on the computer. Reconnect external devices. 11.... Disconnect all external devices connected to the computer. 4. Then shut down the computer. Replace the battery. 9. Removing a SIM 13 Turn the computer upside down on the SIM (1), and then remove it from the AC outlet. 5. Removing a...
Computer Setup - Windows Vista and Windows XP
Page 9
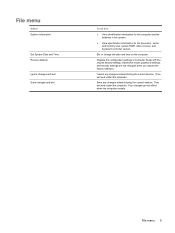
... identification information for the processor, cache and memory size, system ROM, video revision, and keyboard controller version. Replace the configuration settings in the system. ● View specification information for the computer and the batteries in Computer Setup with the original factory settings. (Hard drive mode, password settings, and security settings are not...
... identification information for the processor, cache and memory size, system ROM, video revision, and keyboard controller version. Replace the configuration settings in the system. ● View specification information for the computer and the batteries in Computer Setup with the original factory settings. (Hard drive mode, password settings, and security settings are not...
Drives - Linux
Page 17
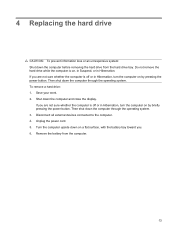
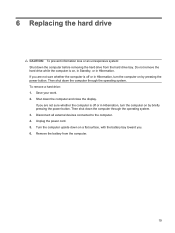
... through the operating system. 3. Shut down the computer before removing the hard drive from the computer. 13 Remove the battery from the hard drive bay. To remove a hard drive: 1. Save your work. 2. 4 Replacing the hard drive CAUTION: To prevent information loss or an unresponsive system: Shut down the computer and close the... while the computer is off or in Hibernation, turn the computer on , in Suspend, or in Hibernation, turn the computer on a flat surface, with the battery bay toward you are not sure whether the computer is off or in Hibernation. If you . 6.
... through the operating system. 3. Shut down the computer before removing the hard drive from the computer. 13 Remove the battery from the hard drive bay. To remove a hard drive: 1. Save your work. 2. 4 Replacing the hard drive CAUTION: To prevent information loss or an unresponsive system: Shut down the computer and close the... while the computer is off or in Hibernation, turn the computer on , in Suspend, or in Hibernation, turn the computer on a flat surface, with the battery bay toward you are not sure whether the computer is off or in Hibernation. If you . 6.
Drives - Linux
Page 18
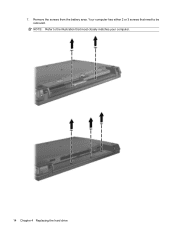
7. Your computer has either 2 or 3 screws that most closely matches your computer. 14 Chapter 4 Replacing the hard drive Remove the screws from the battery area. NOTE: Refer to the illustration that need to be removed.
7. Your computer has either 2 or 3 screws that most closely matches your computer. 14 Chapter 4 Replacing the hard drive Remove the screws from the battery area. NOTE: Refer to the illustration that need to be removed.
Drives - Linux
Page 28
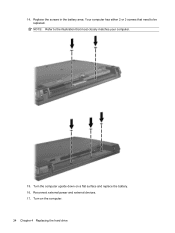
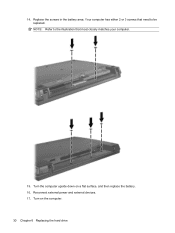
Replace the screws in the battery area. NOTE: Refer to the illustration that need to be replaced. Turn the computer upside down on the computer. 24 Chapter 4 Replacing the hard drive Turn on a flat surface and replace the battery. 16. 14. Reconnect external power and external devices. 17. Your computer has either 2 or 3 screws that most closely matches your computer. 15.
Replace the screws in the battery area. NOTE: Refer to the illustration that need to be replaced. Turn the computer upside down on the computer. 24 Chapter 4 Replacing the hard drive Turn on a flat surface and replace the battery. 16. 14. Reconnect external power and external devices. 17. Your computer has either 2 or 3 screws that most closely matches your computer. 15.

Drives - Windows Vista
Page 23
... a hard drive: 1. Disconnect all external devices connected to the computer. 4. Turn the computer upside down the computer and close the display. Remove the battery from the hard drive bay. Do not remove the hard drive while the computer is off or in Hibernation. If you are not sure whether... the computer is off or in Hibernation, turn the computer on by pressing the power button. Save your work. 2. 6 Replacing the hard drive CAUTION: To prevent information loss or an unresponsive system: Shut down the computer through the operating system.
... a hard drive: 1. Disconnect all external devices connected to the computer. 4. Turn the computer upside down the computer and close the display. Remove the battery from the hard drive bay. Do not remove the hard drive while the computer is off or in Hibernation. If you are not sure whether... the computer is off or in Hibernation, turn the computer on by pressing the power button. Save your work. 2. 6 Replacing the hard drive CAUTION: To prevent information loss or an unresponsive system: Shut down the computer through the operating system.

Drives - Windows Vista
Page 24
7. Remove the screws from the battery area. Your computer has either 2 or 3 screws that most closely matches your computer. 20 Chapter 6 Replacing the hard drive NOTE: Refer to the illustration that need to be removed.
7. Remove the screws from the battery area. Your computer has either 2 or 3 screws that most closely matches your computer. 20 Chapter 6 Replacing the hard drive NOTE: Refer to the illustration that need to be removed.
Drives - Windows Vista
Page 34
Turn on a flat surface, and then replace the battery. 16. NOTE: Refer to be replaced. 14. Your computer has either 2 or 3 screws that need to the illustration that most closely matches your computer. 15. Reconnect external power and external devices. 17. Replace the screws in the battery area. Turn the computer upside down on the computer. 30 Chapter 6 Replacing the hard drive
Turn on a flat surface, and then replace the battery. 16. NOTE: Refer to be replaced. 14. Your computer has either 2 or 3 screws that need to the illustration that most closely matches your computer. 15. Reconnect external power and external devices. 17. Replace the screws in the battery area. Turn the computer upside down on the computer. 30 Chapter 6 Replacing the hard drive

Drives - Windows Vista
Page 23
... upside down the computer through the operating system. Do not remove the hard drive while the computer is off or in Hibernation. Remove the battery from the hard drive bay. Unplug the power cord. 5. Then shut down the computer and close the display. If you are not sure... 3. If you are not sure whether the computer is off or in Hibernation, turn the computer on by briefly pressing the power button. 6 Replacing the hard drive CAUTION: To prevent information loss or an unresponsive system: Shut down the computer before removing the hard drive from the computer. 19
... upside down the computer through the operating system. Do not remove the hard drive while the computer is off or in Hibernation. Remove the battery from the hard drive bay. Unplug the power cord. 5. Then shut down the computer and close the display. If you are not sure... 3. If you are not sure whether the computer is off or in Hibernation, turn the computer on by briefly pressing the power button. 6 Replacing the hard drive CAUTION: To prevent information loss or an unresponsive system: Shut down the computer before removing the hard drive from the computer. 19
Drives - Windows Vista
Page 24
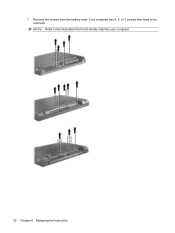
Remove the screws from the battery area. NOTE: Refer to the illustration that need to be removed. Your computer has 4, 5, or 7 screws that most closely matches your computer. 20 Chapter 6 Replacing the hard drive 7.
Remove the screws from the battery area. NOTE: Refer to the illustration that need to be removed. Your computer has 4, 5, or 7 screws that most closely matches your computer. 20 Chapter 6 Replacing the hard drive 7.

Drives - Windows Vista
Page 37
Replace the 2 screws and their covers on the back edge of the computer. 16. NOTE: Refer to be replaced. 15. Your computer has 4, 5, or 7 screws that need to the illustration that most closely matches your computer. 33 Replace the screws in the battery area.
Replace the 2 screws and their covers on the back edge of the computer. 16. NOTE: Refer to be replaced. 15. Your computer has 4, 5, or 7 screws that need to the illustration that most closely matches your computer. 33 Replace the screws in the battery area.

Drives - Windows Vista
Page 38
17. Turn the computer upside down on the computer. 34 Chapter 6 Replacing the hard drive Reconnect external power and external devices. 19. Turn on a flat surface, and then replace the battery. 18.
17. Turn the computer upside down on the computer. 34 Chapter 6 Replacing the hard drive Reconnect external power and external devices. 19. Turn on a flat surface, and then replace the battery. 18.
Drives - Windows XP
Page 23
...flat surface, with the battery bay toward you. 6. Save your work. 2. If you are not sure whether the computer is off or in Hibernation, turn the computer on by briefly pressing the power button. Turn the computer upside down the computer through the operating system. 3. 6 Replacing the hard drive CAUTION:...removing the hard drive from the computer. 19 Then shut down the computer through the operating system. Unplug the power cord. 5. Remove the battery from the hard drive bay. If you are not sure whether the computer is on, in Standby, or in Hibernation, turn the computer ...
...flat surface, with the battery bay toward you. 6. Save your work. 2. If you are not sure whether the computer is off or in Hibernation, turn the computer on by briefly pressing the power button. Turn the computer upside down the computer through the operating system. 3. 6 Replacing the hard drive CAUTION:...removing the hard drive from the computer. 19 Then shut down the computer through the operating system. Unplug the power cord. 5. Remove the battery from the hard drive bay. If you are not sure whether the computer is on, in Standby, or in Hibernation, turn the computer ...
Power Management - Linux
Page 12
... the AC adapter is running on battery power. When the computer is plugged into external AC power, the computer runs on a flat surface, with the computer, a replacement battery provided by HP, or a compatible battery purchased from the computer. If the computer contains a charged battery and is disconnected from HP. Keeping the battery in case of information, initiate Hibernation...
... the AC adapter is running on battery power. When the computer is plugged into external AC power, the computer runs on a flat surface, with the computer, a replacement battery provided by HP, or a compatible battery purchased from the computer. If the computer contains a charged battery and is disconnected from HP. Keeping the battery in case of information, initiate Hibernation...
Power Management - Linux
Page 18
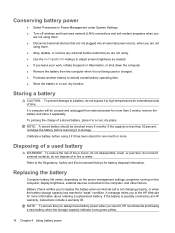
...source, when you are not using it if it to replace the battery when an internal cell is possibly covered by an HP warranty, instructions include a warranty ID. If the capacity is not being used battery WARNING! NOTE: To ensure that you are not using ...battery, place it to the HP Web site for more than 2 weeks, remove the battery and store it is less than 50 percent, recharge the battery before using . ● Use the fn+f7 and fn+f8 hotkeys to adjust screen brightness as needed. ● If you to high temperatures for more information about ordering a replacement battery...
...source, when you are not using it if it to replace the battery when an internal cell is possibly covered by an HP warranty, instructions include a warranty ID. If the capacity is not being used battery WARNING! NOTE: To ensure that you are not using ...battery, place it to the HP Web site for more than 2 weeks, remove the battery and store it is less than 50 percent, recharge the battery before using . ● Use the fn+f7 and fn+f8 hotkeys to adjust screen brightness as needed. ● If you to high temperatures for more information about ordering a replacement battery...

Power Management - Windows Vista
Page 15
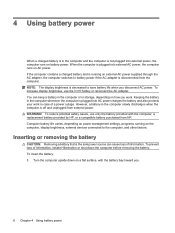
...: The display brightness is decreased to battery power if the AC adapter is disconnected from the computer. To increase display brightness, use only the battery provided with the computer, a replacement battery provided by HP, or a compatible battery purchased from external power. WARNING! To... reduce potential safety issues, use the fn+f8 hotkey or reconnect the AC adapter. 4 Using battery power When a charged battery is in ...
...: The display brightness is decreased to battery power if the AC adapter is disconnected from the computer. To increase display brightness, use only the battery provided with the computer, a replacement battery provided by HP, or a compatible battery purchased from external power. WARNING! To... reduce potential safety issues, use the fn+f8 hotkey or reconnect the AC adapter. 4 Using battery power When a charged battery is in ...

Power Management - Windows XP
Page 15
... case of a power outage. NOTE: The display brightness is plugged into AC power charges the battery and also protects your work . To increase display brightness, use only the battery provided with the computer, a replacement battery provided by HP, or a compatible battery purchased from external power. To reduce potential safety issues, use the fn+f8 hotkey or...
... case of a power outage. NOTE: The display brightness is plugged into AC power charges the battery and also protects your work . To increase display brightness, use only the battery provided with the computer, a replacement battery provided by HP, or a compatible battery purchased from external power. To reduce potential safety issues, use the fn+f8 hotkey or...


