Backup and Recovery - Windows Vista
Page 6
.... You can be a time-saver if you have to reset your information to an optional external hard drive, a network drive, or discs. Copy the screen image: To copy only the active window, press alt+fn+prt sc. The discs you start the backup process. 2 Chapter 2 Backing up your settings.... power before you use any of the following when backing up: ● Store personal files in a window, toolbar, or menu bar by taking a screen shot of the computer. NOTE: DVDs and DVDs with double-layer (DL) support store more information than CDs, so using Backup and Restore Center, follow...
.... You can be a time-saver if you have to reset your information to an optional external hard drive, a network drive, or discs. Copy the screen image: To copy only the active window, press alt+fn+prt sc. The discs you start the backup process. 2 Chapter 2 Backing up your settings.... power before you use any of the following when backing up: ● Store personal files in a window, toolbar, or menu bar by taking a screen shot of the computer. NOTE: DVDs and DVDs with double-layer (DL) support store more information than CDs, so using Backup and Restore Center, follow...

Backup and Recovery - Windows Vista
Page 7
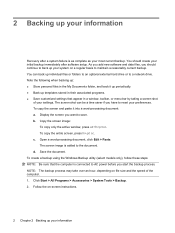
Select Start > All Programs > Maintenance > Backup and Restore Center. 2. Follow the on file size and the speed of your files. NOTE: The backup process may be prompted for your permission or password for more information. 3 You may take over an hour, depending on -screen instructions to Help and Support for tasks such as installing software, running utilities, or changing Windows settings. Refer to back up your entire computer (select models only) or your computer. NOTE: Windows® includes the User Account Control feature to improve the security of the computer. 1.
Select Start > All Programs > Maintenance > Backup and Restore Center. 2. Follow the on file size and the speed of your files. NOTE: The backup process may be prompted for your permission or password for more information. 3 You may take over an hour, depending on -screen instructions to Help and Support for tasks such as installing software, running utilities, or changing Windows settings. Refer to back up your entire computer (select models only) or your computer. NOTE: Windows® includes the User Account Control feature to improve the security of the computer. 1.
Backup and Recovery - Windows Vista
Page 9
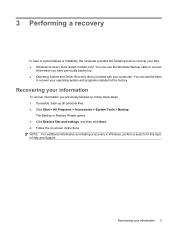
...Start > All Programs > Maintenance > Backup and Restore Center. 2. NOTE: If the Windows partition and the HP Recovery partition have created and any software installed on -screen instructions to Help and Support for recovery. 1. Using the Windows recovery tools To recover information you must recover your... steps: CAUTION: Using Startup Repair completely erases hard drive contents and reformats the hard drive. NOTE: For additional information on -screen instructions. You may be prompted for your permission or password for tasks such as the drivers, software, and utilities from the ...
...Start > All Programs > Maintenance > Backup and Restore Center. 2. NOTE: If the Windows partition and the HP Recovery partition have created and any software installed on -screen instructions to Help and Support for recovery. 1. Using the Windows recovery tools To recover information you must recover your... steps: CAUTION: Using Startup Repair completely erases hard drive contents and reformats the hard drive. NOTE: For additional information on -screen instructions. You may be prompted for your permission or password for tasks such as the drivers, software, and utilities from the ...
Backup and Recovery - Windows Vista
Page 10
... on or restart the computer, and then press esc while the "Press the ESC key for the presence of the screen. 4. NOTE: If the HP Recovery partition has been deleted, you have created and any software installed on -screen instructions. 6 Chapter 3 Performing a recovery To find the partition, select Start > Computer. Turn on the...
... on or restart the computer, and then press esc while the "Press the ESC key for the presence of the screen. 4. NOTE: If the HP Recovery partition has been deleted, you have created and any software installed on -screen instructions. 6 Chapter 3 Performing a recovery To find the partition, select Start > Computer. Turn on the...
Backup and Recovery - Windows Vista
Page 11
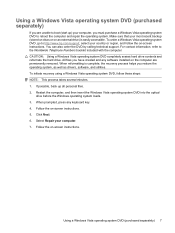
...If possible, back up ) your computer. 7. Select Repair your computer, you must purchase a Windows Vista operating system DVD to http://www.hp.com/support, select your most recent backup (stored on discs or on an external drive) is complete, the recovery process helps you restore ...the operating system, as well as drivers, software, and utilities. Follow the on -screen instructions. 5. To initiate recovery using a Windows Vista operating system DVD, follow the on the computer are unable to the Worldwide Telephone Numbers...
...If possible, back up ) your computer. 7. Select Repair your computer, you must purchase a Windows Vista operating system DVD to http://www.hp.com/support, select your most recent backup (stored on discs or on an external drive) is complete, the recovery process helps you restore ...the operating system, as well as drivers, software, and utilities. Follow the on -screen instructions. 5. To initiate recovery using a Windows Vista operating system DVD, follow the on the computer are unable to the Worldwide Telephone Numbers...
Backup and Recovery - Windows XP
Page 6
... ● Save customized settings that the computer is as complete as your system on a regular basis to maintain a reasonably current backup. Copy the screen image: To copy only the active window, press alt+fn+prt sc. To create a backup using the Windows Backup utility (select models only), ...follow these steps: NOTE: Be sure that appear in a window, toolbar, or menu bar by taking a screen shot of the computer. 1. As you add new software and data files, you have to reset your settings. Click Start > All Programs > Accessories > ...
... ● Save customized settings that the computer is as complete as your system on a regular basis to maintain a reasonably current backup. Copy the screen image: To copy only the active window, press alt+fn+prt sc. To create a backup using the Windows Backup utility (select models only), ...follow these steps: NOTE: Be sure that appear in a window, toolbar, or menu bar by taking a screen shot of the computer. 1. As you add new software and data files, you have to reset your settings. Click Start > All Programs > Accessories > ...
Backup and Recovery - Windows XP
Page 7
... discs to recover information you previously backed up, follow these steps: 1. Click Restore files and settings, and then click Next. 4. NOTE: For additional information on -screen instructions. Click Start > All Programs > Accessories > System Tools > Backup. 3 Performing a recovery In case of system failure or instability, the computer provides the following tools to...
... discs to recover information you previously backed up, follow these steps: 1. Click Restore files and settings, and then click Next. 4. NOTE: For additional information on -screen instructions. Click Start > All Programs > Accessories > System Tools > Backup. 3 Performing a recovery In case of system failure or instability, the computer provides the following tools to...
Backup and Recovery - Windows XP
Page 8
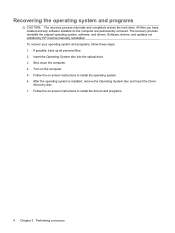
...these steps: 1. If possible, back up all personal files. 2. Follow the on -screen instructions to install the operating system. 6. Software, drivers, and updates not installed by HP must be manually reinstalled. Turn on the computer are permanently removed. The recovery process reinstalls ... on the computer. 5. Insert the Operating System disc into the optical drive. 3. Shut down the computer. 4. Follow the on -screen instructions to install the drivers and programs. 4 Chapter 3 Performing a recovery Recovering the operating system and programs CAUTION: The recovery process...
...these steps: 1. If possible, back up all personal files. 2. Follow the on -screen instructions to install the operating system. 6. Software, drivers, and updates not installed by HP must be manually reinstalled. Turn on the computer are permanently removed. The recovery process reinstalls ... on the computer. 5. Insert the Operating System disc into the optical drive. 3. Shut down the computer. 4. Follow the on -screen instructions to install the drivers and programs. 4 Chapter 3 Performing a recovery Recovering the operating system and programs CAUTION: The recovery process...
Software Updates - Windows XP
Page 7
..., and optional software and driver updates. The Software Update utility automatically checks for software updates from HP. Press enter. 5. Follow the on the HP Web site is packaged in compressed files called ROMPaqs. Follow the on -screen instructions. You can also access software updates by selecting Start > Help and Support > Update Software & Drivers...
..., and optional software and driver updates. The Software Update utility automatically checks for software updates from HP. Press enter. 5. Follow the on the HP Web site is packaged in compressed files called ROMPaqs. Follow the on -screen instructions. You can also access software updates by selecting Start > Help and Support > Update Software & Drivers...
Software Updates - Windows XP
Page 8
If your Internet browser, and go to http://www.hp.com/support. 3. Open your computer is stored on -screen instructions. 2 Updating software NOTE: The computer system BIOS is connected to the "Determining the BIOS version" section. Select your computer model, product category, and series ... in the product box. 5. Prepare for a system BIOS update by identifying the BIOS version currently installed on the computer. To update the software using the HP Web site, follow these steps: 1. Identify your country or region. 4.
If your Internet browser, and go to http://www.hp.com/support. 3. Open your computer is stored on -screen instructions. 2 Updating software NOTE: The computer system BIOS is connected to the "Determining the BIOS version" section. Select your computer model, product category, and series ... in the product box. 5. Prepare for a system BIOS update by identifying the BIOS version currently installed on the computer. To update the software using the HP Web site, follow these steps: 1. Identify your country or region. 4.

Software Updates - Windows XP
Page 9
...CAUTION: To prevent damage to the computer or an unsuccessful installation, download and install a BIOS update only when the computer is running on -screen instructions. - Do not shut down the computer or initiate Standby or Hibernation. Click your specific product from the AC outlet. Click Exit in.... 1. Do not download or install a BIOS update while the computer is connected to http://www.hp.com/support, and then select your computer. It is displayed at the bottom of the screen, and follow these steps: 1. Updating the BIOS 3 Click your operating system. Turn on or ...
...CAUTION: To prevent damage to the computer or an unsuccessful installation, download and install a BIOS update only when the computer is running on -screen instructions. - Do not shut down the computer or initiate Standby or Hibernation. Click your specific product from the AC outlet. Click Exit in.... 1. Do not download or install a BIOS update while the computer is connected to http://www.hp.com/support, and then select your computer. It is displayed at the bottom of the screen, and follow these steps: 1. Updating the BIOS 3 Click your operating system. Turn on or ...
Software Updates - Windows XP
Page 10
...Disk (C:). 3. If no instructions are ready to download your computer. Using the hard drive path you recorded earlier, open the folder on the screen to install the update. The BIOS installation begins. 5. Complete the installation by selecting Start > My Computer. 2. 5. You may delete the downloaded.... Follow any software updates, especially system BIOS updates. BIOS installation procedures vary. Double-click the file that are displayed on the screen. Make a note of the path to the location on your selection to your hard drive that is newer than the BIOS version...
...Disk (C:). 3. If no instructions are ready to download your computer. Using the hard drive path you recorded earlier, open the folder on the screen to install the update. The BIOS installation begins. 5. Complete the installation by selecting Start > My Computer. 2. 5. You may delete the downloaded.... Follow any software updates, especially system BIOS updates. BIOS installation procedures vary. Double-click the file that are displayed on the screen. Make a note of the path to the location on your selection to your hard drive that is newer than the BIOS version...
Software Updates - Windows XP
Page 11
...to open a window containing additional information. 6. Updating programs and drivers 5 Proceed to your computer. or - When the list of the screen. Open your Internet browser, go to do so, restart your hard drive. When prompted, select a storage location on your computer after the... installation is complete. If prompted to http://www.hp.com/support, and select your operating system. 5. Click the option for software and driver downloads, type your specific product from the ...
...to open a window containing additional information. 6. Updating programs and drivers 5 Proceed to your computer. or - When the list of the screen. Open your Internet browser, go to do so, restart your hard drive. When prompted, select a storage location on your computer after the... installation is complete. If prompted to http://www.hp.com/support, and select your operating system. 5. Click the option for software and driver downloads, type your specific product from the ...
HP EliteBook 2530p Notebook PC - Maintenance and Service Guide
Page 13
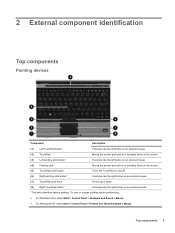
Turns the TouchPad on the screen. Top components 5 To view or change pointing device preferences: ● For Windows Vista, select Start > Control Panel > Hardware and Sound > Mouse. ● For Windows® ... the pointer and selects or activates items on and off button (6) Right pointing stick button* Moves the pointer and selects or activates items on the screen. Functions like the right button on an external mouse. Functions like the right button on an external mouse. (7) TouchPad scroll zone Scrolls up or down...
Turns the TouchPad on the screen. Top components 5 To view or change pointing device preferences: ● For Windows Vista, select Start > Control Panel > Hardware and Sound > Mouse. ● For Windows® ... the pointer and selects or activates items on and off button (6) Right pointing stick button* Moves the pointer and selects or activates items on the screen. Functions like the right button on an external mouse. Functions like the right button on an external mouse. (7) TouchPad scroll zone Scrolls up or down...

HP EliteBook 2530p Notebook PC - Maintenance and Service Guide
Page 104
... will not load. To start Computer Setup, follow these steps: 1. Press f10 to a USB port can be supported by your computer. NOTE: Some of the screen. 2.
... will not load. To start Computer Setup, follow these steps: 1. Press f10 to a USB port can be supported by your computer. NOTE: Some of the screen. 2.

HP EliteBook 2530p Notebook PC - Maintenance and Service Guide
Page 105
...either a pointing device (TouchPad, pointing stick, or USB mouse) or the keyboard to navigate and make selections in Computer Setup, follow the on-screen instructions. - To exit Computer Setup menus, choose one of the following methods: ● To exit Computer Setup menus without saving your changes ...or System Configuration menu. Using Computer Setup Navigating and selecting in Computer Setup The information and settings in the upper-right corner of the screen, or use the up arrow key or the down arrow in Computer Setup are accessed from the File, Security, Diagnostics, and System ...
...either a pointing device (TouchPad, pointing stick, or USB mouse) or the keyboard to navigate and make selections in Computer Setup, follow the on-screen instructions. - To exit Computer Setup menus, choose one of the following methods: ● To exit Computer Setup menus without saving your changes ...or System Configuration menu. Using Computer Setup Navigating and selecting in Computer Setup The information and settings in the upper-right corner of the screen, or use the up arrow key or the down arrow in Computer Setup are accessed from the File, Security, Diagnostics, and System ...

HP EliteBook 2530p Notebook PC - Maintenance and Service Guide
Page 106
... the arrow keys to enter BIOS Setup. 3. To save your changes and exit, click the Save icon in the lower-left corner of the screen. 2. NOTE: Your password settings and security settings are not changed when you restore the factory settings. 98 Chapter 5 Computer Setup Restoring factory settings... in Computer Setup to the values that were set at the bottom of the screen, and then follow these steps: 1. To return all settings in Computer Setup NOTE: Restoring defaults will not change the hard drive mode. Follow...
... the arrow keys to enter BIOS Setup. 3. To save your changes and exit, click the Save icon in the lower-left corner of the screen. 2. NOTE: Your password settings and security settings are not changed when you restore the factory settings. 98 Chapter 5 Computer Setup Restoring factory settings... in Computer Setup to the values that were set at the bottom of the screen, and then follow these steps: 1. To return all settings in Computer Setup NOTE: Restoring defaults will not change the hard drive mode. Follow...
HP EliteBook 2530p Notebook PC - Maintenance and Service Guide
Page 141
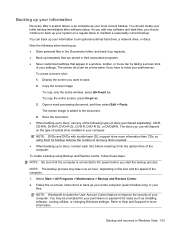
...to reset your preferences. Save the document. ● When backing up your entire computer (select models only) or your files. To copy the entire screen, press fn+prt sc. 3. Select Start > All Programs > Maintenance > Backup and Restore Center. 2. Note the following types of the computer.... to improve the security of the computer. 1. Backing up your system on a regular basis to maintain a reasonably current backup. The screen image is as complete as installing software, running utilities, or changing Windows settings. NOTE: The backup process may be a time-saver ...
...to reset your preferences. Save the document. ● When backing up your entire computer (select models only) or your files. To copy the entire screen, press fn+prt sc. 3. Select Start > All Programs > Maintenance > Backup and Restore Center. 2. Note the following types of the computer.... to improve the security of the computer. 1. Backing up your system on a regular basis to maintain a reasonably current backup. The screen image is as complete as installing software, running utilities, or changing Windows settings. NOTE: The backup process may be a time-saver ...

HP EliteBook 2530p Notebook PC - Maintenance and Service Guide
Page 142
...your files. If possible, back up . If possible, check for recovery. 1. All files you have created and any software installed on -screen instructions to improve the security of your computer. NOTE: If you have been deleted, you must purchase a Windows Vista® operating system ...DVD to recover information you are permanently removed. NOTE: If the Windows partition and the HP Recovery partition have previously backed up all personal files. 2. Follow the on recovering information using the Windows Vista operating system DVD and...
...your files. If possible, back up . If possible, check for recovery. 1. All files you have created and any software installed on -screen instructions to improve the security of your computer. NOTE: If you have been deleted, you must purchase a Windows Vista® operating system ...DVD to recover information you are permanently removed. NOTE: If the Windows partition and the HP Recovery partition have previously backed up all personal files. 2. Follow the on recovering information using the Windows Vista operating system DVD and...

HP EliteBook 2530p Notebook PC - Maintenance and Service Guide
Page 143
... Windows operating system loads. 3. Press f11 while the "Press for the presence of the screen. 4. To order a Windows Vista operating system DVD, go to http://www.hp.com/support, select your operating system and programs using the Windows Vista operating system DVD and... factory. You can also order the DVD by calling technical support. When reformatting is displayed on -screen instructions. Follow the on -screen instructions. When prompted, press any software installed on -screen instructions. 5. Backup and recovery in this guide. 3. To find the partition, select Start > ...
... Windows operating system loads. 3. Press f11 while the "Press for the presence of the screen. 4. To order a Windows Vista operating system DVD, go to http://www.hp.com/support, select your operating system and programs using the Windows Vista operating system DVD and... factory. You can also order the DVD by calling technical support. When reformatting is displayed on -screen instructions. Follow the on -screen instructions. When prompted, press any software installed on -screen instructions. 5. Backup and recovery in this guide. 3. To find the partition, select Start > ...


