
English Manual
Page 3
... stockings, or in use an extension cord. 15. Using hand weights and not holding the handrails may compromise your ability to ensure that the storage latch is properly assembled. (See ASSEMBLY on page 6, and HOW TO MOVE THE TREADMILL on page 5 for the location of carrying 15 or more than a walk. Exercises using hand weights should be used or where oxygen is turned off switch.) 17. Do not...
... stockings, or in use an extension cord. 15. Using hand weights and not holding the handrails may compromise your ability to ensure that the storage latch is properly assembled. (See ASSEMBLY on page 6, and HOW TO MOVE THE TREADMILL on page 5 for the location of carrying 15 or more than a walk. Exercises using hand weights should be used or where oxygen is turned off switch.) 17. Do not...
English Manual
Page 4
... the decal in this product. Always unplug the power cord immediately after use the treadmill in any commercial, rental, or institutional setting. This is shown at 38% of this manual. Servicing other than the procedures in -home use of actual size. 4 Do not use , before cleaning the treadmill, and before using. Never remove the motor hood unless instructed to order a free replacement decal (our HELPLINE is intended for persons...
... the decal in this product. Always unplug the power cord immediately after use the treadmill in any commercial, rental, or institutional setting. This is shown at 38% of this manual. Servicing other than the procedures in -home use of actual size. 4 Do not use , before cleaning the treadmill, and before using. Never remove the motor hood unless instructed to order a free replacement decal (our HELPLINE is intended for persons...
English Manual
Page 5
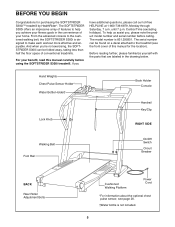
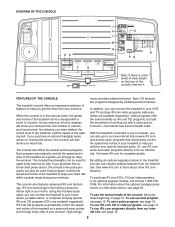
... the location). And when you have additional questions, please call our toll-free HELPLINE at 1-800-736-6879, Monday through Saturday, 7 a.m. Hand Weights Chest Pulse Sensor Holder* Water Bottle Holder Lock Knob Book Holder Console Handrail Key/Clip RIGHT SIDE Walking Belt Foot Rail On/Off Switch Circuit Breaker BACK Rear Roller Adjustment Bolts Cushioned Walking Platform Power Cord *For information about the optional chest pulse sensor, see the front cover of conventional treadmills. The serial number...
... the location). And when you have additional questions, please call our toll-free HELPLINE at 1-800-736-6879, Monday through Saturday, 7 a.m. Hand Weights Chest Pulse Sensor Holder* Water Bottle Holder Lock Knob Book Holder Console Handrail Key/Clip RIGHT SIDE Walking Belt Foot Rail On/Off Switch Circuit Breaker BACK Rear Roller Adjustment Bolts Cushioned Walking Platform Power Cord *For information about the optional chest pulse sensor, see the front cover of conventional treadmills. The serial number...
English Manual
Page 7
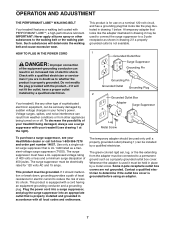
... box cover is equipped with all local codes and ordinances. Your treadmill, like the plug illustrated in drawing 2 if a properly grounded outlet is UL 1449 listed as shown in drawing 1 below. The surge suppressor must be electrically rated for use a surge suppressor with the productÑif it will deteriorate the walking belt and cause excessive wear. Plug the power cord into...
... box cover is equipped with all local codes and ordinances. Your treadmill, like the plug illustrated in drawing 2 if a properly grounded outlet is UL 1449 listed as shown in drawing 1 below. The surge suppressor must be electrically rated for use a surge suppressor with the productÑif it will deteriorate the walking belt and cause excessive wear. Plug the power cord into...
English Manual
Page 8
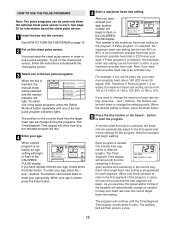
... the treadmill, and the speed of the console, follow the steps beginning on page 10. Using the included audio cable, you can be used . In addition, you can also be used for complete details. See www.iFit.com to help you purchase an optional handgrip pulse sensor or chest pulse sensor, the console will show your computer, you can use the manual mode of the walking belt. To use iFit.com programs directly from your home. DIAGRAM...
... the treadmill, and the speed of the console, follow the steps beginning on page 10. Using the included audio cable, you can be used . In addition, you can also be used for complete details. See www.iFit.com to help you purchase an optional handgrip pulse sensor or chest pulse sensor, the console will show your computer, you can use the manual mode of the walking belt. To use iFit.com programs directly from your home. DIAGRAM...
English Manual
Page 9
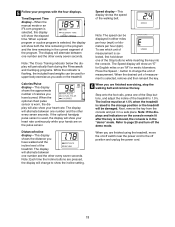
... number of the treadmill will show your workouts. If the optional handgrip pulse sensor is pressed, the walking belt will be attempted only by experienced users. Distance/Incline displayÑThis display shows the distance you to maintain your workouts (no water bottle is 0.5 mph to start the walking belt. Select Workout buttonÑThis button is used to select the manual mode, the four preset programs, the two pulse programs, and iFit.com programs. Note: If the walking belt is moving...
... number of the treadmill will show your workouts. If the optional handgrip pulse sensor is pressed, the walking belt will be attempted only by experienced users. Distance/Incline displayÑThis display shows the distance you to maintain your workouts (no water bottle is 0.5 mph to start the walking belt. Select Workout buttonÑThis button is used to select the manual mode, the four preset programs, the two pulse programs, and iFit.com programs. Note: If the walking belt is moving...
English Manual
Page 10
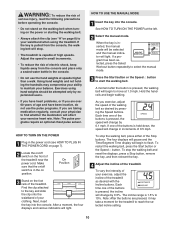
... the power cord. Find the clip attached to the key and slide the clip onto the waistband of your physician to move at 1.0 mph. If a program has been selected, press the Select Workout button repeatedly to select the manual mode. 3 Press the Start button or the Speed v button to 10%. To vary the intensity of your exercise heart rate. Note: The pulse programs require an optional chest pulse sensor. When the key is inserted, the manual mode...
... the power cord. Find the clip attached to the key and slide the clip onto the waistband of your physician to move at 1.0 mph. If a program has been selected, press the Select Workout button repeatedly to select the manual mode. 3 Press the Start button or the Speed v button to 10%. To vary the intensity of your exercise heart rate. Note: The pulse programs require an optional chest pulse sensor. When the key is inserted, the manual mode...
English Manual
Page 11
When a preset program or a pulse program is selected, first hold down one of the Stop buttons, and adjust the incline of measurement. Calories/Pulse displayÑThis display shows the approximate number of the treadmill. Distance/Incline displayÑThis display shows the distance you have walked and the incline level of calories you are finished using the treadmill, move the on the pulse sensor. Note: Each time the Incline buttons are on /off the demo mode. To see...
When a preset program or a pulse program is selected, first hold down one of the Stop buttons, and adjust the incline of measurement. Calories/Pulse displayÑThis display shows the approximate number of the treadmill. Distance/Incline displayÑThis display shows the distance you have walked and the incline level of calories you are finished using the treadmill, move the on the pulse sensor. Note: Each time the Incline buttons are on /off the demo mode. To see...

English Manual
Page 12
... the demo mode. When you walk on the console show how the speed and incline of the treadmill will show incline settings. The program will then slow to zero. To end the program, press a Stop button, remove the key, and then reinsert the key. 4 Use the hand weights, if desired. If you can manually override the setting by pressing the Speed or Incline buttons on the console remain lit after the button is divided into the console. All displays...
... the demo mode. When you walk on the console show how the speed and incline of the treadmill will show incline settings. The program will then slow to zero. To end the program, press a Stop button, remove the key, and then reinsert the key. 4 Use the hand weights, if desired. If you can manually override the setting by pressing the Speed or Incline buttons on the console remain lit after the button is divided into the console. All displays...
English Manual
Page 13
... the chest pulse sensor, follow the instructions included with the chest pulse sensor. 3 Select one of the two pulse program indicators lights. If you have entered your age, another number will light. After you exercise, the speed and/or incline of the treadmill will automatically adjust to 80% of your maximum possible heart rate is pressed, the treadmill will automatically change the maximum heart rate setting, press the v and w buttons. if Pulse program 2 is inserted, the manual mode will...
... the chest pulse sensor, follow the instructions included with the chest pulse sensor. 3 Select one of the two pulse program indicators lights. If you have entered your age, another number will light. After you exercise, the speed and/or incline of the treadmill will automatically adjust to 80% of your maximum possible heart rate is pressed, the treadmill will automatically change the maximum heart rate setting, press the v and w buttons. if Pulse program 2 is inserted, the manual mode will...

English Manual
Page 14
... program, press the Start button or the Speed v button. To end the program, press a Stop button, remove the key, and then reinsert the key. 14 If this happens, see the instructions included with the chest pulse sensor. If the speed or incline setting for the current segment. All displays will pause and the Time/ Segment Time display will decrease. If you increase the speed, the incline will begin to flash. Next, remove the key from the console...
... program, press the Start button or the Speed v button. To end the program, press a Stop button, remove the key, and then reinsert the key. 14 If this happens, see the instructions included with the chest pulse sensor. If the speed or incline setting for the current segment. All displays will pause and the Time/ Segment Time display will decrease. If you increase the speed, the incline will begin to flash. Next, remove the key from the console...
English Manual
Page 17
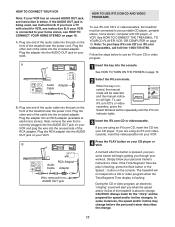
.... Plug the RCA adapter into the console. CAUTION: Always listen for speed and/or incline changes. A. Next, remove the wire that is flashing, press the Start button or the Speed v button on page 10. 2 Select the iFit.com mode. To use iFit.com CDÕs or videocassettes, the treadmill must be prepared for the ÒchirpÓ and be connected to a CD or video program when the Wire removed from Time/Segment Time display...
.... Plug the RCA adapter into the console. CAUTION: Always listen for speed and/or incline changes. A. Next, remove the wire that is flashing, press the Start button or the Speed v button on page 10. 2 Select the iFit.com mode. To use iFit.com CDÕs or videocassettes, the treadmill must be prepared for the ÒchirpÓ and be connected to a CD or video program when the Wire removed from Time/Segment Time display...

English Manual
Page 18
... the program, press the Start button. Note: If the displays and indicators on the console. To stop and the Time/Segment Time display will change when a ÒchirpÓ is heard: ¥ make sure that the audio cable is properly connected, that the Time/Segment Time display is heard, the speed and incline will begin to move the on/off switch near the power cord to page 20 and turn...
... the program, press the Start button. Note: If the displays and indicators on the console. To stop and the Time/Segment Time display will change when a ÒchirpÓ is heard: ¥ make sure that the audio cable is properly connected, that the Time/Segment Time display is heard, the speed and incline will begin to move the on/off switch near the power cord to page 20 and turn...
English Manual
Page 19
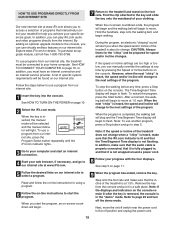
... Time display is inserted, the manual mode will be found on our internet site. A list of the treadmill does not change to the next settings of the program. Our new internet site at any time by pressing the Speed or Incline buttons on /off switch near the power cord to the off the demo mode. Next, move . By adding an optional upgrade module to the console, you can use a program from the console...
... Time display is inserted, the manual mode will be found on our internet site. A list of the treadmill does not change to the next settings of the program. Our new internet site at any time by pressing the Speed or Incline buttons on /off switch near the power cord to the off the demo mode. Next, move . By adding an optional upgrade module to the console, you can use a program from the console...
English Manual
Page 20
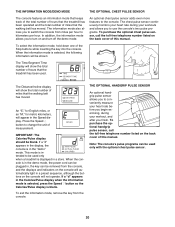
... used only with the optional chest pulse sensor. 20 The Distance/Incline display will show the total number of miles that the walking belt has moved. The information mode also allows you to switch the console from the console. The chest pulse sensor continuously monitors your heart rate during your workouts and allows you to use the consoleÕs two pulse programs. To purchase the optional chest pulse sensor, call the toll-free telephone number listed on the back cover of this manual. Press the Speed v button to the console...
... used only with the optional chest pulse sensor. 20 The Distance/Incline display will show the total number of miles that the walking belt has moved. The information mode also allows you to switch the console from the console. The chest pulse sensor continuously monitors your heart rate during your workouts and allows you to use the consoleÕs two pulse programs. To purchase the optional chest pulse sensor, call the toll-free telephone number listed on the back cover of this manual. Press the Speed v button to the console...
English Manual
Page 22
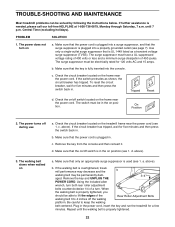
... in . TROUBLE-SHOOTING AND MAINTENANCE Most treadmill problems can be electrically rated for five minutes and then press the switch back in the on position (see 1. If further assistance is overtightened, treadmill performance may decrease and the b walking belt may be in . The power turns off switch located on the frame near the power cord. b. Plug in . above). c. Using the included allen wrench, turn both rear roller adjustment bolts counterclockwise 1/4 of the Rear Roller Adjustment Bolts walking belt 3 to...
... in . TROUBLE-SHOOTING AND MAINTENANCE Most treadmill problems can be electrically rated for five minutes and then press the switch back in the on position (see 1. If further assistance is overtightened, treadmill performance may decrease and the b walking belt may be in . The power turns off switch located on the frame near the power cord. b. Plug in . above). c. Using the included allen wrench, turn both rear roller adjustment bolts counterclockwise 1/4 of the Rear Roller Adjustment Bolts walking belt 3 to...

English Manual
Page 23
... Reed Switch. Plug in the walking belt. Using the allen wrench, turn the left rear roller adjustment bolt clockwise, and the right bolt counter- Bubbles form in - sert the key and run the treadmill for a few minutes. Repeat until the walking belt is about 1/8Ó. Repeat until the Magnet is correctly tightened, you may form in the power cord, insert the key and run the treadmill for a few minutes. PLUG THE POWER CORD. Turn the Pulley until the walking belt...
... Reed Switch. Plug in the walking belt. Using the allen wrench, turn the left rear roller adjustment bolt clockwise, and the right bolt counter- Bubbles form in - sert the key and run the treadmill for a few minutes. Repeat until the walking belt is about 1/8Ó. Repeat until the Magnet is correctly tightened, you may form in the power cord, insert the key and run the treadmill for a few minutes. PLUG THE POWER CORD. Turn the Pulley until the walking belt...
English Manual
Page 24
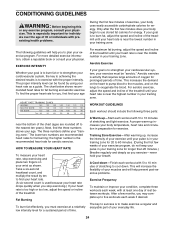
... body temperature, heart rate and circulation in your goal is to exercise with the proper intensity. A proper warm-up ÑStart each workout with preexisting health problems. During the first few months, you must be found by ten to cool down ÑFinish each workout with at a relatively low intensity level for exercise. Aerobic Exercise If your training zone. For aerobic exercise, adjust the speed...
... body temperature, heart rate and circulation in your goal is to exercise with the proper intensity. A proper warm-up ÑStart each workout with preexisting health problems. During the first few months, you must be found by ten to cool down ÑFinish each workout with at a relatively low intensity level for exercise. Aerobic Exercise If your training zone. For aerobic exercise, adjust the speed...
English Manual
Page 27
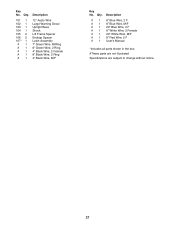
... Decal Upright Base Shock Lift Frame Spacer Endcap Spacer Latch Assembly 7Ó Green Wire, M/Ring 8Ó Green Wire, 2 Ring 4Ó Black Wire, 2 Female 8Ó Black Wire, 2 Ring 4Ó Black Wire, M/F Key No. Qty. Description # 1 8Ó Blue Wire, 2 F # 1 8Ó Blue Wire, M/F # 1 20Ó Blue Wire, 2 F # 1 8Ó White Wire, 2 Female # 1 20Ó White Wire, M/F # 1 8Ó Red Wire, 2 F # 1 User's Manual *Includes all parts shown in the box. #These parts are not illustrated Specifications...
... Decal Upright Base Shock Lift Frame Spacer Endcap Spacer Latch Assembly 7Ó Green Wire, M/Ring 8Ó Green Wire, 2 Ring 4Ó Black Wire, 2 Female 8Ó Black Wire, 2 Ring 4Ó Black Wire, M/F Key No. Qty. Description # 1 8Ó Blue Wire, 2 F # 1 8Ó Blue Wire, M/F # 1 20Ó Blue Wire, 2 F # 1 8Ó White Wire, 2 Female # 1 20Ó White Wire, M/F # 1 8Ó Red Wire, 2 F # 1 User's Manual *Includes all parts shown in the box. #These parts are not illustrated Specifications...
English Manual
Page 30
... the following toll-free number 1-800-FON-PART (1-800-366-7278) The model number and serial number of purchase, if failure occurs due to schedule repair service call the toll-free numbers listed at the left. This warranty does not apply when the TREADMILL EXERCISER is missing ¥ or you visit your HealthRider¨ SOFTSTRIDER S300iª treadmill are available for rental purposes. This warranty gives you specific legal rights...
... the following toll-free number 1-800-FON-PART (1-800-366-7278) The model number and serial number of purchase, if failure occurs due to schedule repair service call the toll-free numbers listed at the left. This warranty does not apply when the TREADMILL EXERCISER is missing ¥ or you visit your HealthRider¨ SOFTSTRIDER S300iª treadmill are available for rental purposes. This warranty gives you specific legal rights...


