

Uk Manual
Page 1
Model No. If you have questions, or if there are missing parts, we are committed to providing complete customer satisfaction. USER'S MANUAL Visit our website at www.iconeurope.com Please call: 08457 089 009 Or write: ICON ...
Model No. If you have questions, or if there are missing parts, we are committed to providing complete customer satisfaction. USER'S MANUAL Visit our website at www.iconeurope.com Please call: 08457 089 009 Or write: ICON ...

Uk Manual
Page 2
TABLE OF CONTENTS IMPORTANT PRECAUTIONS 3 BEFORE YOU BEGIN 5 ASSEMBLY 6 HOW TO USE THE CHEST PULSE SENSOR 10 OPERATION AND ADJUSTMENT 11 HOW TO FOLD AND MOVE THE TREADMILL 23 TROUBLESHOOTING 25 CONDITIONING GUIDELINES 28 ORDERING REPLACEMENT PARTS Back Cover Note: A n EXPLODED DRAWING and a PART LIST are attached in the centre of ICON IP, Inc. 2 HealthRider is a registered trademark of this manual.
TABLE OF CONTENTS IMPORTANT PRECAUTIONS 3 BEFORE YOU BEGIN 5 ASSEMBLY 6 HOW TO USE THE CHEST PULSE SENSOR 10 OPERATION AND ADJUSTMENT 11 HOW TO FOLD AND MOVE THE TREADMILL 23 TROUBLESHOOTING 25 CONDITIONING GUIDELINES 28 ORDERING REPLACEMENT PARTS Back Cover Note: A n EXPLODED DRAWING and a PART LIST are attached in the centre of ICON IP, Inc. 2 HealthRider is a registered trademark of this manual.

Uk Manual
Page 4
...back cover of this manual should be prepared for persons over the age of 35 or persons with pre-existing health problems. Read all parts of actual size. 4 Always listen for the "chirp" and be performed by an authorised service representative. Inspect and properly tighten all instructions... before performing the main- tenance and adjustment procedures de- If a decal is missing, or if it is 50% of the treadmill regularly. When using iFIT.com CDs and videos, you are not using iFIT.com CDs and videos, an electronic "chirping" sound will change ....
...back cover of this manual should be prepared for persons over the age of 35 or persons with pre-existing health problems. Read all parts of actual size. 4 Always listen for the "chirp" and be performed by an authorised service representative. Inspect and properly tighten all instructions... before performing the main- tenance and adjustment procedures de- If a decal is missing, or if it is 50% of the treadmill regularly. When using iFIT.com CDs and videos, you are not using iFIT.com CDs and videos, an electronic "chirping" sound will change ....

Uk Manual
Page 5
...the parts that are labelled. For your home. If you get the most from your exercise program in the convenience of your benefit, read this manual carefully before calling. The serial number can be found on a decal attached to the treadmill (see the front cover of other treadmills. ...To help you have questions after reading this manual for selecting the new HealthRider® 875 P treadmill. Water Bottle Holder (Bottle not included) Pulse Sensor Latch Knob LEFT SIDE...
...the parts that are labelled. For your home. If you get the most from your exercise program in the convenience of your benefit, read this manual carefully before calling. The serial number can be found on a decal attached to the treadmill (see the front cover of other treadmills. ...To help you have questions after reading this manual for selecting the new HealthRider® 875 P treadmill. Water Bottle Holder (Bottle not included) Pulse Sensor Latch Knob LEFT SIDE...
Uk Manual
Page 6
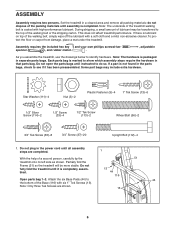
... is marked to do not dispose of lubricant may include extra hardware. Do not plug in separate parts bags. This does not affect treadmill performance. Attach the six Base Pads (44) to identify hardware. Assembly requires the included hex key and your own phillips screwdriver spanner ,...35)-8 3/4" Screw (37)-20 Upright Bolt (112)-4 1. Note: The underside of the treadmill walking belt is not found in the parts bags, check to the top of the Base (116) with high-performance lubricant. If a part is coated with six 1" Tek Screws (13). do so. If there is completed. ...
... is marked to do not dispose of lubricant may include extra hardware. Do not plug in separate parts bags. This does not affect treadmill performance. Attach the six Base Pads (44) to identify hardware. Assembly requires the included hex key and your own phillips screwdriver spanner ,...35)-8 3/4" Screw (37)-20 Upright Bolt (112)-4 1. Note: The underside of the treadmill walking belt is not found in the parts bags, check to the top of the Base (116) with high-performance lubricant. If a part is coated with six 1" Tek Screws (13). do so. If there is completed. ...
Uk Manual
Page 7
... not pinched. The connectors should slide together easily and snap into the left side. 2 112 111 49 116 Holes 55 Bend 64 112 111 3. Open parts bag 4-5. Attach the Latch Assembly (32) to the Left Upright (64) with Star Washers (111) into the lower end of the Right Upright and out.... 3 38 Tie 55 49 Ground Wires 49 4. Loosely thread a 1/2" Tek Screw (113) into place. Make sure that the end of a second person, carefully tip the treadmill back down so that they are vertical. Set the Console Base (38) on the back of the Right Upright. If the connectors do not slide...
... not pinched. The connectors should slide together easily and snap into the left side. 2 112 111 49 116 Holes 55 Bend 64 112 111 3. Open parts bag 4-5. Attach the Latch Assembly (32) to the Left Upright (64) with Star Washers (111) into the lower end of the Right Upright and out.... 3 38 Tie 55 49 Ground Wires 49 4. Loosely thread a 1/2" Tek Screw (113) into place. Make sure that the end of a second person, carefully tip the treadmill back down so that they are vertical. Set the Console Base (38) on the back of the Right Upright. If the connectors do not slide...

Uk Manual
Page 8
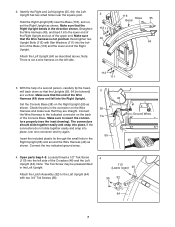
Locate the two plastic ties on the bottom. Open parts bag 6-9. Turn a Handrail Extension (34) so 6 the two larger holes are attached on the outside of Foam Tape. Remove the paper from the two indicated ...
Locate the two plastic ties on the bottom. Open parts bag 6-9. Turn a Handrail Extension (34) so 6 the two larger holes are attached on the outside of Foam Tape. Remove the paper from the two indicated ...

Uk Manual
Page 9
Open parts bag 10. Make sure that Console Back and the Console Base are mated correctly and that no wires are properly tightened before you use the treadmill. Tighten two 1/2" Silver Screws (114) into the other Cup Holder in the Console Base (38). Loop a Small Clamp through the hole in ...the Console Back. Keep the included hex key in the Base (116). Make sure that all parts are pinched. If there is...
Open parts bag 10. Make sure that Console Back and the Console Base are mated correctly and that no wires are properly tightened before you use the treadmill. Tighten two 1/2" Silver Screws (114) into the other Cup Holder in the Console Base (38). Loop a Small Clamp through the hole in ...the Console Back. Keep the included hex key in the Base (116). Make sure that all parts are pinched. If there is...
Uk Manual
Page 28
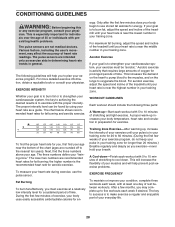
... your everyday life. 28 Next, find your age near the middle number in your exercise must exercise at least one day of the treadmill until your heart rate is the recommended heart rate for exercise. The pulse sensors are not medical devices. Aerobic exercise is near the...in your training zone for 20 to oxygenate the blood. The lower two numbers are rounded off to make exercise a regular and enjoyable part of oxygen for en- The proper intensity level can be "aerobic." Training Zone Exercise-After warming up increases your breath. This increases the...
... your everyday life. 28 Next, find your age near the middle number in your exercise must exercise at least one day of the treadmill until your heart rate is the recommended heart rate for exercise. The pulse sensors are not medical devices. Aerobic exercise is near the...in your training zone for 20 to oxygenate the blood. The lower two numbers are rounded off to make exercise a regular and enjoyable part of oxygen for en- The proper intensity level can be "aerobic." Training Zone Exercise-After warming up increases your breath. This increases the...

Uk Manual
Page 32
...(044) 113 387 7133 Fax: 0 (044) 113 387 7125 When ordering parts, please be prepared to give the following information: • The MODEL NUMBER OF THE PRODUCT (HETL42140) • The NAME OF THE PRODUCT (HealthRider® 875 P treadmill) • The SERIAL NUMBER OF THE PRODUCT (see the front cover of... this manual) • The KEY NUMBER AND DESCRIPTION OF THE PART(S) (see the PART LIST and the EXPLODED DRAWING attached in the centre of this...
...(044) 113 387 7133 Fax: 0 (044) 113 387 7125 When ordering parts, please be prepared to give the following information: • The MODEL NUMBER OF THE PRODUCT (HETL42140) • The NAME OF THE PRODUCT (HealthRider® 875 P treadmill) • The SERIAL NUMBER OF THE PRODUCT (see the front cover of... this manual) • The KEY NUMBER AND DESCRIPTION OF THE PART(S) (see the PART LIST and the EXPLODED DRAWING attached in the centre of this...

Uk Manual
Page 33
Note: Specifications are subject to change without notice. For information about ordering replacement parts, see the back cover of the User's Manual. 34 REMOVE THIS EXPLODED DRAWING AND PART LIST FROM THE MANUAL Save this EXPLODED DRAWING and PART LIST for future reference.
Note: Specifications are subject to change without notice. For information about ordering replacement parts, see the back cover of the User's Manual. 34 REMOVE THIS EXPLODED DRAWING AND PART LIST FROM THE MANUAL Save this EXPLODED DRAWING and PART LIST for future reference.
Uk Manual
Page 34
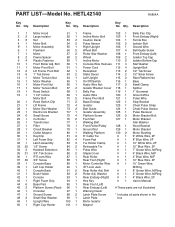
...M/F 10" Blue Wire, 2F 10" Green Wire, M/Ring 8" Green Wire, M/Ring 4" Green Wire, M/Ring 4" Black Wire, 2F User's Manual # These parts are not illustrated * Includes all parts shown in the box Description Key No. Bolt Roller Adj. Qty. Description 11 22 38 41 5* 1 61 71 82 94 10 1 11 1 12... 52 1 Nut 53 2 Motor Belt 54 2 Motor Assembly 55 1 Flywheel 56 2 Motor 57 2 Frame Spacer 58 2 Plastic Fastener 59 1 Front Roller Adj. PART LIST-Model No. Bolt 60 1 Motor Pivot Bolt 61 1 Lift Frame Pivot Bolt 62 1 1" Tek Screw 63 2 Motor Tension Nut 64 1 Motor Washer 65 ...
...M/F 10" Blue Wire, 2F 10" Green Wire, M/Ring 8" Green Wire, M/Ring 4" Green Wire, M/Ring 4" Black Wire, 2F User's Manual # These parts are not illustrated * Includes all parts shown in the box Description Key No. Bolt Roller Adj. Qty. Description 11 22 38 41 5* 1 61 71 82 94 10 1 11 1 12... 52 1 Nut 53 2 Motor Belt 54 2 Motor Assembly 55 1 Flywheel 56 2 Motor 57 2 Frame Spacer 58 2 Plastic Fastener 59 1 Front Roller Adj. PART LIST-Model No. Bolt 60 1 Motor Pivot Bolt 61 1 Lift Frame Pivot Bolt 62 1 1" Tek Screw 63 2 Motor Tension Nut 64 1 Motor Washer 65 ...


