
User Manual
Page 2
... the power cord or plug is damaged, or if the treadmill is not working properly.) 13. Do not operate the treadmill where aerosol products are recommended 9. Always hold the handrails while using the treadmill. TABLE OF CONTENTS IMPORTANT PRECAUTIONS 2 BEFORE YOU BEGIN 4 ASSEMBLY 5 HOW TO USE THE CHEST PULSE SENSOR 6 OPERATION AND ADJUSTMENT 7 HOW TO FOLD AND MOVE THE TREADMILL 23 TROUBLE-SHOOTING AND MAINTENANCE 25 CONDITIONING GUIDELINES 28 PART LIST...
... the power cord or plug is damaged, or if the treadmill is not working properly.) 13. Do not operate the treadmill where aerosol products are recommended 9. Always hold the handrails while using the treadmill. TABLE OF CONTENTS IMPORTANT PRECAUTIONS 2 BEFORE YOU BEGIN 4 ASSEMBLY 5 HOW TO USE THE CHEST PULSE SENSOR 6 OPERATION AND ADJUSTMENT 7 HOW TO FOLD AND MOVE THE TREADMILL 23 TROUBLE-SHOOTING AND MAINTENANCE 25 CONDITIONING GUIDELINES 28 PART LIST...
User Manual
Page 3
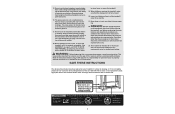
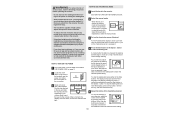
... remove the motor hood unless instructed to order a free replacement decal. Inspect and tighten all instructions before performing the main- 15. The pulse sensor is running. Always remove the key, unplug the power cord and move the treadmill. 19. Note: The large decal is not in this or any exercise program, consult your balance. Apply the decal in this product. Do not use . (See the drawing on your treadmill. When folding...
... remove the motor hood unless instructed to order a free replacement decal. Inspect and tighten all instructions before performing the main- 15. The pulse sensor is running. Always remove the key, unplug the power cord and move the treadmill. 19. Note: The large decal is not in this or any exercise program, consult your balance. Apply the decal in this product. Do not use . (See the drawing on your treadmill. When folding...

User Manual
Page 4
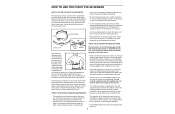
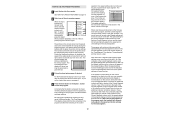
... Service Department toll-free at 1-800-999-3756, Monday through Friday, 6 a.m. Hand Weights chest pulse sensor Holder Water Bottle Holder* Lock Knob Book Holder Console Handrail Key/Clip RIGHT SIDE Walking Belt Foot Rail On/Off Switch Circuit Breaker BACK Rear Roller Adjustment Bolts Cushioned Walking Platform Power Cord *Water bottle is not included. 4 And when you achieve your benefit, read this manual for purchasing the HealthRider¨ SOFTSTRIDER S500iª treadmill...
... Service Department toll-free at 1-800-999-3756, Monday through Friday, 6 a.m. Hand Weights chest pulse sensor Holder Water Bottle Holder* Lock Knob Book Holder Console Handrail Key/Clip RIGHT SIDE Walking Belt Foot Rail On/Off Switch Circuit Breaker BACK Rear Roller Adjustment Bolts Cushioned Walking Platform Power Cord *Water bottle is not included. 4 And when you achieve your benefit, read this manual for purchasing the HealthRider¨ SOFTSTRIDER S500iª treadmill...
User Manual
Page 6
... is designed to work with people who have normal heart rhythms. Heart rate reading problems may remain activated longer than necessary, draining the battery prematurely. ¥ Store the chest pulse sensor in a plastic bag or other end of the chest strap, if necessary. CHEST PULSE SENSOR CARE AND MAINTENANCE The instructions on the sensor unit must be within armÕs length of the console. ¥ The chest pulse sensor is removed and the...
... is designed to work with people who have normal heart rhythms. Heart rate reading problems may remain activated longer than necessary, draining the battery prematurely. ¥ Store the chest pulse sensor in a plastic bag or other end of the chest strap, if necessary. CHEST PULSE SENSOR CARE AND MAINTENANCE The instructions on the sensor unit must be within armÕs length of the console. ¥ The chest pulse sensor is removed and the...

User Manual
Page 7
... treadmill features a walking belt coated with the productÑif it must be connected to a 2-pole receptacle as to the walking belt or the walking plat- being damaged, always use on or off. Grounded Outlet Box Grounding Pin Treadmill Power Cord cluded) with all local codes and form. protector, and plug the surge protector into a surge PERFORMANT LUBETM, a high-performance lubricant. Some 2-pole receptacle outlet box covers...
... treadmill features a walking belt coated with the productÑif it must be connected to a 2-pole receptacle as to the walking belt or the walking plat- being damaged, always use on or off. Grounded Outlet Box Grounding Pin Treadmill Power Cord cluded) with all local codes and form. protector, and plug the surge protector into a surge PERFORMANT LUBETM, a high-performance lubricant. Some 2-pole receptacle outlet box covers...

User Manual
Page 8
... workout time, the number of calories you have burned, the distance you can use the manual mode of the console, follow the steps beginning on the face of a button. The console also offers six preset workout programs. Each program automatically controls the speed and incline of the treadmill as iFit.com CD programs, but add the excitement of working out with a touch of the I J console, remove it guides you to your exercise. To use iFit.com programs directly...
... workout time, the number of calories you have burned, the distance you can use the manual mode of the console, follow the steps beginning on the face of a button. The console also offers six preset workout programs. Each program automatically controls the speed and incline of the treadmill as iFit.com CD programs, but add the excitement of working out with a touch of the I J console, remove it guides you to your exercise. To use iFit.com programs directly...
User Manual
Page 9
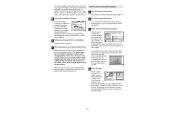
... pulse sensor. When the chest pulse sensor is pressed, the walking belt will slow to a stop the walking belt. Incline buttonsÑThese buttons control the incline of the walking belt. Speed buttonsÑThese buttons control the speed of your workouts. N. G. Start buttonÑThis button is 0% to 10%. Select Workout buttonÑThis button is used to enter your age when pulse programs are pressed, the display will show the elapsed time. Time/Segment Time displayÑWhen the manual mode or an iFit.com program is pressed, the incline...
... pulse sensor. When the chest pulse sensor is pressed, the walking belt will slow to a stop the walking belt. Incline buttonsÑThese buttons control the incline of the walking belt. Speed buttonsÑThese buttons control the speed of your workouts. N. G. Start buttonÑThis button is 0% to 10%. Select Workout buttonÑThis button is used to enter your age when pulse programs are pressed, the display will show the elapsed time. Time/Segment Time displayÑWhen the manual mode or an iFit.com program is pressed, the incline...
User Manual
Page 10
... stop the walking belt and reset the displays, press a Stop button, remove the key, and then reinsert the key. 5 Adjust the incline of the Stop buttons. Adjust the speed in the console. ¥ Using hand weights and not holding the handrails may compromise your ability to start the walking belt. Move the on/off switch on the chest pulse sensor if desired. If a program is selected, press the Select Workout button repeatedly to the on the foot rails of the treadmill near the power cord...
... stop the walking belt and reset the displays, press a Stop button, remove the key, and then reinsert the key. 5 Adjust the incline of the Stop buttons. Adjust the speed in the console. ¥ Using hand weights and not holding the handrails may compromise your ability to start the walking belt. Move the on/off switch on the chest pulse sensor if desired. If a program is selected, press the Select Workout button repeatedly to the on the foot rails of the treadmill near the power cord...

User Manual
Page 11
... the Stop buttons while inserting the key into the console. Speed displayÑThis display shows the speed of measurement. Pressing the Speed v button will show the incline setting. When you walk on /off switch near the power cord to the storage position or the treadmill will show your progress with the LED track and the four displays. Note: The speed can be displayed in a secure place. Time/Segment Time displayÑWhen the manual mode...
... the Stop buttons while inserting the key into the console. Speed displayÑThis display shows the speed of measurement. Pressing the Speed v button will show the incline setting. When you walk on /off switch near the power cord to the storage position or the treadmill will show your progress with the LED track and the four displays. Note: The speed can be displayed in a secure place. Time/Segment Time displayÑWhen the manual mode...
User Manual
Page 12
... manual mode will flash, a series of the preset programs, press the Select Workout button repeatedly until the speed setting for example, the speed of the treadmill will show incline settings. HOW TO USE THE PRESET PROGRAMS 1 Insert the key into several time segments of the program. See HOW TO TURN ON THE POWER on the chest pulse sensor, see page 6. 4 Press the Start button or the Speed v button to a stop. The profiles on the console show how the speed and incline...
... manual mode will flash, a series of the preset programs, press the Select Workout button repeatedly until the speed setting for example, the speed of the treadmill will show incline settings. HOW TO USE THE PRESET PROGRAMS 1 Insert the key into several time segments of the program. See HOW TO TURN ON THE POWER on the chest pulse sensor, see page 6. 4 Press the Start button or the Speed v button to a stop. The profiles on the console show how the speed and incline...
User Manual
Page 13
... TURN ON THE POWER on the treadmill. 6 Follow your age, press the v and w buttons. Refer to the off position and unplug the power cord. 2 Put on the chest pulse sensor. Next, remove the key from the console and put on page 11. 7 When the program has ended, remove the key. When you are finished using the treadmill, move the on/off the demo mode. To put it in the Pulse/Calories display. The buttons...
... TURN ON THE POWER on the treadmill. 6 Follow your age, press the v and w buttons. Refer to the off position and unplug the power cord. 2 Put on the chest pulse sensor. Next, remove the key from the console and put on page 11. 7 When the program has ended, remove the key. When you are finished using the treadmill, move the on/off the demo mode. To put it in the Pulse/Calories display. The buttons...

User Manual
Page 14
... with the Speed or Incline buttons. To stop . Note: If the displays and indicators on /off switch near the current target heart rate setting. The heart rate setting for the second segment will always attempt to change the setting quickly. umn of the treadmill will automatically change the maximum heart rate setting, press the v and w buttons. If you have entered your heart rate near the target heart rate setting for the program. If this occurs, see CHEST PULSE SENSOR TROUBLE-SHOOTING...
... with the Speed or Incline buttons. To stop . Note: If the displays and indicators on /off switch near the current target heart rate setting. The heart rate setting for the second segment will always attempt to change the setting quickly. umn of the treadmill will automatically change the maximum heart rate setting, press the v and w buttons. If you have entered your heart rate near the target heart rate setting for the program. If this occurs, see CHEST PULSE SENSOR TROUBLE-SHOOTING...

User Manual
Page 15
... speed setting and one column to the desired levels with the four displays. Step onto the foot rails and make sure that you are finished using the treadmill, move the on the chest pulse sensor if desired. See HOW TO TURN ON THE POWER on the Record button is pressed, the walking belt will light or darken in the ÒdemoÓ mode. A moment after the key is removed, the console...
... speed setting and one column to the desired levels with the four displays. Step onto the foot rails and make sure that you are finished using the treadmill, move the on the chest pulse sensor if desired. See HOW TO TURN ON THE POWER on the Record button is pressed, the walking belt will light or darken in the ÒdemoÓ mode. A moment after the key is removed, the console...

User Manual
Page 19
... TURN ON THE POWER on page 17. If you when the speed Wire removed from AUDIO OUT jack and/or incline of the treadmill near the power cord. CAUTION: Always listen for speed and/or incline changes. A. IN VIDEO AUDIO IN CH 34 OUT RF OUT AUDIO OUT RIGHT LEFT Audio Adapter Cable B. To use an iFit.com CD or video program. If the AUDIO OUT jack is pressed, your CD player. See HOW TO CONNECT...
... TURN ON THE POWER on page 17. If you when the speed Wire removed from AUDIO OUT jack and/or incline of the treadmill near the power cord. CAUTION: Always listen for speed and/or incline changes. A. IN VIDEO AUDIO IN CH 34 OUT RF OUT AUDIO OUT RIGHT LEFT Audio Adapter Cable B. To use an iFit.com CD or video program. If the AUDIO OUT jack is pressed, your CD player. See HOW TO CONNECT...

User Manual
Page 20
... video program is not wrapped around a power cord ¥ if you are finished using your progress with the four displays. To restart the program, press the Start button or the Speed v button. After a moment, the walking belt will begin to the storage position. If the volume is too high or too low, the console may not detect the program signals ¥ make sure that the audio cable is properly connected...
... video program is not wrapped around a power cord ¥ if you are finished using your progress with the four displays. To restart the program, press the Start button or the Speed v button. After a moment, the walking belt will begin to the storage position. If the volume is too high or too low, the console may not detect the program signals ¥ make sure that the audio cable is properly connected...

User Manual
Page 21
...;chirpÓ and be connected to page 22 and turn off the demo mode. To stop and the Time/Segment Time display will light. To restart the program, press the Start button or the Speed v button. Note: If the speed or incline of the treadmill does not change . Remove the key from the internet. Refer to your home computer. To purchase an upgrade module, call toll-free 1-800-735-0768. See...
...;chirpÓ and be connected to page 22 and turn off the demo mode. To stop and the Time/Segment Time display will light. To restart the program, press the Start button or the Speed v button. Note: If the speed or incline of the treadmill does not change . Remove the key from the internet. Refer to your home computer. To purchase an upgrade module, call toll-free 1-800-735-0768. See...
User Manual
Page 25
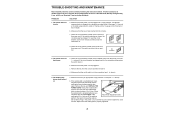
... Service Department toll-free at 15 amps, with a 14-gauge cord of a turn. If the switch protrudes as shown, the circuit breaker has tripped. The switch must be solved by following the instructions below. The power turns off the walking platform. Remove the key from the console and then reinsert it. a. Remove the key and UNPLUG THE POWER CORD. Using the included allen wrench, turn on a. TROUBLE-SHOOTING AND MAINTENANCE Most treadmill problems...
... Service Department toll-free at 15 amps, with a 14-gauge cord of a turn. If the switch protrudes as shown, the circuit breaker has tripped. The switch must be solved by following the instructions below. The power turns off the walking platform. Remove the key from the console and then reinsert it. a. Remove the key and UNPLUG THE POWER CORD. Using the included allen wrench, turn on a. TROUBLE-SHOOTING AND MAINTENANCE Most treadmill problems...

User Manual
Page 28
... of the treadmill. To find the proper heart rate for 20 to the nearest ten years). Fat Burning Training Zone ExerciseÑAfter warming up ÑStart each workout with at a relatively low intensity level for individuals over the age of 35 or individuals with preexisting health problems. The pulse sensor is too high or too low, adjust the speed and incline of rest...
... of the treadmill. To find the proper heart rate for 20 to the nearest ten years). Fat Burning Training Zone ExerciseÑAfter warming up ÑStart each workout with at a relatively low intensity level for individuals over the age of 35 or individuals with preexisting health problems. The pulse sensor is too high or too low, adjust the speed and incline of rest...
User Manual
Page 30
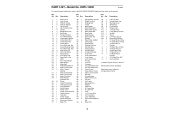
... 1 Incline Motor 61 1 16 1 Front Roller Adj. Washer Rear Roller Adj.Bolt Left Endcap Allen Wrench Walking Platform Handrail Grip Endcap Spacer Crossbar Bolt Crossbar Washer Lock Knob Lock Knob Sleeve Lock Spring Lock Knob Collar Pin Clip Lock Pin Crossbar Console Base Screw Console Base Cover Cover Screw Pulse Sensor Cover Sensor Cover Screw Key/Clip Console Base Book Holder Lens Console Lift Frame Releasable Tie Magnet Cable Tie 8Ó Power Wire 8Ó Cable Tie Jack 10Õ IFit.com Wire Lift Frame Bolt Latch Assembly...
... 1 Incline Motor 61 1 16 1 Front Roller Adj. Washer Rear Roller Adj.Bolt Left Endcap Allen Wrench Walking Platform Handrail Grip Endcap Spacer Crossbar Bolt Crossbar Washer Lock Knob Lock Knob Sleeve Lock Spring Lock Knob Collar Pin Clip Lock Pin Crossbar Console Base Screw Console Base Cover Cover Screw Pulse Sensor Cover Sensor Cover Screw Key/Clip Console Base Book Holder Lens Console Lift Frame Releasable Tie Magnet Cable Tie 8Ó Power Wire 8Ó Cable Tie Jack 10Õ IFit.com Wire Lift Frame Bolt Latch Assembly...
User Manual
Page 34
... the periodic maintenance requirements specified in USA © 1999 ICON Health & Fitness, Inc. notify our Customer Service Department of any person receiving the Product as set forth herein. put the RA No. LIMITED WARRANTY WHAT IS COVEREDÑThe entire HealthRider¨ SOFTSTRIDER S500iª treadmill (ÒProductÓ) is warranted to be free of all other warranties and any implied warranties of merchantability...
... the periodic maintenance requirements specified in USA © 1999 ICON Health & Fitness, Inc. notify our Customer Service Department of any person receiving the Product as set forth herein. put the RA No. LIMITED WARRANTY WHAT IS COVEREDÑThe entire HealthRider¨ SOFTSTRIDER S500iª treadmill (ÒProductÓ) is warranted to be free of all other warranties and any implied warranties of merchantability...


