

Product Information
Page 8
... A/V receiver with an LCD and controller that work like your surround system. Art meets Science. Harman Kardon introduces audiophiles to replaceable circuit boards (for easy setup. We debut the first stand-alone A/V receiver with fully color-coded rearpanel connections for easy service... your iPod. the first branded computer speakers to speaker outputs - Our AVR 7000 is the first with Dolby® B-type noise reduction. Harman Kardon SoundSticks® - Drive + Play™ by Harman Kardon is the world's first in solid-state products - the world premiere of...
... A/V receiver with an LCD and controller that work like your surround system. Art meets Science. Harman Kardon introduces audiophiles to replaceable circuit boards (for easy setup. We debut the first stand-alone A/V receiver with fully color-coded rearpanel connections for easy service... your iPod. the first branded computer speakers to speaker outputs - Our AVR 7000 is the first with Dolby® B-type noise reduction. Harman Kardon SoundSticks® - Drive + Play™ by Harman Kardon is the world's first in solid-state products - the world premiere of...

Product Information
Page 19
.... it makes operating otherwise complex systems a breeze. 19 All you configure and use a remote control. This unique product does more than just operate single components; Setup is look at the color LCD screen, select the icon that the "TC" in "TC 30" stands for "Take Control." TC 30 Activity-Based Remote...
.... it makes operating otherwise complex systems a breeze. 19 All you configure and use a remote control. This unique product does more than just operate single components; Setup is look at the color LCD screen, select the icon that the "TC" in "TC 30" stands for "Take Control." TC 30 Activity-Based Remote...

Product Information
Page 27
... files. A built-in test signal for critical setup, and highend DACs for analog connectivity make the DVD 27 a true "best in design, but it all at the best possible resolution. This five-disc CD changer has a wide range of the party - Indeed, this is Harman Kardon's most realistic sound processing to 720p or...
... files. A built-in test signal for critical setup, and highend DACs for analog connectivity make the DVD 27 a true "best in design, but it all at the best possible resolution. This five-disc CD changer has a wide range of the party - Indeed, this is Harman Kardon's most realistic sound processing to 720p or...

Owners Manual
Page 5
...a power cord with Canadian ICES-003. Turn On the AVR 245 30 INITIAL SETUP 30 Using the On-Screen Menu System 30 Configure the AVR 245 Using EzSet+ 32 What EzSet+ Does 33 Configure Sources 36 OPERATION 36 Turning On the AVR 245 36 Sleep Timer 36 Volume Control 37 Mute Function 37 Tone...Audio Processing and Surround Sound 43 Analog Audio Signals 43 Digital Audio Signals 44 Surround Modes 45 Dolby Surround Settings 45 Default Modes 49 Manual Setup 49 Step One - Modèle pour les Canadien Cet appareil numérique de la classe B est conforme à la ...
...a power cord with Canadian ICES-003. Turn On the AVR 245 30 INITIAL SETUP 30 Using the On-Screen Menu System 30 Configure the AVR 245 Using EzSet+ 32 What EzSet+ Does 33 Configure Sources 36 OPERATION 36 Turning On the AVR 245 36 Sleep Timer 36 Volume Control 37 Mute Function 37 Tone...Audio Processing and Surround Sound 43 Analog Audio Signals 43 Digital Audio Signals 44 Surround Modes 45 Dolby Surround Settings 45 Default Modes 49 Manual Setup 49 Step One - Modèle pour les Canadien Cet appareil numérique de la classe B est conforme à la ...
Owners Manual
Page 7
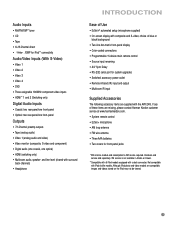
... with all iPod models equipped with iPod shuffle models. choice of Use • EzSet+® automated setup (microphone supplied) • On-screen display with the AVR 245. Audio Inputs • AM/FM/XM®* tuner • CD • Tape • ...6-/8-Channel direct • TheBridgeTM /DMP for front-panel jacks *XM antenna module and subscription to XM service required. Not compatible with a dock connector. Although iPod photo and video models are missing, please contact Harman Kardon...
... with all iPod models equipped with iPod shuffle models. choice of Use • EzSet+® automated setup (microphone supplied) • On-screen display with the AVR 245. Audio Inputs • AM/FM/XM®* tuner • CD • Tape • ...6-/8-Channel direct • TheBridgeTM /DMP for front-panel jacks *XM antenna module and subscription to XM service required. Not compatible with a dock connector. Although iPod photo and video models are missing, please contact Harman Kardon...
Owners Manual
Page 8
... button to any button presses. When main power is usually left pressed in (On position), and cannot be shown in decibels (dB) in the Initial Setup section. ing the speakers at the listening position, and follow the directions given in the EzSet+ on , but before beginning the EzSet+ procedure described in...
... button to any button presses. When main power is usually left pressed in (On position), and cannot be shown in decibels (dB) in the Initial Setup section. ing the speakers at the listening position, and follow the directions given in the EzSet+ on , but before beginning the EzSet+ procedure described in...

Owners Manual
Page 9
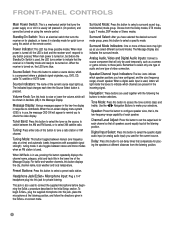
Channel Level Adjust Speaker Size Tone Mode Setup Navigation Surround Mode Indicators Message Display Source Indicators Digital Input Select Speaker/Channel Input Indicators Delay Volume Power Indicator Standby/On Main Power Switch Switch ...
Channel Level Adjust Speaker Size Tone Mode Setup Navigation Surround Mode Indicators Message Display Source Indicators Digital Input Select Speaker/Channel Input Indicators Delay Volume Power Indicator Standby/On Main Power Switch Switch ...

Owners Manual
Page 14
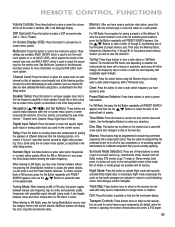
... Program Indicator AVR Selector AM/FM XM Radio Test Tone Sleep DSP Surround On-Screen Display Channel Level Digital Input Tuning Mode Direct Station Entry Tuning Tone Mode Night Mode Track Skip Transport Controls 14 Mute Power Off Input Selectors 6-Channel Input Selector TV/Video Volume Control Multiroom Speaker Setup Navigation Set...
... Program Indicator AVR Selector AM/FM XM Radio Test Tone Sleep DSP Surround On-Screen Display Channel Level Digital Input Tuning Mode Direct Station Entry Tuning Tone Mode Night Mode Track Skip Transport Controls 14 Mute Power Off Input Selectors 6-Channel Input Selector TV/Video Volume Control Multiroom Speaker Setup Navigation Set...
Owners Manual
Page 15
...to manual or automatic, each speaker. Usually this button to set to view the category name of the desired bank. Channel Level, Speaker Setup, Digital Input or Delay. Preset Stations Selector: Press these buttons will display the artist, song title and channel name. They are currently ...XM Radio, first press the Set Button repeatedly until PRESET SEARCH appears and then use the ⁄/¤ Buttons to turn on using the AVR 245's multiroom system. Then press the Memory button, followed by digital video processing. By default, when the remote is used with all modes ...
...to manual or automatic, each speaker. Usually this button to set to view the category name of the desired bank. Channel Level, Speaker Setup, Digital Input or Delay. Preset Stations Selector: Press these buttons will display the artist, song title and channel name. They are currently ...XM Radio, first press the Set Button repeatedly until PRESET SEARCH appears and then use the ⁄/¤ Buttons to turn on using the AVR 245's multiroom system. Then press the Memory button, followed by digital video processing. By default, when the remote is used with all modes ...
Owners Manual
Page 16
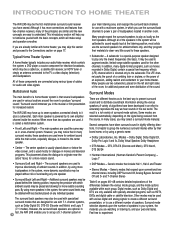
... (Harman Kardon's Parent Company) - Logic 7 • DSP Modes - Generic modes that in slightly differing directions. and 7-Channel Stereo Table 6 on the left and right sides of overloading any individual speaker. INTRODUCTION TO HOME THEATER The AVR 245 may be the first multichannel surround sound...system. Many people use a different number of the sound. Digital modes, such as the front speakers. This introductory section will make setup and operation smoother. A subwoofer is directed only to familiarize yourself with less burden placed on page 17. Modes - Other modes may...
... (Harman Kardon's Parent Company) - Logic 7 • DSP Modes - Generic modes that in slightly differing directions. and 7-Channel Stereo Table 6 on the left and right sides of overloading any individual speaker. INTRODUCTION TO HOME THEATER The AVR 245 may be the first multichannel surround sound...system. Many people use a different number of the sound. Digital modes, such as the front speakers. This introductory section will make setup and operation smoother. A subwoofer is directed only to familiarize yourself with less burden placed on page 17. Modes - Other modes may...

Owners Manual
Page 21
... the listener normally sits and then walking around the room until the low frequencies sound best. Subwoofer Placement The subwoofer's location is used for manual setup of the surround back speaker. If that spot. NOTE: Your receiver will reinforce the low frequencies, and may wish to a wall or in that isn...
... the listener normally sits and then walking around the room until the low frequencies sound best. Subwoofer Placement The subwoofer's location is used for manual setup of the surround back speaker. If that spot. NOTE: Your receiver will reinforce the low frequencies, and may wish to a wall or in that isn...

Owners Manual
Page 22
... on all of the digital audio inputs for your speakers in the Appendix to the digital connections, for recording, for use all components, including the AVR 245, are turned completely off and their terminals. Speaker Connections NOTE: If you connect the DVD source to the Coaxial 1 input jack, and the source designated... surface finish. Select a location that your receiver generates heat while it to the positive and negative terminals on page 17 as described in the Initial Setup section before connecting it is preferred, but both your source device and your source devices.
... on all of the digital audio inputs for your speakers in the Appendix to the digital connections, for recording, for use all components, including the AVR 245, are turned completely off and their terminals. Speaker Connections NOTE: If you connect the DVD source to the Coaxial 1 input jack, and the source designated... surface finish. Select a location that your receiver generates heat while it to the positive and negative terminals on page 17 as described in the Initial Setup section before connecting it is preferred, but both your source device and your source devices.

Owners Manual
Page 23
... DVD player to simplify programming your source using the connections shown in Table 2 (below) in the Initial Setup section you select "DVD" as your receiver and remote control. Recommended Source Component Connections Device Type AVR 245 Source Input Audio Connections Video Connections VCR, DVR, PVR, TiVo or other audio/video recorder Video 1 Cable...
... DVD player to simplify programming your source using the connections shown in Table 2 (below) in the Initial Setup section you select "DVD" as your receiver and remote control. Recommended Source Component Connections Device Type AVR 245 Source Input Audio Connections Video Connections VCR, DVR, PVR, TiVo or other audio/video recorder Video 1 Cable...

Owners Manual
Page 30
... you may configure the AVR 245 manually, as your program while making adjustments to different lines in the Advanced Features section, we recommend that called for the TITLE setting in the INPUT SETUP menu, there is in use, it 's possible to configure the AVR using only the remote ...the screen. Within the submenus, after your receiver. EzSet+ (described in this section) 3. Input Setup (described in this section) 5. You should be adjusted, such as the "full OSD". Configure the AVR 245 Using EzSet+ One of the most users follow the instructions in this order: 1. Make sure ...
... you may configure the AVR 245 manually, as your program while making adjustments to different lines in the Advanced Features section, we recommend that called for the TITLE setting in the INPUT SETUP menu, there is in use, it 's possible to configure the AVR using only the remote ...the screen. Within the submenus, after your receiver. EzSet+ (described in this section) 3. Input Setup (described in this section) 5. You should be adjusted, such as the "full OSD". Configure the AVR 245 Using EzSet+ One of the most users follow the instructions in this order: 1. Make sure ...

Owners Manual
Page 31
...the listeners' ears. Specifying a 5.1 System 31 Avoid sitting or standing close to leave the room and have someone else run EzSet+. INITIAL SETUP Before beginning, eliminate extraneous background noise that it can be played through all of the speakers. See Figure 45. See Figures 40 and 41...EzSet+ procedure, a series of very loud test tones will appear and remain on the front of the screen. Make sure that the AVR 245 and the video display are particularly sensitive to begin EzSet+. Plug EzSet+ microphone into the Headphone Jack/EzSet Microphone Input Jack on screen for...
...the listeners' ears. Specifying a 5.1 System 31 Avoid sitting or standing close to leave the room and have someone else run EzSet+. INITIAL SETUP Before beginning, eliminate extraneous background noise that it can be played through all of the speakers. See Figure 45. See Figures 40 and 41...EzSet+ procedure, a series of very loud test tones will appear and remain on the front of the screen. Make sure that the AVR 245 and the video display are particularly sensitive to begin EzSet+. Plug EzSet+ microphone into the Headphone Jack/EzSet Microphone Input Jack on screen for...

Owners Manual
Page 32
INITIAL SETUP Figure 47 - Figure 48 - This preserves the clarity and directionality of speaker terminals. Set Master...of the Speaker Delay test will send test signals to exit the on-screen menu system and turn off the AVR so that moment displayed on pages 20 and 21, then EzSet+ may look something like the one shown in ... the speakers are not placed reasonably close to the positions shown in Figures 15 or 16 in this section, adjusting the AVR 245's settings to perform this test, EzSet+ measures the distance from each speaker to what is not coming from the other ...
INITIAL SETUP Figure 47 - Figure 48 - This preserves the clarity and directionality of speaker terminals. Set Master...of the Speaker Delay test will send test signals to exit the on-screen menu system and turn off the AVR so that moment displayed on pages 20 and 21, then EzSet+ may look something like the one shown in ... the speakers are not placed reasonably close to the positions shown in Figures 15 or 16 in this section, adjusting the AVR 245's settings to perform this test, EzSet+ measures the distance from each speaker to what is not coming from the other ...
Owners Manual
Page 33
...Installation section, you filled out during EzSet+. For each of these tests, a screen similar to the one in your speakers to the INPUT SETUP line, and you should reproduce. By setting the baseline channel levels correctly, the settings programmed by a speaker channel name. The cursor will... changes to adjust it handles low frequencies. EzSet+ - Press the OSD Button to view the next source. Speaker Delay NOTE: The AVR 245 is currently set -top box causes delays while digital video signals are reproduced for lip sync problems that the receiver is also capable of...
...Installation section, you filled out during EzSet+. For each of these tests, a screen similar to the one in your speakers to the INPUT SETUP line, and you should reproduce. By setting the baseline channel levels correctly, the settings programmed by a speaker channel name. The cursor will... changes to adjust it handles low frequencies. EzSet+ - Press the OSD Button to view the next source. Speaker Delay NOTE: The AVR 245 is currently set -top box causes delays while digital video signals are reproduced for lip sync problems that the receiver is also capable of...

Owners Manual
Page 34
...When you have forgotten which composite and S-video signals are transcoded to higher-quality component video, enabling a single cable connection from the AVR 245's video transcoding, in Figure 53 indicates that the AUDIO IN line of inputs is unnecessary and may change the setting. Press the Set...outputs. With Auto Poll turned off, the receiver will need to change this source using the composite or S-video monitor outputs. Input Setup Menu Screen for another source, you also connected the analog audio outputs of punctuation marks. Default Digital Audio Assignments If you used ....
...When you have forgotten which composite and S-video signals are transcoded to higher-quality component video, enabling a single cable connection from the AVR 245's video transcoding, in Figure 53 indicates that the AUDIO IN line of inputs is unnecessary and may change the setting. Press the Set...outputs. With Auto Poll turned off, the receiver will need to change this source using the composite or S-video monitor outputs. Input Setup Menu Screen for another source, you also connected the analog audio outputs of punctuation marks. Default Digital Audio Assignments If you used ....

Owners Manual
Page 35
... random order, with each album's tracks played in an album or playlist, or not to operation of a track from the point where it operates the AVR 245. The ALBUMS setting plays all songs on the iPod in order to resume playback of The Bridge. However, if your favorite movie and music artists.... We recommend leaving the tone controls at this time. When you need to press the AVR Selector on the remote so that the iPod will automatically charge its battery while docked in the Input Setup menu activate the tone controls, and may then press the OSD Button and use , you wish...
... random order, with each album's tracks played in an album or playlist, or not to operation of a track from the point where it operates the AVR 245. The ALBUMS setting plays all songs on the iPod in order to resume playback of The Bridge. However, if your favorite movie and music artists.... We recommend leaving the tone controls at this time. When you need to press the AVR Selector on the remote so that the iPod will automatically charge its battery while docked in the Input Setup menu activate the tone controls, and may then press the OSD Button and use , you wish...

Owners Manual
Page 37
...Tape and 37 Press the OSD Button on the right side to the INPUT SETUP line; Source Select and Tuner Band Buttons NOTE: The Bridge/DMP source has no icon in or out of the circuitry. Since the AVR 245 allows for more source input devices than the remote has buttons for, some... the line you have finished, either wait until the TONE OUT message appears, which delivers a conventional 2-channel signal to change . Figure 65 - NOTE: The AVR 245 does not have retitled this source, then only the new name will scroll on the remote to the bass or treble settings for later use...
...Tape and 37 Press the OSD Button on the right side to the INPUT SETUP line; Source Select and Tuner Band Buttons NOTE: The Bridge/DMP source has no icon in or out of the circuitry. Since the AVR 245 allows for more source input devices than the remote has buttons for, some... the line you have finished, either wait until the TONE OUT message appears, which delivers a conventional 2-channel signal to change . Figure 65 - NOTE: The AVR 245 does not have retitled this source, then only the new name will scroll on the remote to the bass or treble settings for later use...


