
User Manual
Page 1
... Stand Base Assembly 9 1.3 Introducing the TV 11 1.4 Features 11 1.5 Control Panel 12 1.6 Input and Output Jacks 12 1.7 Remote Control 14 1.8 Inserting the Remote Control Batteries 18 2. Setting up your TV 20 2.1 Power Connection 20 2.2 Rear Connections 20 2.3 Using the TV 22 2.3.1 Turning the TV On and Off 22 2.3.2 Switching Source Signals 22 2.3.3 Performing an Automatic Channel Search 22 2.3.4 Selecting Channels 22 2.3.5 Adjusting the Volume 22 3. Adjusting On-Screen Display (OSD) Settings 23 3.1 OSD Setting Menus 24 3.2 Adjusting Picture Settings 24 3.3 Adjusting Sound...
... Stand Base Assembly 9 1.3 Introducing the TV 11 1.4 Features 11 1.5 Control Panel 12 1.6 Input and Output Jacks 12 1.7 Remote Control 14 1.8 Inserting the Remote Control Batteries 18 2. Setting up your TV 20 2.1 Power Connection 20 2.2 Rear Connections 20 2.3 Using the TV 22 2.3.1 Turning the TV On and Off 22 2.3.2 Switching Source Signals 22 2.3.3 Performing an Automatic Channel Search 22 2.3.4 Selecting Channels 22 2.3.5 Adjusting the Volume 22 3. Adjusting On-Screen Display (OSD) Settings 23 3.1 OSD Setting Menus 24 3.2 Adjusting Picture Settings 24 3.3 Adjusting Sound...
User Manual
Page 2
Troubleshooting 33 5. Using the Cable Organizer 38 2 Dissembling the stand base 37 9. Support USB Compatible Formats 35 7. Support Timing 34 6. Specifications 36 8. English Table of Contents 3.6 Adjusting Eco Settings 32 4.
Troubleshooting 33 5. Using the Cable Organizer 38 2 Dissembling the stand base 37 9. Support USB Compatible Formats 35 7. Support Timing 34 6. Specifications 36 8. English Table of Contents 3.6 Adjusting Eco Settings 32 4.

User Manual
Page 4
... These servicing instructions are qualified to provide enough space for use by qualified service personnel only. WARNING To prevent the spread of fire, keep candles or other than that contained in the operating instructions unless you are for the emission of heat. Apparatus shall not be placed on the apparatus. English Safety Notices Installation Safety Notes Location Avoid...
... These servicing instructions are qualified to provide enough space for use by qualified service personnel only. WARNING To prevent the spread of fire, keep candles or other than that contained in the operating instructions unless you are for the emission of heat. Apparatus shall not be placed on the apparatus. English Safety Notices Installation Safety Notes Location Avoid...

User Manual
Page 5
... broken glass. 7. The screen of the TV is made of the TV. 4. Do not allow children to disconnect the plug by pulling on the source signal, use a VGA monitor cable with ferrite shield. To reduce the influence of main frequency on the power cord. English Notes: • The LED-LCD HDTV is for entertainment use only and visual display tasks are located inside the TV.
... broken glass. 7. The screen of the TV is made of the TV. 4. Do not allow children to disconnect the plug by pulling on the source signal, use a VGA monitor cable with ferrite shield. To reduce the influence of main frequency on the power cord. English Notes: • The LED-LCD HDTV is for entertainment use only and visual display tasks are located inside the TV.
User Manual
Page 6
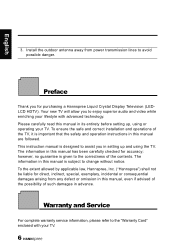
... installation and operations of the TV, it is designed to enjoy superior audio and video while enriching your TV. 6 Please carefully read this manual in this manual are followed. Your new TV will allow you to assist you for purchasing a Hannspree Liquid Crystal Display Television (LEDLCD HDTV). This instruction manual is important that the safety and operation instructions in its entirety before setting up and using...
... installation and operations of the TV, it is designed to enjoy superior audio and video while enriching your TV. 6 Please carefully read this manual in this manual are followed. Your new TV will allow you to assist you for purchasing a Hannspree Liquid Crystal Display Television (LEDLCD HDTV). This instruction manual is important that the safety and operation instructions in its entirety before setting up and using...
User Manual
Page 11
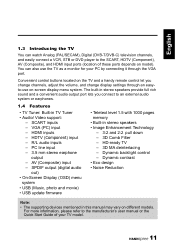
... the Quick Start Guide of these ports depends on model). R/L audio inputs - AV (Composite) input - You can watch Analog (PAL/SECAM), Digital (DVB-T/DVB-C) television channels, and easily connect a VCR, STB or DVD player to an external audio system or earphones. 1.4 Features • TV Tuner: Built-in stereo speakers provide full rich sound and a convenient audio output port lets you change channels, adjust the volume, and change display settings through the VGA port. The built-in TV Tuner • Audio/ Video support: - Dynamic backlight control...
... the Quick Start Guide of these ports depends on model). R/L audio inputs - AV (Composite) input - You can watch Analog (PAL/SECAM), Digital (DVB-T/DVB-C) television channels, and easily connect a VCR, STB or DVD player to an external audio system or earphones. 1.4 Features • TV Tuner: Built-in stereo speakers provide full rich sound and a convenient audio output port lets you change channels, adjust the volume, and change display settings through the VGA port. The built-in TV Tuner • Audio/ Video support: - Dynamic backlight control...
User Manual
Page 12
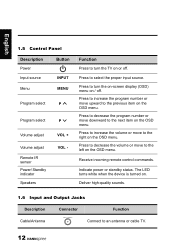
English 1.5 Control Panel Description Power Input source Button INPUT Menu MENU Program select P Program select P Volume adjust Volume adjust Remote IR sensor Power/ Standby indicator Speakers VOL + VOL - Receive incoming remote control commands. The LED turns white when the device is turned on or off . Press to increase the volume or move upward to turn the on-screen display (OSD) menu on the OSD menu. Function Press to the previous item on the OSD menu. Indicate power or standby status. Press to increase the program number or move to...
English 1.5 Control Panel Description Power Input source Button INPUT Menu MENU Program select P Program select P Volume adjust Volume adjust Remote IR sensor Power/ Standby indicator Speakers VOL + VOL - Receive incoming remote control commands. The LED turns white when the device is turned on or off . Press to increase the volume or move upward to turn the on-screen display (OSD) menu on the OSD menu. Function Press to the previous item on the OSD menu. Indicate power or standby status. Press to increase the program number or move to...

User Manual
Page 14
..., HDMI 1, HDMI 2, and USB. Press to enter the program numbers (press 1 and 0 for program 10). Press to select a program directly. Use to display the programs contained. 14 Connect an HDMI equipment or an HDMI-DVI adapter cable to turn the TV on or off. Connect to the included power cord. 1.7 Remote Control Description Icon Power Input Signal Type INPUT Keypad Pro.List Pro.LIST Function Press to devices such as a DVD player or set-top box. English Description HDMI 1 Input HDMI 2 Input (32"/42" only) HDMI 3 Input SPDIF Power...
..., HDMI 1, HDMI 2, and USB. Press to enter the program numbers (press 1 and 0 for program 10). Press to select a program directly. Use to display the programs contained. 14 Connect an HDMI equipment or an HDMI-DVI adapter cable to turn the TV on or off. Connect to the included power cord. 1.7 Remote Control Description Icon Power Input Signal Type INPUT Keypad Pro.List Pro.LIST Function Press to devices such as a DVD player or set-top box. English Description HDMI 1 Input HDMI 2 Input (32"/42" only) HDMI 3 Input SPDIF Power...
User Manual
Page 16
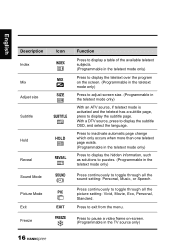
... MIX SIZE SUBTITLE HOLD REVEAL SOUND PIC EXIT FREEZE Function Press to display a table of the available teletext subjects. (Programmable in the teletext mode only) Press to display the teletext over the program on -screen. (Programmable in the TV source only) 16 With a DTV source, press to toggle through all the sound setting: Personal, Music, or Speech. Press to inactivate automatic page change...
... MIX SIZE SUBTITLE HOLD REVEAL SOUND PIC EXIT FREEZE Function Press to display a table of the available teletext subjects. (Programmable in the teletext mode only) Press to display the teletext over the program on -screen. (Programmable in the TV source only) 16 With a DTV source, press to toggle through all the sound setting: Personal, Music, or Speech. Press to inactivate automatic page change...

User Manual
Page 20
... quality speaker system 1 32"/42" only 45 6 7 Home theater Video Game Console DVD player VCR VCR/VCD/DVD/STB Video Game Console 10 CI-based devices 9 Camcorder VCR/VCD/DVD STB 8 Earphone TV cable / antenna 20 English 2 Setting up your TV 2.1 Power Connection 1 Connect the power cord to the AC IN input jack on the rear of the TV. 2 Insert the plug at the other end of the power cord into a power outlet. 2.2 Rear Connections See...
... quality speaker system 1 32"/42" only 45 6 7 Home theater Video Game Console DVD player VCR VCR/VCD/DVD/STB Video Game Console 10 CI-based devices 9 Camcorder VCR/VCD/DVD STB 8 Earphone TV cable / antenna 20 English 2 Setting up your TV 2.1 Power Connection 1 Connect the power cord to the AC IN input jack on the rear of the TV. 2 Insert the plug at the other end of the power cord into a power outlet. 2.2 Rear Connections See...

User Manual
Page 21
... model. 21 Video Input Composite Audio Inputs 10 CI • The Common Interface cable is optional. AUDIO In 3 HDMI 1 • The HDMI cable is optional. HDMI 3 However it's necessary to do so if a HDMI to DVI cable is connected. 4 SPDIF • The SPDIF cable is not necessary. English No. HDMI 2 • When the HDMI to a TV cable or antenna, try scanning for channels. 8 Earphone • The internal TV speakers will not output sound when a speaker...
... model. 21 Video Input Composite Audio Inputs 10 CI • The Common Interface cable is optional. AUDIO In 3 HDMI 1 • The HDMI cable is optional. HDMI 3 However it's necessary to do so if a HDMI to DVI cable is connected. 4 SPDIF • The SPDIF cable is not necessary. English No. HDMI 2 • When the HDMI to a TV cable or antenna, try scanning for channels. 8 Earphone • The internal TV speakers will not output sound when a speaker...

User Manual
Page 22
on the control panel or remote control to decrease the volume. 3 Press MUTE to eliminate sounds, and press MUTE again or press the volume buttons to increase the volume. 2 Press VOL- The power LED turns off . 2.3.2 Switching Source Signals Press INPUT on the control panel or remote control to select the incoming source signal. 2.3.3 Performing an Automatic Channel Search Before using the TV to view programs, you need to activate the channel search first. 1 Press MENU on the control panel or remote control, then...
on the control panel or remote control to decrease the volume. 3 Press MUTE to eliminate sounds, and press MUTE again or press the volume buttons to increase the volume. 2 Press VOL- The power LED turns off . 2.3.2 Switching Source Signals Press INPUT on the control panel or remote control to select the incoming source signal. 2.3.3 Performing an Automatic Channel Search Before using the TV to view programs, you need to activate the channel search first. 1 Press MENU on the control panel or remote control, then...
User Manual
Page 25
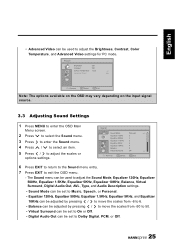
... Temperature Advanced Video 100 100 Cool Remove OK Select EXIT Exit Note: The options available on the OSD may vary depending on the input signal source. 3.3 Adjusting Sound Settings 1 Press MENU to enter the OSD Main Menu screen. 2 Press to select the Sound menu. 3 Press to enter the Sound menu. 4 Press / to select an item. 5 Press / to adjust the Brightness, Contrast, Color Temperature, and Advanced Video settings for PC mode.
... Temperature Advanced Video 100 100 Cool Remove OK Select EXIT Exit Note: The options available on the OSD may vary depending on the input signal source. 3.3 Adjusting Sound Settings 1 Press MENU to enter the OSD Main Menu screen. 2 Press to select the Sound menu. 3 Press to enter the Sound menu. 4 Press / to select an item. 5 Press / to adjust the Brightness, Contrast, Color Temperature, and Advanced Video settings for PC mode.
User Manual
Page 26
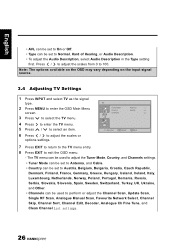
... set to Normal, Hard of Hearing, or Audio Description. • To adjust the Audio Description, select Audio Description in the Type setting first. TV Tuner Mode Country Channels Antenna Austria Remove OK Select EXIT Exit 7 Press EXIT to return to the TV menu entry. 8 Press EXIT to 100. English • AVL can be used to perform or adjust the Channel Scan, Update Scan, Single RF Scan, Analogue Manual Scan, Favourite Network Select, Channel Skip, Channel Sort, Channel...
... set to Normal, Hard of Hearing, or Audio Description. • To adjust the Audio Description, select Audio Description in the Type setting first. TV Tuner Mode Country Channels Antenna Austria Remove OK Select EXIT Exit 7 Press EXIT to return to the TV menu entry. 8 Press EXIT to 100. English • AVL can be used to perform or adjust the Channel Scan, Update Scan, Single RF Scan, Analogue Manual Scan, Favourite Network Select, Channel Skip, Channel Sort, Channel...
User Manual
Page 28
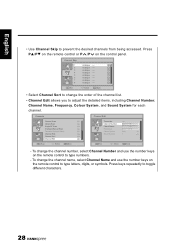
... channels from being accessed. Channels Channel Scan Update Scan Single RF Scan Analogue Manual Scan Favourite Network Select Channel Skip Channel Sort Channel Edit OK Scan Select EXIT Back Channel Edit Transmitter Channel Number: Chanel Name: Frequency Colour System Sound System ----1 ----77.3 Auto I OK Set Select EXIT Back - To change the channel name, select Channel Name and use the number keys on the remote control to type letters, digits, or symbols. Press PS/PT on the remote control or P /P on the remote control to type numbers...
... channels from being accessed. Channels Channel Scan Update Scan Single RF Scan Analogue Manual Scan Favourite Network Select Channel Skip Channel Sort Channel Edit OK Scan Select EXIT Back Channel Edit Transmitter Channel Number: Chanel Name: Frequency Colour System Sound System ----1 ----77.3 Auto I OK Set Select EXIT Back - To change the channel name, select Channel Name and use the number keys on the remote control to type letters, digits, or symbols. Press PS/PT on the remote control or P /P on the remote control to type numbers...
User Manual
Page 29
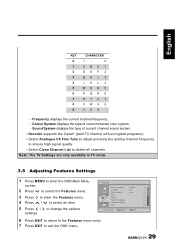
... exit the OSD menu. 29 English KEY 0 1 2 3 4 5 6 7 8 9 CHARACTER +- .0 ABC1 DEF 2 GH I 3 JKL4 MNO 5 PQR 6 STU7 VWX 8 YZ 9 - Colour System displays the type of current channel sound system. • Decoder supports the Canal+ (paid TV channel with encrypted programs). • Select Analogue Ch Fine Tune to adjust precisely the analog channel frequency to ensure high signal quality. • Select Clean Channel List to change the options settings.
... exit the OSD menu. 29 English KEY 0 1 2 3 4 5 6 7 8 9 CHARACTER +- .0 ABC1 DEF 2 GH I 3 JKL4 MNO 5 PQR 6 STU7 VWX 8 YZ 9 - Colour System displays the type of current channel sound system. • Decoder supports the Canal+ (paid TV channel with encrypted programs). • Select Analogue Ch Fine Tune to adjust precisely the analog channel frequency to ensure high signal quality. • Select Clean Channel List to change the options settings.
User Manual
Page 30
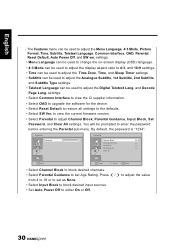
...; Select Input Block to block desired input sources. • Set Auto Power Off to adjust the Menu Language, 4:3 Mode, Picture Format, Time, Subtitle, Teletext Language, Common Interface, OAD, Parental, Reset Default, Auto Power Off, and SW ver. settings. • Select Common Interface to view the CI supplier information. • Select OAD to upgrade the software for the device. • Select Reset Default to restore all settings to adjust Channel Block, Parental Guidance, Input Block, Set Password, and Clear All settings. English...
...; Select Input Block to block desired input sources. • Set Auto Power Off to adjust the Menu Language, 4:3 Mode, Picture Format, Time, Subtitle, Teletext Language, Common Interface, OAD, Parental, Reset Default, Auto Power Off, and SW ver. settings. • Select Common Interface to view the CI supplier information. • Select OAD to upgrade the software for the device. • Select Reset Default to restore all settings to adjust Channel Block, Parental Guidance, Input Block, Set Password, and Clear All settings. English...
User Manual
Page 33
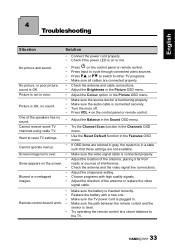
... sources of the antenna or replace the video signal cable. Make sure the path between the remote control and the sensor is inserted correctly. English 4 Troubleshooting Situation Solution • Connect the power cord properly. • Check if the power LED is connected securely. Make sure the audio cable is on or not. If OSD items are colored in gray, the system is in color. • • Picture is functioning properly. Choose programs...
... sources of the antenna or replace the video signal cable. Make sure the path between the remote control and the sensor is inserted correctly. English 4 Troubleshooting Situation Solution • Connect the power cord properly. • Check if the power LED is connected securely. Make sure the audio cable is on or not. If OSD items are colored in gray, the system is in color. • • Picture is functioning properly. Choose programs...
User Manual
Page 36
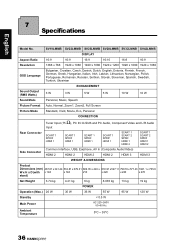
... W Sound Mode Personal, Music, Speech Picture Format Auto, Normal, Zoom1, Zoom2, Full Screen Picture Mode Standard, Vivid, Movie, Eco, Personal CONNECTION Ω Tuner Input (75 ), PC IN: D-SUB and PC Audio, Component Video and L/R Audio Input Rear Connector SCART 1 SPDIF HDMI 1 SCART 1 SPDIF HDMI 1 SCART 1 SPDIF HDMI 1 SCART 1 SPDIF HDMI 1 SCART 1 SCART 2 SPDIF HDMI 1 HDMI 2 SCART 1 SCART 2 SPDIF HDMI 1 HDMI 2 Common Interface, USB, Earphone, AV In (Composite Audio/Video) Side Connector HDMI 2 HDMI 2 HDMI 2 HDMI 2 HDMI 3 HDMI 3 WEIGHT & DIMENSIONS Product Dimensions...
... W Sound Mode Personal, Music, Speech Picture Format Auto, Normal, Zoom1, Zoom2, Full Screen Picture Mode Standard, Vivid, Movie, Eco, Personal CONNECTION Ω Tuner Input (75 ), PC IN: D-SUB and PC Audio, Component Video and L/R Audio Input Rear Connector SCART 1 SPDIF HDMI 1 SCART 1 SPDIF HDMI 1 SCART 1 SPDIF HDMI 1 SCART 1 SPDIF HDMI 1 SCART 1 SCART 2 SPDIF HDMI 1 HDMI 2 SCART 1 SCART 2 SPDIF HDMI 1 HDMI 2 Common Interface, USB, Earphone, AV In (Composite Audio/Video) Side Connector HDMI 2 HDMI 2 HDMI 2 HDMI 2 HDMI 3 HDMI 3 WEIGHT & DIMENSIONS Product Dimensions...
User Manual
Page 37
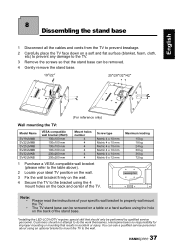
.... 3 Remove the screws so that the stand base can ask a qualified service personnel about using the 4 mount holes on the back and center of the stand base. *Installing the LED-LCD HDTV requires special skill that results in accident or injury. You can be removed. 4 Gently remove the stand base. 19"/22" 25"/28"/32"/42" (For reference only) Wall mounting the TV: Model Name SV19LMMB SV22LMMB SV25LMMB SV28LMMB SV32LMNB SV42LMNB VESA-compatible wall bracket...
.... 3 Remove the screws so that the stand base can ask a qualified service personnel about using the 4 mount holes on the back and center of the stand base. *Installing the LED-LCD HDTV requires special skill that results in accident or injury. You can be removed. 4 Gently remove the stand base. 19"/22" 25"/28"/32"/42" (For reference only) Wall mounting the TV: Model Name SV19LMMB SV22LMMB SV25LMMB SV28LMMB SV32LMNB SV42LMNB VESA-compatible wall bracket...


