
User Manual
Page 2
... (2) this device must accept any interference received, including interference that interference will not occur in a residential installation. If this manual thoroughly. This device complies with requirement of the FCC Rules. CANADA This Class B digital apparatus meets all requirements of the FCC... device, pursuant to radio communications. Socket-outlet shall be near the equipment and shall be retained for future reference. User's Manual Before operating the monitor, please read this equipment does cause harmful interference to radio or television reception, which can radiate radio ...
... (2) this device must accept any interference received, including interference that interference will not occur in a residential installation. If this manual thoroughly. This device complies with requirement of the FCC Rules. CANADA This Class B digital apparatus meets all requirements of the FCC... device, pursuant to radio communications. Socket-outlet shall be near the equipment and shall be retained for future reference. User's Manual Before operating the monitor, please read this equipment does cause harmful interference to radio or television reception, which can radiate radio ...

User Manual
Page 3
... impact on { chlorinated and brominated flame retardants and polymers { heavy metals such as EMAS or ISO 14 001 • Restrictions on our natural environment. User's Manual Congratulations!
... impact on { chlorinated and brominated flame retardants and polymers { heavy metals such as EMAS or ISO 14 001 • Restrictions on our natural environment. User's Manual Congratulations!

User Manual
Page 4
We strongly encourage you to contact the provided information to hazardous and poisoned substances. For more information, please visit www.hannsg.com 4 User's Manual RECYCLING INFORMATION We, the Hanns.G care very much about our environment protection strategy and firmly believe that it helps us have healthier earth via appropriate ...
We strongly encourage you to contact the provided information to hazardous and poisoned substances. For more information, please visit www.hannsg.com 4 User's Manual RECYCLING INFORMATION We, the Hanns.G care very much about our environment protection strategy and firmly believe that it helps us have healthier earth via appropriate ...
User Manual
Page 5
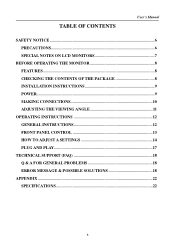
TABLE OF CONTENTS User's Manual SAFETY NOTICE ...6 PRECAUTIONS...6 SPECIAL NOTES ON LCD MONITORS 7 BEFORE OPERATING THE MONITOR 8 FEATURES...8 CHECKING THE CONTENTS OF THE PACKAGE 8 INSTALLATION INSTRUCTIONS 9 POWER...9 MAKING CONNECTIONS 10 ADJUSTING THE VIEWING ANGLE 11 OPERATING INSTRUCTIONS 12 GENERAL INSTRUCTIONS 12 FRONT PANEL CONTROL 13 HOW TO ADJUST A SETTINGS 14 PLUG AND PLAY 17 TECHNICAL SUPPORT (FAQ 18 Q & A FOR GENERAL PROBLEMS 18 ERROR MESSAGE & POSSIBLE SOLUTIONS 18 APPENDIX ...22 SPECIFICATIONS 22 5
TABLE OF CONTENTS User's Manual SAFETY NOTICE ...6 PRECAUTIONS...6 SPECIAL NOTES ON LCD MONITORS 7 BEFORE OPERATING THE MONITOR 8 FEATURES...8 CHECKING THE CONTENTS OF THE PACKAGE 8 INSTALLATION INSTRUCTIONS 9 POWER...9 MAKING CONNECTIONS 10 ADJUSTING THE VIEWING ANGLE 11 OPERATING INSTRUCTIONS 12 GENERAL INSTRUCTIONS 12 FRONT PANEL CONTROL 13 HOW TO ADJUST A SETTINGS 14 PLUG AND PLAY 17 TECHNICAL SUPPORT (FAQ 18 Q & A FOR GENERAL PROBLEMS 18 ERROR MESSAGE & POSSIBLE SOLUTIONS 18 APPENDIX ...22 SPECIFICATIONS 22 5
User Manual
Page 6
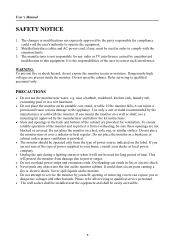
...; Do not place the monitor on the monitor. • Do not attempt to power surges. • Do not overload power strips and extension cords. User's Manual SAFETY NOTICE 1. The manufacturer is not responsible for long period of power source indicated on the monitor cabinet. It is provided. • The monitor should...
...; Do not place the monitor on the monitor. • Do not attempt to power surges. • Do not overload power strips and extension cords. User's Manual SAFETY NOTICE 1. The manufacturer is not responsible for long period of power source indicated on the monitor cabinet. It is provided. • The monitor should...
User Manual
Page 7
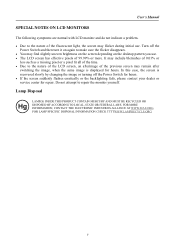
...; Due to the nature of the LCD screen, an afterimage of 99.99% or more. In this case, the screen is displayed for repair. User's Manual SPECIAL NOTES ON LCD MONITORS The following symptoms are normal with LCD monitor and do not indicate a problem. • Due to the nature of the...
...; Due to the nature of the LCD screen, an afterimage of 99.99% or more. In this case, the screen is displayed for repair. User's Manual SPECIAL NOTES ON LCD MONITORS The following symptoms are normal with LCD monitor and do not indicate a problem. • Due to the nature of the...
User Manual
Page 8
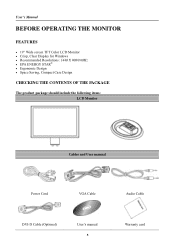
User's Manual BEFORE OPERATING THE MONITOR FEATURES • 19" Wide screen TFT Color LCD Monitor • Crisp, Clear Display for Windows • Recommended Resolutions: 1440 X 900@60Hz • EPA ENERGY STAR® • Ergonomic Design • Space Saving, Compact Case Design CHECKING THE CONTENTS OF THE PACKAGE The product package should include the following items: LCD Monitor Cables and User manual Power Cord VGA Cable Audio Cable DVI-D Cable (Optional) User's manual 8 Warranty card
User's Manual BEFORE OPERATING THE MONITOR FEATURES • 19" Wide screen TFT Color LCD Monitor • Crisp, Clear Display for Windows • Recommended Resolutions: 1440 X 900@60Hz • EPA ENERGY STAR® • Ergonomic Design • Space Saving, Compact Case Design CHECKING THE CONTENTS OF THE PACKAGE The product package should include the following items: LCD Monitor Cables and User manual Power Cord VGA Cable Audio Cable DVI-D Cable (Optional) User's manual 8 Warranty card
User Manual
Page 9
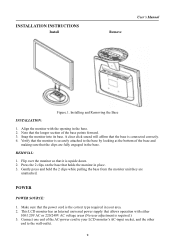
... the power cord is securely attached to the wall-outlet. 9 Flip over the monitor so that the clips are unattached. INSTALLATION INSTRUCTIONS Install Remove User's Manual Figure.1. Installing and Removing the Base INSTALLATION: 1. Gently press and hold the 2 clips while pulling the base from the monitor unit they are fully engaged...
... the power cord is securely attached to the wall-outlet. 9 Flip over the monitor so that the clips are unattached. INSTALLATION INSTRUCTIONS Install Remove User's Manual Figure.1. Installing and Removing the Base INSTALLATION: 1. Gently press and hold the 2 clips while pulling the base from the monitor unit they are fully engaged...
User Manual
Page 10
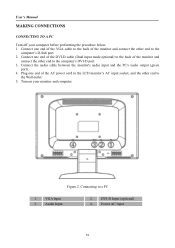
.... 1. Connect one end of the VGA cable to the back of the monitor and connect the other end to the computer's DVI-D port. 3. Figure.2. User's Manual MAKING CONNECTIONS CONNECTING TO A PC Turn off your monitor and computer. Connect one end of the DVI-D cable (Dual input mode optional) to the back...
.... 1. Connect one end of the VGA cable to the back of the monitor and connect the other end to the computer's DVI-D port. 3. Figure.2. User's Manual MAKING CONNECTIONS CONNECTING TO A PC Turn off your monitor and computer. Connect one end of the DVI-D cable (Dual input mode optional) to the back...
User Manual
Page 11
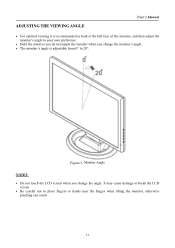
Monitor Angle NOTES: • Do not touch the LCD screen when you change the angle. ADJUSTING THE VIEWING ANGLE User's Manual • For optimal viewing it is recommended to look at the full face of the monitor, and then adjust the monitor's angle to your own ...
Monitor Angle NOTES: • Do not touch the LCD screen when you change the angle. ADJUSTING THE VIEWING ANGLE User's Manual • For optimal viewing it is recommended to look at the full face of the monitor, and then adjust the monitor's angle to your own ...

User Manual
Page 12
... or off. Menu / Return 3. Auto adjustment /Input source change / Enter 4. Brightness adjustment button /▲ [+] 5. Volume adjustment button / ▼ [-] 6. Control Panel Buttons CONTROL PANEL BUTTONS: 1. User's Manual OPERATING INSTRUCTIONS GENERAL INSTRUCTIONS Press the power button to turn the monitor on the monitor. The other control buttons are located on the front panel...
... or off. Menu / Return 3. Auto adjustment /Input source change / Enter 4. Brightness adjustment button /▲ [+] 5. Volume adjustment button / ▼ [-] 6. Control Panel Buttons CONTROL PANEL BUTTONS: 1. User's Manual OPERATING INSTRUCTIONS GENERAL INSTRUCTIONS Press the power button to turn the monitor on the monitor. The other control buttons are located on the front panel...
User Manual
Page 13
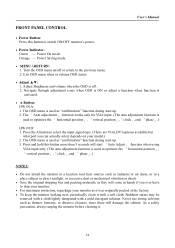
... to switch ON/OFF monitor's power. • Power Indicator: Green - As a safety precaution, always unplug the monitor before cleaning it with a mild detergent solution. User's Manual FRONT PANEL CONTROL • Power Button: Press this button more than 3 seconds will start 「Auto Adjust」 function when using VGA input only. (The...
... to switch ON/OFF monitor's power. • Power Indicator: Green - As a safety precaution, always unplug the monitor before cleaning it with a mild detergent solution. User's Manual FRONT PANEL CONTROL • Power Button: Press this button more than 3 seconds will start 「Auto Adjust」 function when using VGA input only. (The...

User Manual
Page 14
... analog (VGA) or Digital (DVI) source. INPUT SETTING INPUT SETTING AUTO SEARCH Select the 「INPUT SETTING」option to provide a clearer, sharper image. User's Manual HOW TO ADJUST A SETTINGS BRIGHTNESS/CONTRAST BRIGHTNESS Adjust the brightness value of the image are automatically detected, and the contrast is or in initial scale.
... analog (VGA) or Digital (DVI) source. INPUT SETTING INPUT SETTING AUTO SEARCH Select the 「INPUT SETTING」option to provide a clearer, sharper image. User's Manual HOW TO ADJUST A SETTINGS BRIGHTNESS/CONTRAST BRIGHTNESS Adjust the brightness value of the image are automatically detected, and the contrast is or in initial scale.
User Manual
Page 15
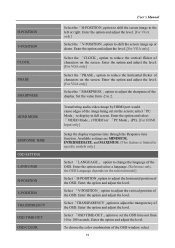
... the left or right. H-POSITION V-POSITION CLOCK PHASE SHARPNESS HDMI MODE RESPONSE TIME OSD SETTING LANGUAGE H-POSITION V-POSITION TRANSPARENCY OSD TIME-OUT OSD COLOR User's Manual Select the「H-POSITION」option to shift the screen image to adjust the transparency of the OSD.
... the left or right. H-POSITION V-POSITION CLOCK PHASE SHARPNESS HDMI MODE RESPONSE TIME OSD SETTING LANGUAGE H-POSITION V-POSITION TRANSPARENCY OSD TIME-OUT OSD COLOR User's Manual Select the「H-POSITION」option to shift the screen image to adjust the transparency of the OSD.
User Manual
Page 16
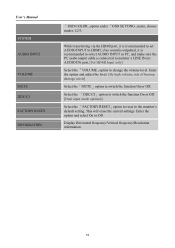
... (or AUDIO IN) port. [For HDMI Input only] Select the 「VOLUME」option to HDMI; Enter the option and select On or Off. User's Manual SYSTEM AUDIO INPUT VOLUME MUTE DDC/CI FACTORY RESET INFORMATION 「OSD COLOR」option under 「OSD SETTING」menu, choose modes 1/2/3. While transferring...
... (or AUDIO IN) port. [For HDMI Input only] Select the 「VOLUME」option to HDMI; Enter the option and select On or Off. User's Manual SYSTEM AUDIO INPUT VOLUME MUTE DDC/CI FACTORY RESET INFORMATION 「OSD COLOR」option under 「OSD SETTING」menu, choose modes 1/2/3. While transferring...
User Manual
Page 17
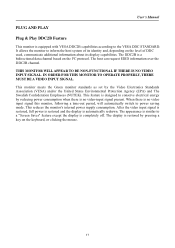
... a "Screen Saver" feature except the display is a bidirectional data channel based on the level of DDC used, communicate additional information about its display capabilities. User's Manual PLUG AND PLAY Plug & Play DDC2B Feature This monitor is automatically redrawn. The appearance is similar to conserve electrical energy by reducing power consumption when...
... a "Screen Saver" feature except the display is a bidirectional data channel based on the level of DDC used, communicate additional information about its display capabilities. User's Manual PLUG AND PLAY Plug & Play DDC2B Feature This monitor is automatically redrawn. The appearance is similar to conserve electrical energy by reducing power consumption when...
User Manual
Page 18
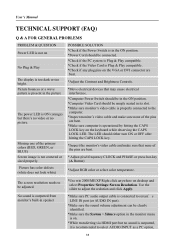
... silder to adjust the reslution and click Apply. *Make sure PC audio output cable is connected to select AUDIO INPUT as a PC option, 18 User's Manual TECHNICAL SUPPORT (FAQ) Q & A FOR GENERAL PROBLEMS PROBLEM & QUESTION Power LED is not on No Plug & Play The display is not centered or sized properly. POSSIBLE...
... silder to adjust the reslution and click Apply. *Make sure PC audio output cable is connected to select AUDIO INPUT as a PC option, 18 User's Manual TECHNICAL SUPPORT (FAQ) Q & A FOR GENERAL PROBLEMS PROBLEM & QUESTION Power LED is not on No Plug & Play The display is not centered or sized properly. POSSIBLE...

User Manual
Page 19
User's Manual and make sure PC audio output cable is connected to monitor's LINE IN port(or AUDIO IN port). [For HDMI Input only] 19
User's Manual and make sure PC audio output cable is connected to monitor's LINE IN port(or AUDIO IN port). [For HDMI Input only] 19
User Manual
Page 20
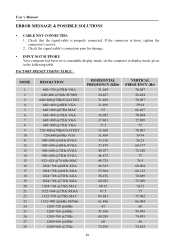
....995 74.893 60 74.443 20 Check that the signal-cable is properly connected, If the connector is loose, tighten the connector's screws. 2. User's Manual ERROR MESSAGE & POSSIBLE SOLUTIONS ƒ CABLE NOT CONNECTED: 1.
....995 74.893 60 74.443 20 Check that the signal-cable is properly connected, If the connector is loose, tighten the connector's screws. 2. User's Manual ERROR MESSAGE & POSSIBLE SOLUTIONS ƒ CABLE NOT CONNECTED: 1.
User Manual
Page 22
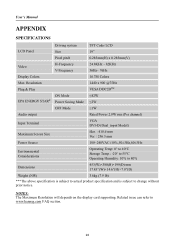
....6"(H)×7.8"(D) Weight (NW) 3.6kg (7.9 lb) ***The above specification is subject to actual product specification and is subject to www.hannsg.com FAQ section. 22 User's Manual APPENDIX SPECIFICATIONS LCD Panel Driving system Size TFT Color LCD 19" Pixel pitch 0.285mm(H) x 0.285mm(V) Video H-Frequency V-Frequency 24.8KHz - 82KHz 56Hz- 76Hz Display Colors...
....6"(H)×7.8"(D) Weight (NW) 3.6kg (7.9 lb) ***The above specification is subject to actual product specification and is subject to www.hannsg.com FAQ section. 22 User's Manual APPENDIX SPECIFICATIONS LCD Panel Driving system Size TFT Color LCD 19" Pixel pitch 0.285mm(H) x 0.285mm(V) Video H-Frequency V-Frequency 24.8KHz - 82KHz 56Hz- 76Hz Display Colors...