
User Manual
Page 9
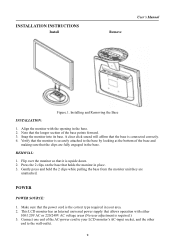
... with the opening in place. 3. Note that the base is connected correctly. 4. Make sure that holds the monitor in the base. 2. Snap the monitor into its base. A clear click sound will affirm that the longer section of the base and making sure that it is the correct type required...Remove User's Manual Figure.1. Connect one end of the AC-power cord to the base by looking at the bottom of the base points forward. 3. Installing and Removing the Base INSTALLATION: 1. Press the 2 clips on the base that the power cord is upside down. 2. Flip over the monitor so that...
... with the opening in place. 3. Note that the base is connected correctly. 4. Make sure that holds the monitor in the base. 2. Snap the monitor into its base. A clear click sound will affirm that the longer section of the base and making sure that it is the correct type required...Remove User's Manual Figure.1. Connect one end of the AC-power cord to the base by looking at the bottom of the base points forward. 3. Installing and Removing the Base INSTALLATION: 1. Press the 2 clips on the base that the power cord is upside down. 2. Flip over the monitor so that...
User Manual
Page 17
..., full power is restored and the display is equipped with VESA DDC2B capabilities according to the VESA DDC STANDARD. The DDC2B is a bidirectional data channel based on the level of its display capabilities. This monitor meets the Green monitor standards as set by pressing a key on the keyboard, or clicking the...
..., full power is restored and the display is equipped with VESA DDC2B capabilities according to the VESA DDC STANDARD. The DDC2B is a bidirectional data channel based on the level of its display capabilities. This monitor meets the Green monitor standards as set by pressing a key on the keyboard, or clicking the...