
User Manual
Page 2
... is connected. ƒ Consult the dealer or an experienced radio/TV technician for help. This manual should be accessible. 2 This equipment generates, uses and can be determined by turning the equipment off and on, the user is subject to provide reasonable protection against harmful interference in a residential installation. This device complies with...
... is connected. ƒ Consult the dealer or an experienced radio/TV technician for help. This manual should be accessible. 2 This equipment generates, uses and can be determined by turning the equipment off and on, the user is subject to provide reasonable protection against harmful interference in a residential installation. This device complies with...

User Manual
Page 3
...metals such as cadmium, mercury and lead. Energy • Energy-saving mode after a certain time - beneficial both for the user and the environment • Electrical safety Emissions • Electromagnetic fields • Noise emissions Ecology • The product must be prepared for the... recycling and the manufacturer must have a certified environmental management system such as manufacturers all over the world. User's Manual Congratulations! The display you have been developed by users and IT-manufacturers all over the world. Since the end of the 1980s TCO has been involved in...
...metals such as cadmium, mercury and lead. Energy • Energy-saving mode after a certain time - beneficial both for the user and the environment • Electrical safety Emissions • Electromagnetic fields • Noise emissions Ecology • The product must be prepared for the... recycling and the manufacturer must have a certified environmental management system such as manufacturers all over the world. User's Manual Congratulations! The display you have been developed by users and IT-manufacturers all over the world. Since the end of the 1980s TCO has been involved in...

User Manual
Page 4
... materials, which can be re-decomposed and re-integrated into brand-new marvels. On the contrary, other material can be classified to recycle this product. User's Manual RECYCLING INFORMATION We, the Hanns.G care very much about our environment protection strategy and firmly believe that it helps us have healthier earth via appropriate...
... materials, which can be re-decomposed and re-integrated into brand-new marvels. On the contrary, other material can be classified to recycle this product. User's Manual RECYCLING INFORMATION We, the Hanns.G care very much about our environment protection strategy and firmly believe that it helps us have healthier earth via appropriate...
User Manual
Page 5
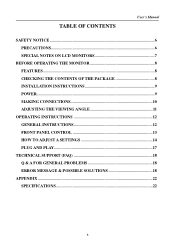
TABLE OF CONTENTS User's Manual SAFETY NOTICE ...6 PRECAUTIONS...6 SPECIAL NOTES ON LCD MONITORS 7 BEFORE OPERATING THE MONITOR 8 FEATURES...8 CHECKING THE CONTENTS OF THE PACKAGE 8 INSTALLATION INSTRUCTIONS 9 POWER...9 MAKING CONNECTIONS 10 ADJUSTING THE VIEWING ANGLE 11 OPERATING INSTRUCTIONS 12 GENERAL INSTRUCTIONS 12 FRONT PANEL CONTROL 13 HOW TO ADJUST A SETTINGS 14 PLUG AND PLAY 17 TECHNICAL SUPPORT (FAQ 18 Q & A FOR GENERAL PROBLEMS 18 ERROR MESSAGE & POSSIBLE SOLUTIONS 18 APPENDIX ...22 SPECIFICATIONS 22 5
TABLE OF CONTENTS User's Manual SAFETY NOTICE ...6 PRECAUTIONS...6 SPECIAL NOTES ON LCD MONITORS 7 BEFORE OPERATING THE MONITOR 8 FEATURES...8 CHECKING THE CONTENTS OF THE PACKAGE 8 INSTALLATION INSTRUCTIONS 9 POWER...9 MAKING CONNECTIONS 10 ADJUSTING THE VIEWING ANGLE 11 OPERATING INSTRUCTIONS 12 GENERAL INSTRUCTIONS 12 FRONT PANEL CONTROL 13 HOW TO ADJUST A SETTINGS 14 PLUG AND PLAY 17 TECHNICAL SUPPORT (FAQ 18 Q & A FOR GENERAL PROBLEMS 18 ERROR MESSAGE & POSSIBLE SOLUTIONS 18 APPENDIX ...22 SPECIFICATIONS 22 5
User Manual
Page 6
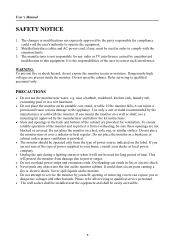
... • The monitor should be installed near or over a radiator or heat register. near water, e.g. To ensure reliable operation of the user to operate the equipment. 2. If the monitor falls, it will protect the monitor from overheating, be used in the back and bottom of...To prevent fire or shock hazard, do not expose the monitor to service the monitor by unauthorized modification to dangerous voltages and other hazards. User's Manual SAFETY NOTICE 1. PRECAUTIONS • Do not use a mounting kit approved by the manufacturer and follow the kit instructions. • Slots and...
... • The monitor should be installed near or over a radiator or heat register. near water, e.g. To ensure reliable operation of the user to operate the equipment. 2. If the monitor falls, it will protect the monitor from overheating, be used in the back and bottom of...To prevent fire or shock hazard, do not expose the monitor to service the monitor by unauthorized modification to dangerous voltages and other hazards. User's Manual SAFETY NOTICE 1. PRECAUTIONS • Do not use a mounting kit approved by the manufacturer and follow the kit instructions. • Slots and...
User Manual
Page 7
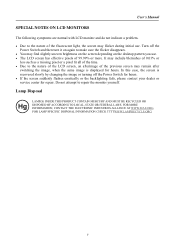
... to make sure the flicker disappears. • You may flicker during initial use . • The LCD screen has effective pixels of 99.99% or more. User's Manual SPECIAL NOTES ON LCD MONITORS The following symptoms are normal with LCD monitor and do not indicate a problem. • Due to the nature of the...
... to make sure the flicker disappears. • You may flicker during initial use . • The LCD screen has effective pixels of 99.99% or more. User's Manual SPECIAL NOTES ON LCD MONITORS The following symptoms are normal with LCD monitor and do not indicate a problem. • Due to the nature of the...
User Manual
Page 8
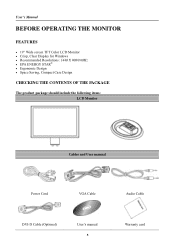
User's Manual BEFORE OPERATING THE MONITOR FEATURES • 19" Wide screen TFT Color LCD Monitor • Crisp, Clear Display for Windows • Recommended Resolutions: 1440 X 900@60Hz • EPA ENERGY STAR® • Ergonomic Design • Space Saving, Compact Case Design CHECKING THE CONTENTS OF THE PACKAGE The product package should include the following items: LCD Monitor Cables and User manual Power Cord VGA Cable Audio Cable DVI-D Cable (Optional) User's manual 8 Warranty card
User's Manual BEFORE OPERATING THE MONITOR FEATURES • 19" Wide screen TFT Color LCD Monitor • Crisp, Clear Display for Windows • Recommended Resolutions: 1440 X 900@60Hz • EPA ENERGY STAR® • Ergonomic Design • Space Saving, Compact Case Design CHECKING THE CONTENTS OF THE PACKAGE The product package should include the following items: LCD Monitor Cables and User manual Power Cord VGA Cable Audio Cable DVI-D Cable (Optional) User's manual 8 Warranty card
User Manual
Page 9
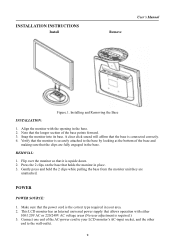
...by looking at the bottom of the base points forward. 3. Connect one end of the AC-power cord to your area. 2. INSTALLATION INSTRUCTIONS Install Remove User's Manual Figure.1. Snap the monitor into its base. Press the 2 clips on the base that the monitor is required.) 3. POWER POWER SOURCE: 1. A ... click sound will affirm that the clips are unattached. Align the monitor with either 100/120V AC or 220/240V AC voltage areas (No user adjustment is securely attached to the wall-outlet. 9 Note that the longer section of the base and making sure that the base is upside...
...by looking at the bottom of the base points forward. 3. Connect one end of the AC-power cord to your area. 2. INSTALLATION INSTRUCTIONS Install Remove User's Manual Figure.1. Snap the monitor into its base. Press the 2 clips on the base that the monitor is required.) 3. POWER POWER SOURCE: 1. A ... click sound will affirm that the clips are unattached. Align the monitor with either 100/120V AC or 220/240V AC voltage areas (No user adjustment is securely attached to the wall-outlet. 9 Note that the longer section of the base and making sure that the base is upside...
User Manual
Page 10
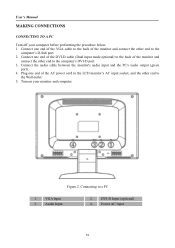
....2. Audio Input 2. Plug one end of the monitor and connect the other end to a PC 1. Connecting to the Wall outlet. 5. DVI-D Input (optional) 4. VGA Input 3. User's Manual MAKING CONNECTIONS CONNECTING TO A PC Turn off your monitor and computer.
....2. Audio Input 2. Plug one end of the monitor and connect the other end to a PC 1. Connecting to the Wall outlet. 5. DVI-D Input (optional) 4. VGA Input 3. User's Manual MAKING CONNECTIONS CONNECTING TO A PC Turn off your monitor and computer.
User Manual
Page 11
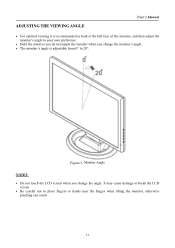
... careful not to 20°. Monitor Angle NOTES: • Do not touch the LCD screen when you change the angle. Figure.3. ADJUSTING THE VIEWING ANGLE User's Manual • For optimal viewing it is recommended to look at the full face of the monitor, and then adjust the monitor's angle to your own...
... careful not to 20°. Monitor Angle NOTES: • Do not touch the LCD screen when you change the angle. Figure.3. ADJUSTING THE VIEWING ANGLE User's Manual • For optimal viewing it is recommended to look at the full face of the monitor, and then adjust the monitor's angle to your own...

User Manual
Page 12
Brightness adjustment button /▲ [+] 5. Auto adjustment /Input source change / Enter 4. Figure.4. Power Indicator 12 Volume adjustment button / ▼ [-] 6. Power Button 2. User's Manual OPERATING INSTRUCTIONS GENERAL INSTRUCTIONS Press the power button to turn the monitor on the front panel of the monitor (See Figure 4). Control Panel Buttons CONTROL ...
Brightness adjustment button /▲ [+] 5. Auto adjustment /Input source change / Enter 4. Figure.4. Power Indicator 12 Volume adjustment button / ▼ [-] 6. Power Button 2. User's Manual OPERATING INSTRUCTIONS GENERAL INSTRUCTIONS Press the power button to turn the monitor on the front panel of the monitor (See Figure 4). Control Panel Buttons CONTROL ...
User Manual
Page 13
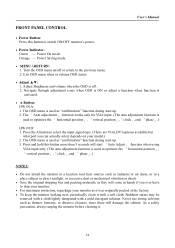
User's Manual FRONT PANEL CONTROL • Power Button: Press this button more than 3 seconds will start -up . 3. Turn the OSD menu on your monitor as "confirmation" function ...
User's Manual FRONT PANEL CONTROL • Power Button: Press this button more than 3 seconds will start -up . 3. Turn the OSD menu on your monitor as "confirmation" function ...

User Manual
Page 14
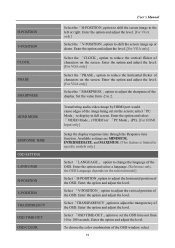
... black bands. [The availability of this function. "FIT" indicates scaling by using this function depends upon the selected model] 14 User's Manual HOW TO ADJUST A SETTINGS BRIGHTNESS/CONTRAST BRIGHTNESS Adjust the brightness value of the display according to your preference: WARM /NATURE/ COOL...option to activate or deactivate the automatic signal search function. [For DVI/ HDMI Input only] COLOR SETTING WARM NATURE COOL USER IMAGE SETTING AUTO ADJUST Adjust the color temperature value of the display according to your preference. Select「CONTRAST」option ...
... black bands. [The availability of this function. "FIT" indicates scaling by using this function depends upon the selected model] 14 User's Manual HOW TO ADJUST A SETTINGS BRIGHTNESS/CONTRAST BRIGHTNESS Adjust the brightness value of the display according to your preference: WARM /NATURE/ COOL...option to activate or deactivate the automatic signal search function. [For DVI/ HDMI Input only] COLOR SETTING WARM NATURE COOL USER IMAGE SETTING AUTO ADJUST Adjust the color temperature value of the display according to your preference. Select「CONTRAST」option ...
User Manual
Page 15
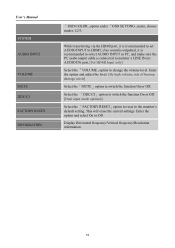
... through the Response time function. H-POSITION V-POSITION CLOCK PHASE SHARPNESS HDMI MODE RESPONSE TIME OSD SETTING LANGUAGE H-POSITION V-POSITION TRANSPARENCY OSD TIME-OUT OSD COLOR User's Manual Select the「H-POSITION」option to shift the screen image to adjust the vertical position of the image being cut on the screen. Enter...
... through the Response time function. H-POSITION V-POSITION CLOCK PHASE SHARPNESS HDMI MODE RESPONSE TIME OSD SETTING LANGUAGE H-POSITION V-POSITION TRANSPARENCY OSD TIME-OUT OSD COLOR User's Manual Select the「H-POSITION」option to shift the screen image to adjust the vertical position of the image being cut on the screen. Enter...
User Manual
Page 16
... optional] Select the 「FACTORY RESET」option to reset to switch the function On or Off. Enter the option and select On or Off. User's Manual SYSTEM AUDIO INPUT VOLUME MUTE DDC/CI FACTORY RESET INFORMATION 「OSD COLOR」option under 「OSD SETTING」menu, choose modes 1/2/3. Enter the...
... optional] Select the 「FACTORY RESET」option to reset to switch the function On or Off. Enter the option and select On or Off. User's Manual SYSTEM AUDIO INPUT VOLUME MUTE DDC/CI FACTORY RESET INFORMATION 「OSD COLOR」option under 「OSD SETTING」menu, choose modes 1/2/3. Enter the...
User Manual
Page 17
... is automatically redrawn. This reduces the monitor's internal power supply consumption. It allows the monitor to a "Screen Saver" feature except the display is completely off. User's Manual PLUG AND PLAY Plug & Play DDC2B Feature This monitor is equipped with VESA DDC2B capabilities according to power saving mode.
... is automatically redrawn. This reduces the monitor's internal power supply consumption. It allows the monitor to a "Screen Saver" feature except the display is completely off. User's Manual PLUG AND PLAY Plug & Play DDC2B Feature This monitor is equipped with VESA DDC2B capabilities according to power saving mode.
User Manual
Page 18
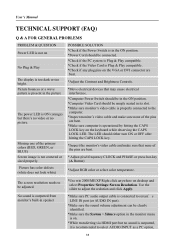
... frequency CLOCK and PHASE or press hot-key (A Button) Picture has color defects (white does not look white) *Adjust RGB color or select color temperature. User's Manual TECHNICAL SUPPORT (FAQ) Q & A FOR GENERAL PROBLEMS PROBLEM & QUESTION Power LED is not on No Plug & Play The display is not centered or sized properly...
... frequency CLOCK and PHASE or press hot-key (A Button) Picture has color defects (white does not look white) *Adjust RGB color or select color temperature. User's Manual TECHNICAL SUPPORT (FAQ) Q & A FOR GENERAL PROBLEMS PROBLEM & QUESTION Power LED is not on No Plug & Play The display is not centered or sized properly...
User Manual
Page 19
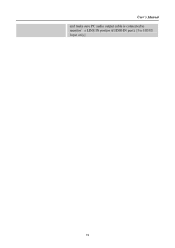
User's Manual and make sure PC audio output cable is connected to monitor's LINE IN port(or AUDIO IN port). [For HDMI Input only] 19
User's Manual and make sure PC audio output cable is connected to monitor's LINE IN port(or AUDIO IN port). [For HDMI Input only] 19
User Manual
Page 20
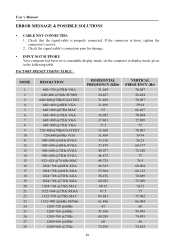
... damage. ƒ INPUT NOT SUPPORT: Your computer has been set to unsuitable display mode, set the computer to display mode given in the following table. User's Manual ERROR MESSAGE & POSSIBLE SOLUTIONS ƒ CABLE NOT CONNECTED: 1. FACTORY PRESET TIMING TABLE: MODE 1 2 3 4 5 6 7 8 9 10 11 12 13 14 15 16 17 18 19 20 21...
... damage. ƒ INPUT NOT SUPPORT: Your computer has been set to unsuitable display mode, set the computer to display mode given in the following table. User's Manual ERROR MESSAGE & POSSIBLE SOLUTIONS ƒ CABLE NOT CONNECTED: 1. FACTORY PRESET TIMING TABLE: MODE 1 2 3 4 5 6 7 8 9 10 11 12 13 14 15 16 17 18 19 20 21...
User Manual
Page 22
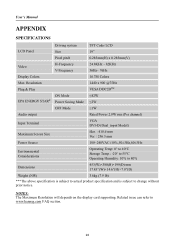
User's Manual APPENDIX SPECIFICATIONS LCD Panel Driving system Size TFT Color LCD 19" Pixel pitch 0.285mm(H) x 0.285mm(V) Video H-Frequency V-Frequency 24.8KHz - 82KHz 56Hz- 76Hz Display Colors ...
User's Manual APPENDIX SPECIFICATIONS LCD Panel Driving system Size TFT Color LCD 19" Pixel pitch 0.285mm(H) x 0.285mm(V) Video H-Frequency V-Frequency 24.8KHz - 82KHz 56Hz- 76Hz Display Colors ...