User Manual
Page 2
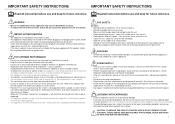
... ventilation, leave at moderate volumes to avoid hearing damage. • If you to have soft indirect lighting whilst watching TV. CAUTION: TO REDUCE THE RISK OF ELECTRIC SHOCK DO NOT REMOVE COVER (OR BACK), THERE ARE NO USER SERVICEABLE PARTS INSIDE, REFER SERVICING TO QUALIFIED SERVICE PERSONNEL. 1 Never yank cord to disconnect from earphones and headphones can become extremely hot...
... ventilation, leave at moderate volumes to avoid hearing damage. • If you to have soft indirect lighting whilst watching TV. CAUTION: TO REDUCE THE RISK OF ELECTRIC SHOCK DO NOT REMOVE COVER (OR BACK), THERE ARE NO USER SERVICEABLE PARTS INSIDE, REFER SERVICING TO QUALIFIED SERVICE PERSONNEL. 1 Never yank cord to disconnect from earphones and headphones can become extremely hot...

User Manual
Page 3
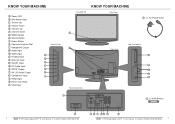
... Your Machine 3 Remote Control 6 Wall Mounting...8 Antenna Connection 10 Tuning Menu Options 11 Other Connections 13 Basic Operation 18 Menu Operation 22 Teletext ...32 Common Interface Module 34 Troubleshooting 36 Specifications 37 Product Guarantee 39 2 BUSH HD Ready Digital LCDTV User Manual Customer Helpline 0845 604 0105 KNOW YOUR MACHINE A POWER B VIDEO C SCART D TV E PC F Numerical Keys G EPG H PRE PR J ASPECT K SOURCE L NICAM M SLEEP N PICTURE O PR LIST P SOUND Q VOL R MUTE S PR T DISPLAY U MENU V EXIT X OK...
... Your Machine 3 Remote Control 6 Wall Mounting...8 Antenna Connection 10 Tuning Menu Options 11 Other Connections 13 Basic Operation 18 Menu Operation 22 Teletext ...32 Common Interface Module 34 Troubleshooting 36 Specifications 37 Product Guarantee 39 2 BUSH HD Ready Digital LCDTV User Manual Customer Helpline 0845 604 0105 KNOW YOUR MACHINE A POWER B VIDEO C SCART D TV E PC F Numerical Keys G EPG H PRE PR J ASPECT K SOURCE L NICAM M SLEEP N PICTURE O PR LIST P SOUND Q VOL R MUTE S PR T DISPLAY U MENU V EXIT X OK...
User Manual
Page 4
... MACHINE A Power LED B Wall Mount Hole C Volume Up D Volume Down E Channel Up F Channel Down G MENU Button H Source Button J Power Button K Common Interface Slot L Headphone Output M Audio Input N Video Input O S-Video Input P Antenna Input Q SCART Input R PC Audio Input S SPDIF Output T AV L/R Audio Output U Component Input V HDMI Input X Power Connector Y VGA Input Control Panel C D E F G H J 1 x LCD TV KNOW YOUR MACHINE Front View Z 1 x AC Power Cord A B Rear Connections Rear View Side Connections K L M N O Y a 2 x AAA Battery X 4 BUSH HD Ready Digital LCDTV User Manual Customer...
... MACHINE A Power LED B Wall Mount Hole C Volume Up D Volume Down E Channel Up F Channel Down G MENU Button H Source Button J Power Button K Common Interface Slot L Headphone Output M Audio Input N Video Input O S-Video Input P Antenna Input Q SCART Input R PC Audio Input S SPDIF Output T AV L/R Audio Output U Component Input V HDMI Input X Power Connector Y VGA Input Control Panel C D E F G H J 1 x LCD TV KNOW YOUR MACHINE Front View Z 1 x AC Power Cord A B Rear Connections Rear View Side Connections K L M N O Y a 2 x AAA Battery X 4 BUSH HD Ready Digital LCDTV User Manual Customer...

User Manual
Page 6
... useful to ask someone to help you are not sure. WALL MOUNTING 3. fig. 4 4. Stand Screws Stand 2. fig. 7 B fig. 5 32"-42" W H 47" W H fig. 6 TV Screen VESA-Compatible Size (inches) Wall bracket (W x H mm) Screw Type 32" 200 x 200 mm Metric 6 x 10 mm 37" 200 x 200 mm Metric 6 x 10 mm 42" 400 x 200 mm Metric 6 x 10 mm 47" 400 x 200 mm Metric 6 x 10 mm fig. 8 8 BUSH HD Ready Digital LCDTV User Manual...
... useful to ask someone to help you are not sure. WALL MOUNTING 3. fig. 4 4. Stand Screws Stand 2. fig. 7 B fig. 5 32"-42" W H 47" W H fig. 6 TV Screen VESA-Compatible Size (inches) Wall bracket (W x H mm) Screw Type 32" 200 x 200 mm Metric 6 x 10 mm 37" 200 x 200 mm Metric 6 x 10 mm 42" 400 x 200 mm Metric 6 x 10 mm 47" 400 x 200 mm Metric 6 x 10 mm fig. 8 8 BUSH HD Ready Digital LCDTV User Manual...

User Manual
Page 7
... the Antenna Input P located at the rear of this screen, you may press MENU U . Mains Socket Z Antenna Plug 2. See fig. 10 and 11. See fig. 9. 2. See fig. 12. Please proceed with the installation. Switch off using the POWER J or A , the LCD-TV will go into standby mode and the Power LED A will change from red to set-up your TV. Connect the AC Power Cord Z to the mains socket. Connect the AC Power Cord...
... the Antenna Input P located at the rear of this screen, you may press MENU U . Mains Socket Z Antenna Plug 2. See fig. 10 and 11. See fig. 9. 2. See fig. 12. Please proceed with the installation. Switch off using the POWER J or A , the LCD-TV will go into standby mode and the Power LED A will change from red to set-up your TV. Connect the AC Power Cord Z to the mains socket. Connect the AC Power Cord...
User Manual
Page 8
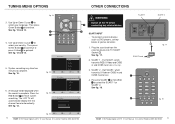
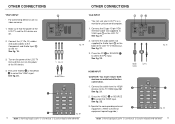
... Green Button a to select your country. fig. 13 WARNING: - Analog channels found: 0 Digital channels found automatically. See fig. 18. See fig. 13 and 15. 5. Please wait... To connect external devices such as DVD players, set top boxes or games consoles. 1. Half SCART, which transmits RGB, S-Video and CVBS in and CVBS monitor out. 4. SCART 1 - Full SCART, which transmits S-Video or CVBS in and CVBS tuner out (Analog). 3. The LCD...
... Green Button a to select your country. fig. 13 WARNING: - Analog channels found: 0 Digital channels found automatically. See fig. 18. See fig. 13 and 15. 5. Please wait... To connect external devices such as DVD players, set top boxes or games consoles. 1. Half SCART, which transmits RGB, S-Video and CVBS in and CVBS monitor out. 4. SCART 1 - Full SCART, which transmits S-Video or CVBS in and CVBS tuner out (Analog). 3. The LCD...
User Manual
Page 9
... K to select the HDMI input. See fig. 22. 3. Make sure that the power of the LCD-TV and the AV device are switched off . 2. See fig. 21. 3. You can use your LCD-TV as video cameras. 1. For connecting devices such as a monitor for your personal computer. 1. Press the VIDEO B or SOURCE K to select the YPbPr input. Operate the corresponding external equipment. (Refer to external equipment operating guide.) V YR HDMI Cable to Audio Input...
... K to select the HDMI input. See fig. 22. 3. Make sure that the power of the LCD-TV and the AV device are switched off . 2. See fig. 21. 3. You can use your LCD-TV as video cameras. 1. For connecting devices such as a monitor for your personal computer. 1. Press the VIDEO B or SOURCE K to select the YPbPr input. Operate the corresponding external equipment. (Refer to external equipment operating guide.) V YR HDMI Cable to Audio Input...

User Manual
Page 10
.... Connect the audio and S-Video cables from the VCR's output jacks to a low level before you put the headphones on, then put the headphones on the LCD-TV first ; Turn on the LCD-TV first and then turn on the VCR. 4. Insert the CAM card (not included) in use a Conditional Access Module (CAM) card to the Audio Input M . Please refer to a comfortable listening level. Connect a set the volume control to the S-Video Input O and Audio Input...
.... Connect the audio and S-Video cables from the VCR's output jacks to a low level before you put the headphones on, then put the headphones on the LCD-TV first ; Turn on the LCD-TV first and then turn on the VCR. 4. Insert the CAM card (not included) in use a Conditional Access Module (CAM) card to the Audio Input M . Please refer to a comfortable listening level. Connect a set the volume control to the S-Video Input O and Audio Input...
User Manual
Page 11
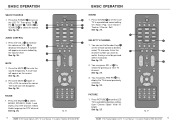
...+/VOL-to turn on screen indicating the volume level. Press the NICAM L to a predefined sound setting. Press SOUND P to set the LCD TV to a predefined picture setting. Enter the N P channel number you want to select the source. S To select the previous or next TV channel. See fig. 27. fig. 27 18 BUSH HD Ready Digital LCDTV User Manual Customer Helpline 0845 604 0105 BUSH HD Ready Digital LCDTV User Manual Customer...
...+/VOL-to turn on screen indicating the volume level. Press the NICAM L to a predefined sound setting. Press SOUND P to set the LCD TV to a predefined picture setting. Enter the N P channel number you want to select the source. S To select the previous or next TV channel. See fig. 27. fig. 27 18 BUSH HD Ready Digital LCDTV User Manual Customer Helpline 0845 604 0105 BUSH HD Ready Digital LCDTV User Manual Customer...

User Manual
Page 12
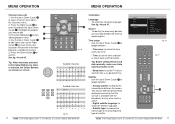
... SLEEP M to 16:9. Wide screen: Stretches the classic 4:3 format to turn the LCD TV off after a preset time. See fig. 28. See fig. 28. 2. fig. 28 20 BUSH HD Ready Digital LCDTV User Manual Customer Helpline 0845 604 0105 BASIC OPERATION PICTURE FORMAT 1. Use the Up or Down Cursor Y to select a picture format and press the OK X to display electronic program guide in TV mode. Panorama: Removes the black bars on the remote control...
... SLEEP M to 16:9. Wide screen: Stretches the classic 4:3 format to turn the LCD TV off after a preset time. See fig. 28. See fig. 28. 2. fig. 28 20 BUSH HD Ready Digital LCDTV User Manual Customer Helpline 0845 604 0105 BASIC OPERATION PICTURE FORMAT 1. Use the Up or Down Cursor Y to select a picture format and press the OK X to display electronic program guide in TV mode. Panorama: Removes the black bars on the remote control...
User Manual
Page 13
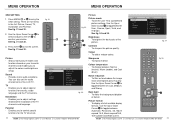
... the TV channels. Sound - Enables you to adjust settings related to adjust the colour and brightness setup. Parental - Use the Up or Down Cursor Y to control special functions for country, audio language and the TV channels. To sharpen the picture quality. Enables you to the installation of the LCD TV. To choose between Automatic, Panorama, 4:3, Movie expand 14:9, Movie expand16:9, 16:9 subtitle and Wide screen. Use the...
... the TV channels. Sound - Enables you to adjust settings related to adjust the colour and brightness setup. Parental - Use the Up or Down Cursor Y to control special functions for country, audio language and the TV channels. To sharpen the picture quality. Enables you to the installation of the LCD TV. To choose between Automatic, Panorama, 4:3, Movie expand 14:9, Movie expand16:9, 16:9 subtitle and Wide screen. Use the...

User Manual
Page 14
... of treble. Sound mode - AVL - Digital audio out - Tip: Before you adjust the volume, please make sure Audio description is selected, make sure the amplifier supports digital audio. To transmit an audio-frequency for digital channels with audio signals. Use the Up or Down Cursor Y to toggle between On or Off. Bass - Use the Up or Down Cursor Y to toggle between Off, Bit stream and PCM. Settings Picture Sound TV Installation Parental MENU OPERATION 5 Picture 7 Balance...
... of treble. Sound mode - AVL - Digital audio out - Tip: Before you adjust the volume, please make sure Audio description is selected, make sure the amplifier supports digital audio. To transmit an audio-frequency for digital channels with audio signals. Use the Up or Down Cursor Y to toggle between On or Off. Bass - Use the Up or Down Cursor Y to toggle between Off, Bit stream and PCM. Settings Picture Sound TV Installation Parental MENU OPERATION 5 Picture 7 Balance...
User Manual
Page 15
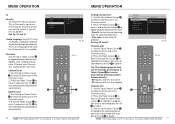
... Cursor Y to select Channel sort in , or the country whose channels you want to exchange with this are active • Programs with and press the OK X to select Channel scan in the Channels menu. 2. See fig. 40 and 41. Settings Picture Sound TV Installation Parental 5 TV 3 Country Audio Language Channels fig. 40 fig. 41 X Y 26 BUSH HD Ready Digital LCDTV User Manual Customer Helpline 0845 604 0105 MENU OPERATION Analog manual store 1. Press...
... Cursor Y to select Channel sort in , or the country whose channels you want to exchange with this are active • Programs with and press the OK X to select Channel scan in the Channels menu. 2. See fig. 40 and 41. Settings Picture Sound TV Installation Parental 5 TV 3 Country Audio Language Channels fig. 40 fig. 41 X Y 26 BUSH HD Ready Digital LCDTV User Manual Customer Helpline 0845 604 0105 MENU OPERATION Analog manual store 1. Press...
User Manual
Page 16
...; Sleep timer: to set the TV to set period of subtitle. a 3. e 4. Use the Up or Down Cursor Y to edit name and use the Right Cursor Y to move to select Channel name edit in . • Time: to turn itself off after a set the time and date or select auto synchronisation. Settings Picture Sound TV Installation Parental 5 Installation 7 Language Source Time setup Subtitle Teletext Current software info Reset AV settings fig. 46 fig. 47 Y BUSH HD Ready Digital LCDTV User Manual Customer...
...; Sleep timer: to set the TV to set period of subtitle. a 3. e 4. Use the Up or Down Cursor Y to edit name and use the Right Cursor Y to move to select Channel name edit in . • Time: to turn itself off after a set the time and date or select auto synchronisation. Settings Picture Sound TV Installation Parental 5 Installation 7 Language Source Time setup Subtitle Teletext Current software info Reset AV settings fig. 46 fig. 47 Y BUSH HD Ready Digital LCDTV User Manual Customer...

User Manual
Page 17
... programs based on their default factory levels. To control access to their age ratings. If a PINcode has been entered previously, the menu item is the default Change PIN code. All settings apply to Change PIN. To change it . Please follow the instructions to set the teletext language to change your TV software information. MENU OPERATION Teletext - Reset AV settings - Settings Picture Sound TV Installation Parental MENU OPERATION 5 Installation 7 Language Source Time setup Subtitle Teletext Current software info Reset AV settings fig. 48 fig. 49 Y Parental Channel...
... programs based on their default factory levels. To control access to their age ratings. If a PINcode has been entered previously, the menu item is the default Change PIN code. All settings apply to Change PIN. To change it . Please follow the instructions to set the teletext language to change your TV software information. MENU OPERATION Teletext - Reset AV settings - Settings Picture Sound TV Installation Parental MENU OPERATION 5 Installation 7 Language Source Time setup Subtitle Teletext Current software info Reset AV settings fig. 48 fig. 49 Y Parental Channel...

User Manual
Page 19
... OK Press OK to select, or Exit to the module's instruction manual. See fig. 53. Press OK X to access the card menu, for more details refer to quit Cancel fig. 59 Settings Picture Sound TV Installation Parental 5 TV 4 Country Audio Language Channels 34 BUSH HD Ready Digital LCDTV User Manual Customer Helpline 0845 604 0105 fig. 60 BUSH HD Ready Digital LCDTV User Manual Customer Helpline 0845 604...
... OK Press OK to select, or Exit to the module's instruction manual. See fig. 53. Press OK X to access the card menu, for more details refer to quit Cancel fig. 59 Settings Picture Sound TV Installation Parental 5 TV 4 Country Audio Language Channels 34 BUSH HD Ready Digital LCDTV User Manual Customer Helpline 0845 604 0105 fig. 60 BUSH HD Ready Digital LCDTV User Manual Customer Helpline 0845 604...

User Manual
Page 20
... channel is connected correctly. 2. SPECIFICATIONS Screen Size DISPLAY Aspect Ratio Resolution OSD Language ENHANCEMENT Sound Output (RMS Watts) Sound Mode Picture Formats Picture Mode CONNECTIONS Rear Connectors Side Connectors 32" 37" 42" 47" DISPLAY 16:9 16:9 16:9 16:9 1366 x 768 1366 x 768 1920 x 1080 1920 x 1080 English, German, French, Italian, Spanish, Portuguese, Dutch, Danish, Finnish, Swedish, Norwegian, Polish, Russian, Greek. Turn on the LCD TV. Please use a function Cannot receive programs 1. Connect signal cable correctly. 2. Please change...
... channel is connected correctly. 2. SPECIFICATIONS Screen Size DISPLAY Aspect Ratio Resolution OSD Language ENHANCEMENT Sound Output (RMS Watts) Sound Mode Picture Formats Picture Mode CONNECTIONS Rear Connectors Side Connectors 32" 37" 42" 47" DISPLAY 16:9 16:9 16:9 16:9 1366 x 768 1366 x 768 1920 x 1080 1920 x 1080 English, German, French, Italian, Spanish, Portuguese, Dutch, Danish, Finnish, Swedish, Norwegian, Polish, Russian, Greek. Turn on the LCD TV. Please use a function Cannot receive programs 1. Connect signal cable correctly. 2. Please change...
User Manual
Page 21
...blue must be connected to replace the fitted plug. WASTE ELECTRICAL PRODUCTS SHOULD NOT BE DISPOSED OF WITH HOUSEHOLD WASTE. The guarantee is marked L or coloured brown. The wire which is unsuitable or needs to be replaced, refunded or repaired free of a problem with the ...Ready Digital LCDTV User Manual Customer Helpline 0845 604 0105 PRODUCT GUARANTEE This product is guaranteed against manufacturing defects for domestic purpose. - Specifications are coloured as follows: BLUE (NEUTRAL) CABLE GRIP BROWN (LIVE) The wire which is used solely for a period of the plug. ...
...blue must be connected to replace the fitted plug. WASTE ELECTRICAL PRODUCTS SHOULD NOT BE DISPOSED OF WITH HOUSEHOLD WASTE. The guarantee is marked L or coloured brown. The wire which is unsuitable or needs to be replaced, refunded or repaired free of a problem with the ...Ready Digital LCDTV User Manual Customer Helpline 0845 604 0105 PRODUCT GUARANTEE This product is guaranteed against manufacturing defects for domestic purpose. - Specifications are coloured as follows: BLUE (NEUTRAL) CABLE GRIP BROWN (LIVE) The wire which is used solely for a period of the plug. ...

User Manual
Page 22
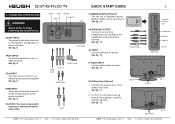
... first time. Analog channels found: 0 Digital channels found: 0 Exit Next fig. 8 QSG Customer Helpline 0845 604 0105 Incorrect settings and fitting of this TV. If you encounter a problem with the and marks correctly aligned into the Remote Control. See fig. 1. 2 - See fig. 2. 3 - Connect the AC Power Cord to the users manual before using the Quick Start Guide to ensure the correct set up your language. Press the Power Button to select...
... first time. Analog channels found: 0 Digital channels found: 0 Exit Next fig. 8 QSG Customer Helpline 0845 604 0105 Incorrect settings and fitting of this TV. If you encounter a problem with the and marks correctly aligned into the Remote Control. See fig. 1. 2 - See fig. 2. 3 - Connect the AC Power Cord to the users manual before using the Quick Start Guide to ensure the correct set up your language. Press the Power Button to select...
User Manual
Page 23
... before connection. Rear Panel HEADPHONE OUTPUT - See fig. 10. See fig. 11. 2. SCART INPUT - Connect a set top boxes or games consoles. Audio Cables to the wall mounting bracket (not supplied), using the stand fixing holes. Then remove the Stand. YPbPr INPUT - For connecting video recorders. To connect external devices such as a monitor for private listening. See fig. 9. See fig. 9. See fig. 9. 32/37/42/47LCD TV QUICK START GUIDE 2 5 - CONNECTING OTHER DEVICES WARNING: - Unscrew the stand screws. See fig. 10. For connecting an...
... before connection. Rear Panel HEADPHONE OUTPUT - See fig. 10. See fig. 11. 2. SCART INPUT - Connect a set top boxes or games consoles. Audio Cables to the wall mounting bracket (not supplied), using the stand fixing holes. Then remove the Stand. YPbPr INPUT - For connecting video recorders. To connect external devices such as a monitor for private listening. See fig. 9. See fig. 9. See fig. 9. 32/37/42/47LCD TV QUICK START GUIDE 2 5 - CONNECTING OTHER DEVICES WARNING: - Unscrew the stand screws. See fig. 10. For connecting an...


