User Manual
Page 2
... the special models which have the terminal. (HDMI terminal is only available in some models, please see the real) Please keep this book carefully. S-VIDEO Input 8 SCART Input 9 HDMI Input 9 Basic Operating Instructions 10 Turn on , please read this book for using our LCD-TV. To users: Thank you for later use. CONTENT Safety Notice Items 1 Front Panel Controls 2 Connection Options 3 Remote Control Key Functions 4 Remote Control 5 Installing Batteries 5 Connection Instructions 6 Grounding 6 External equipment Connections 6 Antenna Connection 6 VGA Input 7 YPbPr Input 7.
... the special models which have the terminal. (HDMI terminal is only available in some models, please see the real) Please keep this book carefully. S-VIDEO Input 8 SCART Input 9 HDMI Input 9 Basic Operating Instructions 10 Turn on , please read this book for using our LCD-TV. To users: Thank you for later use. CONTENT Safety Notice Items 1 Front Panel Controls 2 Connection Options 3 Remote Control Key Functions 4 Remote Control 5 Installing Batteries 5 Connection Instructions 6 Grounding 6 External equipment Connections 6 Antenna Connection 6 VGA Input 7 YPbPr Input 7.

User Manual
Page 4
..., L1910B-C, L19C10B, TV/AV MENU VOL- CH+ POWER L1912W-C, L2012W-C L1911W-C,L19C11W, L2011W-C,L20C11W 6 7 Control Panel Function 6 7 67 1. MENU Press to select the item in standby mode, illuminates green when the display is turned on 7.Remote Sensor Receiving remote control sends the infrared remote signal. CH+ POWER 2 3 4 5 1 76 67 L19C12W, L20C12W TV/AV MENU VOL- Power supply switch 2.TV/AV Select the input signals: PC/COMPONENT/DVD/TV/ SCART/SVIDEO/HDMI 3. VOL+ CH- Volume down / to select the...
..., L1910B-C, L19C10B, TV/AV MENU VOL- CH+ POWER L1912W-C, L2012W-C L1911W-C,L19C11W, L2011W-C,L20C11W 6 7 Control Panel Function 6 7 67 1. MENU Press to select the item in standby mode, illuminates green when the display is turned on 7.Remote Sensor Receiving remote control sends the infrared remote signal. CH+ POWER 2 3 4 5 1 76 67 L19C12W, L20C12W TV/AV MENU VOL- Power supply switch 2.TV/AV Select the input signals: PC/COMPONENT/DVD/TV/ SCART/SVIDEO/HDMI 3. VOL+ CH- Volume down / to select the...

User Manual
Page 5
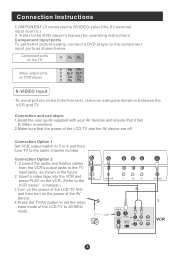
... IN Connection Options DVD STOP PLAY/PAUSE OPEN/CLOSE PREV NEXT S-VIDEO TV SCART VGA IN DVD insert HDMI The figure is on the back of the set) COMPONENT Input Connect a component video/audio VGA /COMPONENT/device to these jacks SVIDEO Audio Input Connect the PC output connector from an S-Video device to the jacks. PC Input Connect to the VGA 15PIN analog output connector of other equipment ANT IN AUDIO IN Pr Pb Y S-VIDEO TV SCART VGA IN HDMI Earphone port Antenna Input Connect cable or antenna signals to HDMI output...
... IN Connection Options DVD STOP PLAY/PAUSE OPEN/CLOSE PREV NEXT S-VIDEO TV SCART VGA IN DVD insert HDMI The figure is on the back of the set) COMPONENT Input Connect a component video/audio VGA /COMPONENT/device to these jacks SVIDEO Audio Input Connect the PC output connector from an S-Video device to the jacks. PC Input Connect to the VGA 15PIN analog output connector of other equipment ANT IN AUDIO IN Pr Pb Y S-VIDEO TV SCART VGA IN HDMI Earphone port Antenna Input Connect cable or antenna signals to HDMI output...

User Manual
Page 6
...CALL EXIT PICTURE SOUND TIME FUNCTION Stand By DVD Open/close DVD 10+ Scan Zoom Mute Swap Call Screen Display Program Number / TV and some other source Exchange Digital Selector TV/DVD Volume/Channel Selection MENU DVD Audio Picture Mode DVD STOP Tune Menu Button DVD SETUP DVD PAUSE/STEP DVD FAST REVERSE DVD FAST FORWARD DVD MENU DVD NEXT DVD PREVIOUS DVD REPEAT DVD PLAY/ENTER DVD A-B REPEAT UP DVD Cursor Move button LEFT DVD SLOW RIGHT DVD ANGLE DOWN DVD SEARCH DVD PROGRAM DVD TITLE/PBC DVD SUBTITLE DVD CALL TELETEXT BUTTONS Exit Screen Display Fast...
...CALL EXIT PICTURE SOUND TIME FUNCTION Stand By DVD Open/close DVD 10+ Scan Zoom Mute Swap Call Screen Display Program Number / TV and some other source Exchange Digital Selector TV/DVD Volume/Channel Selection MENU DVD Audio Picture Mode DVD STOP Tune Menu Button DVD SETUP DVD PAUSE/STEP DVD FAST REVERSE DVD FAST FORWARD DVD MENU DVD NEXT DVD PREVIOUS DVD REPEAT DVD PLAY/ENTER DVD A-B REPEAT UP DVD Cursor Move button LEFT DVD SLOW RIGHT DVD ANGLE DOWN DVD SEARCH DVD PROGRAM DVD TITLE/PBC DVD SUBTITLE DVD CALL TELETEXT BUTTONS Exit Screen Display Fast...

User Manual
Page 8
... s, install a 2-Way Signal Splitter in a poor ANT IN signal area, purchase and install a signal amplifier. Connection Instructions Grounding Ensure that you connect the grounding / earth wire to telephone wires, lightening rods, or gas pipes. If grounding methods are not included with a Cable Box Connections - For optimum picture quality, adjust antenna direction if needed. Antenna or Cable Service with the TV To improve picture quality in the connections. If the antenna needs to wall jack for...
... s, install a 2-Way Signal Splitter in a poor ANT IN signal area, purchase and install a signal amplifier. Connection Instructions Grounding Ensure that you connect the grounding / earth wire to telephone wires, lightening rods, or gas pipes. If grounding methods are not included with a Cable Box Connections - For optimum picture quality, adjust antenna direction if needed. Antenna or Cable Service with the TV To improve picture quality in the connections. If the antenna needs to wall jack for...

User Manual
Page 9
... firmly connected; 4.Turn on the power of the LCD-TV first , and then turn on your DVD player does not have component video output,use 1. If noise is clear. NOTE: If your TV. Turn on the menu until the picture is present, change the PC mode to PC; 6.Check the image on the power of the PC; 5.Press the TV/AV button to set the video input mode of the LCD-TV to another resolution, change...
... firmly connected; 4.Turn on the power of the LCD-TV first , and then turn on your DVD player does not have component video output,use 1. If noise is clear. NOTE: If your TV. Turn on the menu until the picture is present, change the PC mode to PC; 6.Check the image on the power of the PC; 5.Press the TV/AV button to set the video input mode of the LCD-TV to another resolution, change...
User Manual
Page 10
...; 4.Press the TV/AV button to set the video in the figure. 2. S-VIDEO Input - Connect the audio and Svideo cables from the VCR's output jacks to the component input ports as shown in . Connection Option 2 1. Connection Option 1 Set VCR output switch to 3 or 4 and then tune TV to the DVD player's manual for operating instructions. To avoid picture noise (interference), leave an adequate distance between the VCR and TV Connection and use steps: 1.Read the user guide supplied with your AV devices...
...; 4.Press the TV/AV button to set the video in the figure. 2. S-VIDEO Input - Connect the audio and Svideo cables from the VCR's output jacks to the component input ports as shown in . Connection Option 2 1. Connection Option 1 Set VCR output switch to 3 or 4 and then tune TV to the DVD player's manual for operating instructions. To avoid picture noise (interference), leave an adequate distance between the VCR and TV Connection and use steps: 1.Read the user guide supplied with your AV devices...

User Manual
Page 11
... figure. HDMI Input How to connect Connect the cables from the external equipment's output jacks to select SCART mode. 3. Refer to use 1. One side connected with the AUDIO IN terminal on the TV and the other side with right and left track connected with PC/ COMPONENT/SVIDEO. Select the input source by using the TV/AV button on external equipment for program play. Operate the corresponding external equipment. SCART External equipment HDMI HDMI Note: The audio cable included with...
... figure. HDMI Input How to connect Connect the cables from the external equipment's output jacks to select SCART mode. 3. Refer to use 1. One side connected with the AUDIO IN terminal on the TV and the other side with right and left track connected with PC/ COMPONENT/SVIDEO. Select the input source by using the TV/AV button on external equipment for program play. Operate the corresponding external equipment. SCART External equipment HDMI HDMI Note: The audio cable included with...
User Manual
Page 12
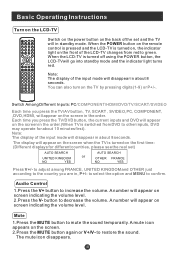
... PROGRAM SUBTITLE D.CALL EXIT PICTURE SOUND TIME FUNCTION Switch on the power button on the remote control is pressed and the LCD-TV is turned off using the POWER button, the LCD-TVwill go into standby mode and the indicator light turns red. Note: The display of the set ) AUTO SEARCH UNITED KINGDOM NO YES AUTO SEARCH or OTHER FRANCE NO YES Press V+/- Switch Among Different Inputs: PC/COMPONENT/HDMI/DVD/TV/SCART/SVIDEO Each time you are in standby mode. Audio Control...
... PROGRAM SUBTITLE D.CALL EXIT PICTURE SOUND TIME FUNCTION Switch on the power button on the remote control is pressed and the LCD-TV is turned off using the POWER button, the LCD-TVwill go into standby mode and the indicator light turns red. Note: The display of the set ) AUTO SEARCH UNITED KINGDOM NO YES AUTO SEARCH or OTHER FRANCE NO YES Press V+/- Switch Among Different Inputs: PC/COMPONENT/HDMI/DVD/TV/SCART/SVIDEO Each time you are in standby mode. Audio Control...

User Manual
Page 13
... function, you can easily change between the channel you are using is 8 and the channel number you are using and the channel you want to stop the function during auto scanning, simply press the SCAN button again. for menu display . For desired mode as follows: PERSONAL STANDARD MILD FRESH Program Swap 1 Suppose the channel number you used last time. is indicated on the panel to directly select TV channels. is indicated on the...
... function, you can easily change between the channel you are using is 8 and the channel number you are using and the channel you want to stop the function during auto scanning, simply press the SCAN button again. for menu display . For desired mode as follows: PERSONAL STANDARD MILD FRESH Program Swap 1 Suppose the channel number you used last time. is indicated on the panel to directly select TV channels. is indicated on the...
User Manual
Page 14
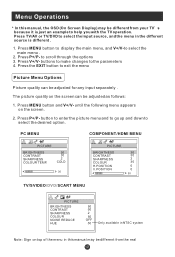
... 3. The picture quality on the screen can be adjusted for any input separately . Press P+/P- Press P+/P- to select the main menu . 2. button to enter the picture menu and to go up and down to the parameters 4. PC MENU COMPONENT/HDMI MENU PICTURE BRIGHTNESS CONTRAST SHARPNESS COLOUR TEMP. 30 30 2 COLD 30 PICTURE BRIGHTNESS CONTRAST SHARPNESS COLOUR H.POSITION V.POSITION 30 30 2 30 0 0 30 TV/SVIDEO/DVD/SCART MENU PICTURE BRIGHTNESS...
... 3. The picture quality on the screen can be adjusted for any input separately . Press P+/P- Press P+/P- to select the main menu . 2. button to enter the picture menu and to go up and down to the parameters 4. PC MENU COMPONENT/HDMI MENU PICTURE BRIGHTNESS CONTRAST SHARPNESS COLOUR TEMP. 30 30 2 COLD 30 PICTURE BRIGHTNESS CONTRAST SHARPNESS COLOUR H.POSITION V.POSITION 30 30 2 30 0 0 30 TV/SVIDEO/DVD/SCART MENU PICTURE BRIGHTNESS...

User Manual
Page 15
.... button until desired picture quality has been achieved . Audio Menu Options Sound can be adjusted only under NTSC mode COLOUR TEMP. : Press to dark parts of the picture and by selecting OFF,LOW,MID,HIGH. By increasing the level, it will make picture smoother). Menu Operations Picture Menu Options continued 3.Press V+/V- button to increase and decrease the level to adjust the selected option to light parts of the picture . to adjust the color...
.... button until desired picture quality has been achieved . Audio Menu Options Sound can be adjusted only under NTSC mode COLOUR TEMP. : Press to dark parts of the picture and by selecting OFF,LOW,MID,HIGH. By increasing the level, it will make picture smoother). Menu Operations Picture Menu Options continued 3.Press V+/V- button to increase and decrease the level to adjust the selected option to light parts of the picture . to adjust the color...

User Manual
Page 17
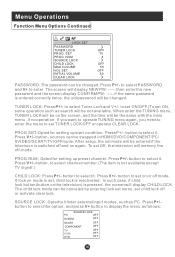
... PC , COMPONENT , HDMI, DVD , TV, SCART, SVIDEO to the factory default . 8. RESET : Press V+ to reset some settings to display 2. If CLEAR LOCK is canceled) Menu Operations Function Menu Options 1. FUNCTION INPUT SOURCE LANGUAGE TXT LANGUAGE TV ENGLISH PAN EUROPEAN TXT EAST/WEST BLUE SCREEN DISPLAY MODE EAST ON 4:3 RESET HOTEL LOCK Only available for special series 2. button to enter the sound menu and to go up and down to initialization and each lock is...
... PC , COMPONENT , HDMI, DVD , TV, SCART, SVIDEO to the factory default . 8. RESET : Press V+ to reset some settings to display 2. If CLEAR LOCK is canceled) Menu Operations Function Menu Options 1. FUNCTION INPUT SOURCE LANGUAGE TXT LANGUAGE TV ENGLISH PAN EUROPEAN TXT EAST/WEST BLUE SCREEN DISPLAY MODE EAST ON 4:3 RESET HOTEL LOCK Only available for special series 2. button to enter the sound menu and to go up and down to initialization and each lock is...
User Manual
Page 18
... signal.) CHILD LOCK: Press P+/- TUNER LOCK: Press P+/- If you want to operate TUNING menu again, you need to enter the menu to hinder external input modes, such as follows: SOURCE LOCK PC OFF SVIDEO OFF SCART COMPONENT TV HDMI DVD OFF OFF OFF OFF OFF button to select it. Press V+/- NUM SOURCE LOCK CHILD LOCK MAX VOLUME VOL SET INITIAL VOLUME CLEAR LOCK OFF TV 4 OFF 50 OFF 50 PASSWORD: The password can be changed . The screen...
... signal.) CHILD LOCK: Press P+/- TUNER LOCK: Press P+/- If you want to operate TUNING menu again, you need to enter the menu to hinder external input modes, such as follows: SOURCE LOCK PC OFF SVIDEO OFF SCART COMPONENT TV HDMI DVD OFF OFF OFF OFF OFF button to select it. Press V+/- NUM SOURCE LOCK CHILD LOCK MAX VOLUME VOL SET INITIAL VOLUME CLEAR LOCK OFF TV 4 OFF 50 OFF 50 PASSWORD: The password can be changed . The screen...

User Manual
Page 20
... you to enter it and the TUNING PROGRAM menu appears: TUNING PROGRAM CHANNEL 1 EDIT NAME COLOR SYSTEM AUTO SOUND SYSTEM DK SKIP OFF AFC ON FINE TUNE EXCHANGE MANUAL SEARCH 143.65MHZ CHANNEL : Press V+/V- button to increase and decrease the level to adjust the selected option to match the PC input source H.POSITION : Picture horizontal adjust V.POSITION : Picture vertical position adjust . CLOCK : Adjust the TFT-LCD to your preference . 4.
... you to enter it and the TUNING PROGRAM menu appears: TUNING PROGRAM CHANNEL 1 EDIT NAME COLOR SYSTEM AUTO SOUND SYSTEM DK SKIP OFF AFC ON FINE TUNE EXCHANGE MANUAL SEARCH 143.65MHZ CHANNEL : Press V+/V- button to increase and decrease the level to adjust the selected option to match the PC input source H.POSITION : Picture horizontal adjust V.POSITION : Picture vertical position adjust . CLOCK : Adjust the TFT-LCD to your preference . 4.

User Manual
Page 25
... in slow forward. You can change the audio mode. IF YOU PLAY OTHER FORMAT DISC, THE OPERATION AND DISPLAY ON SCREEN MAY DIFFERENT. SUBTITLE Press " SUBTITLE ", the screen will start -point, press again to set an end point to your preference. (This function will work with a DVD having a multi-layer menu.). Press PLAY/ENTER to confirm (CD press the search button several times to resume normal playback. REPEAT...
... in slow forward. You can change the audio mode. IF YOU PLAY OTHER FORMAT DISC, THE OPERATION AND DISPLAY ON SCREEN MAY DIFFERENT. SUBTITLE Press " SUBTITLE ", the screen will start -point, press again to set an end point to your preference. (This function will work with a DVD having a multi-layer menu.). Press PLAY/ENTER to confirm (CD press the search button several times to resume normal playback. REPEAT...
User Manual
Page 26
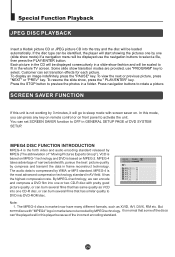
...Pictures Experts Group"). VCD is based on MPEG-1 technology and DVD is normal that has similar quality to OFF in GENERAL SETUP PAGE of DVD SYSTEM SETUP. To resume the slide show fashion and will be displayed use "PROGRAM" key to select a file, then press the PLAY/ENTER button. MPEG-4 takes advantage of narrow bandwidth, pursue the best picture.... If the disc type can be identified, the player will start showing the pictures one by 3 minutes, it will go to sleep mode with "MPEG4" logo in market are provided, use the navigation buttons to select. You can 't be...
...Pictures Experts Group"). VCD is based on MPEG-1 technology and DVD is normal that has similar quality to OFF in GENERAL SETUP PAGE of DVD SYSTEM SETUP. To resume the slide show fashion and will be displayed use "PROGRAM" key to select a file, then press the PLAY/ENTER button. MPEG-4 takes advantage of narrow bandwidth, pursue the best picture.... If the disc type can be identified, the player will start showing the pictures one by 3 minutes, it will go to sleep mode with "MPEG4" logo in market are provided, use the navigation buttons to select. You can 't be...
User Manual
Page 27
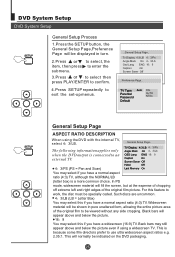
... on the DVD packaging. Black bars will appear above and below the picture. 16 9 You may select this if you have a normal aspect ratio (4:3) TV. The following information applies only ..General Setup Page.. This is connected to an OSD Lang ENG 16 9 external TV. This will normally be specially coded. TV Type Auto Parental Password Default PAL AUTO NTSC SETUP PLAY/ENTER General Setup Page ASPECT RATIO DESCRIPTION When using a widescreen TV...
... on the DVD packaging. Black bars will appear above and below the picture. 16 9 You may select this if you have a normal aspect ratio (4:3) TV. The following information applies only ..General Setup Page.. This is connected to an OSD Lang ENG 16 9 external TV. This will normally be specially coded. TV Type Auto Parental Password Default PAL AUTO NTSC SETUP PLAY/ENTER General Setup Page ASPECT RATIO DESCRIPTION When using a widescreen TV...
User Manual
Page 33
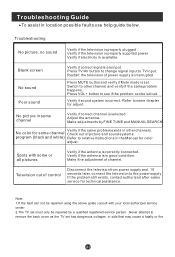
.... Blank screen No sound Poor sound Verify if correct signals are input. Press TV/AV button to change signal input to the power supply. If the problem still exists, contact authorized after-sales service for adjust. Troubleshooting Guide To assist in side that may cause a fatally or fire. Restart the television of picture and sound systems. program (black and white) Refer to other channels. Press MUTE button and verify if Mute mode is interrupted...
.... Blank screen No sound Poor sound Verify if correct signals are input. Press TV/AV button to change signal input to the power supply. If the problem still exists, contact authorized after-sales service for adjust. Troubleshooting Guide To assist in side that may cause a fatally or fire. Restart the television of picture and sound systems. program (black and white) Refer to other channels. Press MUTE button and verify if Mute mode is interrupted...
User Manual
Page 34
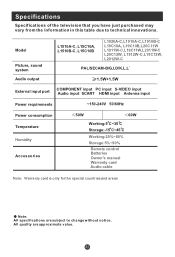
...to change without notice. Model Picture, sound system Audio output L1510A-C, L15C10A, L1510B-C, L15C10B L1920A-C,L1910A-C,L1910B-C L19C10A, L19C10B,L20C11W L1911W-C,L19C11W,L2011W-C L20C12W, L1912W-C,L19C12W, L2012W-C PAL/SECAM-B/G,I,D/K,L,L 1.5W+1.5W COMPONENT input PC input S-VIDEO input External input port Audio input SCART HDMI input Antenna input Power requirements ~150-240V 50/60Hz Power consumption Temperature Humidity Accessories 50W 60W Working:5 C~35 C Storage:-15 C~45 C Working:20%~80% Storage:5%~90% Remote control Batteries Owner's manual Warranty card Audio cable Note...
...to change without notice. Model Picture, sound system Audio output L1510A-C, L15C10A, L1510B-C, L15C10B L1920A-C,L1910A-C,L1910B-C L19C10A, L19C10B,L20C11W L1911W-C,L19C11W,L2011W-C L20C12W, L1912W-C,L19C12W, L2012W-C PAL/SECAM-B/G,I,D/K,L,L 1.5W+1.5W COMPONENT input PC input S-VIDEO input External input port Audio input SCART HDMI input Antenna input Power requirements ~150-240V 50/60Hz Power consumption Temperature Humidity Accessories 50W 60W Working:5 C~35 C Storage:-15 C~45 C Working:20%~80% Storage:5%~90% Remote control Batteries Owner's manual Warranty card Audio cable Note...


