Product Manual
Page 1
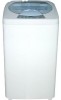
Portable Electronic Washer Lave-Linge Électronic Mobile Lavarroopas Eléctrico Portátil PROGRAM STATUS PROCEDURE STATUS 01 STANDARD 02 HEAVY aa 03 GENTLE 04 QUICK WASH 05 WASH SOAK bb WASH cc RINSE dd SPIN 06 SPIN HIGHMEDLIUOMRWESVEREVERS(YHUOLURORSPWLLATUERS) (MIN) WATER LEVEL HLP23E PROGRAM RESERVATION User Manual HLP23E Guide de l'Utilisateur HLP23E Manual del Usuario Modelo HLP23E Quality • Innovation • Style
Portable Electronic Washer Lave-Linge Électronic Mobile Lavarroopas Eléctrico Portátil PROGRAM STATUS PROCEDURE STATUS 01 STANDARD 02 HEAVY aa 03 GENTLE 04 QUICK WASH 05 WASH SOAK bb WASH cc RINSE dd SPIN 06 SPIN HIGHMEDLIUOMRWESVEREVERS(YHUOLURORSPWLLATUERS) (MIN) WATER LEVEL HLP23E PROGRAM RESERVATION User Manual HLP23E Guide de l'Utilisateur HLP23E Manual del Usuario Modelo HLP23E Quality • Innovation • Style
Product Manual
Page 3
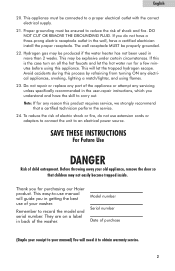
... that children may not easily become trapped inside. SAVE THESE INSTRUCTIONS For Future Use DANGER Risk of the washer. This easy-to-use manual will guide you do not use of your washer. This appliance must be ensured to reduce the risk of electric shock or fire, do not have a... 20. Proper grounding must be produced if the water heater has not been used in the user-repair instructions, which you for purchasing our Haier product. To reduce the risk of shock and fire. Do not repair or replace any servicing unless specifically recommended in more than 2 weeks.
... that children may not easily become trapped inside. SAVE THESE INSTRUCTIONS For Future Use DANGER Risk of the washer. This easy-to-use manual will guide you do not use of your washer. This appliance must be ensured to reduce the risk of electric shock or fire, do not have a... 20. Proper grounding must be produced if the water heater has not been used in the user-repair instructions, which you for purchasing our Haier product. To reduce the risk of shock and fire. Do not repair or replace any servicing unless specifically recommended in more than 2 weeks.
Product Manual
Page 4
English Table Of Contents PAGE SAFETY INSTRUCTIONS 1-2 PARTS AND FEATURES 4-5 OPERATING YOUR WASHER 6 UNPACKING AND ACCESSORIES INVENTORY 10 PROPER LOCATION 11 INSTALLATION INSTRUCTIONS 12 ELECTRICAL CONNECTIONS 15 PROPER CARE AND CLEANING 16 TROUBLESHOOTING GUIDE 17 WARRANTY 19 3
English Table Of Contents PAGE SAFETY INSTRUCTIONS 1-2 PARTS AND FEATURES 4-5 OPERATING YOUR WASHER 6 UNPACKING AND ACCESSORIES INVENTORY 10 PROPER LOCATION 11 INSTALLATION INSTRUCTIONS 12 ELECTRICAL CONNECTIONS 15 PROPER CARE AND CLEANING 16 TROUBLESHOOTING GUIDE 17 WARRANTY 19 3

Product Manual
Page 5
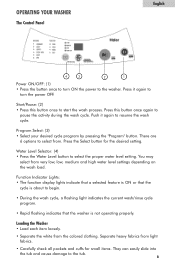
Washer Cabinet 4. Front Leveling Leg 4 OPERATING INSTRUCTIONS Parts and Features PROGRAM STATUS PROCEDURE STATUS 01 STANDARD 02 HEAVY aa 03 GENTLE 04 QUICK WASH 05 WASH SOAK bb WASH cc RINSE dd SPIN 06 SPIN HIGHMEDLIUOMRWESVEREVERS(YHUOLURORSPWLLATUERS) (MIN) WATER LEVEL HLP23E PROGRAM RESERVATION English 1 2 3 4 1. Control Panel 3. Top Lid 2.
Washer Cabinet 4. Front Leveling Leg 4 OPERATING INSTRUCTIONS Parts and Features PROGRAM STATUS PROCEDURE STATUS 01 STANDARD 02 HEAVY aa 03 GENTLE 04 QUICK WASH 05 WASH SOAK bb WASH cc RINSE dd SPIN 06 SPIN HIGHMEDLIUOMRWESVEREVERS(YHUOLURORSPWLLATUERS) (MIN) WATER LEVEL HLP23E PROGRAM RESERVATION English 1 2 3 4 1. Control Panel 3. Top Lid 2.
Product Manual
Page 7
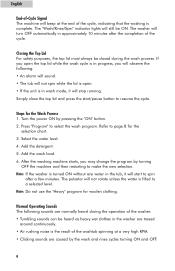
.... Separate heavy fabrics from very low, low, medium and high water level settings depending on the wash load. There are 6 options to select from the colored clothing. Loading the Washer • Load each item loosely. • Separate the white from . You may select from light... to turn the power OFF. Press it again to begin. • During the wash cycle, a flashing light indicates the current wash/rinse cycle program. • Rapid flashing indicates that the washer is not operating properly. Function Indicator Lights: • The function display lights indicate that...
.... Separate heavy fabrics from very low, low, medium and high water level settings depending on the wash load. There are 6 options to select from the colored clothing. Loading the Washer • Load each item loosely. • Separate the white from . You may select from light... to turn the power OFF. Press it again to begin. • During the wash cycle, a flashing light indicates the current wash/rinse cycle program. • Rapid flashing indicates that the washer is not operating properly. Function Indicator Lights: • The function display lights indicate that...
Product Manual
Page 8
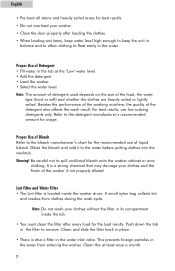
... float easily in the tub at least once a month. 7 It is also a filter in place. • There is a strong chemical that may damage your washer. • Close the door properly after every load for the best results. Push down the tab in the water from clothes during the... before putting clothes into the washtub. Dilute the bleach and add it to the detergent manufacturer's recommended amount for usage. Besides the performance of the washing machine, the quality of the load, the water type (hard or soft) and whether the clothes are heavily soiled or lightly soiled. Lint Filter and ...
... float easily in the tub at least once a month. 7 It is also a filter in place. • There is a strong chemical that may damage your washer. • Close the door properly after every load for the best results. Push down the tab in the water from clothes during the... before putting clothes into the washtub. Dilute the bleach and add it to the detergent manufacturer's recommended amount for usage. Besides the performance of the washing machine, the quality of the load, the water type (hard or soft) and whether the clothes are heavily soiled or lightly soiled. Lint Filter and ...
Product Manual
Page 10
...without any water in approximately 10 minutes after a few minutes. Turn the power ON by the wash and rinse cycles turning ON and OFF. 9 The pulsator will still be heard as heavy wet clothes in wash mode, it will beep at a very high RPM. • Clicking sounds are caused by... of the cycle. Refer to page 8 for woolen clothing. Note: If the washer is in progress, you may change the program by turning OFF the machine and then restarting to make the new selection. After the washing machine starts, you will observe the following sounds are tossed around continuously. • Air...
...without any water in approximately 10 minutes after a few minutes. Turn the power ON by the wash and rinse cycles turning ON and OFF. 9 The pulsator will still be heard as heavy wet clothes in wash mode, it will beep at a very high RPM. • Clicking sounds are caused by... of the cycle. Refer to page 8 for woolen clothing. Note: If the washer is in progress, you may change the program by turning OFF the machine and then restarting to make the new selection. After the washing machine starts, you will observe the following sounds are tossed around continuously. • Air...
Product Manual
Page 11
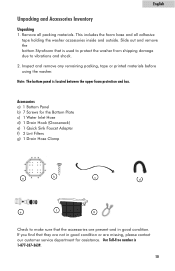
...materials. Accessories a) 1 Bottom Panel b) 7 Screws for assistance. Inspect and remove any remaining packing, tape or printed materials before using the washer. If you find that the accessories are missing, please contact our customer service department for the Bottom Plate c) 1 Water Inlet Hose d) 1...d e f g Check to vibrations and shock. 2. Remove all adhesive tape holding the washer accessories inside and outside. Slide out and remove the bottom Styrofoam that is used to protect the washer from shipping damage due to make sure that they are not in good condition or are ...
...materials. Accessories a) 1 Bottom Panel b) 7 Screws for assistance. Inspect and remove any remaining packing, tape or printed materials before using the washer. If you find that the accessories are missing, please contact our customer service department for the Bottom Plate c) 1 Water Inlet Hose d) 1...d e f g Check to vibrations and shock. 2. Remove all adhesive tape holding the washer accessories inside and outside. Slide out and remove the bottom Styrofoam that is used to protect the washer from shipping damage due to make sure that they are not in good condition or are ...

Product Manual
Page 12
... cooking appliances, etc.). • Any floor unevenness should be corrected with the leveling leg located on the bottom right corner of the washer. • The washer must be stored at room temperature. • If you received this appliance when the outside temperature is below freezing, do not operate ...warmed to room temperature. • Do not install or operate this appliance in Cold Environments • This appliance must not place the washer where the temperature is below freezing. Storage in an area where room temperature is at room temperature. You must be placed at or ...
... cooking appliances, etc.). • Any floor unevenness should be corrected with the leveling leg located on the bottom right corner of the washer. • The washer must be stored at room temperature. • If you received this appliance when the outside temperature is below freezing, do not operate ...warmed to room temperature. • Do not install or operate this appliance in Cold Environments • This appliance must not place the washer where the temperature is below freezing. Storage in an area where room temperature is at room temperature. You must be placed at or ...
Product Manual
Page 13
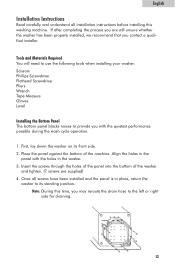
...panel against the bottom of the washer and tighten. (7 screws are still unsure whether the washer has been properly installed, we recommend that you may reroute the drain hose to the left or right side for draining. 12 Note: During this washing machine. Tools and Materials Required You will... need to use the following tools when installing your washer: Scissors Phillips Screwdriver Flathead Screwdriver Pliers Wrench Tape Measure Gloves Level Installing the Bottom ...
...panel against the bottom of the washer and tighten. (7 screws are still unsure whether the washer has been properly installed, we recommend that you may reroute the drain hose to the left or right side for draining. 12 Note: During this washing machine. Tools and Materials Required You will... need to use the following tools when installing your washer: Scissors Phillips Screwdriver Flathead Screwdriver Pliers Wrench Tape Measure Gloves Level Installing the Bottom ...
Product Manual
Page 14
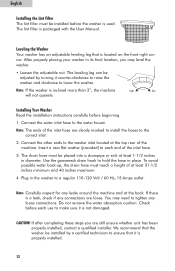
...these steps you may need to ensure that it is not damaged. Leveling the Washer Your washer has an adjustable leveling leg that the washer be adjusted by a certified technician to tighten any leaks around the machine and at the top rear of at least 1-1/2 inches in its final location... properly installed. 13 To avoid possible water back-up, the drain hose must reach a height of the machine. Plug in place. Insert a new flat washer (provided) to each use to the washer inlet located at the back. Check before beginning. 1. Connect the other ends to make sure it is ...
...these steps you may need to ensure that it is not damaged. Leveling the Washer Your washer has an adjustable leveling leg that the washer be adjusted by a certified technician to tighten any leaks around the machine and at the top rear of at least 1-1/2 inches in its final location... properly installed. 13 To avoid possible water back-up, the drain hose must reach a height of the machine. Plug in place. Insert a new flat washer (provided) to each use to the washer inlet located at the back. Check before beginning. 1. Connect the other ends to make sure it is ...
Product Manual
Page 15
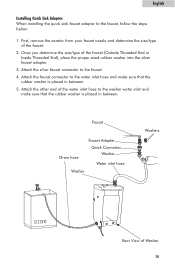
... place the proper sized rubber washer into the silver faucet adapter. 3. Attach the faucet connector to the washer water inlet and make sure that the rubber washer is placed in between . 5. Faucet Drain hose Faucet Adapter Quick Connector Washer Water inlet hose Washer Washers SINK Rear View of the ...faucet. 2. Once you determine the size/type of the water inlet hose to the water inlet hose and make sure that the rubber washer is placed in between . Attach the...
... place the proper sized rubber washer into the silver faucet adapter. 3. Attach the faucet connector to the washer water inlet and make sure that the rubber washer is placed in between . 5. Faucet Drain hose Faucet Adapter Quick Connector Washer Water inlet hose Washer Washers SINK Rear View of the ...faucet. 2. Once you determine the size/type of the water inlet hose to the water inlet hose and make sure that the rubber washer is placed in between . Attach the...

Product Manual
Page 16
... event of an electrical short circuit, grounding reduces the risk of electric shock by providing an escape wire for a prolonged period of time, clean the washer before using it again. 15 Power Interruptions Occasionally, there may be inserted into at least a 15 AMP 110-120 VOLT, 60 HZ GROUNDED OUTLET. Remove...
... event of an electrical short circuit, grounding reduces the risk of electric shock by providing an escape wire for a prolonged period of time, clean the washer before using it again. 15 Power Interruptions Occasionally, there may be inserted into at least a 15 AMP 110-120 VOLT, 60 HZ GROUNDED OUTLET. Remove...
Product Manual
Page 17
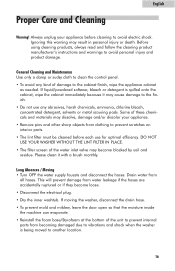
...chlorine bleach, concentrated detergent, solvents or metal scouring pads. If moving the washer, disconnect the drain hose. • To prevent mold and mildew, leave the door open so that the moisture inside the machine can evaporate. • Reinstall the foam base/Styrofoam at the bottom of ...cleaning product manufacturer's instructions and warnings to another location. 16 Drain water from becoming damaged due to vibrations and shock when the washer is spilled onto the cabinet, wipe the cabinet immediately because it with a brush monthly. If liquid/powdered softener, bleach or ...
...chlorine bleach, concentrated detergent, solvents or metal scouring pads. If moving the washer, disconnect the drain hose. • To prevent mold and mildew, leave the door open so that the moisture inside the machine can evaporate. • Reinstall the foam base/Styrofoam at the bottom of ...cleaning product manufacturer's instructions and warnings to another location. 16 Drain water from becoming damaged due to vibrations and shock when the washer is spilled onto the cabinet, wipe the cabinet immediately because it with a brush monthly. If liquid/powdered softener, bleach or ...
Product Manual
Page 18
... in the tub after water inlet. • Water leaks - Reload and redistribute the clothing to start the wash process. • The pulsator pauses during incoming water flow in - Press this button to rebalance the machine. • Check if the door is normal. Problems with water: • Not enough water is coming ...tangled or bent. The drain hose may be clogged or bent. • Water flows out of the drain hose during water inlet. • The washer may need to be rebalanced. You may need to press the button to ensure the best quality. 17 This is open. This may be clogged...
... in the tub after water inlet. • Water leaks - Reload and redistribute the clothing to start the wash process. • The pulsator pauses during incoming water flow in - Press this button to rebalance the machine. • Check if the door is normal. Problems with water: • Not enough water is coming ...tangled or bent. The drain hose may be clogged or bent. • Water flows out of the drain hose during water inlet. • The washer may need to be rebalanced. You may need to press the button to ensure the best quality. 17 This is open. This may be clogged...
Product Manual
Page 19
... your clothes) to avoid soap residue on one side. The laundry needs to be dissolving in the tub. Refer to the washer installation section. • Wash load may need to be due to an overloaded washtub. • Vibration noises are ripped or have been improperly sorted or ...the machine has been overloaded. Refer to the wash. Liquid detergent is intermittent when it stops, the "Rinse" indicator lights up and the wash- Clothes have holes - The detergent may not be balanced to avoid slanting. &#...
... your clothes) to avoid soap residue on one side. The laundry needs to be dissolving in the tub. Refer to the washer installation section. • Wash load may need to be due to an overloaded washtub. • Vibration noises are ripped or have been improperly sorted or ...the machine has been overloaded. Refer to the wash. Liquid detergent is intermittent when it stops, the "Rinse" indicator lights up and the wash- Clothes have holes - The detergent may not be balanced to avoid slanting. &#...


