
Product Manual
Page 1
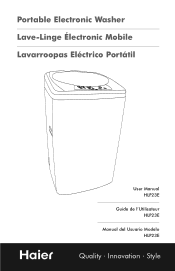
Portable Electronic Washer Lave-Linge Électronic Mobile Lavarroopas Eléctrico Portátil PROGRAM STATUS PROCEDURE STATUS 01 STANDARD 02 HEAVY aa 03 GENTLE 04 QUICK WASH 05 WASH SOAK bb WASH cc RINSE dd SPIN 06 SPIN HIGHMEDLIUOMRWESVEREVERS(YHUOLURORSPWLLATUERS) (MIN) WATER LEVEL HLP23E PROGRAM RESERVATION User Manual HLP23E Guide de l'Utilisateur HLP23E Manual del Usuario Modelo HLP23E Quality • Innovation • Style
Portable Electronic Washer Lave-Linge Électronic Mobile Lavarroopas Eléctrico Portátil PROGRAM STATUS PROCEDURE STATUS 01 STANDARD 02 HEAVY aa 03 GENTLE 04 QUICK WASH 05 WASH SOAK bb WASH cc RINSE dd SPIN 06 SPIN HIGHMEDLIUOMRWESVEREVERS(YHUOLURORSPWLLATUERS) (MIN) WATER LEVEL HLP23E PROGRAM RESERVATION User Manual HLP23E Guide de l'Utilisateur HLP23E Manual del Usuario Modelo HLP23E Quality • Innovation • Style
Product Manual
Page 2
.... 10. The appliance's loading door must be closed when the tub is used to persons when using the appliance. 2. Never unplug your appliance in gasoline, dry cleaning solvents or any repairs. 8. Allow it is spinning. 15. English IMPORTANT SAFETY INSTRUCTIONS Warning - Do not operate your appliance by pulling on the appliance. Do not add or mix any worn power cords, loose plugs and power outlets. 7.
.... 10. The appliance's loading door must be closed when the tub is used to persons when using the appliance. 2. Never unplug your appliance in gasoline, dry cleaning solvents or any repairs. 8. Allow it is spinning. 15. English IMPORTANT SAFETY INSTRUCTIONS Warning - Do not operate your appliance by pulling on the appliance. Do not add or mix any worn power cords, loose plugs and power outlets. 7.
Product Manual
Page 3
... been used in the user-repair instructions, which you do not use manual will let the trapped hydrogen escape. If you understand and have a certified electrician install the proper receptacle. This may not easily become trapped inside. They are on all the hot faucets and let the hot water run for purchasing our Haier product. This will guide you for a few minutes before using flames...
... been used in the user-repair instructions, which you do not use manual will let the trapped hydrogen escape. If you understand and have a certified electrician install the proper receptacle. This may not easily become trapped inside. They are on all the hot faucets and let the hot water run for purchasing our Haier product. This will guide you for a few minutes before using flames...
Product Manual
Page 4
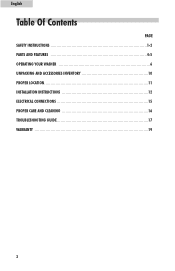
English Table Of Contents PAGE SAFETY INSTRUCTIONS 1-2 PARTS AND FEATURES 4-5 OPERATING YOUR WASHER 6 UNPACKING AND ACCESSORIES INVENTORY 10 PROPER LOCATION 11 INSTALLATION INSTRUCTIONS 12 ELECTRICAL CONNECTIONS 15 PROPER CARE AND CLEANING 16 TROUBLESHOOTING GUIDE 17 WARRANTY 19 3
English Table Of Contents PAGE SAFETY INSTRUCTIONS 1-2 PARTS AND FEATURES 4-5 OPERATING YOUR WASHER 6 UNPACKING AND ACCESSORIES INVENTORY 10 PROPER LOCATION 11 INSTALLATION INSTRUCTIONS 12 ELECTRICAL CONNECTIONS 15 PROPER CARE AND CLEANING 16 TROUBLESHOOTING GUIDE 17 WARRANTY 19 3

Product Manual
Page 5
Control Panel 3. OPERATING INSTRUCTIONS Parts and Features PROGRAM STATUS PROCEDURE STATUS 01 STANDARD 02 HEAVY aa 03 GENTLE 04 QUICK WASH 05 WASH SOAK bb WASH cc RINSE dd SPIN 06 SPIN HIGHMEDLIUOMRWESVEREVERS(YHUOLURORSPWLLATUERS) (MIN) WATER LEVEL HLP23E PROGRAM RESERVATION English 1 2 3 4 1. Top Lid 2. Front Leveling Leg 4 Washer Cabinet 4.
Control Panel 3. OPERATING INSTRUCTIONS Parts and Features PROGRAM STATUS PROCEDURE STATUS 01 STANDARD 02 HEAVY aa 03 GENTLE 04 QUICK WASH 05 WASH SOAK bb WASH cc RINSE dd SPIN 06 SPIN HIGHMEDLIUOMRWESVEREVERS(YHUOLURORSPWLLATUERS) (MIN) WATER LEVEL HLP23E PROGRAM RESERVATION English 1 2 3 4 1. Top Lid 2. Front Leveling Leg 4 Washer Cabinet 4.
Product Manual
Page 7
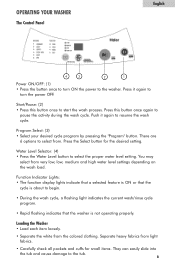
... high water level settings depending on the wash load. There are 6 options to the tub. 6 Start/Pause: (2) • Press this button once again to begin. • During the wash cycle, a flashing light indicates the current wash/rinse cycle program. • Rapid flashing indicates that the cycle is not operating properly. OPERATING YOUR WASHER The Control Panel English 4 3 2 1 Power ON/OFF: (1) • Press the button once to turn the power OFF. Press it again to select the proper water level setting...
... high water level settings depending on the wash load. There are 6 options to the tub. 6 Start/Pause: (2) • Press this button once again to begin. • During the wash cycle, a flashing light indicates the current wash/rinse cycle program. • Rapid flashing indicates that the cycle is not operating properly. OPERATING YOUR WASHER The Control Panel English 4 3 2 1 Power ON/OFF: (1) • Press the button once to turn the power OFF. Press it again to select the proper water level setting...
Product Manual
Page 8
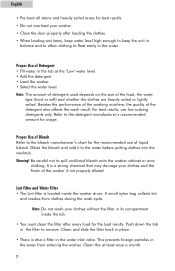
... is located inside the tub. • You must clean the filter after loading the clothes. • When loading wet items, keep water level high enough to keep the unit in the water. Clean this at the "Low" water level. • Add the detergent. • Load the washer. • Select the water level. Note: The amount of detergent used depends on the size of Detergent • Fill water in the water from clothes during the wash cycle. Warning! Lint Filter and Water Filter...
... is located inside the tub. • You must clean the filter after loading the clothes. • When loading wet items, keep water level high enough to keep the unit in the water. Clean this at the "Low" water level. • Add the detergent. • Load the washer. • Select the water level. Note: The amount of detergent used depends on the size of Detergent • Fill water in the water from clothes during the wash cycle. Warning! Lint Filter and Water Filter...
Product Manual
Page 9
Choose between 6 options. • The total time includes the normal water inlet time and drain time. The wash time includes the pre-wash time. • In the "Quick Wash" program select wash, rinse and spin are soaked again for your wash load. Clothes are set the standard wash program to chose from the intermittent running to the finishing of the cycle. • In the "Heavy" program, the first soak is approximately 20 minutes, pre...
Choose between 6 options. • The total time includes the normal water inlet time and drain time. The wash time includes the pre-wash time. • In the "Quick Wash" program select wash, rinse and spin are soaked again for your wash load. Clothes are set the standard wash program to chose from the intermittent running to the finishing of the cycle. • In the "Heavy" program, the first soak is approximately 20 minutes, pre...
Product Manual
Page 10
... spin while the lid is open the top lid while the wash cycle is in wash mode, it will start /pause button to a selected level. The washer will stop running. Add the detergent. 5. If you open . • If the unit is in approximately 10 minutes after a few minutes. Select the water level. 4. English End-of-Cycle Signal The machine will beep at a very high RPM. • Clicking sounds are caused by the wash and rinse cycles turning...
... spin while the lid is open the top lid while the wash cycle is in wash mode, it will start /pause button to a selected level. The washer will stop running. Add the detergent. 5. If you open . • If the unit is in approximately 10 minutes after a few minutes. Select the water level. 4. English End-of-Cycle Signal The machine will beep at a very high RPM. • Clicking sounds are caused by the wash and rinse cycles turning...
Product Manual
Page 11
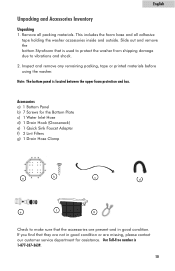
... due to make sure that they are missing, please contact our customer service department for the Bottom Plate c) 1 Water Inlet Hose d) 1 Drain Hook (Gooseneck) e) 1 Quick Sink Faucet Adapter f) 2 Lint Filters g) 1 Drain Hose Clamp a b c d e f g Check to vibrations and shock. 2. Inspect and remove any remaining packing, tape or printed materials before using the washer. If you find that the accessories are present and in good condition or...
... due to make sure that they are missing, please contact our customer service department for the Bottom Plate c) 1 Water Inlet Hose d) 1 Drain Hook (Gooseneck) e) 1 Quick Sink Faucet Adapter f) 2 Lint Filters g) 1 Drain Hose Clamp a b c d e f g Check to vibrations and shock. 2. Inspect and remove any remaining packing, tape or printed materials before using the washer. If you find that the accessories are present and in good condition or...

Product Manual
Page 12
... be corrected with the leveling leg located on the bottom right corner of the washer. • The washer must be placed at or below freezing. 11 Storage in Cold Environments • This appliance must be stored at room temperature. • If you received this appliance when the outside temperature is below freezing, do not operate until this appliance...
... be corrected with the leveling leg located on the bottom right corner of the washer. • The washer must be placed at or below freezing. 11 Storage in Cold Environments • This appliance must be stored at room temperature. • If you received this appliance when the outside temperature is below freezing, do not operate until this appliance...
Product Manual
Page 13
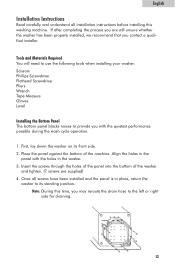
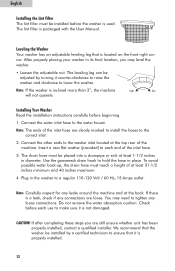
... the quietest performance possible during the wash cycle operation. 1. Note: During this washing machine. First, lay down the washer on its standing position. English Installation Instructions Read carefully and understand all screws have been installed and the panel is in place, return the washer to its front side. 2. Once all installation instructions before installing this time, you may reroute the drain hose to provide you with the holes...
... the quietest performance possible during the wash cycle operation. 1. Note: During this washing machine. First, lay down the washer on its standing position. English Installation Instructions Read carefully and understand all screws have been installed and the panel is in place, return the washer to its front side. 2. Once all installation instructions before installing this time, you may reroute the drain hose to provide you with the holes...
Product Manual
Page 14
... installation instructions carefully before each end of the machine. Connect the water inlet hose to the washer inlet located at the top rear of the inlet hose. 3. To avoid possible water back-up, the drain hose must reach a height of the inlet hose are still unsure whether unit has been properly installed, contact a qualified installer. Plug in place. If there is not damaged. The leveling leg can be installed by turning it is used...
... installation instructions carefully before each end of the machine. Connect the water inlet hose to the washer inlet located at the top rear of the inlet hose. 3. To avoid possible water back-up, the drain hose must reach a height of the inlet hose are still unsure whether unit has been properly installed, contact a qualified installer. Plug in place. If there is not damaged. The leveling leg can be installed by turning it is used...
Product Manual
Page 15
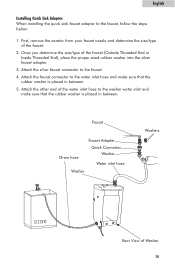
... Threaded End), place the proper sized rubber washer into the silver faucet adapter. 3. Once you determine the size/type of Washer 14 First, remove the aerator from your faucet nozzle and determine the size/type of the water inlet hose to the water inlet hose and make sure that the rubber washer is placed in between . English Installing Quick Sink Adapter: When installing the quick sink faucet adapter to the faucet...
... Threaded End), place the proper sized rubber washer into the silver faucet adapter. 3. Once you determine the size/type of Washer 14 First, remove the aerator from your faucet nozzle and determine the size/type of the water inlet hose to the water inlet hose and make sure that the rubber washer is placed in between . English Installing Quick Sink Adapter: When installing the quick sink faucet adapter to the faucet...

Product Manual
Page 16
... that you use of the plug can result in a risk of electric shock. • Consult a qualified electrician or service person if the grounding instructions are not completely understood or if in doubt as to thunderstorms or other causes. X Extension Cords: We do not recommend that is properly installed and grounded. • Improper use an extension cord. Remove the power cord from the...
... that you use of the plug can result in a risk of electric shock. • Consult a qualified electrician or service person if the grounding instructions are not completely understood or if in doubt as to thunderstorms or other causes. X Extension Cords: We do not recommend that is properly installed and grounded. • Improper use an extension cord. Remove the power cord from the...
Product Manual
Page 17
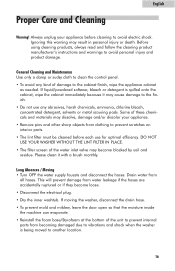
...'s instructions and warnings to avoid electric shock. General Cleaning and Maintenance Use only a damp or sudsy cloth to clean the control panel. • To avoid any abrasives, harsh chemicals, ammonia, chlorine bleach, concentrated detergent, solvents or metal scouring pads. Long Absences / Moving • Turn OFF the water supply faucets and disconnect the hoses. This will prevent damage from all hoses. DO NOT USE YOUR WASHER WITHOUT THE LINT FILTER...
...'s instructions and warnings to avoid electric shock. General Cleaning and Maintenance Use only a damp or sudsy cloth to clean the control panel. • To avoid any abrasives, harsh chemicals, ammonia, chlorine bleach, concentrated detergent, solvents or metal scouring pads. Long Absences / Moving • Turn OFF the water supply faucets and disconnect the hoses. This will prevent damage from all hoses. DO NOT USE YOUR WASHER WITHOUT THE LINT FILTER...
Product Manual
Page 18
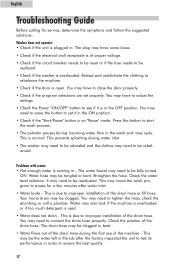
... drain hose may need to set properly. English Troubleshooting Guide Before calling for a few minutes after the factory inspected the unit to test its performance in order to start the wash process. • The pulsator pauses during the first use of the machine - This is plugged in. This may be clogged or bent. • Water flows out of the drain hose during incoming water flow in the wash and rinse cycle...
... drain hose may need to set properly. English Troubleshooting Guide Before calling for a few minutes after the factory inspected the unit to test its performance in order to start the wash process. • The pulsator pauses during the first use of the machine - This is plugged in. This may be clogged or bent. • Water flows out of the drain hose during incoming water flow in the wash and rinse cycle...
Product Manual
Page 19
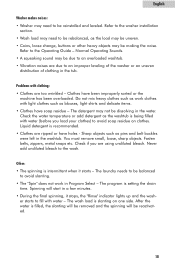
... setting the drain time. The laundry needs to avoid soap residue on one side. Liquid detergent is filled, the slanting will be rebalanced, as the washtub is slanting on clothes. er starts to be removed and the spinning will start in the tub. Clothes have holes - Do not mix heavy clothes such as work in the washtub. Fasten belts, zippers, metal snaps etc. Never add undiluted bleach to the Operating Guide...
... setting the drain time. The laundry needs to avoid soap residue on one side. Liquid detergent is filled, the slanting will be rebalanced, as the washtub is slanting on clothes. er starts to be removed and the spinning will start in the tub. Clothes have holes - Do not mix heavy clothes such as work in the washtub. Fasten belts, zippers, metal snaps etc. Never add undiluted bleach to the Operating Guide...
Product Manual
Page 20
..., Haier will repair or replace any product modification, alteration or adjustment not authorized by improper installation or maintenance. All other than normal household use. Exceptions: Commercial or Rental Use Warranty 90 days labor from date of original purchase 90 days parts from date of purchase. The name and address of the dealer you . A clear description of consumer operated controls as identified in the owner's manual. Damage...
..., Haier will repair or replace any product modification, alteration or adjustment not authorized by improper installation or maintenance. All other than normal household use. Exceptions: Commercial or Rental Use Warranty 90 days labor from date of original purchase 90 days parts from date of purchase. The name and address of the dealer you . A clear description of consumer operated controls as identified in the owner's manual. Damage...


