User Manual
Page 2
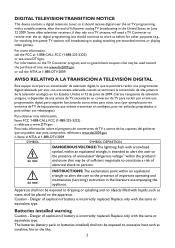
...: The lightning flash with liquids, such as vases, shall be used toward the purchase of important operating and maintenance (servicing) instruction in analog, watching pre-recorded movies, or playing video games). Apparatus shall not be exposed to dripping or splashing and no objects filled with arrowhead symbol, within an equilateral triangle, is incorrectly replaced. DIGITAL TELEVISION TRANSITION NOTICE This device contains a digital television tuner, so...
...: The lightning flash with liquids, such as vases, shall be used toward the purchase of important operating and maintenance (servicing) instruction in analog, watching pre-recorded movies, or playing video games). Apparatus shall not be exposed to dripping or splashing and no objects filled with arrowhead symbol, within an equilateral triangle, is incorrectly replaced. DIGITAL TELEVISION TRANSITION NOTICE This device contains a digital television tuner, so...
User Manual
Page 3
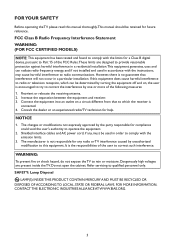
... limits for a Class B digital device, pursuant to Part 15 of the FCC Rules.These limits are present inside the TV. Connect the equipment into an outlet on , the user is encouraged to try to correct the interference by the party responsible for help. Do not open the cabinet. FOR YOUR SAFETY Before operating the TV please...
... limits for a Class B digital device, pursuant to Part 15 of the FCC Rules.These limits are present inside the TV. Connect the equipment into an outlet on , the user is encouraged to try to correct the interference by the party responsible for help. Do not open the cabinet. FOR YOUR SAFETY Before operating the TV please...
User Manual
Page 5
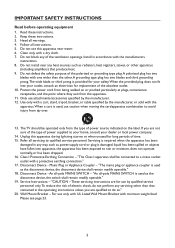
... your outlet, consult an electrician for long periods of time. 15. Use only with a cart, stand, tripod, bracket, or table specified by the manufacturer, or sold with the manufacturers instructions. 8. Disconnect Device - Mains Plug or Appliance Coupler - Disconnect Device - These servicing instructions are for use only with UL Listed Wall Mount Bracket with a protective earthing connection." 17. Do not block any of electric shock...
... your outlet, consult an electrician for long periods of time. 15. Use only with a cart, stand, tripod, bracket, or table specified by the manufacturer, or sold with the manufacturers instructions. 8. Disconnect Device - Mains Plug or Appliance Coupler - Disconnect Device - These servicing instructions are for use only with UL Listed Wall Mount Bracket with a protective earthing connection." 17. Do not block any of electric shock...
User Manual
Page 6
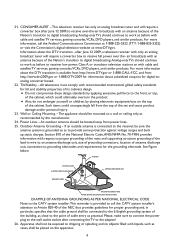
... antenna because of antenna discharge unit, connection to digital broadcasting. Information about the DTV transition -after June 12 2009, a television receiver with only an analog broadcast tuner will require a converter box after connecting the TV to the point of the NEC that the cable ground shall be sure the antenna system is grounded so as before with cable and satellite TV services, gaming consoles,VCRs, DVD players...
... antenna because of antenna discharge unit, connection to digital broadcasting. Information about the DTV transition -after June 12 2009, a television receiver with only an analog broadcast tuner will require a converter box after connecting the TV to the point of the NEC that the cable ground shall be sure the antenna system is grounded so as before with cable and satellite TV services, gaming consoles,VCRs, DVD players...

User Manual
Page 8
TABLE OF CONTENT DIGITAL TELEVISION TRANSITION NOTICE 2 FOR YOUR SAFETY 3 PRECAUTIONS AND REMINDERS 4 IMPORTANT SAFETY INSTRUCTIONS 5 PREPARATION 9 ATTACHING THE BASE...9 PREPARING YOUR LCD HDTV FOR WALL MOUNTING 9 PERIPHERAL CONNECTION GUIDE 12 OPERATING INSTRUCTIONS 14 TO USE THE FRONT PANEL CONTROL 14 TO USE THE REMOTE CONTROL 15 TO USE THE MENUS ...16 CHANNEL MENU ...16 VIDEO MENU ...16 AUDIO MENU ...17 FEATURE MENU...17 VGA MENU...20 TIPS ...21 PRODUCT SPECIFICATION 22 BEFORE CALLING SERVICE 24 GLOSSARY ...25 WARRANTY 26 8
TABLE OF CONTENT DIGITAL TELEVISION TRANSITION NOTICE 2 FOR YOUR SAFETY 3 PRECAUTIONS AND REMINDERS 4 IMPORTANT SAFETY INSTRUCTIONS 5 PREPARATION 9 ATTACHING THE BASE...9 PREPARING YOUR LCD HDTV FOR WALL MOUNTING 9 PERIPHERAL CONNECTION GUIDE 12 OPERATING INSTRUCTIONS 14 TO USE THE FRONT PANEL CONTROL 14 TO USE THE REMOTE CONTROL 15 TO USE THE MENUS ...16 CHANNEL MENU ...16 VIDEO MENU ...16 AUDIO MENU ...17 FEATURE MENU...17 VGA MENU...20 TIPS ...21 PRODUCT SPECIFICATION 22 BEFORE CALLING SERVICE 24 GLOSSARY ...25 WARRANTY 26 8
User Manual
Page 9
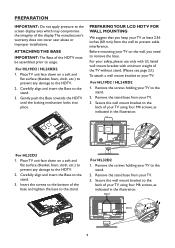
... base to the stand. 2. For HL19D2 / HL24XD2 1. Remove the screws holding your TV to usage. Remove the screws holding your TV to the stand. Secure the wall mount bracket to prevent cable interference. For HL32D2 1. Secure the wall mount bracket to the screen display area which may compromise the integrity of the display.The manufacturer's warranty does not cover user abuse or improper installations. ATTACHING THE BASE IMPORTANT: The Base of the HDTV...
... base to the stand. 2. For HL19D2 / HL24XD2 1. Remove the screws holding your TV to usage. Remove the screws holding your TV to the stand. Secure the wall mount bracket to prevent cable interference. For HL32D2 1. Secure the wall mount bracket to the screen display area which may compromise the integrity of the display.The manufacturer's warranty does not cover user abuse or improper installations. ATTACHING THE BASE IMPORTANT: The Base of the HDTV...
User Manual
Page 11
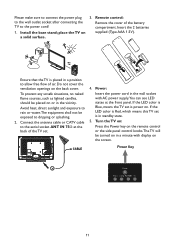
.... 2. Install the base stand; Insert the 2 batteries supplied (Type AAA 1.5V). If the LED color is Blue, means the TV set is placed in a minute with AC power supply.You can see LED states at the back of the TV set is in the wall socket with display on the back cover. Turn the TV on: Press the Power key on the remote control or the side panel control knobs...
.... 2. Install the base stand; Insert the 2 batteries supplied (Type AAA 1.5V). If the LED color is Blue, means the TV set is placed in a minute with AC power supply.You can see LED states at the back of the TV set is in the wall socket with display on the back cover. Turn the TV on: Press the Power key on the remote control or the side panel control knobs...
User Manual
Page 12
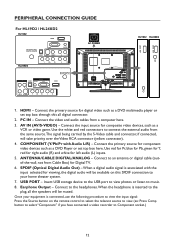
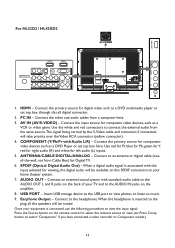
...: Press Comp button to select "Component" if you have connected a video recorder to an antenna or digital cable (outof-the-wall, not from Cable Box) for viewing, the digital audio will be available on this all the speakers will be muted. Connect to the headphones.When the headphone is associated with Audio L/R) - Use the white and red connectors to the plug, all digital connector. 2. ANTENNA/CABLE DIGITAL/ANALOG - Connect the primary source for left audio (L) inputs. 5. Earphone Output - PERIPHERAL CONNECTION GUIDE For HL19D2...
...: Press Comp button to select "Component" if you have connected a video recorder to an antenna or digital cable (outof-the-wall, not from Cable Box) for viewing, the digital audio will be available on this all the speakers will be muted. Connect to the headphones.When the headphone is associated with Audio L/R) - Use the white and red connectors to the plug, all digital connector. 2. ANTENNA/CABLE DIGITAL/ANALOG - Connect the primary source for left audio (L) inputs. 5. Earphone Output - PERIPHERAL CONNECTION GUIDE For HL19D2...
User Manual
Page 13
... IN - Connect to the headphones.When the headphone is connected, use the following procedure to view the input signal: Press the Source button on this all the speakers will be available on the remote control to select the relevant source to view. (ex: Press Comp button to select "Component" if you have connected a video recorder to Component socket.) 13 SPDIF (Optical Digital Audio Out) - ANTENNA/CABLE DIGITAL/ANALOG - When a digital audio signal is associated with standard audio cable to the plug, all digital connector...
... IN - Connect to the headphones.When the headphone is connected, use the following procedure to view the input signal: Press the Source button on this all the speakers will be available on the remote control to select the relevant source to view. (ex: Press Comp button to select "Component" if you have connected a video recorder to Component socket.) 13 SPDIF (Optical Digital Audio Out) - ANTENNA/CABLE DIGITAL/ANALOG - When a digital audio signal is associated with standard audio cable to the plug, all digital connector...
User Manual
Page 14
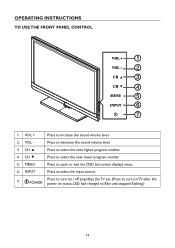
INPUT Press to open or exit the OSD (on status, LED had changed to select the next higher program number. 4. MENU Press to select the input source. 7. i POWER Press to turn on / off (standby) the TV set. (Press to turn on TV after the power on -screen display) menu. 6. CH ▲ Press to Blue and stopped flashing.) 14 Press to select the next lower program number. 5. CH ▼ Press to decrease the sound volume level. 3. OPERATING INSTRUCTIONS TO USE THE FRONT PANEL CONTROL 1 2 3 4 5 6 7 1 VOL + Press to increase the sound volume level. 2. VOL -
INPUT Press to open or exit the OSD (on status, LED had changed to select the next higher program number. 4. MENU Press to select the input source. 7. i POWER Press to turn on / off (standby) the TV set. (Press to turn on TV after the power on -screen display) menu. 6. CH ▲ Press to Blue and stopped flashing.) 14 Press to select the next lower program number. 5. CH ▼ Press to decrease the sound volume level. 3. OPERATING INSTRUCTIONS TO USE THE FRONT PANEL CONTROL 1 2 3 4 5 6 7 1 VOL + Press to increase the sound volume level. 2. VOL -

User Manual
Page 15
... time. Info Press to display the Electronic Program Guide. Menu Press to open or toggle channel item in Favorite Channel List. C. Comp Press to adjust the various function items on status, LED had changed to blue and stopped flashing.) Video Press repeatedly to choose VGA or HDMI source mode. Sleep Press to set the preset time to switch the TV to open or exit menu. , , , ENTER Press to choose Component source mode. MTS/SAP...
... time. Info Press to display the Electronic Program Guide. Menu Press to open or toggle channel item in Favorite Channel List. C. Comp Press to adjust the various function items on status, LED had changed to blue and stopped flashing.) Video Press repeatedly to choose VGA or HDMI source mode. Sleep Press to set the preset time to switch the TV to open or exit menu. , , , ENTER Press to choose Component source mode. MTS/SAP...
User Manual
Page 16
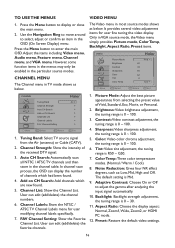
... Channel Labels menu for user fine tuning the video display. Picture Mode: Adjust the best picture appearance from the Air (antenna) or Cable (CATV). 2. Use the Navigation Ring to move around to display or close the main menu. 2. The default setting is 0 ~ 100. 6. Tuning Band: Select TV source signal from selecting the preset value of the received DTV signal. 3. FAV Channel Setting: Show the Favorite Channel List. Color: Video color chroma adjustment, the tuning range is Mid. 9. Preset: Restore the default video settings...
... Channel Labels menu for user fine tuning the video display. Picture Mode: Adjust the best picture appearance from the Air (antenna) or Cable (CATV). 2. Use the Navigation Ring to move around to display or close the main menu. 2. The default setting is 0 ~ 100. 6. Tuning Band: Select TV source signal from selecting the preset value of the received DTV signal. 3. FAV Channel Setting: Show the Favorite Channel List. Color: Video color chroma adjustment, the tuning range is Mid. 9. Preset: Restore the default video settings...
User Manual
Page 17
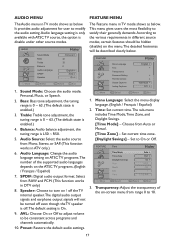
... mode shows as below. AUDIO Move Sound Mode Bass Treble Balance Audio Language SPDIF Speaker Personal 32 32 0 English PCM On ENTER Select Menu Return Exit Exit 1. FEATURE Menu Language Time Transparency Password Setting Parental Control Closed Captions Analog Captions English 1 With Mute CC1 Move ENTER Select Menu Return Exit Exit 1. Set to satisfy their generally demands. Bass: Bass tone adjustment, the tuning range is 0 ~ 63. (The default state is L50 ~ R50. 5. SPDIF: Digital audio output format. Balance: Audio balance adjustment...
... mode shows as below. AUDIO Move Sound Mode Bass Treble Balance Audio Language SPDIF Speaker Personal 32 32 0 English PCM On ENTER Select Menu Return Exit Exit 1. FEATURE Menu Language Time Transparency Password Setting Parental Control Closed Captions Analog Captions English 1 With Mute CC1 Move ENTER Select Menu Return Exit Exit 1. Set to satisfy their generally demands. Bass: Bass tone adjustment, the tuning range is 0 ~ 63. (The default state is L50 ~ R50. 5. SPDIF: Digital audio output format. Balance: Audio balance adjustment...
User Manual
Page 18
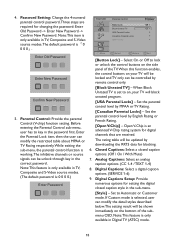
... Parental Locks] - Digital Captions Setup: Provide numerous options for setting the digital closed caption options. (Off / On / With Mute) 7. Set the parental control level by English Rating or French Rating. [Open V-Chip] - Digital Captions: Select a digital caption options. (SERVICE 1-6) 9. Closed Captions: Select a closed caption style in the password first. Set to key in the sub-menu. [Style] - Parental Control: Provide the parental Control (V-chip) function setting. Note:This feature is only available in TV, Composite and S-Video source modes.The default password...
... Parental Locks] - Digital Captions Setup: Provide numerous options for setting the digital closed caption options. (Off / On / With Mute) 7. Set the parental control level by English Rating or French Rating. [Open V-Chip] - Digital Captions: Select a digital caption options. (SERVICE 1-6) 9. Closed Captions: Select a closed caption style in the password first. Set to key in the sub-menu. [Style] - Parental Control: Provide the parental Control (V-chip) function setting. Note:This feature is only available in TV, Composite and S-Video source modes.The default password...

User Manual
Page 19
... interface: • After plugging USB storage device into the USB hub. MultiMedia Menu: This option shows the photos in JPEG formats and plays the music in MP3 formats that stored in current folder. • Start Slide Show: Enter Slide Show mode. • Rotate Photo: Rotate selected picture. (0/90/180/270) 19 FEATURE Analog Captions Digital Captions Digital Captions Setup Input Labels Component Setting MultiMedia Menu Reset To Default English English Move ENTER Select Menu Return Exit Exit...
... interface: • After plugging USB storage device into the USB hub. MultiMedia Menu: This option shows the photos in JPEG formats and plays the music in MP3 formats that stored in current folder. • Start Slide Show: Enter Slide Show mode. • Rotate Photo: Rotate selected picture. (0/90/180/270) 19 FEATURE Analog Captions Digital Captions Digital Captions Setup Input Labels Component Setting MultiMedia Menu Reset To Default English English Move ENTER Select Menu Return Exit Exit...
User Manual
Page 21
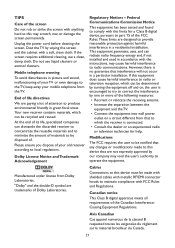
... changes or modifications made with shielded cables with a soft, clean cloth. Cables Connections to this device must be made to this equipment does cause harmful interference to which can be determined by turning the equipment off and on, the user is connected. • Consult the dealer or an experienced radio or television technician for a Class B digital device, pursuant to part...
... changes or modifications made with shielded cables with a soft, clean cloth. Cables Connections to this device must be made to this equipment does cause harmful interference to which can be determined by turning the equipment off and on, the user is connected. • Consult the dealer or an experienced radio or television technician for a Class B digital device, pursuant to part...

User Manual
Page 22
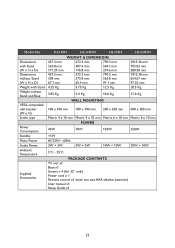
... HL19D2 and HL32D2) HDMI input Supported scan rates: 480i, 480p, 720p, 1080i, 1080p AV/S-Video input AV/S-Video input AV/S-Video input AV/S-Video input SPDIF SPDIF SPDIF SPDIF HDMI 1 HDMI 1 HDMI HDMI HDMI 2 HDMI 2 Audio out Audio out Earphone Output USB PORT Earphone Output USB PORT AV IN 2 Earphone Output USB PORT AV IN 2 Earphone Output USB PORT 22 Model No. PRODUCT SPECIFICATION NOTE • This model complies with the specifications listed below. • Designs and specifications are subject to change without notice. • This model may not be...
... HL19D2 and HL32D2) HDMI input Supported scan rates: 480i, 480p, 720p, 1080i, 1080p AV/S-Video input AV/S-Video input AV/S-Video input AV/S-Video input SPDIF SPDIF SPDIF SPDIF HDMI 1 HDMI 1 HDMI HDMI HDMI 2 HDMI 2 Audio out Audio out Earphone Output USB PORT Earphone Output USB PORT AV IN 2 Earphone Output USB PORT AV IN 2 Earphone Output USB PORT 22 Model No. PRODUCT SPECIFICATION NOTE • This model complies with the specifications listed below. • Designs and specifications are subject to change without notice. • This model may not be...
User Manual
Page 23
... 91.1 mm 97.10 mm Weight with Stand 4.25 Kg 5.75 Kg 12.5 Kg 20.5 Kg Weight without Stand and Base 3.85 Kg 5.4 Kg 10.6 Kg 17.6 Kg WALL MOUNTING VESA-compatible wall bracket 100 x 100 mm 100 x 100 mm 200 x 200 mm 400 x 200 mm (W x H) Screw type Metric 4 x 10 mm Metric 4 x 10 mm Metric 6 x 10 mm Metric 6 x 10 mm Power Consumption Standby 45W Model No.
... 91.1 mm 97.10 mm Weight with Stand 4.25 Kg 5.75 Kg 12.5 Kg 20.5 Kg Weight without Stand and Base 3.85 Kg 5.4 Kg 10.6 Kg 17.6 Kg WALL MOUNTING VESA-compatible wall bracket 100 x 100 mm 100 x 100 mm 200 x 200 mm 400 x 200 mm (W x H) Screw type Metric 4 x 10 mm Metric 4 x 10 mm Metric 6 x 10 mm Metric 6 x 10 mm Power Consumption Standby 45W Model No.

User Manual
Page 24
.... Try another channel. • Adjust the contrast and brightness settings. • Check the Closed Captions control. No power • Check if the TV's AC power cord is set in the TV mode. 24 Good picture but poor color • Adjust the contrast, color and brightness settings. Switch off the equipment. hair dryer, nearby neon lights, etc.) • Turn off one of your TV. • Select the TV mode to high rise...
.... Try another channel. • Adjust the contrast and brightness settings. • Check the Closed Captions control. No power • Check if the TV's AC power cord is set in the TV mode. 24 Good picture but poor color • Adjust the contrast, color and brightness settings. Switch off the equipment. hair dryer, nearby neon lights, etc.) • Turn off one of your TV. • Select the TV mode to high rise...

User Manual
Page 25
... with VCRs (or other accessories) in order to provide maximum consumer viewing satisfaction. 25 Second Audio Program (SAP) Another or additional audio channel provided for the displayed program). A monaural sound track included within the recorded or video signal (usually containing a second language translation for in the Multichannel Television Sound (MTS) broadcast standard. Sleep Timer You can connect your TV set a time period for television broadcasts. HDMI Inputs High-Definition Multimedia Interface Audio / Video Inputs Located...
... with VCRs (or other accessories) in order to provide maximum consumer viewing satisfaction. 25 Second Audio Program (SAP) Another or additional audio channel provided for the displayed program). A monaural sound track included within the recorded or video signal (usually containing a second language translation for in the Multichannel Television Sound (MTS) broadcast standard. Sleep Timer You can connect your TV set a time period for television broadcasts. HDMI Inputs High-Definition Multimedia Interface Audio / Video Inputs Located...


