User Manual
Page 2
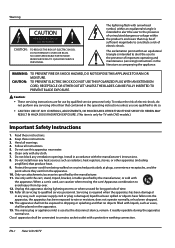
...DVD models.) Important Safety Instructions 1. EN-1 Haier LCD HDTV Heed all instructions. 5. Only use caution when moving the cart/ Apparatus combination to avoid injury from the apparatus. 10. Refer all servicing to constitute a risk of uninsulated dangerous voltage within an equilateral triangle is used...as power-supply cord or plug is only for long periods of important operating and maintenance (servicing) instructions in the literature accompanying the appliance. CAUTION: TO REDUCE THE RISK OF ELECTRIC SHOCK, DO NOT REMOVE COVER (OR BACK). NO USER SERVICEABLE PARTS ...
...DVD models.) Important Safety Instructions 1. EN-1 Haier LCD HDTV Heed all instructions. 5. Only use caution when moving the cart/ Apparatus combination to avoid injury from the apparatus. 10. Refer all servicing to constitute a risk of uninsulated dangerous voltage within an equilateral triangle is used...as power-supply cord or plug is only for long periods of important operating and maintenance (servicing) instructions in the literature accompanying the appliance. CAUTION: TO REDUCE THE RISK OF ELECTRIC SHOCK, DO NOT REMOVE COVER (OR BACK). NO USER SERVICEABLE PARTS ...
User Manual
Page 4
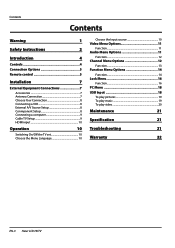
... 5 Remote control 5 Installation 7 External Equipment Connections 7 Accessories 7 Antenna Connection 7 Choose Your Connection 8 Connecting a VCR 8 External A/V Source Setup 8 Conmponent Setup 8 Connecting a computer 9 Cable TV Setup 9 HDMI input 10 Operation 10 Switching On/Off the TV set 10 Choose the Menu Language 10 Choose the Input source 10 Video Menu Options 11 Function 11 Audio Menu Options 11 Function 12 Channel Menu Options 12 Function 13 Function Menu Options 14 Function 14 Lock Menu 16 Function 16 PC Menu 18 USB Input 18 To play pictures 19 To play...
... 5 Remote control 5 Installation 7 External Equipment Connections 7 Accessories 7 Antenna Connection 7 Choose Your Connection 8 Connecting a VCR 8 External A/V Source Setup 8 Conmponent Setup 8 Connecting a computer 9 Cable TV Setup 9 HDMI input 10 Operation 10 Switching On/Off the TV set 10 Choose the Menu Language 10 Choose the Input source 10 Video Menu Options 11 Function 11 Audio Menu Options 11 Function 12 Channel Menu Options 12 Function 13 Function Menu Options 14 Function 14 Lock Menu 16 Function 16 PC Menu 18 USB Input 18 To play pictures 19 To play...
User Manual
Page 5
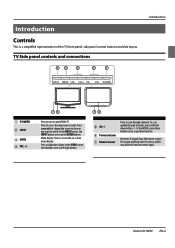
... to the one you want to access the input source mode. In the MENU screen, the INPUT button serves as up/down either+/-. Menu display. Press to turn on -screen menu display. In the MENU screen, these buttons serve as the ENTER button. Receivers IR signals from the remote control. Introduction Controls This is a simplified representation of the TV front panel, side panel control buttons and side inputs. TV Side panel controls and connections Introduction INPUT MENU VOL- To scan quickly through channels. Haier LCD HDTV EN-4
... to the one you want to access the input source mode. In the MENU screen, the INPUT button serves as up/down either+/-. Menu display. Press to turn on -screen menu display. In the MENU screen, these buttons serve as the ENTER button. Receivers IR signals from the remote control. Introduction Controls This is a simplified representation of the TV front panel, side panel control buttons and side inputs. TV Side panel controls and connections Introduction INPUT MENU VOL- To scan quickly through channels. Haier LCD HDTV EN-4
User Manual
Page 6
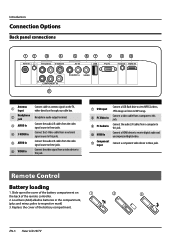
... box. Introduction Connection Options Back panel connections ATN IN R-AUDIO-L S-VIDEO IN AV IN USB PC IN PC AUDIO IN HDMI IN Pr Pb Y COMPONENT IN R-AUDIO -L VIDEO 1 Antenna Input 2 Headphone jack 3 AUDIO In 4 S-VIDEO In 5 AUDIO In 6 VIDEO In Connect cable or antenna signals to respective mark) 3. Connect the audio L/R cables from a computer to this jack. 7 USB input 8 PC Video In 9 PC Audio In 0 HDMI In A Component Input Connect a USB flash drive to view MPEG2 videos, JPEG images or listen to these jacks. Replace the cover of the remote controller. 2. Connect...
... box. Introduction Connection Options Back panel connections ATN IN R-AUDIO-L S-VIDEO IN AV IN USB PC IN PC AUDIO IN HDMI IN Pr Pb Y COMPONENT IN R-AUDIO -L VIDEO 1 Antenna Input 2 Headphone jack 3 AUDIO In 4 S-VIDEO In 5 AUDIO In 6 VIDEO In Connect cable or antenna signals to respective mark) 3. Connect the audio L/R cables from a computer to this jack. 7 USB input 8 PC Video In 9 PC Audio In 0 HDMI In A Component Input Connect a USB flash drive to view MPEG2 videos, JPEG images or listen to these jacks. Replace the cover of the remote controller. 2. Connect...
User Manual
Page 7
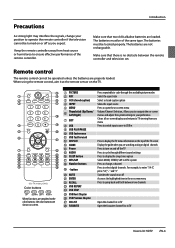
... A USB fast forward B DISPLAY C GUIDE D Power E AUDIO F SLEEP button G MTS/SAP H Number buttons I • button J MUTE K ENTER L RECALL M USB REPEAT N USB STOP O USB Next Chapter P USB Previous Chapter Q CH.LIST R FAVORITE Press repeatedly to cycle through the available picture modes Select the aspect ratio Select a closed caption option Show the input source Press to open the on-screen menu Volume/Channel Selection, Allows you to navigate the on and off the TV Press to cycle through different sound settings Press to display the sleep timer...
... A USB fast forward B DISPLAY C GUIDE D Power E AUDIO F SLEEP button G MTS/SAP H Number buttons I • button J MUTE K ENTER L RECALL M USB REPEAT N USB STOP O USB Next Chapter P USB Previous Chapter Q CH.LIST R FAVORITE Press repeatedly to cycle through the available picture modes Select the aspect ratio Select a closed caption option Show the input source Press to open the on-screen menu Volume/Channel Selection, Allows you to navigate the on and off the TV Press to cycle through different sound settings Press to display the sleep timer...
User Manual
Page 8
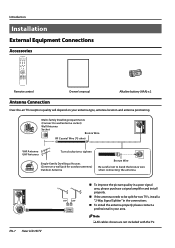
.... ANT IN ANT IN EN-7 Haier LCD HDTV „„ To improve the picture quality in your antenna type, antenna location and antenna positioning. Introduction Installation External Equipment Connections Accessories TV DVD STB CABLE VCR AUD PICTURE AUDIO PC HDMI INPUT MUTE RECALL VOL MENU CH EXIT ENTER SLEEP DISPLAY USB PLAY/PAUSE STOP REC REV PREV NEXT REPEAT MTS/SAP FREEZE CH.LIST GUIDE CCD ARC FAVORITE Remote control Owner's manual Alkaline battery (AAA) x2 Antenna Connection Over-the-air TV reception...
.... ANT IN ANT IN EN-7 Haier LCD HDTV „„ To improve the picture quality in your antenna type, antenna location and antenna positioning. Introduction Installation External Equipment Connections Accessories TV DVD STB CABLE VCR AUD PICTURE AUDIO PC HDMI INPUT MUTE RECALL VOL MENU CH EXIT ENTER SLEEP DISPLAY USB PLAY/PAUSE STOP REC REV PREV NEXT REPEAT MTS/SAP FREEZE CH.LIST GUIDE CCD ARC FAVORITE Remote control Owner's manual Alkaline battery (AAA) x2 Antenna Connection Over-the-air TV reception...
User Manual
Page 9
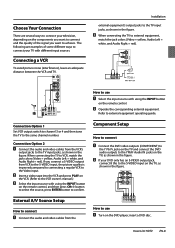
... same channel number. When connecting the TV to external equipment operating guide. AV IN R-AUDIO-L VIDEO Installation external equipment's output jacks to the TV input jacks, as shown in the figure. B Operate the corresponding external equipment. Connection Option 2 A Connect the audio and video cables from the How to use A Select the input source with using the INPUT button on the remote control. B Insert a video tape into the VCR and press PLAY on the VCR. (Refer to the VCR owner's manual.) C Select the input source with using the INPUT button on the remote control...
... same channel number. When connecting the TV to external equipment operating guide. AV IN R-AUDIO-L VIDEO Installation external equipment's output jacks to the TV input jacks, as shown in the figure. B Operate the corresponding external equipment. Connection Option 2 A Connect the audio and video cables from the How to use A Select the input source with using the INPUT button on the remote control. B Insert a video tape into the VCR and press PLAY on the VCR. (Refer to the VCR owner's manual.) C Select the input source with using the INPUT button on the remote control...
User Manual
Page 10
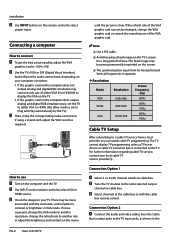
Connecting a computer How to connect A To get the best picture quality, adjust the VGA graphics card to select proper input. If using a sound card, adjust the VGA sound as shown in VGA mode. C Select channels at the cable box or with channel switch on the computer does output analog and digital RGB simultaneously, set to Plug and Play automatically by the TV.) C Then, make the corresponding audio connection. If noise is present, change the VGA mode to display the VGA on the TV. ••...
Connecting a computer How to connect A To get the best picture quality, adjust the VGA graphics card to select proper input. If using a sound card, adjust the VGA sound as shown in VGA mode. C Select channels at the cable box or with channel switch on the computer does output analog and digital RGB simultaneously, set to Plug and Play automatically by the TV.) C Then, make the corresponding audio connection. If noise is present, change the VGA mode to display the VGA on the TV. ••...

User Manual
Page 11
... used for displaying menus and indications. figure.When connecting the TV to standby mode. D Press VOL+/- ATN IN Pr R-AUDIO-L S-VIDEO IN Pb COMPONENT IN Y AV IN R-AUDIO -L VIDEO C Select your desired channel with the TV operation. The TV reverts to a Cable Box, match the jack colors (Video = yellow, Audio Left = white, and Audio Right = red). HDMI input How To Connect Connect the cables from the external equipment's output jacks to work properly. C Press VOL+ /ENTER button and then use CH+/- B Select...
... used for displaying menus and indications. figure.When connecting the TV to standby mode. D Press VOL+/- ATN IN Pr R-AUDIO-L S-VIDEO IN Pb COMPONENT IN Y AV IN R-AUDIO -L VIDEO C Select your desired channel with the TV operation. The TV reverts to a Cable Box, match the jack colors (Video = yellow, Audio Left = white, and Audio Right = red). HDMI input How To Connect Connect the cables from the external equipment's output jacks to work properly. C Press VOL+ /ENTER button and then use CH+/- B Select...
User Manual
Page 12
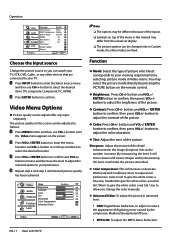
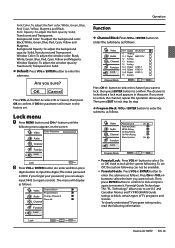
... of picture which best corresponds to adjust the color saturation. Operation Video Audio Channel Function Lock Language OSD Timeout OSD Transparency Screen Mode DPMS Blue Screen DCR Time Setup Closed Caption English Short Middle Normal On On On Default Function CH+/VOL+/- C Press VOL+/ ENTER button to adjust the contrast of the inputs. D Repeat step 2 and step 3 until the Video menu appears on the remote control. YYContrast: Press CH+/- YYColor: Press CH+/- User to your viewing requirements...
... of picture which best corresponds to adjust the color saturation. Operation Video Audio Channel Function Lock Language OSD Timeout OSD Transparency Screen Mode DPMS Blue Screen DCR Time Setup Closed Caption English Short Middle Normal On On On Default Function CH+/VOL+/- C Press VOL+/ ENTER button to adjust the contrast of the inputs. D Repeat step 2 and step 3 until the Video menu appears on the remote control. YYContrast: Press CH+/- YYColor: Press CH+/- User to your viewing requirements...
User Manual
Page 13
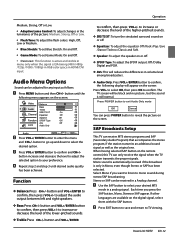
... /720p /1080i /1080p) in RGB color space in HDMI/DVI input. A Use the SAP button to confirm, the following menu appears on or off . Audio Menu Options Sound can be black and no picture , but the sound is still normal. Video Balance 0 Bass 50 Audio Treble 50 SRS TS XT On Channel Equalizer Off Speaker Off Function SPDIF Type Off AVL Off Lock Audio Only Audio ENTER Adjust CH+/VOL+/- D Repeat step 2 and...
... /720p /1080i /1080p) in RGB color space in HDMI/DVI input. A Use the SAP button to confirm, the following menu appears on or off . Audio Menu Options Sound can be black and no picture , but the sound is still normal. Video Balance 0 Bass 50 Audio Treble 50 SRS TS XT On Channel Equalizer Off Speaker Off Function SPDIF Type Off AVL Off Lock Audio Only Audio ENTER Adjust CH+/VOL+/- D Repeat step 2 and...
User Manual
Page 14
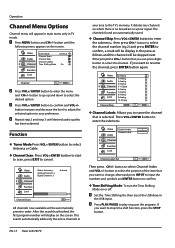
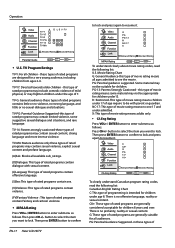
... program number will be display in your preference. This search automatically adds only the active channels in the pane as follows and this channel will display on or off. YY Channel Skip:Press VOL+/ENTER button to select Antenna or Cable. Video Audio Channel Function Lock 2 Analog 3 Analog 4 Analog 5 Analog 5-1 Digital 6 Analog 7 Analog 8 Analog 9 Analog 10 Analog Channel Skip ENTER Set CH+/VOL+/- A Set the Time Shifting On, then insert the USB drive in TV mode. Operation Channel Menu Options Channel menu will appear in main menu...
... program number will be display in your preference. This search automatically adds only the active channels in the pane as follows and this channel will display on or off. YY Channel Skip:Press VOL+/ENTER button to select Antenna or Cable. Video Audio Channel Function Lock 2 Analog 3 Analog 4 Analog 5 Analog 5-1 Digital 6 Analog 7 Analog 8 Analog 9 Analog 10 Analog Channel Skip ENTER Set CH+/VOL+/- A Set the Time Shifting On, then insert the USB drive in TV mode. Operation Channel Menu Options Channel menu will appear in main menu...

User Manual
Page 15
... following menu appears on the TV. Note RR Time Shift function is opacity. RR Time shift only supports FAT32 file-system. Video Audio Channel Function Lock Language OSD Timeout OSD Transparency Screen Mode DPMS Blue Screen DCR Time Setup Closed Caption English Short Middle Normal On On On Default Function CH+/VOL+/- Function YY Language:Press VOL+/- button to select Middle /Short and Long to change the transparency of no signal. button to select...
... following menu appears on the TV. Note RR Time Shift function is opacity. RR Time shift only supports FAT32 file-system. Video Audio Channel Function Lock Language OSD Timeout OSD Transparency Screen Mode DPMS Blue Screen DCR Time Setup Closed Caption English Short Middle Normal On On On Default Function CH+/VOL+/- Function YY Language:Press VOL+/- button to select Middle /Short and Long to change the transparency of no signal. button to select...

User Manual
Page 16
... Closed Caption options. button to set the time. Therefore, closed caption by broadcasters. (This blocks a large portion of the picture on AM and PM. •• Sleep Timer:Press VOL+/- EN-15 Haier LCD HDTV Video Audio Analog Caption Off Digital Closed Caption Off Digital Caption Style Channel Function Lock Closed Caption CH+/- Video Audio Auto Date Time Channel Function Lock Timer On Time Off Time On 2009/01/01 11:54 AM Off 11:54 AM 12:00 AM Date/Time CH+/VOL+/- Text1: For program guide...
... Closed Caption options. button to set the time. Therefore, closed caption by broadcasters. (This blocks a large portion of the picture on AM and PM. •• Sleep Timer:Press VOL+/- EN-15 Haier LCD HDTV Video Audio Analog Caption Off Digital Closed Caption Off Digital Caption Style Channel Function Lock Closed Caption CH+/- Video Audio Auto Date Time Channel Function Lock Timer On Time Off Time On 2009/01/01 11:54 AM Off 11:54 AM 12:00 AM Date/Time CH+/VOL+/- Text1: For program guide...
User Manual
Page 17
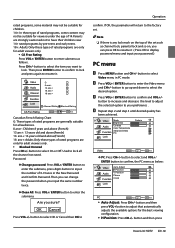
...; Parental Guide: Press VOL+/ ENTER button to input the digits( The initial password is locked and a lock mark appears in the pane. Video Enter Password Audio Channel Function Lock Lock EXIT Back B Press VOL+/ ENTER button ato enter and then press digits button to enter the submenu as follows: Video Audio Channel Channel Block Program Block Change Password Clean All Function Lock Lock ENTER Enter CH+/VOL+/- To set . If OK the parameter will display as follows. Video Audio Channel Function Lock...
...; Parental Guide: Press VOL+/ ENTER button to input the digits( The initial password is locked and a lock mark appears in the pane. Video Enter Password Audio Channel Function Lock Lock EXIT Back B Press VOL+/ ENTER button ato enter and then press digits button to enter the submenu as follows: Video Audio Channel Channel Block Program Block Change Password Clean All Function Lock Lock ENTER Enter CH+/VOL+/- To set . If OK the parameter will display as follows. Video Audio Channel Function Lock...
User Manual
Page 18
... audience, including children from ages 2-6. G: These type of TV-Y7: Directed towards older children - Then press ENTER button to confirm EN-17 Haier LCD HDTV to lock and press again to resume it . Video Audio Channel Function Lock G PG PG-13 R NC-17 X Allowed Rating Blocked Rating MPAA Rating ENTER Set CH+/VOL+/- this type of rated programs contain Fantasy and cartoon violence. •...
... audience, including children from ages 2-6. G: These type of TV-Y7: Directed towards older children - Then press ENTER button to confirm EN-17 Haier LCD HDTV to lock and press again to resume it . Video Audio Channel Function Lock G PG PG-13 R NC-17 X Allowed Rating Blocked Rating MPAA Rating ENTER Set CH+/VOL+/- this type of rated programs contain Fantasy and cartoon violence. •...
User Manual
Page 19
... types of rated programs are generally suitable for all the channel not rated. Password: YYChange password: Press VOL+/ ENTER button to enter the submenu, press digits button to confirm and VOL+/- If OK, the parameter will return to the factory set such as channel lock, parental lock and so on, you input the same number twice. C Press VOL+/ ENTER button to input the number of 0-9 twice in PC mode. Select EXIT...
... types of rated programs are generally suitable for all the channel not rated. Password: YYChange password: Press VOL+/ ENTER button to enter the submenu, press digits button to confirm and VOL+/- If OK, the parameter will return to the factory set such as channel lock, parental lock and so on, you input the same number twice. C Press VOL+/ ENTER button to input the number of 0-9 twice in PC mode. Select EXIT...
User Manual
Page 20
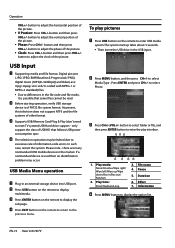
.... button to select folder or file, and then press ENTER button to reset TV system),USB Hard-drive support - B Press USB button on the remote to display multimedia. To play interface. 1. C Supports USB/Memory Card Plug & Play (don't need to enter the play pictures A Press USB button on the remote to return to excessive rate of USB HD that some files cannot be halted due to the previous menu. button and then press VOL+/- USB Input A Supporting media and file format: Digital pictures...
.... button to select folder or file, and then press ENTER button to reset TV system),USB Hard-drive support - B Press USB button on the remote to display multimedia. To play interface. 1. C Supports USB/Memory Card Plug & Play (don't need to enter the play pictures A Press USB button on the remote to return to excessive rate of USB HD that some files cannot be halted due to the previous menu. button and then press VOL+/- USB Input A Supporting media and file format: Digital pictures...
User Manual
Page 22
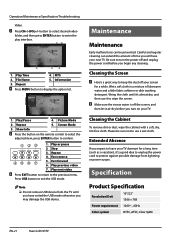
.... Picture Mode 2. Play or pause 2 Stop 3. Please be prevented. Operation/Maintenance/Specification/Troubleshooting Video. Screen Mode 3. B Make sure the excess water is off and unplug the power cord before you begin any cleaning. Careful and regular cleaning can be sure not to confirm. 1 23 PLAY/PAUSE STOP REPEAT REV PREV NEXT 1. Be sure to turn on the remote control to select the adjusted item, press ENTER button to use...
.... Picture Mode 2. Play or pause 2 Stop 3. Please be prevented. Operation/Maintenance/Specification/Troubleshooting Video. Screen Mode 3. B Make sure the excess water is off and unplug the power cord before you begin any cleaning. Careful and regular cleaning can be sure not to confirm. 1 23 PLAY/PAUSE STOP REPEAT REV PREV NEXT 1. Be sure to turn on the remote control to select the adjusted item, press ENTER button to use...
User Manual
Page 23
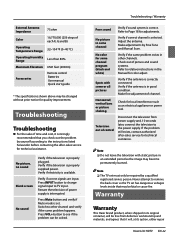
... color for some or all pictures Verify if the antenna is selected. Make fine adjustment of channel. Verify if electricity is properly plugged. Press INPUT button to change signal input to see if the problem can be solved. Note RR Do not leave the television with some channel program (black and white) Verify if the same problem exists in the Manual for adjustments. No picture, no sound Blank screen No sound Verify if the television...
... color for some or all pictures Verify if the antenna is selected. Make fine adjustment of channel. Verify if electricity is properly plugged. Press INPUT button to change signal input to see if the problem can be solved. Note RR Do not leave the television with some channel program (black and white) Verify if the same problem exists in the Manual for adjustments. No picture, no sound Blank screen No sound Verify if the television...


