
User Manual
Page 9
...8226; The product has been dropped or damaged. • There are provided for the moisture to prevent damaging the device or distorting the touch screen display. Slots and openings are noticeable signs of overheating. • The product does not operate normally when you move your device ...after a dramatic change in temperature When you follow the operating instructions. • Avoid hot areas The product should be blocked or covered. 9 General Precautions • Avoid applying excessive pressure to the device Do not put heavy objects or apply excessive pressure on the ...
...8226; The product has been dropped or damaged. • There are provided for the moisture to prevent damaging the device or distorting the touch screen display. Slots and openings are noticeable signs of overheating. • The product does not operate normally when you move your device ...after a dramatic change in temperature When you follow the operating instructions. • Avoid hot areas The product should be blocked or covered. 9 General Precautions • Avoid applying excessive pressure to the device Do not put heavy objects or apply excessive pressure on the ...

User Manual
Page 18
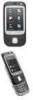
... button. You can also connect the supplied USB stereo headset for hands-free conversation or for details. Bottom panel RESET Open the rubber cover to soft-reset your device. Speaker Self-portrait Mirror Use it when taking self-portrait shots. Sync Connector/Earphone Jack/AC adapter connector... Open the rubber cover to connect the supplied USB cable to synchronize information or plug in the AC adapter to install the SIM card and battery. Back Cover Remove to recharge the battery.
... button. You can also connect the supplied USB stereo headset for hands-free conversation or for details. Bottom panel RESET Open the rubber cover to soft-reset your device. Speaker Self-portrait Mirror Use it when taking self-portrait shots. Sync Connector/Earphone Jack/AC adapter connector... Open the rubber cover to connect the supplied USB cable to synchronize information or plug in the AC adapter to install the SIM card and battery. Back Cover Remove to recharge the battery.

User Manual
Page 21
... as shown in the following illustration. Hold open from both ends. 2. Close the slot cover. Use your device is turned off. 2. Make sure your thumb or finger to pry open the slot cover easier, pry it out of the slot. 4. Insert the USIM/SIM card with one hand. 3. To install the... USIM/SIM card 1. Getting Started 21 To remove the back cover Before installing the USIM/SIM card or battery, you have to pop it open the slot cover with its gold contacts facing down and its cut-off corner facing toward the inside of the...
... as shown in the following illustration. Hold open from both ends. 2. Close the slot cover. Use your device is turned off. 2. Make sure your thumb or finger to pry open the slot cover easier, pry it out of the slot. 4. Insert the USIM/SIM card with one hand. 3. To install the... USIM/SIM card 1. Getting Started 21 To remove the back cover Before installing the USIM/SIM card or battery, you have to pop it open the slot cover with its gold contacts facing down and its cut-off corner facing toward the inside of the...

User Manual
Page 22
... the battery first, then gently push the battery into place. To remove the battery 1. Pry open the rubber cover at the bottom-left side of the battery compartment. Close the rubber cover. To remove the battery, lift it up . 3. Insert the microSD card with the protruding copper conductor on... the lower-left side of the device. 2. Remove the back cover. 3. 22 Getting Started To install the battery Install the battery by inserting it with its exposed copper part aligned with the gold contacts facing up...
... the battery first, then gently push the battery into place. To remove the battery 1. Pry open the rubber cover at the bottom-left side of the battery compartment. Close the rubber cover. To remove the battery, lift it up . 3. Insert the microSD card with the protruding copper conductor on... the lower-left side of the device. 2. Remove the back cover. 3. 22 Getting Started To install the battery Install the battery by inserting it with its exposed copper part aligned with the gold contacts facing up...

User Manual
Page 196
A soft (or normal) reset of some programs. If a soft reset is not performing properly. To perform a soft reset Open the rubber cover at the bottom of that program, then tap Remove. Your device restarts and displays the Today screen. On the Task Manager screen, tap the Advanced ...
A soft (or normal) reset of some programs. If a soft reset is not performing properly. To perform a soft reset Open the rubber cover at the bottom of that program, then tap Remove. Your device restarts and displays the Today screen. On the Task Manager screen, tap the Advanced ...
Read Me First
Page 2
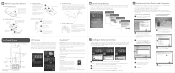
...instructions to power on the Today screen. Navigation Control / ENTER End Camera button HTC Home HTC Home™ is not fully charged out of the battery compartment. TouchFLO™ TouchFLO™ gives you better touch panel experience on the go. 1 When you to another, slide your finger... the bottom part of your computer. Finger scrolling While on the outside 2 Pull back the red 1 rubber cover. 3 Close the red rubber door. Opening the Touch Cube Configure Data Connections When you automatically set the date, time, and a device password. Note If your SIM card ...
...instructions to power on the Today screen. Navigation Control / ENTER End Camera button HTC Home HTC Home™ is not fully charged out of the battery compartment. TouchFLO™ TouchFLO™ gives you better touch panel experience on the go. 1 When you to another, slide your finger... the bottom part of your computer. Finger scrolling While on the outside 2 Pull back the red 1 rubber cover. 3 Close the red rubber door. Opening the Touch Cube Configure Data Connections When you automatically set the date, time, and a device password. Note If your SIM card ...


