Instruction Manual
Page 1
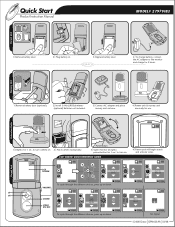
...nursery unit on . 2 Place camera facing baby. Quick Start Product Instruction Manual R R MODEL# 2797VIB3 R Parent Unit Nursery Unit Activating Units 1 Remove battery door. 2 Plug battery in. 3 Replace battery door. 4 To charge battery, connect the AC adapter to the monitor and charge for 1 sec. LCD SCREEN 12 Hour(...Vibe on . O R pen R 1 Depress for 3 hours. LCD SCREEN: QUICK REFERENCE GUIDE R 4 Parent unit will begin search and activate video. to turn camera on base. 4 Parent unit & nursery unit are ready for 1 sec. to turn on Vibe off 9:22pm 9:22pm No Signal &#...
...nursery unit on . 2 Place camera facing baby. Quick Start Product Instruction Manual R R MODEL# 2797VIB3 R Parent Unit Nursery Unit Activating Units 1 Remove battery door. 2 Plug battery in. 3 Replace battery door. 4 To charge battery, connect the AC adapter to the monitor and charge for 1 sec. LCD SCREEN 12 Hour(...Vibe on . O R pen R 1 Depress for 3 hours. LCD SCREEN: QUICK REFERENCE GUIDE R 4 Parent unit will begin search and activate video. to turn camera on base. 4 Parent unit & nursery unit are ready for 1 sec. to turn on Vibe off 9:22pm 9:22pm No Signal &#...
Instruction Manual
Page 8
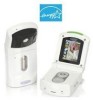
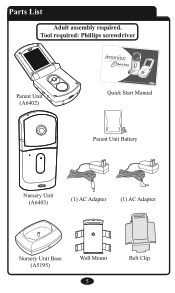
Quick Start Manual Parent Unit Battery R Nursery Unit (A6403) (1) AC Adapter (1) AC Adapter Nursery Unit Base (A5195) Wall Mount 5 Belt Clip Tool required: Phillips screwdriver R Digital Color Video Baby Monitor Quick Start Product Instruction Manual Parent Unit (A6402) OWNER'S MANUAL Keep instructions for future use. Parts List Adult assembly required.
Quick Start Manual Parent Unit Battery R Nursery Unit (A6403) (1) AC Adapter (1) AC Adapter Nursery Unit Base (A5195) Wall Mount 5 Belt Clip Tool required: Phillips screwdriver R Digital Color Video Baby Monitor Quick Start Product Instruction Manual Parent Unit (A6402) OWNER'S MANUAL Keep instructions for future use. Parts List Adult assembly required.
Instruction Manual
Page 9
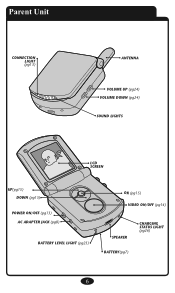
Parent Unit CONNECTION LIGHT (pg13) ANTENNA VOLUME UP (pg24) VOLUME DOWN (pg24) SOUND LIGHTS LCD SCREEN UP(pg15) DOWN (pg15) POWER ON/OFF (pg13) AC ADAPTER JACK (pg8) BATTERY LEVEL LIGHT (pg25) OK (pg15) VIDEO ON/OFF (pg14) SPEAKER CHARGING STATUS LIGHT (pg26) BATTERY(pg7) 6
Parent Unit CONNECTION LIGHT (pg13) ANTENNA VOLUME UP (pg24) VOLUME DOWN (pg24) SOUND LIGHTS LCD SCREEN UP(pg15) DOWN (pg15) POWER ON/OFF (pg13) AC ADAPTER JACK (pg8) BATTERY LEVEL LIGHT (pg25) OK (pg15) VIDEO ON/OFF (pg14) SPEAKER CHARGING STATUS LIGHT (pg26) BATTERY(pg7) 6

Instruction Manual
Page 10
Installing Batteries 1 The battery must be plugged into the slot. 7 Remove the battery door cover on the Parent Unit by sliding it down. 2 Plug battery into the slot shown in #2. 3 Place battery pack into recess and press wire into the Parent Unit before the unit will be ready for use.
Installing Batteries 1 The battery must be plugged into the slot. 7 Remove the battery door cover on the Parent Unit by sliding it down. 2 Plug battery into the slot shown in #2. 3 Place battery pack into recess and press wire into the Parent Unit before the unit will be ready for use.
Instruction Manual
Page 11
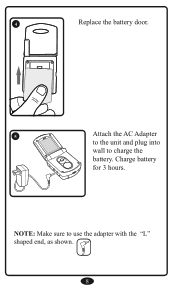
4 Replace the battery door. 5 R Attach the AC Adapter to the unit and plug into wall to use the adapter with the "L" shaped end, as shown. 8 R NOTE: Make sure to charge the battery. Charge battery for 3 hours.
4 Replace the battery door. 5 R Attach the AC Adapter to the unit and plug into wall to use the adapter with the "L" shaped end, as shown. 8 R NOTE: Make sure to charge the battery. Charge battery for 3 hours.
Instruction Manual
Page 13
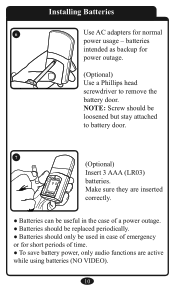
... are inserted correctly. ● Batteries can be useful in the case of a power outage. ● Batteries should be replaced periodically. ● Batteries should be used in case of emergency or for short periods of time. ● To save battery power, only audio functions are active while using batteries (NO VIDEO). 10 batteries intended as backup for normal...
... are inserted correctly. ● Batteries can be useful in the case of a power outage. ● Batteries should be replaced periodically. ● Batteries should be used in case of emergency or for short periods of time. ● To save battery power, only audio functions are active while using batteries (NO VIDEO). 10 batteries intended as backup for normal...
Instruction Manual
Page 28
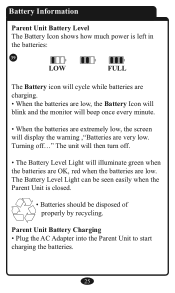
... green when the batteries are OK, red when the batteries are very low. The Battery Level Light can be seen easily when the Parent Unit is left in the batteries: 39 LOW FULL The Battery icon will cycle while batteries are charging. • When the batteries are low, the Battery Icon will blink... and the monitor will beep once every minute. • When the batteries are extremely low, the screen will display...
... green when the batteries are OK, red when the batteries are very low. The Battery Level Light can be seen easily when the Parent Unit is left in the batteries: 39 LOW FULL The Battery icon will cycle while batteries are charging. • When the batteries are low, the Battery Icon will blink... and the monitor will beep once every minute. • When the batteries are extremely low, the screen will display...
Instruction Manual
Page 29
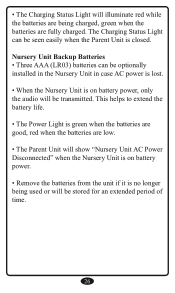
...Light can be optionally installed in the Nursery Unit in case AC power is lost. • When the Nursery Unit is on battery power. • Remove the batteries from the unit if it is no longer being used or will be seen easily when the Parent Unit is closed. Nursery ...Unit Backup Batteries • Three AAA (LR03) batteries can be transmitted. • The Charging Status Light will illuminate red while the batteries are being charged, green when the batteries are low. • The Parent Unit will show "Nursery Unit AC Power...
...Light can be optionally installed in the Nursery Unit in case AC power is lost. • When the Nursery Unit is on battery power. • Remove the batteries from the unit if it is no longer being used or will be seen easily when the Parent Unit is closed. Nursery ...Unit Backup Batteries • Three AAA (LR03) batteries can be transmitted. • The Charging Status Light will illuminate red while the batteries are being charged, green when the batteries are low. • The Parent Unit will show "Nursery Unit AC Power...
Instruction Manual
Page 31
... AC Adapter not properly connected - First, check that: • Power is turned ON for both units • Both units are plugged in (or batteries are fresh in Nursery Unit and fully charged in Parent Unit) • Electrical outlet works • Volume is turned up on Parent Unit • ...Parent Unit is in range of the Nursery Unit Parent Unit Only Works With AC Adapter • Check that the battery is properly installed and plugged into connector. remove the obstruction. • Press the Video Button to view the video. 28 No Sound or No Video • Batteries dead or weak -
... AC Adapter not properly connected - First, check that: • Power is turned ON for both units • Both units are plugged in (or batteries are fresh in Nursery Unit and fully charged in Parent Unit) • Electrical outlet works • Volume is turned up on Parent Unit • ...Parent Unit is in range of the Nursery Unit Parent Unit Only Works With AC Adapter • Check that the battery is properly installed and plugged into connector. remove the obstruction. • Press the Video Button to view the video. 28 No Sound or No Video • Batteries dead or weak -


