Instruction Manual
Page 1
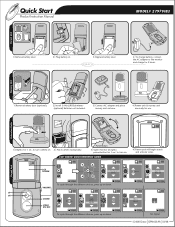
... Product Instruction Manual R R MODEL# 2797VIB3 R Parent Unit Nursery Unit Activating Units 1 Remove battery door. 2 Plug battery in. 3 Replace battery door. 4 To charge battery, connect the AC adapter to the monitor and charge for 1 sec. R R R 1 Remove battery door (optional). 2 Install 3 AAA (LR03) batteries (optional) Batteries not included. 3 Connect AC adapter and place nursery unit on . Power Button 3 Open monitor and press power button for use. to turn camera on Vibe off 9:22pm 9:22pm No Signal ©2008 Graco ISPM023AA 03/08 Parent Unit...
... Product Instruction Manual R R MODEL# 2797VIB3 R Parent Unit Nursery Unit Activating Units 1 Remove battery door. 2 Plug battery in. 3 Replace battery door. 4 To charge battery, connect the AC adapter to the monitor and charge for 1 sec. R R R 1 Remove battery door (optional). 2 Install 3 AAA (LR03) batteries (optional) Batteries not included. 3 Connect AC adapter and place nursery unit on . Power Button 3 Open monitor and press power button for use. to turn camera on Vibe off 9:22pm 9:22pm No Signal ©2008 Graco ISPM023AA 03/08 Parent Unit...

Instruction Manual
Page 4
R R OWNER'S MANUAL Keep Instructions For Future Reference ©2008 Graco ISPM024BA 3/08
R R OWNER'S MANUAL Keep Instructions For Future Reference ©2008 Graco ISPM024BA 3/08

Instruction Manual
Page 5
...any location which would muffle the sound or interfere with 110-120 volt AC electrical outlets. • Protect the AC adapter cords. This device is not designed or intended for use with a dry cloth. 2 Do not put the Nursery Unit inside a crib or playard. ...cords. • DO NOT place the Nursery Unit or its cord within range of each other. • STRANGULATION HAZARD. Do not use as a blanket. Do not cover the Nursery Unit or Parent Units with any part of the Nursery Unit, Parent Units, or docking station in water. Warnings to Parents and Other Users Failure to aid in the monitoring...
...any location which would muffle the sound or interfere with 110-120 volt AC electrical outlets. • Protect the AC adapter cords. This device is not designed or intended for use with a dry cloth. 2 Do not put the Nursery Unit inside a crib or playard. ...cords. • DO NOT place the Nursery Unit or its cord within range of each other. • STRANGULATION HAZARD. Do not use as a blanket. Do not cover the Nursery Unit or Parent Units with any part of the Nursery Unit, Parent Units, or docking station in water. Warnings to Parents and Other Users Failure to aid in the monitoring...
Instruction Manual
Page 6
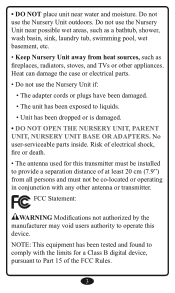
..., wet basement, etc. • Keep Nursery Unit away from all persons and must be installed to liquids. • Unit has been dropped or is damaged. • DO NOT OPEN THE NURSERY UNIT, PARENT UNIT, NURSERY UNIT BASE OR ADAPTERS. No user-serviceable parts inside. Do not use the Nursery Unit if: • The adapter cords or plugs have been damaged. • The unit has been exposed to provide a separation...
..., wet basement, etc. • Keep Nursery Unit away from all persons and must be installed to liquids. • Unit has been dropped or is damaged. • DO NOT OPEN THE NURSERY UNIT, PARENT UNIT, NURSERY UNIT BASE OR ADAPTERS. No user-serviceable parts inside. Do not use the Nursery Unit if: • The adapter cords or plugs have been damaged. • The unit has been exposed to provide a separation...

Instruction Manual
Page 7
...from that may cause undesired operation. 4 This device complies with the instructions, may not cause harmful interference, and (2) This device must accept ... can radiate radio frequency energy and, if not installed and used in accordance with part 15 of the following two conditions: (1) This ...device may cause harmful interference to the following measures: • Reorient or relocate the receiving antenna. • Increase the separation between the equipment and receiver. • Connect the equipment into an outlet on , the user...
...from that may cause undesired operation. 4 This device complies with the instructions, may not cause harmful interference, and (2) This device must accept ... can radiate radio frequency energy and, if not installed and used in accordance with part 15 of the following two conditions: (1) This ...device may cause harmful interference to the following measures: • Reorient or relocate the receiving antenna. • Increase the separation between the equipment and receiver. • Connect the equipment into an outlet on , the user...
Instruction Manual
Page 8
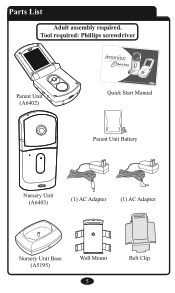
Tool required: Phillips screwdriver R Digital Color Video Baby Monitor Quick Start Product Instruction Manual Parent Unit (A6402) OWNER'S MANUAL Keep instructions for future use. Quick Start Manual Parent Unit Battery R Nursery Unit (A6403) (1) AC Adapter (1) AC Adapter Nursery Unit Base (A5195) Wall Mount 5 Belt Clip Parts List Adult assembly required.
Tool required: Phillips screwdriver R Digital Color Video Baby Monitor Quick Start Product Instruction Manual Parent Unit (A6402) OWNER'S MANUAL Keep instructions for future use. Quick Start Manual Parent Unit Battery R Nursery Unit (A6403) (1) AC Adapter (1) AC Adapter Nursery Unit Base (A5195) Wall Mount 5 Belt Clip Parts List Adult assembly required.
Instruction Manual
Page 9
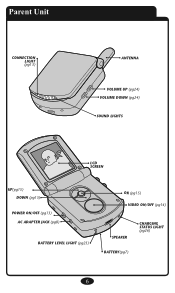
Parent Unit CONNECTION LIGHT (pg13) ANTENNA VOLUME UP (pg24) VOLUME DOWN (pg24) SOUND LIGHTS LCD SCREEN UP(pg15) DOWN (pg15) POWER ON/OFF (pg13) AC ADAPTER JACK (pg8) BATTERY LEVEL LIGHT (pg25) OK (pg15) VIDEO ON/OFF (pg14) SPEAKER CHARGING STATUS LIGHT (pg26) BATTERY(pg7) 6
Parent Unit CONNECTION LIGHT (pg13) ANTENNA VOLUME UP (pg24) VOLUME DOWN (pg24) SOUND LIGHTS LCD SCREEN UP(pg15) DOWN (pg15) POWER ON/OFF (pg13) AC ADAPTER JACK (pg8) BATTERY LEVEL LIGHT (pg25) OK (pg15) VIDEO ON/OFF (pg14) SPEAKER CHARGING STATUS LIGHT (pg26) BATTERY(pg7) 6
Instruction Manual
Page 11
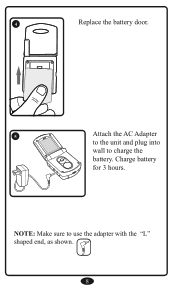
Charge battery for 3 hours. R NOTE: Make sure to charge the battery. 4 Replace the battery door. 5 R Attach the AC Adapter to the unit and plug into wall to use the adapter with the "L" shaped end, as shown. 8
Charge battery for 3 hours. R NOTE: Make sure to charge the battery. 4 Replace the battery door. 5 R Attach the AC Adapter to the unit and plug into wall to use the adapter with the "L" shaped end, as shown. 8
Instruction Manual
Page 13
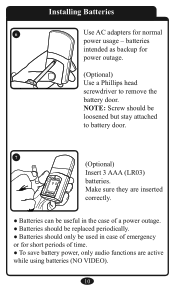
... head screwdriver to battery door. 7 (Optional) Insert 3 AAA (LR03) batteries. Make sure they are active while using batteries (NO VIDEO). 10 Installing Batteries 6 Use AC adapters for short periods of time. ● To save battery power, only audio functions are inserted correctly. ● Batteries can be useful in the case of a power outage. ● Batteries should be replaced periodically. ● Batteries should be used...
... head screwdriver to battery door. 7 (Optional) Insert 3 AAA (LR03) batteries. Make sure they are active while using batteries (NO VIDEO). 10 Installing Batteries 6 Use AC adapters for short periods of time. ● To save battery power, only audio functions are inserted correctly. ● Batteries can be useful in the case of a power outage. ● Batteries should be replaced periodically. ● Batteries should be used...

Instruction Manual
Page 16
Parent Unit Power On/Off 12 R Press and hold Power On/Off button for the Nursery Unit. Unit will turn 9:22pm from red to green. 13 Connection Light 13 R Make sure Nursery Unit is turned on. The Connection Light at the top of the unit, will cycle through intro and begin searching for 1 second. The live video feed will then be shown.
Parent Unit Power On/Off 12 R Press and hold Power On/Off button for the Nursery Unit. Unit will turn 9:22pm from red to green. 13 Connection Light 13 R Make sure Nursery Unit is turned on. The Connection Light at the top of the unit, will cycle through intro and begin searching for 1 second. The live video feed will then be shown.

Instruction Manual
Page 17
14 R Press and hold Power On/Off button for 1 second to view the image from the Nursery Unit. 14 Pressing the Video button will allow the user to turn unit off. 15 R To activate or deactivate the live video feed, press the Video button.
14 R Press and hold Power On/Off button for 1 second to view the image from the Nursery Unit. 14 Pressing the Video button will allow the user to turn unit off. 15 R To activate or deactivate the live video feed, press the Video button.
Instruction Manual
Page 18
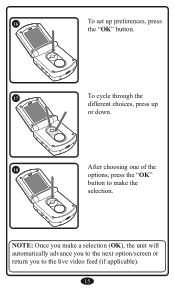
NOTE: Once you make a selection (OK), the unit will automatically advance you to the next option/screen or return you to make the selection. 16 R To set up preferences, press the "OK" button. 17 R To cycle through the different choices, press up or down. 18 R After choosing one of the options, press the "OK" button to the live video feed (if applicable). 15
NOTE: Once you make a selection (OK), the unit will automatically advance you to the next option/screen or return you to make the selection. 16 R To set up preferences, press the "OK" button. 17 R To cycle through the different choices, press up or down. 18 R After choosing one of the options, press the "OK" button to the live video feed (if applicable). 15
Instruction Manual
Page 19
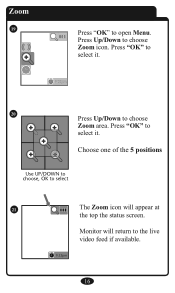
Press "OK" to open Menu. Zoom 19 Press "OK" to select it . 9:22pm Use UP/DOWN to choose, OK to select 20 Press Up/Down to select 21 The Zoom icon will return to choose Zoom icon. Choose one of the 5 positions 9:22pm Use UP/DOWN to choose, OK to choose Zoom area. Press "OK" to select it . Monitor will appear at the top the status screen. Press Up/Down to the live video feed if available. 9:22pm 16
Press "OK" to open Menu. Zoom 19 Press "OK" to select it . 9:22pm Use UP/DOWN to choose, OK to select 20 Press Up/Down to select 21 The Zoom icon will return to choose Zoom icon. Choose one of the 5 positions 9:22pm Use UP/DOWN to choose, OK to choose Zoom area. Press "OK" to select it . Monitor will appear at the top the status screen. Press Up/Down to the live video feed if available. 9:22pm 16

Instruction Manual
Page 20
Zoom Out 22 Press OK to choose Zoom out icon. Press OK to select it. 9:22pm Use UP/DOWN to choose, OK to live video screen if available. Zoom icon will return to select 23 Monitor will not be visible on the status screen. 9:22pm 17 Press Up/Down to open Menu.
Zoom Out 22 Press OK to choose Zoom out icon. Press OK to select it. 9:22pm Use UP/DOWN to choose, OK to live video screen if available. Zoom icon will return to select 23 Monitor will not be visible on the status screen. 9:22pm 17 Press Up/Down to open Menu.

Instruction Manual
Page 23
NOTE: Alarm will chime every day at the pre-selected time until user stops it. 20 or if unit if powered off every 2 seconds for 10 minutes, or until Alarm is deactivated, new time is not visible, it . When Alarm sounds, press any button. 30 31 R Alarm Clock icon will sound off . NOTE: If Alarm Clock icon is selected. Alarm will appear on the bottom of the screen, next to deactivate it has not been activated. 9:22pm To silence Alarm, press any button to the time.
NOTE: Alarm will chime every day at the pre-selected time until user stops it. 20 or if unit if powered off every 2 seconds for 10 minutes, or until Alarm is deactivated, new time is not visible, it . When Alarm sounds, press any button. 30 31 R Alarm Clock icon will sound off . NOTE: If Alarm Clock icon is selected. Alarm will appear on the bottom of the screen, next to deactivate it has not been activated. 9:22pm To silence Alarm, press any button to the time.
Instruction Manual
Page 28
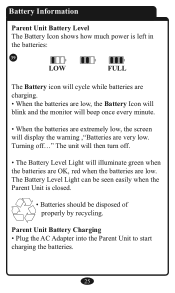
... Battery Level Light can be seen easily when the Parent Unit is left in the batteries: 39 LOW FULL The Battery icon will cycle while batteries are charging. • When the batteries are low, the Battery Icon will blink and the monitor will beep once every minute. • When the batteries are extremely low, the screen will illuminate green when the batteries are OK, red...
... Battery Level Light can be seen easily when the Parent Unit is left in the batteries: 39 LOW FULL The Battery icon will cycle while batteries are charging. • When the batteries are low, the Battery Icon will blink and the monitor will beep once every minute. • When the batteries are extremely low, the screen will illuminate green when the batteries are OK, red...
Instruction Manual
Page 29
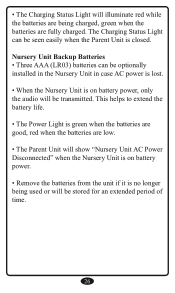
Nursery Unit Backup Batteries • Three AAA (LR03) batteries can be seen easily when the Parent Unit is closed. This helps to extend the battery life. • The Power Light is green when the batteries are good, red when the batteries are fully charged. The Charging Status Light can be optionally installed in the Nursery Unit in case AC power is lost. • When the Nursery Unit is on battery power. • Remove the...
Nursery Unit Backup Batteries • Three AAA (LR03) batteries can be seen easily when the Parent Unit is closed. This helps to extend the battery life. • The Power Light is green when the batteries are good, red when the batteries are fully charged. The Charging Status Light can be optionally installed in the Nursery Unit in case AC power is lost. • When the Nursery Unit is on battery power. • Remove the...
Instruction Manual
Page 31
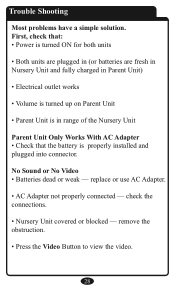
.... replace or use AC Adapter. • AC Adapter not properly connected - No Sound or No Video • Batteries dead or weak - First, check that: • Power is turned ON for both units • Both units are plugged in (or batteries are fresh in Nursery Unit and fully charged in Parent Unit) • Electrical outlet works • Volume is turned up on Parent Unit • Parent Unit is in range of...
.... replace or use AC Adapter. • AC Adapter not properly connected - No Sound or No Video • Batteries dead or weak - First, check that: • Power is turned ON for both units • Both units are plugged in (or batteries are fresh in Nursery Unit and fully charged in Parent Unit) • Electrical outlet works • Volume is turned up on Parent Unit • Parent Unit is in range of...
Instruction Manual
Page 32
.... • Parent Unit too far from Nursery Unit - eliminate cause of static (TVs, mixers, computers, fans, fluorescent lights, light dimmers, etc.) • Significant amount of the room. try repositioning Nursery Unit. • Volume setting too low - turn it up. • Interference from baby - Shrill Sound (Feedback) • Nursery Unit and Parent Unit too close together- Try moving the Nursery Unit to another part of obstructions between Parent Unit and Nursery Unit such...
.... • Parent Unit too far from Nursery Unit - eliminate cause of static (TVs, mixers, computers, fans, fluorescent lights, light dimmers, etc.) • Significant amount of the room. try repositioning Nursery Unit. • Volume setting too low - turn it up. • Interference from baby - Shrill Sound (Feedback) • Nursery Unit and Parent Unit too close together- Try moving the Nursery Unit to another part of obstructions between Parent Unit and Nursery Unit such...
Instruction Manual
Page 34
Turn on . • Within a few seconds, the Parent Unit will display "Looking for a Nursery Unit to pair with the Nursery Unit • If the Parent Unit is still a problem, repeat steps 1 and 2. 31 The green power light should come on your Nursery Unit now." • Place the Nursery Unit in the same room, as the Parent Unit. • Turn the Nursery Unit Off then On again using the On/Off...
Turn on . • Within a few seconds, the Parent Unit will display "Looking for a Nursery Unit to pair with the Nursery Unit • If the Parent Unit is still a problem, repeat steps 1 and 2. 31 The green power light should come on your Nursery Unit now." • Place the Nursery Unit in the same room, as the Parent Unit. • Turn the Nursery Unit Off then On again using the On/Off...


