
Manual
Page 2
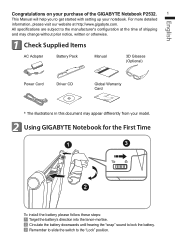
For more detailed information, please visit our website at the time of the GIGABYTE Notebook P2532. 1 This Manual will help you to the "Lock" position. English Congratulations on your purchase of shipping and may change without prior notice, written or...Battery Pack Manual 3D Glasses (Optional) Power Cord Driver CD Global Warranty Card * The illustrations in this document may appear differently from your model. 2 Using GIGABYTE Notebook for the First Time 1 3 2 To install the battery please follow these steps: 1 Target the battery's direction into the tenon-mortise. 2 Circulate...
For more detailed information, please visit our website at the time of the GIGABYTE Notebook P2532. 1 This Manual will help you to the "Lock" position. English Congratulations on your purchase of shipping and may change without prior notice, written or...Battery Pack Manual 3D Glasses (Optional) Power Cord Driver CD Global Warranty Card * The illustrations in this document may appear differently from your model. 2 Using GIGABYTE Notebook for the First Time 1 3 2 To install the battery please follow these steps: 1 Target the battery's direction into the tenon-mortise. 2 Circulate...
Manual
Page 3
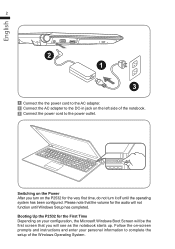
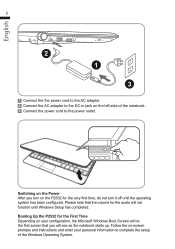
... instructions and enter your configuration, the Microsoft Windows Boot Screen will be the first screen that the volume for the First Time Depending on the P2532 for the very first time, do not turn on your personal information to complete the setup of the notebook. 3 Connect the power cord to the... system has been configured. English 2 2 1 3 1 Connect the the power cord to the AC adapter. 2 Connect the AC adapter to the power outlet. Booting Up the P2532 for the audio will see as the notebook starts up. Please note that you turn it off until Windows Setup has completed.
... instructions and enter your configuration, the Microsoft Windows Boot Screen will be the first screen that the volume for the First Time Depending on the P2532 for the very first time, do not turn on your personal information to complete the setup of the notebook. 3 Connect the power cord to the... system has been configured. English 2 2 1 3 1 Connect the the power cord to the AC adapter. 2 Connect the AC adapter to the power outlet. Booting Up the P2532 for the audio will see as the notebook starts up. Please note that you turn it off until Windows Setup has completed.
Manual
Page 6
... of charge remaining. After connecting the charged glasses. (Light is amber when charging) Keyboard The P2532 features a Windows Compatible Keyboard. The number of the keyboard will also vary by language and region. (English P2532 QWERTY Keyboard Layout) The set language of keys on the keyboard will depend on the region. English...
... of charge remaining. After connecting the charged glasses. (Light is amber when charging) Keyboard The P2532 features a Windows Compatible Keyboard. The number of the keyboard will also vary by language and region. (English P2532 QWERTY Keyboard Layout) The set language of keys on the keyboard will depend on the region. English...
Manual
Page 2
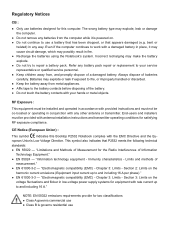
...a damaged battery. Chapter 3: Limits - Section 3: Limits on . ● Do not continue to use a battery that has been dropped, or that P2532 meets the following technical standards: ● EN 55022 - bent or twisted) in conjunction with any batteries from metal appliances. ● Affix tape to repair...with rate current up to your hands or metal objects. Regulatory Notices CB : ● Only use batteries designed for this Booktop P2532 Notebook complies with the EMC Directive and the European Union's Low Voltage Directive. Section 2: Limits on the harmonic current emissions (Equipment...
...a damaged battery. Chapter 3: Limits - Section 3: Limits on . ● Do not continue to use a battery that has been dropped, or that P2532 meets the following technical standards: ● EN 55022 - bent or twisted) in conjunction with any batteries from metal appliances. ● Affix tape to repair...with rate current up to your hands or metal objects. Regulatory Notices CB : ● Only use batteries designed for this Booktop P2532 Notebook complies with the EMC Directive and the European Union's Low Voltage Directive. Section 2: Limits on the harmonic current emissions (Equipment...

Manual
Page 6
... Pack Manaual 3D Glasses (Optional) Power Cord Driver CD Global Warranty Card * The illustrations in this document may appear different from your model. 2 Using GIGABYTE Notebook for the First Time 1 3 2 To install the battery please follow these steps: 1 Target the battery's direction into the tenon-mortise. 2... get started with setting up your notebook. For more detailed information, please visit our website at the time of the GIGABYTE Notebook P2532. 1 This Manual will help you to the "Lock" position. All specifications are subject to the manufacturer's configuration at www...
... Pack Manaual 3D Glasses (Optional) Power Cord Driver CD Global Warranty Card * The illustrations in this document may appear different from your model. 2 Using GIGABYTE Notebook for the First Time 1 3 2 To install the battery please follow these steps: 1 Target the battery's direction into the tenon-mortise. 2... get started with setting up your notebook. For more detailed information, please visit our website at the time of the GIGABYTE Notebook P2532. 1 This Manual will help you to the "Lock" position. All specifications are subject to the manufacturer's configuration at www...
Manual
Page 7
Booting Up the P2532 for the First Time Depending on -screen prompts and instructions and enter your configuration, the Microsoft Windows Boot Screen will be the first screen that ... completed. Follow the on your personal information to complete the setup of the notebook. 3 Connect the power cord to the DC-in jack on the P2532 for the audio will see as the notebook starts up. Please note that you turn on the left side of the Windows Operating System. Switching...
Booting Up the P2532 for the First Time Depending on -screen prompts and instructions and enter your configuration, the Microsoft Windows Boot Screen will be the first screen that ... completed. Follow the on your personal information to complete the setup of the notebook. 3 Connect the power cord to the DC-in jack on the P2532 for the audio will see as the notebook starts up. Please note that you turn on the left side of the Windows Operating System. Switching...
Manual
Page 10
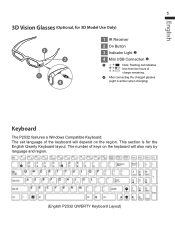
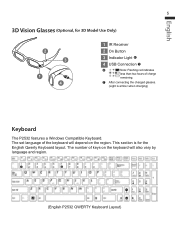
English 5 3D Vision Glasses (Optional, for the English Qwerty Keyboard layout. This section is amber when charging) Keyboard The P2532 features a Windows Compatible Keyboard. The set language of charge remaining. After connecting the charged glasses. (Light is for 3D Model Use Only) 2 3 1 4 1 IR Receiver 2 ... Light 4 USB Connection Note: Flashing red indicates less than two hours of the keyboard will also vary by language and region. (English P2532 QWERTY Keyboard Layout) The number of keys on the keyboard will depend on the region.
English 5 3D Vision Glasses (Optional, for the English Qwerty Keyboard layout. This section is amber when charging) Keyboard The P2532 features a Windows Compatible Keyboard. The set language of charge remaining. After connecting the charged glasses. (Light is for 3D Model Use Only) 2 3 1 4 1 IR Receiver 2 ... Light 4 USB Connection Note: Flashing red indicates less than two hours of the keyboard will also vary by language and region. (English P2532 QWERTY Keyboard Layout) The number of keys on the keyboard will depend on the region.
