Manual
Page 1
... in any labels on this card. Reverse engineering or disassembly is protected by GIGA-BYTE TECHNOLOGY CO., LTD. ("GBT"). No part of this manual may void the warranty of their respective owners. Trademarks Third-party brands and names are the properties of this graphics card. GV-R465-1GI ATI RadeonTM HD 4650 Graphics Accelerator User's Manual Rev. 101 12MM-R465GI-101R Copyright © 2008 GIGABYTE TECHNOLOGY CO., LTD Copyright by...
... in any labels on this card. Reverse engineering or disassembly is protected by GIGA-BYTE TECHNOLOGY CO., LTD. ("GBT"). No part of this manual may void the warranty of their respective owners. Trademarks Third-party brands and names are the properties of this graphics card. GV-R465-1GI ATI RadeonTM HD 4650 Graphics Accelerator User's Manual Rev. 101 12MM-R465GI-101R Copyright © 2008 GIGABYTE TECHNOLOGY CO., LTD Copyright by...
Manual
Page 4
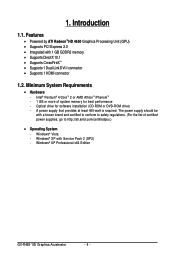
.... (For the list of system memory for software installation (CD-ROM or DVD-ROM drive) - Introduction 1.1. The power supply should be with Service Pack 2 (SP2) - Windows® XP Professional x64 Edition GV-R465-1GI Graphics Accelerator - 4 - Features • Powered by ATI RadeonTMHD 4650 Graphics Processing Unit (GPU) • Supports PCI Express 2.0 • Integrated with 1 GB GDDR2 memory • Supports DirectX 10.1 • Supports CrossFireXTM • Supports 1 Dual-Link DVI-I connector • Supports 1 HDMI connector 1.2. Minimum System Requirements • Hardware -
.... (For the list of system memory for software installation (CD-ROM or DVD-ROM drive) - Introduction 1.1. The power supply should be with Service Pack 2 (SP2) - Windows® XP Professional x64 Edition GV-R465-1GI Graphics Accelerator - 4 - Features • Powered by ATI RadeonTMHD 4650 Graphics Processing Unit (GPU) • Supports PCI Express 2.0 • Integrated with 1 GB GDDR2 memory • Supports DirectX 10.1 • Supports CrossFireXTM • Supports 1 Dual-Link DVI-I connector • Supports 1 HDMI connector 1.2. Minimum System Requirements • Hardware -
Manual
Page 6
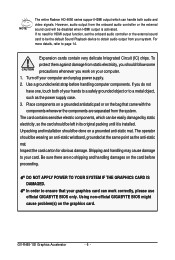
... audio controller or the external sound card will be disabled when HDMI output is installed. Using non-official GIGABYTE BIOS might cause problem(s) on a grounded anti-static mat. To protect them against damage from your graphics card can work on the card before handling computer components. If you work correctly, please use official GIGABYTE BIOS only. The card contains sensitive electric components, which can handle both of your computer. 1. The entire Radeon...
... audio controller or the external sound card will be disabled when HDMI output is installed. Using non-official GIGABYTE BIOS might cause problem(s) on a grounded anti-static mat. To protect them against damage from your graphics card can work on the card before handling computer components. If you work correctly, please use official GIGABYTE BIOS only. The card contains sensitive electric components, which can handle both of your computer. 1. The entire Radeon...
Manual
Page 7
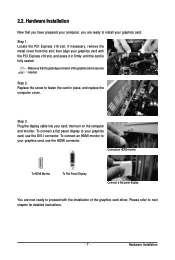
.... Connect an HDMI monitor To HDMI Monitor To Flat Panel Display Connect a flat panel display You are ready to install your computer, you have prepared your graphics card. Hardware Installation Now that the gold edge connector of the graphics card driver. then align your card; Replace the screw to next chapter for detailed instructions. - 7 - If necessary, remove the metal cover from this slot; To connect a flat panel display to your graphics card, use the HDMI connector. To connect an HDMI monitor to your graphics card, use the DVI-I connector...
.... Connect an HDMI monitor To HDMI Monitor To Flat Panel Display Connect a flat panel display You are ready to install your computer, you have prepared your graphics card. Hardware Installation Now that the gold edge connector of the graphics card driver. then align your card; Replace the screw to next chapter for detailed instructions. - 7 - If necessary, remove the metal cover from this slot; To connect a flat panel display to your graphics card, use the HDMI connector. To connect an HDMI monitor to your graphics card, use the DVI-I connector...
Manual
Page 8
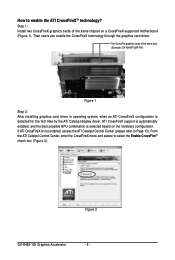
... the hardware configuration. If ATI CrossFireX is selected based on a CrossFireX-supported motherboard (Figure 1). Then users can enable the CrossFireX technology through the graphics card driver. From the ATI Catalyst Control Center, enter the CrossFireX menu and assure to enable the ATI CrossFireXTM technology? How to select the Enable CrossFireTM check box (Figure 2). Figure 2 GV-R465-1GI Graphics Accelerator - 8 - Step 1: Install two CrossFireX graphics cards of the same type. (Example: GV-RX16P128P-RH) Figure 1 Step 2: After installing graphics card driver in operating...
... the hardware configuration. If ATI CrossFireX is selected based on a CrossFireX-supported motherboard (Figure 1). Then users can enable the CrossFireX technology through the graphics card driver. From the ATI Catalyst Control Center, enter the CrossFireX menu and assure to enable the ATI CrossFireXTM technology? How to select the Enable CrossFireTM check box (Figure 2). Figure 2 GV-R465-1GI Graphics Accelerator - 8 - Step 1: Install two CrossFireX graphics cards of the same type. (Example: GV-RX16P128P-RH) Figure 1 Step 2: After installing graphics card driver in operating...

Manual
Page 9
... later version. 2. For software MPEG support in the screen shot below. (If the driver Autorun screen does not appear automatically, go to install DirectX separately. - 9 - Driver and Utility Installation 3.1.1. The driver Autorun screen is automatically displayed which looks like that shown in Windows XP, you must install DirectX first. Users who run Windows XP with Service Pack 2 or above do not need to My Computer, double-click the optical drive and execute the setup...
... later version. 2. For software MPEG support in the screen shot below. (If the driver Autorun screen does not appear automatically, go to install DirectX separately. - 9 - Driver and Utility Installation 3.1.1. The driver Autorun screen is automatically displayed which looks like that shown in Windows XP, you must install DirectX first. Users who run Windows XP with Service Pack 2 or above do not need to My Computer, double-click the optical drive and execute the setup...

Manual
Page 10
Then the driver installation is installing the components. GV-R465-1GI Graphics Accelerator - 10 - Setp 4: Click the Express or Custom icon and then click Next. Step 6: Click the Finish button to restart the computer. Step 5: Click the Accept button. The system is completed.
Then the driver installation is installing the components. GV-R465-1GI Graphics Accelerator - 10 - Setp 4: Click the Express or Custom icon and then click Next. Step 6: Click the Finish button to restart the computer. Step 5: Click the Accept button. The system is completed.
Manual
Page 12
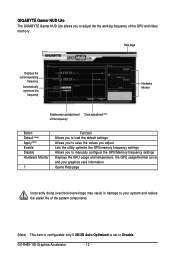
... current operating frequency Automatically optimizes the frequency Hardware Monitor Enables manual adjustment Clock adjustment(Note) of the GPU and video memory. GV-R465-1GI Graphics Accelerator - 12 - GIGABYTE Gamer HUD Lite The GIGABYTE Gamer HUD Lite allows you to manually configure the GPU/Memory frequency settings Displays the GPU usage and temperature, the GPU usage/thermal curve, and your graphics card information Opens Help page Incorrectly doing overclock/overvoltage may result in damage to your system and reduce the useful life of the system components. (Note...
... current operating frequency Automatically optimizes the frequency Hardware Monitor Enables manual adjustment Clock adjustment(Note) of the GPU and video memory. GV-R465-1GI Graphics Accelerator - 12 - GIGABYTE Gamer HUD Lite The GIGABYTE Gamer HUD Lite allows you to manually configure the GPU/Memory frequency settings Displays the GPU usage and temperature, the GPU usage/thermal curve, and your graphics card information Opens Help page Incorrectly doing overclock/overvoltage may result in damage to your system and reduce the useful life of the system components. (Note...

Manual
Page 14
Using the picture to the left as the example, to set HDMI audio to Start > Control Panel > Hardware and Sound > Manage audio devices. Step 1: Go to be the default Sound Playback device, select Digital Output Device (HDMI). Figure 1 Figure 2 Figure 3 Step 2: In the Manage audio devices dialog box, click the Playback tab. Otherwise, select Digital Output Device (SPDIF), which is the onboard audio controller. Configuring Audio Output Configure the default audio output device based upon your needs. GV-R465-1GI Graphics Accelerator - 14 -
Using the picture to the left as the example, to set HDMI audio to Start > Control Panel > Hardware and Sound > Manage audio devices. Step 1: Go to be the default Sound Playback device, select Digital Output Device (HDMI). Figure 1 Figure 2 Figure 3 Step 2: In the Manage audio devices dialog box, click the Playback tab. Otherwise, select Digital Output Device (SPDIF), which is the onboard audio controller. Configuring Audio Output Configure the default audio output device based upon your needs. GV-R465-1GI Graphics Accelerator - 14 -
Manual
Page 15
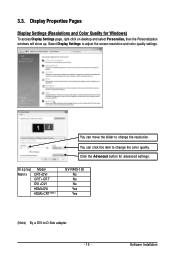
... resolution. Click the Advanced button for Windows) To access Display Settings page, right-click on desktop and select Personalize, then the Personalization windows will show up. Display Properties Pages Display Settings (Resolutions and Color Quality for advanced settings. Select Display Settings to -D-Sub adapter. - 15 - Display Matrix Model CRT+DVI CRT+CRT DVI +DVI HDMI+DVI HDMI+CRT (Note ) GV-R465-1GI No No No Yes Yes (Note) By a DVI-to adjust the screen resolution and color quality settings. You can click the item to change the color quality. 3.3. Software Installation...
... resolution. Click the Advanced button for Windows) To access Display Settings page, right-click on desktop and select Personalize, then the Personalization windows will show up. Display Properties Pages Display Settings (Resolutions and Color Quality for advanced settings. Select Display Settings to -D-Sub adapter. - 15 - Display Matrix Model CRT+DVI CRT+CRT DVI +DVI HDMI+DVI HDMI+CRT (Note ) GV-R465-1GI No No No Yes Yes (Note) By a DVI-to adjust the screen resolution and color quality settings. You can click the item to change the color quality. 3.3. Software Installation...
Manual
Page 16
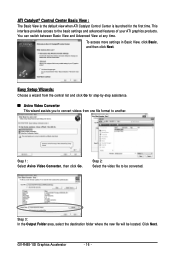
... video file to be located. Click Next. You can switch between Basic View and Advanced View at any time. To access more settings in Basic View, click Basic, and then click Next. Step 3: In the Output Folder area, select the destination folder where the new file will be converted. ATI Catalyst® Control Center Basic View : The Basic View is the default view when ATI Catalyst Control Center...
... video file to be located. Click Next. You can switch between Basic View and Advanced View at any time. To access more settings in Basic View, click Basic, and then click Next. Step 3: In the Output Folder area, select the destination folder where the new file will be converted. ATI Catalyst® Control Center Basic View : The Basic View is the default view when ATI Catalyst Control Center...

Manual
Page 17
Finally, click Next to change the name of the new file, enter the new name in the Output File area. Step 4: In the Output Video Format list, select a file format for desktop viewing. „ HydraVision Configuration Settings This wizard will take you to set up the HydraVision Configuration based on your own preference. - 17 - If you to configure display setting for the new file. Software Installation The video file has been successfully converted. „ Setup my display configuration This wizard allows you wish to start file conversion.
Finally, click Next to change the name of the new file, enter the new name in the Output File area. Step 4: In the Output Video Format list, select a file format for desktop viewing. „ HydraVision Configuration Settings This wizard will take you to set up the HydraVision Configuration based on your own preference. - 17 - If you to configure display setting for the new file. Software Installation The video file has been successfully converted. „ Setup my display configuration This wizard allows you wish to start file conversion.
Manual
Page 18
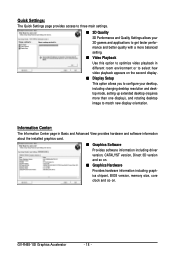
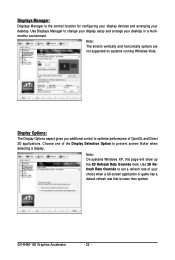
... new display orientation. GV-R465-1GI Graphics Accelerator - 18 - Quick Settings: The Quick Settings page provides access to three main settings. „ 3D Quality 3D Performance and Quality Settings allows your desktop, including changing desktop resolution and desktop mode, setting up extended desktop (requires more balanced setting. „ Video Playback Use this option to optimize video playback in Basic and Advanced View provides hardware and software information about the installed graphics card. „ Graphics Software Provides software information including driver version...
... new display orientation. GV-R465-1GI Graphics Accelerator - 18 - Quick Settings: The Quick Settings page provides access to three main settings. „ 3D Quality 3D Performance and Quality Settings allows your desktop, including changing desktop resolution and desktop mode, setting up extended desktop (requires more balanced setting. „ Video Playback Use this option to optimize video playback in Basic and Advanced View provides hardware and software information about the installed graphics card. „ Graphics Software Provides software information including driver version...
Manual
Page 20
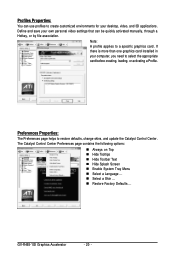
... restore defaults, change skins, and update the Catalyst Control Center. The Catalyst Control Center Preferences page contains the following options: „ Always on Top „ Hide Tooltips „ Hide Toolbar Text „ Hide Splash Screen „ Enable System Tray Menu „ Select a Language ... „ Select a Skin ... „ Restore Factory Defaults ... If there is more than one graphics card installed in your desktop, video, and 3D applications. GV-R465-1GI Graphics Accelerator - 20...
... restore defaults, change skins, and update the Catalyst Control Center. The Catalyst Control Center Preferences page contains the following options: „ Always on Top „ Hide Tooltips „ Hide Toolbar Text „ Hide Splash Screen „ Enable System Tray Menu „ Select a Language ... „ Select a Skin ... „ Restore Factory Defaults ... If there is more than one graphics card installed in your desktop, video, and 3D applications. GV-R465-1GI Graphics Accelerator - 20...
Manual
Page 22
... a display. Displays Manager: Displays Manager is lower than optimal. Use Displays Manager to set a refresh rate of your choice when a full-screen application or game has a default refresh rate that is the central location for configuring your display devices and arranging your desktop in a multimonitor environment. Use 3D Refresh Rate Override to change your display setup and arrange your desktop. Note: The stretch vertically and horizontally options are not supported on systems running Windows Vista. GV-R465-1GI Graphics Accelerator - 22...
... a display. Displays Manager: Displays Manager is lower than optimal. Use Displays Manager to set a refresh rate of your choice when a full-screen application or game has a default refresh rate that is the central location for configuring your display devices and arranging your desktop in a multimonitor environment. Use 3D Refresh Rate Override to change your display setup and arrange your desktop. Note: The stretch vertically and horizontally options are not supported on systems running Windows Vista. GV-R465-1GI Graphics Accelerator - 22...

Manual
Page 23
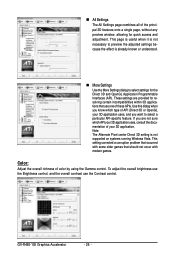
... enable composite sync. „ AvivoTM Color Use AvivoTM Color for ATI graphics cards that support per-display color settings. Independently set the hue, saturation, and temperature for the resolution and refresh rate. „ Adjustments Use Monitor Adjustments to resize and reposition the computer desktop on your monitor's display screen. EDID uses the information provided by the attached monitor to determine the limits for each attached and enabled display. - 23 - You can also enable Extended Display Identification Data (EDID). Monitor Properties 1: „ Attributes Monitor...
... enable composite sync. „ AvivoTM Color Use AvivoTM Color for ATI graphics cards that support per-display color settings. Independently set the hue, saturation, and temperature for the resolution and refresh rate. „ Adjustments Use Monitor Adjustments to resize and reposition the computer desktop on your monitor's display screen. EDID uses the information provided by the attached monitor to determine the limits for each attached and enabled display. - 23 - You can also enable Extended Display Identification Data (EDID). Monitor Properties 1: „ Attributes Monitor...
Manual
Page 24
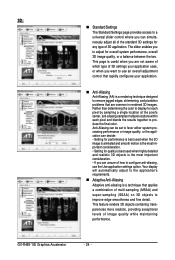
... type of 3D application. This page is useful when you are not aware of which type of 3D settings your application uses, or when you are common in rendered 3D images. GV-R465-1GI Graphics Accelerator - 24 - 3D: „ Standard Settings The Standard Settings page provides access to a universal slider control where you to adjust for overall system performance, overall 3D image...
... type of 3D application. This page is useful when you are not aware of which type of 3D settings your application uses, or when you are common in rendered 3D images. GV-R465-1GI Graphics Accelerator - 24 - 3D: „ Standard Settings The Standard Settings page provides access to a universal slider control where you to adjust for overall system performance, overall 3D image...
Manual
Page 26
... not occur with modern games. Color: Adjust the overall richness of color by using the Gamma control. This setting corrected a corruption problem that occurred with some older games that use the Contrast control. Note: The Alternate Pixel center Direct 3D setting is already known or understood. „ More Settings Use the More Settings dialog to preview the adjusted settings because the effect is not supported on systems running Windows Vista.
... not occur with modern games. Color: Adjust the overall richness of color by using the Gamma control. This setting corrected a corruption problem that occurred with some older games that use the Contrast control. Note: The Alternate Pixel center Direct 3D setting is already known or understood. „ More Settings Use the More Settings dialog to preview the adjusted settings because the effect is not supported on systems running Windows Vista.
Manual
Page 28
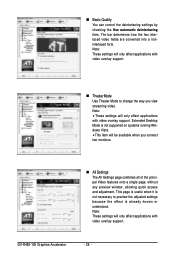
GV-R465-1GI Graphics Accelerator - 28 - The bar determines how the two interlaced video fields are converted into a noninterlaced form. Note: • These settings will only affect applications with video overlay support. Extended Desktop Mode is not necessary to change the way you connect two monitors. „ All Settings The All Settings page combines all of the principal Video features onto a single page, without any preview window, allowing quick access...
GV-R465-1GI Graphics Accelerator - 28 - The bar determines how the two interlaced video fields are converted into a noninterlaced form. Note: • These settings will only affect applications with video overlay support. Extended Desktop Mode is not necessary to change the way you connect two monitors. „ All Settings The All Settings page combines all of the principal Video features onto a single page, without any preview window, allowing quick access...
Manual
Page 30
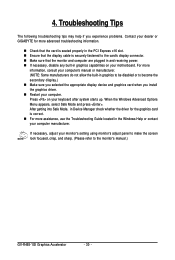
... PCI Express x16 slot. „ Ensure that the display cable is securely fastened to become the secondary display.) „ Make sure you selected the appropriate display device and graphics card when you experience problems. Contact your dealer or GIGABYTE for more assistance, use the Troubleshooting Guide located in graphics capabilities on your monitor's setting using monitor's adjust panel to make the screen look focused, crisp, and sharp. (Please refer to the monitor's manual.) GV-R465-1GI Graphics Accelerator...
... PCI Express x16 slot. „ Ensure that the display cable is securely fastened to become the secondary display.) „ Make sure you selected the appropriate display device and graphics card when you experience problems. Contact your dealer or GIGABYTE for more assistance, use the Troubleshooting Guide located in graphics capabilities on your monitor's setting using monitor's adjust panel to make the screen look focused, crisp, and sharp. (Please refer to the monitor's manual.) GV-R465-1GI Graphics Accelerator...


