
Manual
Page 9
... or metal components placed on the motherboard or within an electrostatic shielding container. •• Before unplugging the power supply cable from the power outlet before installing or removing the motherboard or other hardware components. •• When connecting hardware components to ... (Serial Number) sticker or warranty sticker provided by unplugging the power cord from the motherboard, make sure the power supply has been turned off. •• Before turning on the power, make sure the power supply voltage has been set according to the local voltage standard. •...
... or metal components placed on the motherboard or within an electrostatic shielding container. •• Before unplugging the power supply cable from the power outlet before installing or removing the motherboard or other hardware components. •• When connecting hardware components to ... (Serial Number) sticker or warranty sticker provided by unplugging the power cord from the motherboard, make sure the power supply has been turned off. •• Before turning on the power, make sure the power supply voltage has been set according to the local voltage standard. •...
Manual
Page 19
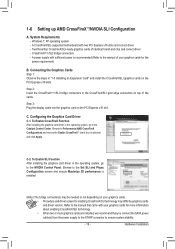
...the operating system, go to the Catalyst Control Center. Windows 7, XP operating system -- Configuring the Graphics Card Driver C-1. C. A power supply with two PCI Express x16 slots and correct driver -- Two/three/four CrossFireX/SLI-ready graphics cards of the cards. CrossFireX(Note)/... or more graphics cards are installed, we recommend that you connect the SATA power cable(s) from the power supply to the ATX4P connector to the manual that came with your graphics cards for the power requirement) B. Step 2: Insert the CrossFireX(Note)/SLI bridge connectors in "1-5 Installing...
...the operating system, go to the Catalyst Control Center. Windows 7, XP operating system -- Configuring the Graphics Card Driver C-1. C. A power supply with two PCI Express x16 slots and correct driver -- Two/three/four CrossFireX/SLI-ready graphics cards of the cards. CrossFireX(Note)/... or more graphics cards are installed, we recommend that you connect the SATA power cable(s) from the power supply to the ATX4P connector to the manual that came with your graphics cards for the power requirement) B. Step 2: Insert the CrossFireX(Note)/SLI bridge connectors in "1-5 Installing...

Manual
Page 26
... - The 12V power connector mainly supplies power to the power connector in the correct orientation. Before connecting the power connector, first make sure the power supply is recommended that a power supply that can withstand high power consumption be used that does not provide the required power, the result can supply enough stable power to all devices are properly installed. If a power supply is not connected...
... - The 12V power connector mainly supplies power to the power connector in the correct orientation. Before connecting the power connector, first make sure the power supply is recommended that a power supply that can withstand high power consumption be used that does not provide the required power, the result can supply enough stable power to all devices are properly installed. If a power supply is not connected...

Manual
Page 27
... powDeIPr to the CPU or the system may result in the correct orientation (the black connector wire is recommended that you connect the SATA power cable(s) from the power supply to the ATX4P con1 nector to prevent your CPU and system from overheating. Definition 1 NC 2 NC BIOS Switcher (SW4) 1 3 NC 4 GND 5 GND 6 GND...
... powDeIPr to the CPU or the system may result in the correct orientation (the black connector wire is recommended that you connect the SATA power cable(s) from the power supply to the ATX4P con1 nector to prevent your CPU and system from overheating. Definition 1 NC 2 NC BIOS Switcher (SW4) 1 3 NC 4 GND 5 GND 6 GND...
Manual
Page 37
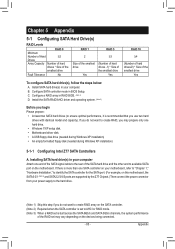
... Setup program that you not flash the BIOS. BIOS Setup For instructions on the motherboard supplies the necessary power to the CMOS to boot. Inadequately altering the settings may result in the CMOS. When the power is turned off, the battery on using the Q-Flash and @BIOS utilities, refer to... to the "Load Optimized Defaults" section in this chapter or introductions of BIOS, it with caution. To upgrade the BIOS, use either the GIGABYTE Q-Flash or @BIOS utility. •• Q-Flash allows the user to prevent system instability or other unexpected results. To flash the BIOS,...
... Setup program that you not flash the BIOS. BIOS Setup For instructions on the motherboard supplies the necessary power to the CMOS to boot. Inadequately altering the settings may result in the CMOS. When the power is turned off, the battery on using the Q-Flash and @BIOS utilities, refer to... to the "Load Optimized Defaults" section in this chapter or introductions of BIOS, it with caution. To upgrade the BIOS, use either the GIGABYTE Q-Flash or @BIOS utility. •• Q-Flash allows the user to prevent system instability or other unexpected results. To flash the BIOS,...
Manual
Page 85
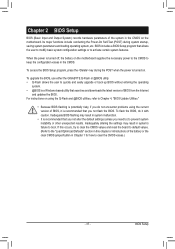
...SATA hard drives (to ensure optimal performance, it is recommended that you may vary depending on the motherboard. Installing SATA hard drive(s) in your power supply to the hard drive. (Note 1) Skip this step if you do not want to create RAID array on the SATA controller. (Note ...SATA port. (For example, on this motherboard, the SATA3 0/1 (Note 3) and SATA2 2/3/4/5 ports are supported by the Z77 Chipset.) Then connect the power connector from your computer. Appendix Configure SATA controller mode in RAID BIOS. (Note 1) D. If there is built across the SATA 6Gb/s and SATA 3Gb...
...SATA hard drives (to ensure optimal performance, it is recommended that you may vary depending on the motherboard. Installing SATA hard drive(s) in your power supply to the hard drive. (Note 1) Skip this step if you do not want to create RAID array on the SATA controller. (Note ...SATA port. (For example, on this motherboard, the SATA3 0/1 (Note 3) and SATA2 2/3/4/5 ports are supported by the Z77 Chipset.) Then connect the power connector from your computer. Appendix Configure SATA controller mode in RAID BIOS. (Note 1) D. If there is built across the SATA 6Gb/s and SATA 3Gb...
Manual
Page 93
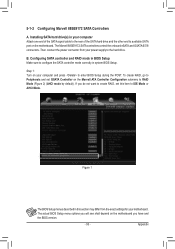
... POST. The Marvell 88SE9172 SATA controllers control the onboard eSATA and GSATA 6/7/8 connectors. Installing SATA hard drive(s) in system BIOS Setup. Then connect the power connector from the exact settings for your computer and press to configure the SATA controller mode correctly in your power supply to available SATA port on your motherboard.
... POST. The Marvell 88SE9172 SATA controllers control the onboard eSATA and GSATA 6/7/8 connectors. Installing SATA hard drive(s) in system BIOS Setup. Then connect the power connector from the exact settings for your computer and press to configure the SATA controller mode correctly in your power supply to available SATA port on your motherboard.
Manual
Page 116
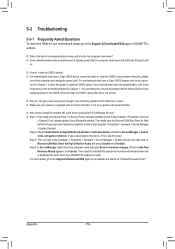
...1. Q: Why is still on. A: For motherboards that 's why the light is the light of standby power after the computer shuts down ? If your motherboard, please go to the Support & Downloads\FAQ page on GIGABYTE's website. Q: Why do I clear the CMOS values? If not, try a speaker with an internal ...amplifier. If not, please update it from the battery holder to stop supplying power to the CMOS, which will clear the CMOS values after the...
...1. Q: Why is still on. A: For motherboards that 's why the light is the light of standby power after the computer shuts down ? If your motherboard, please go to the Support & Downloads\FAQ page on GIGABYTE's website. Q: Why do I clear the CMOS values? If not, try a speaker with an internal ...amplifier. If not, please update it from the battery holder to stop supplying power to the CMOS, which will clear the CMOS values after the...

Manual
Page 118
... is the CPU cooler running? Plug in the keyboard and mouse and restart the computer. Yes Check if there is verified and solved. No The power supply, CPU or CPU socket might fail. The problem is display on , is verified and solved. The problem is unable to see if the device works...
... is the CPU cooler running? Plug in the keyboard and mouse and restart the computer. Yes Check if there is verified and solved. No The power supply, CPU or CPU socket might fail. The problem is display on , is verified and solved. The problem is unable to see if the device works...


