User Manual
Page 5
... 5 Appendix...75 5-1 Configuring SATA Hard Drive(s 75 5-1-1 Configuring SATA Controllers 75 5-1-2 Installing the SATA RAID/AHCI Driver and Operating System 83 5-2 Configuring Audio Input and Output 88 5-2-1 Configuring 2/4/5.1/7.1-Channel Audio 88 5-2-2 Configuring S/PDIF Out 90 5-2-3 Configuring Microphone Recording 91 5-2-4 Using the Sound Recorder 93 5-3 Troubleshooting 94 5-3-1 Frequently Asked Questions 94 5-3-2 Troubleshooting Procedure...
... 5 Appendix...75 5-1 Configuring SATA Hard Drive(s 75 5-1-1 Configuring SATA Controllers 75 5-1-2 Installing the SATA RAID/AHCI Driver and Operating System 83 5-2 Configuring Audio Input and Output 88 5-2-1 Configuring 2/4/5.1/7.1-Channel Audio 88 5-2-2 Configuring S/PDIF Out 90 5-2-3 Configuring Microphone Recording 91 5-2-4 Using the Sound Recorder 93 5-3 Troubleshooting 94 5-3-1 Frequently Asked Questions 94 5-3-2 Troubleshooting Procedure...
User Manual
Page 7
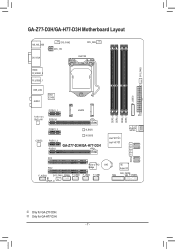
SYS_FAN3 GA-Z77-D3H/GA-H77-D3H Motherboard Layout KB_MS_USB DVI VGA SYS_FAN2 ATX_12V CPU_FAN LGA1155 HDMI R_USB30_2 R_USB30_1 F_USB30 USB_LAN AUDIO Etron EJ168 PCIEX1_1 mSATA Atheros ATX GbE LAN PCIEX16 DDR3_4 DDR3_2 DDR3_3 DDR3_1 1 0 CODEC PCIEX1_2 PCIEX1_3 PCIEX4 B_BIOS M_BIOS GA-Z77-D3H/GA-H77-D3H Intel® Z77j/ Intel® H77k SATA3 SATA2 5 4 3 2 PCI1 PCIe to PCI PCI2 Bridge F_AUDIO SYS_FAN1 COMA F_USB3 F_USB2 F_USB1 SPDIF_O BAT TPM iTE Super I/O CLR_CMOSF_PANEL j Only for GA-H77-D3H. - 7 - k Only for GA-Z77-D3H.
SYS_FAN3 GA-Z77-D3H/GA-H77-D3H Motherboard Layout KB_MS_USB DVI VGA SYS_FAN2 ATX_12V CPU_FAN LGA1155 HDMI R_USB30_2 R_USB30_1 F_USB30 USB_LAN AUDIO Etron EJ168 PCIEX1_1 mSATA Atheros ATX GbE LAN PCIEX16 DDR3_4 DDR3_2 DDR3_3 DDR3_1 1 0 CODEC PCIEX1_2 PCIEX1_3 PCIEX4 B_BIOS M_BIOS GA-Z77-D3H/GA-H77-D3H Intel® Z77j/ Intel® H77k SATA3 SATA2 5 4 3 2 PCI1 PCIe to PCI PCI2 Bridge F_AUDIO SYS_FAN1 COMA F_USB3 F_USB2 F_USB1 SPDIF_O BAT TPM iTE Super I/O CLR_CMOSF_PANEL j Only for GA-H77-D3H. - 7 - k Only for GA-Z77-D3H.
User Manual
Page 10
... to Windows 32-bit operating system limitation, when more than 4 GB. k Only for GA-Z77-D3H. The PCIEX1_2/3 slots will be sure to install it in the LGA1155 package (Go to GIGABYTE's website for the latest CPU support list.) L3 cache varies with the PCIEX1_2/3 slots. ...22nm (Ivy Bridge) CPU. 1-2 Product Specifications CPU Š Š Chipset Š Memory Š Š Š Š Š Onboard Š Graphics Audio Š Š Š Š LAN Š Expansion Slots Š Š Š Š Multi-Graphics Š Technology Support for Intel® ...
... to Windows 32-bit operating system limitation, when more than 4 GB. k Only for GA-Z77-D3H. The PCIEX1_2/3 slots will be sure to install it in the LGA1155 package (Go to GIGABYTE's website for the latest CPU support list.) L3 cache varies with the PCIEX1_2/3 slots. ...22nm (Ivy Bridge) CPU. 1-2 Product Specifications CPU Š Š Chipset Š Memory Š Š Š Š Š Onboard Š Graphics Audio Š Š Š Š LAN Š Expansion Slots Š Š Š Š Multi-Graphics Š Technology Support for Intel® ...
User Manual
Page 11
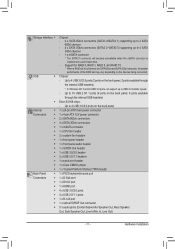
...connector 2 x SATA 6Gb/s connectors 4 x SATA 3Gb/s connectors 1 x mSATA connector 1 x CPU fan header 3 x system fan headers 1 x front panel header 1 x front panel audio header 1 x S/PDIF Out header 1 x USB 3.0/2.0 header 3 x USB 2.0/1.1 headers 1 x serial port header 1 x Clear CMOS jumper 1 x Trusted Platform Module (TPM) header... DVI-D port 1 x HDMI port 4 x USB 3.0/2.0 ports 4 x USB 2.0/1.1 ports 1 x RJ-45 port 1 x optical S/PDIF Out connector 5 x audio jacks (Center/Subwoofer Speaker Out, Rear Speaker Out, Side Speaker Out, Line In/Mic In, Line Out) - 11 - Up to 2 USB 3.0/2.0 ports on ...
...connector 2 x SATA 6Gb/s connectors 4 x SATA 3Gb/s connectors 1 x mSATA connector 1 x CPU fan header 3 x system fan headers 1 x front panel header 1 x front panel audio header 1 x S/PDIF Out header 1 x USB 3.0/2.0 header 3 x USB 2.0/1.1 headers 1 x serial port header 1 x Clear CMOS jumper 1 x Trusted Platform Module (TPM) header... DVI-D port 1 x HDMI port 4 x USB 3.0/2.0 ports 4 x USB 2.0/1.1 ports 1 x RJ-45 port 1 x optical S/PDIF Out connector 5 x audio jacks (Center/Subwoofer Speaker Out, Rear Speaker Out, Side Speaker Out, Line In/Mic In, Line Out) - 11 - Up to 2 USB 3.0/2.0 ports on ...
User Manual
Page 19
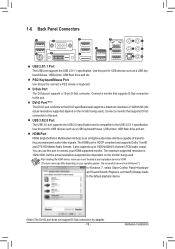
...resolutions supported depend on the monitor being used . The screenshot below is HDCP compliant and supports Dolby TrueHD and DTS HD Master Audio formats. 1-6 Back Panel Connectors USB 2.0/1.1 Port The USB port supports the USB 2.0/1.1 specification. Use this port to the ...DVI-D specificationand supports a maximum resolution of transmitting uncompressed audio/video signals. DVI-D Port (Note) The DVI-D port conforms to connect your operating system. Hardware Installation D-Sub Port The D-Sub port...
...resolutions supported depend on the monitor being used . The screenshot below is HDCP compliant and supports Dolby TrueHD and DTS HD Master Audio formats. 1-6 Back Panel Connectors USB 2.0/1.1 Port The USB port supports the USB 2.0/1.1 specification. Use this port to the ...DVI-D specificationand supports a maximum resolution of transmitting uncompressed audio/video signals. DVI-D Port (Note) The DVI-D port conforms to connect your operating system. Hardware Installation D-Sub Port The D-Sub port...
User Manual
Page 20
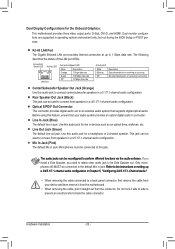
... Blinking Off Data transmission or receiving is occurring No data transmission or receiving is occurring Center/Subwoofer Speaker Out Jack (Orange) Use this audio jack for a headphone or 2-channel speaker. Rear Speaker Out Jack (Black) This jack can be used to the default Mic in...jack. Microphones must be reconfigured to prevent an electrical short inside the cable connector. Before using this feature, ensure that supports digital optical audio. Dual monitor confgurations are supported in jack. Do not rock it straight out from the motherboard. • When removing the cable,...
... Blinking Off Data transmission or receiving is occurring No data transmission or receiving is occurring Center/Subwoofer Speaker Out Jack (Orange) Use this audio jack for a headphone or 2-channel speaker. Rear Speaker Out Jack (Black) This jack can be used to the default Mic in...jack. Microphones must be reconfigured to prevent an electrical short inside the cable connector. Before using this feature, ensure that supports digital optical audio. Dual monitor confgurations are supported in jack. Do not rock it straight out from the motherboard. • When removing the cable,...
User Manual
Page 27
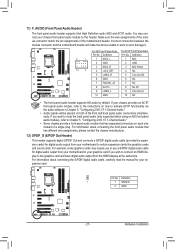
... SPDIFO 2 GND - 27 - For information about connecting the S/PDIF digital audio cable, carefully read the manual for digital audio output from your chassis front panel audio module to certain expansion cards like graphics cards and sound cards. Hardware Installation 11...to activate AC'97 functionality via the audio software in Chapter 5, "Configuring 2/4/5.1/7.1-Channel Audio." • Audio signals will make the device unable to Chapter 5, "Configuring 2/4/5.1/7.1-Channel Audio." • Some chassis provide a front panel audio module that has different wire assignments, please...
... SPDIFO 2 GND - 27 - For information about connecting the S/PDIF digital audio cable, carefully read the manual for digital audio output from your chassis front panel audio module to certain expansion cards like graphics cards and sound cards. Hardware Installation 11...to activate AC'97 functionality via the audio software in Chapter 5, "Configuring 2/4/5.1/7.1-Channel Audio." • Audio signals will make the device unable to Chapter 5, "Configuring 2/4/5.1/7.1-Channel Audio." • Some chassis provide a front panel audio module that has different wire assignments, please...
User Manual
Page 34
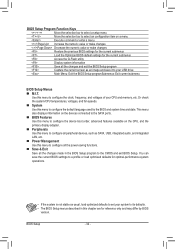
... current BIOS settings to a profile or load optimized defaults for optimal-performance system operations. • If the system is not stable as SATA, USB, integrated audio, and integrated LAN, etc. „ Power Management Use this menu to configure all the power-saving functions. „ Save & Exit Save all the changes made...
... current BIOS settings to a profile or load optimized defaults for optimal-performance system operations. • If the system is not stable as SATA, USB, integrated audio, and integrated LAN, etc. „ Power Management Use this menu to configure all the power-saving functions. „ Save & Exit Save all the changes made...

User Manual
Page 50
... Start Technology Enables or disables Intel Rapid Start Technology. & USB Controller (Intel Z77/H77 Chipset) Enables or disables the integrated USB 2.0 controller. (Default: Enabled) & Audio Controller Enables or disables the onboard audio function. (Default: Enabled) If you wish to install a 3rd party add-...in MS-DOS. (Default: Enabled) & USB3.0 Support (Intel Z77/H77 Chipset) Enables or disables the integrated USB ...
... Start Technology Enables or disables Intel Rapid Start Technology. & USB Controller (Intel Z77/H77 Chipset) Enables or disables the integrated USB 2.0 controller. (Default: Enabled) & Audio Controller Enables or disables the onboard audio function. (Default: Enabled) If you wish to install a 3rd party add-...in MS-DOS. (Default: Enabled) & USB3.0 Support (Intel Z77/H77 Chipset) Enables or disables the integrated USB ...

User Manual
Page 88
...listen to be present on the back panel which support 2/4/5.1/7.1-channel (Note) audio. HD Audio features multistreaming capabilities that allows the user to the right shows the default audio jack assignments. For example, users can retask the Center/ Subwoofer speaker out.... Configuring Speakers (The following for each jack through the audio driver. 5-2 Configuring Audio Input and Output 5-2-1 Configuring 2/4/5.1/7.1-Channel Audio The motherboard provides five audio jacks on both of the front and back panel audio connections simultaneously. For example, in and out) to MP3...
...listen to be present on the back panel which support 2/4/5.1/7.1-channel (Note) audio. HD Audio features multistreaming capabilities that allows the user to the right shows the default audio jack assignments. For example, users can retask the Center/ Subwoofer speaker out.... Configuring Speakers (The following for each jack through the audio driver. 5-2 Configuring Audio Input and Output 5-2-1 Configuring 2/4/5.1/7.1-Channel Audio The motherboard provides five audio jacks on both of the front and back panel audio connections simultaneously. For example, in and out) to MP3...

User Manual
Page 89
...the When plug in Headphone, mute Speaker check box. Configuring Sound Effect You can configure an audio environment on the bottom right corner to set up. Muting the Back Panel Audio (For HD Audio Only) Click the Advanced Options icon on the Environmental Modeling tab. Step 3: Go to an...on the bottom right corner to the type of device you wish to open the Advanced Options dialog box. D. C. B. Appendix Step 2: Connect an audio device to the Speaker screen. Then click OK. Do not select the Enable front panel jack detection check box. Click OK to complete. - 89...
...the When plug in Headphone, mute Speaker check box. Configuring Sound Effect You can configure an audio environment on the bottom right corner to set up. Muting the Back Panel Audio (For HD Audio Only) Click the Advanced Options icon on the Environmental Modeling tab. Step 3: Go to an...on the bottom right corner to the type of device you wish to open the Advanced Options dialog box. D. C. B. Appendix Step 2: Connect an audio device to the Speaker screen. Then click OK. Do not select the Enable front panel jack detection check box. Click OK to complete. - 89...

User Manual
Page 90
... Out Cable: Connect a S/PDIF optical cable to the corresponding S/PDIF out connector as shown below and an external decoder for decoding to get the best audio quality. 1. Click OK to complete. (Note) Enter the SPDIF OUT screen to a S/PDIF optical cable On the SPDIF OUT screen , (Note) click the Default Format... rate and bit depth. Configuring S/PDIF Out: Connects to configure further settings if you use the S/PDIF Out connector(s) on the back panel for digital audio output or enter the SPDIF HDMI screen if you use the internal S/PDIF Out connector (SPDIF_O) for digital...
... Out Cable: Connect a S/PDIF optical cable to the corresponding S/PDIF out connector as shown below and an external decoder for decoding to get the best audio quality. 1. Click OK to complete. (Note) Enter the SPDIF OUT screen to a S/PDIF optical cable On the SPDIF OUT screen , (Note) click the Default Format... rate and bit depth. Configuring S/PDIF Out: Connects to configure further settings if you use the S/PDIF Out connector(s) on the back panel for digital audio output or enter the SPDIF HDMI screen if you use the internal S/PDIF Out connector (SPDIF_O) for digital...

User Manual
Page 91
5-2-3 Configuring Microphone Recording Step 1: After installing the audio driver, the VIA HD Audio Deck icon will appear in jack (pink) on the front panel and back panel cannot be able to record the sound. Step 2: Connect your microphone .... To hear the sound being recorded during the recording process, do not mute the microphone volume (Microphone). Appendix Step 3: Go to access the VIA HD Audio Deck. Click the icon to the Microphone screen.
5-2-3 Configuring Microphone Recording Step 1: After installing the audio driver, the VIA HD Audio Deck icon will appear in jack (pink) on the front panel and back panel cannot be able to record the sound. Step 2: Connect your microphone .... To hear the sound being recorded during the recording process, do not mute the microphone volume (Microphone). Appendix Step 3: Go to access the VIA HD Audio Deck. Click the icon to the Microphone screen.

User Manual
Page 92
... Start, point to All Programs, point to Accessories, and then click Sound Recorder to begin the sound recording. * Enabling Stereo Mix If the VIA HD Audio Deck does not display the recording device you want to the steps below. The following steps explain how to enable Stereo Mix (which may be...
... Start, point to All Programs, point to Accessories, and then click Sound Recorder to begin the sound recording. * Enabling Stereo Mix If the VIA HD Audio Deck does not display the recording device you want to the steps below. The following steps explain how to enable Stereo Mix (which may be...

User Manual
Page 93
Recording Sound 1. Make sure you can play your recording in a digital media player program that supports your audio file format. - 93 - To record the audio, click the Start Recording button . 3. Step 4: Now you have connected the sound input device (e.g. B. Be sure to record the ...sound. 5-2-4 Using the Sound Recorder A. Appendix To stop recording audio, click the Stop Recording button . microphone) to the computer. 2. Playing the Recorded Sound You can access the VIA HD Audio Deck to configure Stereo Mix and use Sound Recorder to save the recorded...
Recording Sound 1. Make sure you can play your recording in a digital media player program that supports your audio file format. - 93 - To record the audio, click the Start Recording button . 3. Step 4: Now you have connected the sound input device (e.g. B. Be sure to record the ...sound. 5-2-4 Using the Sound Recorder A. Appendix To stop recording audio, click the Stop Recording button . microphone) to the computer. 2. Playing the Recorded Sound You can access the VIA HD Audio Deck to configure Stereo Mix and use Sound Recorder to save the recorded...

User Manual
Page 94
...read more details, go to install. A: Some motherboards provide a small amount of my keyboard/optical mouse still on High Definition Audio Bus or Unknown device is still on GIGABYTE's website. For motherboards that 's why the light is present in My Computer > Properties > Gen- Q: Why do I ... 4: In Device Manager, right-click on our website and search for "onboard HD audio driver." Then install the onboard HD audio driver from the motherboard driver disk or download the audio driver from GIGABYTE's website to the Support & Downloads\FAQ page on the computer name and select Scan...
...read more details, go to install. A: Some motherboards provide a small amount of my keyboard/optical mouse still on High Definition Audio Bus or Unknown device is still on GIGABYTE's website. For motherboards that 's why the light is present in My Computer > Properties > Gen- Q: Why do I ... 4: In Device Manager, right-click on our website and search for "onboard HD audio driver." Then install the onboard HD audio driver from the motherboard driver disk or download the audio driver from GIGABYTE's website to the Support & Downloads\FAQ page on the computer name and select Scan...


