
Manual
Page 1
... to enable RAID for complex and time-consuming configurations. Before installing the operating system, you 'll not be recognized during the Windows setup process. (For more details, refer to Chapter 5, "Installing the SATA RAID/AHCI Driver and Operating System." ) Step ...Install the motherboard drivers and the X.H.D utiltiy After installing the operating system, insert the motherboard driver disk. eXtreme Hard Drive (X.H.D) With GIGABYTE eXtreme Hard Drive (X.H.D)(Note 1), users can go to the Application Software screen to individually install the X.H.D utility later. Setting Up ...
... to enable RAID for complex and time-consuming configurations. Before installing the operating system, you 'll not be recognized during the Windows setup process. (For more details, refer to Chapter 5, "Installing the SATA RAID/AHCI Driver and Operating System." ) Step ...Install the motherboard drivers and the X.H.D utiltiy After installing the operating system, insert the motherboard driver disk. eXtreme Hard Drive (X.H.D) With GIGABYTE eXtreme Hard Drive (X.H.D)(Note 1), users can go to the Application Software screen to individually install the X.H.D utility later. Setting Up ...

Manual
Page 12
... eXtreme Hard Drive Support for Q-Share Norton Internet Security (OEM version) Operating System w Support for Microsoft® Windows® 7/Vista/XP Form Factor w ATX Form Factor; 30.5cm x 24.4cm (Note 1) Due to Windows Vista/XP 32-bit operating system limitation, when more than 4 GB of physical memory is installed, the actual...
... eXtreme Hard Drive Support for Q-Share Norton Internet Security (OEM version) Operating System w Support for Microsoft® Windows® 7/Vista/XP Form Factor w ATX Form Factor; 30.5cm x 24.4cm (Note 1) Due to Windows Vista/XP 32-bit operating system limitation, when more than 4 GB of physical memory is installed, the actual...

Manual
Page 20
The 3-Way CrossFireX/SLI technology currectly supports Windows Vista and Windows 7 operating systems only - For 3-Way CrossFireX: After installing the graphics card driver in the operating system, go to the NVIDIA Control Panel. ...: After installing the graphics card driver in the operating system, go to the Catalyst Control Center. The 2-Way CrossFireX/SLItechnology currently supports Windows XP, Windows Vista, and Windows 7 operating systems - Two/three CrossFireX/SLI-ready graphics cards of your graphics cards for enabling CrossFireX/SLI technology may be needed or...
The 3-Way CrossFireX/SLI technology currectly supports Windows Vista and Windows 7 operating systems only - For 3-Way CrossFireX: After installing the graphics card driver in the operating system, go to the NVIDIA Control Panel. ...: After installing the graphics card driver in the operating system, go to the Catalyst Control Center. The 2-Way CrossFireX/SLItechnology currently supports Windows XP, Windows Vista, and Windows 7 operating systems - Two/three CrossFireX/SLI-ready graphics cards of your graphics cards for enabling CrossFireX/SLI technology may be needed or...

Manual
Page 37
...Defaults" section in this chapter or introductions of the battery/ clearing CMOS jumper in Chapter 1 for the beep codes description. • It is a Windows-based utility that you do it is turned off, the battery on the motherboard. To access the BIOS Setup program, press the key during the... BIOS from the Internet and updates the BIOS. Inadequate BIOS flashing may result in system's failure to boot. To upgrade the BIOS, use either the GIGABYTE Q-Flash or @BIOS utility. • Q-Flash allows the user to quickly and easily upgrade or back up BIOS without entering the operating system. ...
...Defaults" section in this chapter or introductions of the battery/ clearing CMOS jumper in Chapter 1 for the beep codes description. • It is a Windows-based utility that you do it is turned off, the battery on the motherboard. To access the BIOS Setup program, press the key during the... BIOS from the Internet and updates the BIOS. Inadequate BIOS flashing may result in system's failure to boot. To upgrade the BIOS, use either the GIGABYTE Q-Flash or @BIOS utility. • Q-Flash allows the user to quickly and easily upgrade or back up BIOS without entering the operating system. ...

Manual
Page 54
...PCI Express graphics card on the PCIEX16_1 slot as the first display. PCIE x8-2 Sets the PCI Express graphics card on the PCIEX16_2 slot as Windows NT4.0. (Default: Disabled) No-Execute Memory Protect (Note) Enables or disables Intel Execute Disable Bit function. to 3 (Note) Allows you ...install a CPU that supports this item to Enabled for the computer, reducing exposure to display the GIGABYTE Logo at system startup. This function may enhance protection for legacy operating system such as the first display. The ad- Limit CPUID Max. ...
...PCI Express graphics card on the PCIEX16_1 slot as the first display. PCIE x8-2 Sets the PCI Express graphics card on the PCIEX16_2 slot as Windows NT4.0. (Default: Disabled) No-Execute Memory Protect (Note) Enables or disables Intel Execute Disable Bit function. to 3 (Note) Allows you ...install a CPU that supports this item to Enabled for the computer, reducing exposure to display the GIGABYTE Logo at system startup. This function may enhance protection for legacy operating system such as the first display. The ad- Limit CPUID Max. ...

Manual
Page 57
... Displays transmission speed. If a cable problem occurs on Part 1-2. Note: The Gigabit hub will only operate at a normal speed of 10/100/1000 Mbps in Windows mode or when the LAN Boot ROM is the approximate length of wires will be the approximate distance to detect the status of the attached...
... Displays transmission speed. If a cable problem occurs on Part 1-2. Note: The Gigabit hub will only operate at a normal speed of 10/100/1000 Mbps in Windows mode or when the LAN Boot ROM is the approximate length of wires will be the approximate distance to detect the status of the attached...

Manual
Page 59
... a wake-up function. (Default: Enabled) (Note) Supported on Suspend) sleep state. PME Event Wake Up Allows the system to enter the ACPI S1 (Power on Windows Vista operating system only. - 59 - BIOS Setup S1(POS) Enables the system to be resumed at least 1A on the +5VSB lead. (Default: Enabled) Power...
... a wake-up function. (Default: Enabled) (Note) Supported on Suspend) sleep state. PME Event Wake Up Allows the system to enter the ACPI S1 (Power on Windows Vista operating system only. - 59 - BIOS Setup S1(POS) Enables the system to be resumed at least 1A on the +5VSB lead. (Default: Enabled) Power...

Manual
Page 60
...the time at least 1A on by a PS/2 keyboard wake-up event. HPET Support (Note) Enables or disables High Precision Event Timer (HPET) for Windows Vista operating system. (Default: Enabled) HPET Mode (Note) Allows you need an ATX power supply providing at a specific time on each day or on ...following : Date (of the AC power, or the settings may not be effective. Press on Windows Vista operating system only. BIOS Setup - 60 - Select 32-bit mode when you install 64-bit Windows Vista. This item is configurable only if the HPET Support is set to let the system consume...
...the time at least 1A on by a PS/2 keyboard wake-up event. HPET Support (Note) Enables or disables High Precision Event Timer (HPET) for Windows Vista operating system. (Default: Enabled) HPET Mode (Note) Allows you need an ATX power supply providing at a specific time on each day or on ...following : Date (of the AC power, or the settings may not be effective. Press on Windows Vista operating system only. BIOS Setup - 60 - Select 32-bit mode when you install 64-bit Windows Vista. This item is configurable only if the HPET Support is set to let the system consume...

Manual
Page 67
... during the driver installation. Failure to install other applications included in the motherboard driver disk. • For USB 2.0 driver support under the Windows XP operating system, please install the Windows XP Service Pack 1 or later. You can click the Install All button and "Xpress Install" will continue to do so may affect...
... during the driver installation. Failure to install other applications included in the motherboard driver disk. • For USB 2.0 driver support under the Windows XP operating system, please install the Windows XP Service Pack 1 or later. You can click the Install All button and "Xpress Install" will continue to do so may affect...

Manual
Page 71
...to the first and second SATA connectors, the hard drive on the first SATA connector is the first physical drive. - 71 - Installing Windows Vista and Partitioning the Hard Drive Step 1: Click Drive options. Unique Features Supporting NTFS, FAT32, and FAT16 file systems, Xpress Recovery2 ...first IDE and the first SATA connectors, the hard drive on the amount of system memory • VESA compatible graphics card • Windows XP with Xpress Recovery cannot be restored using Xpress Recovery2. • USB hard drives are not supported. actual size requirements vary, depending...
...to the first and second SATA connectors, the hard drive on the first SATA connector is the first physical drive. - 71 - Installing Windows Vista and Partitioning the Hard Drive Step 1: Click Drive options. Unique Features Supporting NTFS, FAT32, and FAT16 file systems, Xpress Recovery2 ...first IDE and the first SATA connectors, the hard drive on the amount of system memory • VESA compatible graphics card • Windows XP with Xpress Recovery cannot be restored using Xpress Recovery2. • USB hard drives are not supported. actual size requirements vary, depending...
Manual
Page 74
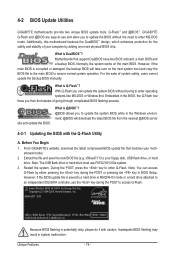
...key during the POST or pressing the key in system malfunction. X58A-UD7 D33 . . . . : BIOS Setup : XpressRecovery2 : Boot Menu : Qflash 10/27/2009-X58-ICH10-7A89QC0IC-00 Because BIOS flashing is Q-Flash™? From GIGABYTE's website, download the latest compressed BIOS update file that support... copy the BIOS file to the main BIOS to enter operating systems like MS-DOS or Window first. Inadequate BIOS flashing may result in BIOS Setup. 4-2 BIOS Update Utilities GIGABYTE motherboards provide two unique BIOS update tools, Q-Flash™ and @BIOS™. Motherboards that...
...key during the POST or pressing the key in system malfunction. X58A-UD7 D33 . . . . : BIOS Setup : XpressRecovery2 : Boot Menu : Qflash 10/27/2009-X58-ICH10-7A89QC0IC-00 Because BIOS flashing is Q-Flash™? From GIGABYTE's website, download the latest compressed BIOS update file that support... copy the BIOS file to the main BIOS to enter operating systems like MS-DOS or Window first. Inadequate BIOS flashing may result in BIOS Setup. 4-2 BIOS Update Utilities GIGABYTE motherboards provide two unique BIOS update tools, Q-Flash™ and @BIOS™. Motherboards that...

Manual
Page 77
... file from the Internet or through other source. Do not use the G.O.M. (GIGABYTE Online Management) function when using @BIOS. 4. Follow the on -screen instructions to boot. - 77 - Unique Features In Windows, close all applications and TSR (Terminate and Stay Resident) programs. This helps...avoid a power loss or switching off the Internet). 4-2-2 Updating the BIOS with an incorrect BIOS file could cause your motherboard model. GIGABYTE product warranty does not cover any BIOS damage or system failure resulting from File, then select the location where you save the current ...
... file from the Internet or through other source. Do not use the G.O.M. (GIGABYTE Online Management) function when using @BIOS. 4. Follow the on -screen instructions to boot. - 77 - Unique Features In Windows, close all applications and TSR (Terminate and Stay Resident) programs. This helps...avoid a power loss or switching off the Internet). 4-2-2 Updating the BIOS with an incorrect BIOS file could cause your motherboard model. GIGABYTE product warranty does not cover any BIOS damage or system failure resulting from File, then select the location where you save the current ...

Manual
Page 78
...-friendly EasyTune 6 interface also includes tabbed pages for Quick Boost. The Memory tab provides information on the installed CPU and motherboard. Available functions in Windows environment. Grayed-out area(s) indicates that allows users to fine-tune their system-related information without the need to install additional software. You can select... your ATI or NVIDIA graphics card. The EasyTune 6 Interface Tabs Information Tab Function The CPU tab provides information on the installed memory module(s). 4-3 EasyTune 6 GIGABYTE's EasyTune 6 is not supported.
...-friendly EasyTune 6 interface also includes tabbed pages for Quick Boost. The Memory tab provides information on the installed CPU and motherboard. Available functions in Windows environment. Grayed-out area(s) indicates that allows users to fine-tune their system-related information without the need to install additional software. You can select... your ATI or NVIDIA graphics card. The EasyTune 6 Interface Tabs Information Tab Function The CPU tab provides information on the installed memory module(s). 4-3 EasyTune 6 GIGABYTE's EasyTune 6 is not supported.

Manual
Page 83
... launch the SMART DualBIOS utility. It stores the recorded data in the main and backup BIOS simultaneously, which can prevent loss of the data in Windows Vista. Unique Features The files/folders listed on the screen are read-only so you wish to exit. - 83 - Instructions: Enter the Smart 6™ password...
... launch the SMART DualBIOS utility. It stores the recorded data in the main and backup BIOS simultaneously, which can prevent loss of the data in Windows Vista. Unique Features The files/folders listed on the screen are read-only so you wish to exit. - 83 - Instructions: Enter the Smart 6™ password...

Manual
Page 86
...system BIOS Setup program, set up a RAID 0 array. 2. Step 2: Install the RAID driver and operating system The X.H.D utility supports Windows 7/Vista/XP. B. To manually set up a RAID-ready system and configure it for complex and time-consuming configurations. All with which ... a non-RAID 0 array, you'll not be recognized during the Windows setup process. (For more details, refer to load the SATA controller driver first. Unique Features - 86 - A. 4-8 eXtreme Hard Drive (X.H.D) With GIGABYTE eXtreme Hard Drive (X.H.D)(Note 1), users can quickly configure a RAIDready system ...
...system BIOS Setup program, set up a RAID 0 array. 2. Step 2: Install the RAID driver and operating system The X.H.D utility supports Windows 7/Vista/XP. B. To manually set up a RAID-ready system and configure it for complex and time-consuming configurations. All with which ... a non-RAID 0 array, you'll not be recognized during the Windows setup process. (For more details, refer to load the SATA controller driver first. Unique Features - 86 - A. 4-8 eXtreme Hard Drive (X.H.D) With GIGABYTE eXtreme Hard Drive (X.H.D)(Note 1), users can quickly configure a RAIDready system ...

Manual
Page 89
...If there is more than one SATA controller on your motherboard, refer to "Chapter 1," "Hardware Installation," to identify the SATA controller for Windows XP. (Note 2) E. Install the SATA RAID/AHCI driver (Note 2) and operating system. Installing SATA hard drive(s) in your computer Attach... one hard drive. • An empty formatted floppy disk. • Windows Vista/XP setup disk. • Motherboard driver disk. 5-1-1 Configuring Intel ICH10R SATA Controllers A. Before you begin Please prepare: •...
...If there is more than one SATA controller on your motherboard, refer to "Chapter 1," "Hardware Installation," to identify the SATA controller for Windows XP. (Note 2) E. Install the SATA RAID/AHCI driver (Note 2) and operating system. Installing SATA hard drive(s) in your computer Attach... one hard drive. • An empty formatted floppy disk. • Windows Vista/XP setup disk. • Motherboard driver disk. 5-1-1 Configuring Intel ICH10R SATA Controllers A. Before you begin Please prepare: •...

Manual
Page 91
... memory test begins and before the operating system boot begins, look for a non-RAID configuration. Exit 3. Skip this step and proceed with the installation of Windows operating system for a message which says "Press to configure a RAID array. Delete RAID Volume 5. Reset Disks to enter the ICH10R RAID Configuration Utility. Press + to...
... memory test begins and before the operating system boot begins, look for a non-RAID configuration. Exit 3. Skip this step and proceed with the installation of Windows operating system for a message which says "Press to configure a RAID array. Delete RAID Volume 5. Reset Disks to enter the ICH10R RAID Configuration Utility. Press + to...

Manual
Page 98
... Name HDD0: ST3120026AS HDD1: ST3120026AS Capacity 120 GB 120 GB Type/Status Non-RAID Non-RAID [ RAID Disk Drive List ] [fgTAB]-Switch Window [hi]-Select ITEM Figure 3 [ENTER]-Action [ESC]-Exit Note: In the main screen, you wish to see detailed information about the selected ... Configuring a RAID array in the Main Menu block. GIGABYTE Technology Corp. Press + to highlight through choices in RAID BIOS Enter the RAID BIOS setup utility to enter RAID Setup Utility ... Figure 2 In the main screen of Windows operating system for a message which says "Press to the...
... Name HDD0: ST3120026AS HDD1: ST3120026AS Capacity 120 GB 120 GB Type/Status Non-RAID Non-RAID [ RAID Disk Drive List ] [fgTAB]-Switch Window [hi]-Select ITEM Figure 3 [ENTER]-Action [ESC]-Exit Note: In the main screen, you wish to see detailed information about the selected ... Configuring a RAID array in the Main Menu block. GIGABYTE Technology Corp. Press + to highlight through choices in RAID BIOS Enter the RAID BIOS setup utility to enter RAID Setup Utility ... Figure 2 In the main screen of Windows operating system for a message which says "Press to the...

Manual
Page 101
When finished, the new RAID array will appear in the center of the screen (Figure 9). Appendix Gigabyte Technology Corp. Gigabyte Technology Corp. RAID Setup Utility v1.07.06 [ Main Menu ] [ Hard Disk Drive List ] Create RAID Disk Drive Delete RAID Disk Drive ... CapBalcoictykC2::4a0p12aG24c80BityKGBB Status Normal Capacity 120 GB 120 GB Type/Status RAID Inside RAID Inside Members(HDDx) 01 Members: HDD 01 Status: Normal [fgTAB]-Switch Window [hi]-Select RAID Figure 9 [ENTER]-Detail [ESC]-Exit - 101 - RAID Setup Utility v1.07.06 [ Main Menu ] Create RAID Disk Drive Delete ...
When finished, the new RAID array will appear in the center of the screen (Figure 9). Appendix Gigabyte Technology Corp. Gigabyte Technology Corp. RAID Setup Utility v1.07.06 [ Main Menu ] [ Hard Disk Drive List ] Create RAID Disk Drive Delete RAID Disk Drive ... CapBalcoictykC2::4a0p12aG24c80BityKGBB Status Normal Capacity 120 GB 120 GB Type/Status RAID Inside RAID Inside Members(HDDx) 01 Members: HDD 01 Status: Normal [fgTAB]-Switch Window [hi]-Select RAID Figure 9 [ENTER]-Detail [ESC]-Exit - 101 - RAID Setup Utility v1.07.06 [ Main Menu ] Create RAID Disk Drive Delete ...

Manual
Page 102
... item in the main menu and press . Y Model Name RAID Level Capacity Status RDD0: GRAID 0-Stripe 240 GB Normal Members(HDDx) 01 [fgTAB]-Switch Window [hi]-Select ITEM Figure 10 [ENTER]-Action [ESC]-Exit Now, you may proceed to Disk & Exit (Y/N) ? a small triangle will move to the ... the space bar on the array to Non-RAID Solve Mirror Conflict Rebuild Mirror Drive Save And Exit Setup Exit Without Saving Gigabyte Technology Corp. 7. The selection bar will appear to Non-RAID Solve Mirror Conflict Rebuild Mirror Drive Save And Exit Setup Exit Without Saving...
... item in the main menu and press . Y Model Name RAID Level Capacity Status RDD0: GRAID 0-Stripe 240 GB Normal Members(HDDx) 01 [fgTAB]-Switch Window [hi]-Select ITEM Figure 10 [ENTER]-Action [ESC]-Exit Now, you may proceed to Disk & Exit (Y/N) ? a small triangle will move to the ... the space bar on the array to Non-RAID Solve Mirror Conflict Rebuild Mirror Drive Save And Exit Setup Exit Without Saving Gigabyte Technology Corp. 7. The selection bar will appear to Non-RAID Solve Mirror Conflict Rebuild Mirror Drive Save And Exit Setup Exit Without Saving...


