
Manual
Page 16
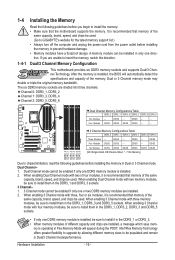
... mode with two memory modules, be sure to install them in the DDR3_1 and DDR3_3 sockets. 3 Channel-1. 3 Channel mode cannot be used. (Go to GIGABYTE's website for the latest memory support list.) • Always turn off the computer and unplug the power cord from the power outlet before installing the...module can be installed in only one DDR3 memory module is installed, be sure to install it is installed, the BIOS will appear during the POST. The six DDR3 memory sockets are unable to install them in the DDR3_1, DDR3_3 and DDR3_5 sockets. When enabling Dual Channel mode with three ...
... mode with two memory modules, be sure to install them in the DDR3_1 and DDR3_3 sockets. 3 Channel-1. 3 Channel mode cannot be used. (Go to GIGABYTE's website for the latest memory support list.) • Always turn off the computer and unplug the power cord from the power outlet before installing the...module can be installed in only one DDR3 memory module is installed, be sure to install it is installed, the BIOS will appear during the POST. The six DDR3 memory sockets are unable to install them in the DDR3_1, DDR3_3 and DDR3_5 sockets. When enabling Dual Channel mode with three ...
Manual
Page 35
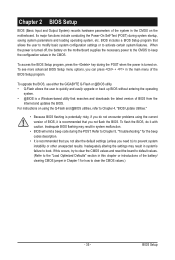
... system's failure to clear the CMOS values.) - 35 - BIOS Setup To access the BIOS Setup program, press the key during the POST when the power is recommended that searches and downloads the latest version of BIOS from the Internet and updates the BIOS. To upgrade the ...BIOS, use either the GIGABYTE Q-Flash or @BIOS utility. • Q-Flash allows the user to quickly and easily upgrade or back up BIOS without entering the operating system...
... system's failure to clear the CMOS values.) - 35 - BIOS Setup To access the BIOS Setup program, press the key during the POST when the power is recommended that searches and downloads the latest version of BIOS from the Internet and updates the BIOS. To upgrade the ...BIOS, use either the GIGABYTE Q-Flash or @BIOS utility. • Q-Flash allows the user to quickly and easily upgrade or back up BIOS without entering the operating system...
Manual
Page 36
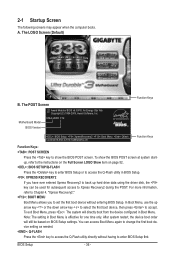
... boot device, then press to accept. BIOS Setup - 36 - The POST Screen Award Modular BIOS v6.00PG, An Energy Star Ally Copyright (C) 1984-2009, Award Software, Inc. To show the BIOS POST screen. To exit Boot Menu, press . Motherboard Model BIOS Version X58A-UD3R F1d . . . . : BIOS Setup : XpressRecovery2 : Boot Menu : Qflash 12/23/2009...
... boot device, then press to accept. BIOS Setup - 36 - The POST Screen Award Modular BIOS v6.00PG, An Energy Star Ally Copyright (C) 1984-2009, Award Software, Inc. To show the BIOS POST screen. To exit Boot Menu, press . Motherboard Model BIOS Version X58A-UD3R F1d . . . . : BIOS Setup : XpressRecovery2 : Boot Menu : Qflash 12/23/2009...

Manual
Page 49
... Configure your IDE/SATA devices by using one of the three methods below: • Auto Lets the BIOS automatically detect IDE/SATA devices during the POST. (Default) - 49 - Select the desired field and use the up arrow or down arrow key to set the time. Select the desired field and use...
... Configure your IDE/SATA devices by using one of the three methods below: • Auto Lets the BIOS automatically detect IDE/SATA devices during the POST. (Default) - 49 - Select the desired field and use the up arrow or down arrow key to set the time. Select the desired field and use...

Manual
Page 50
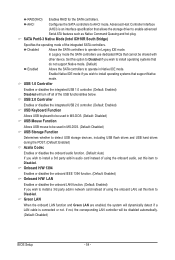
... extended memory. Options are determined by using one of the two methods below: • Auto Lets the BIOS automatically detect IDE/SATA devices during the POST. (Default) • None If no IDE/SATA devices are used , set this item to None. No Errors The system boot will not stop for ... drive when the hard drive access mode is set this item to None so the system will skip the detection of the device during the POST for faster system startup. Halt On Allows you to determine whether the system will not stop for a keyboard error but stop for all other...
... extended memory. Options are determined by using one of the two methods below: • Auto Lets the BIOS automatically detect IDE/SATA devices during the POST. (Default) • None If no IDE/SATA devices are used , set this item to None. No Errors The system boot will not stop for ... drive when the hard drive access mode is set this item to None so the system will skip the detection of the device during the POST for faster system startup. Halt On Allows you to determine whether the system will not stop for a keyboard error but stop for all other...

Manual
Page 52
...Sets the PCI Express graphics card on the PCIEX8_1 slot as the first display. to 3 (Note) Allows you to set this item to display the GIGABYTE Logo at system startup. Set this item to limit CPUID maximum value. PCIE x16-2 Sets the PCI Express graphics card on the PCIEX8_2 slot as... such as the first display. (Note) This item is from the installed PCI graphics card or the PCI Express graphics card. Disabled displays normal POST message. (Default: Enabled) Backup BIOS Image to HDD Allows the system to copy the BIOS image file to viruses and malicious buffer overflow attacks ...
...Sets the PCI Express graphics card on the PCIEX8_1 slot as the first display. to 3 (Note) Allows you to set this item to display the GIGABYTE Logo at system startup. Set this item to limit CPUID maximum value. PCIE x16-2 Sets the PCI Express graphics card on the PCIEX8_2 slot as... such as the first display. (Note) This item is from the installed PCI graphics card or the PCI Express graphics card. Disabled displays normal POST message. (Default: Enabled) Backup BIOS Image to HDD Allows the system to copy the BIOS image file to viruses and malicious buffer overflow attacks ...
Manual
Page 54
... in MS-DOS. (Default: Disabled) USB Storage Function Determines whether to detect USB storage devices, including USB flash drives and USB hard drives during the POST. (Default: Enabled) Azalia Codec Enables or disables the onboard audio function. (Default: Auto) If you wish to be disabled automatically. (Default: Disabled) BIOS Setup - 54...
... in MS-DOS. (Default: Disabled) USB Storage Function Determines whether to detect USB storage devices, including USB flash drives and USB hard drives during the POST. (Default: Enabled) Azalia Codec Enables or disables the onboard audio function. (Default: Auto) If you wish to be disabled automatically. (Default: Disabled) BIOS Setup - 54...

Manual
Page 70
... the backup file to the unallocated space (black stripe along the top). Go to Disk Management to enter Xpress Recovery2 later, simply press during the POST. Boot from the motherboard driver disk to access Xpress Recovery2 for the first time, Xpress Recovery2 will stay permanent in Xpress Recovery2 Xpress Recovery2 will...
... the backup file to the unallocated space (black stripe along the top). Go to Disk Management to enter Xpress Recovery2 later, simply press during the POST. Boot from the motherboard driver disk to access Xpress Recovery2 for the first time, Xpress Recovery2 will stay permanent in Xpress Recovery2 Xpress Recovery2 will...
Manual
Page 72
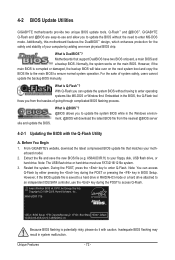
... corrupted or damaged, the backup BIOS will download the latest BIOS file from the hassles of system safety, users cannot update the backup BIOS manually. X58A-UD3R F1d . . . . : BIOS Setup : XpressRecovery2 : Boot Menu : Qflash 12/23/2009-X58-ICH10-7A89QG0KC-00 Because BIOS flashing is Q-Flash...drive attached to -use FAT32/16/12 file system. 3. GIGABYTE Q-Flash and @BIOS are easy-to an independent IDE/SATA controller, use the key during the POST or pressing the key in system malfunction. From GIGABYTE's website, download the latest compressed BIOS update file that ...
... corrupted or damaged, the backup BIOS will download the latest BIOS file from the hassles of system safety, users cannot update the backup BIOS manually. X58A-UD3R F1d . . . . : BIOS Setup : XpressRecovery2 : Boot Menu : Qflash 12/23/2009-X58-ICH10-7A89QG0KC-00 Because BIOS flashing is Q-Flash...drive attached to -use FAT32/16/12 file system. 3. GIGABYTE Q-Flash and @BIOS are easy-to an independent IDE/SATA controller, use the key during the POST or pressing the key in system malfunction. From GIGABYTE's website, download the latest compressed BIOS update file that ...
Manual
Page 73
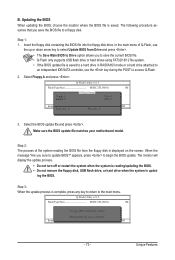
... file is saved to a hard drive in RAID/AHCI mode or a hard drive attached to an independent IDE/SATA controller, use the key during the POST to the main menu. CoaodpyCMBIOOSS DcoemfapuletteEdn-aPbaless !! Step 1: 1. Unique Features The monitor will display the update process. • Do not turn off or restart the...
... file is saved to a hard drive in RAID/AHCI mode or a hard drive attached to an independent IDE/SATA controller, use the key during the POST to the main menu. CoaodpyCMBIOOSS DcoemfapuletteEdn-aPbaless !! Step 1: 1. Unique Features The monitor will display the update process. • Do not turn off or restart the...
Manual
Page 74
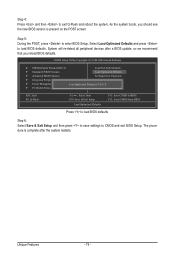
.... Unique Features - 74 - Select Load Optimized Defaults and press to exit Q-Flash and reboot the system. The procedure is present on the POST screen. As the system boots, you should see the new BIOS version is complete after a BIOS update, so we recommend that you reload... BIOS defaults. Step 5: During the POST, press to CMOS and exit BIOS Setup. CMOS Setup Utility-Copyright (C) 1984-2009 Award Software MB Intelligent Tweaker(M.I.T.) Load Fail-Safe Defaults ...
.... Unique Features - 74 - Select Load Optimized Defaults and press to exit Q-Flash and reboot the system. The procedure is present on the POST screen. As the system boots, you should see the new BIOS version is complete after a BIOS update, so we recommend that you reload... BIOS defaults. Step 5: During the POST, press to CMOS and exit BIOS Setup. CMOS Setup Utility-Copyright (C) 1984-2009 Award Software MB Intelligent Tweaker(M.I.T.) Load Fail-Safe Defaults ...
Manual
Page 86
... controller mode correctly in this item to create RAID, set ICH SATA Control Mode under the Integrated Peripherals menu to enter BIOS Setup during the POST (Power-On Self-Test). The BIOS Setup menus described in system BIOS Setup. To create RAID, set this section may differ from the exact settings...
... controller mode correctly in this item to create RAID, set ICH SATA Control Mode under the Integrated Peripherals menu to enter BIOS Setup during the POST (Power-On Self-Test). The BIOS Setup menus described in system BIOS Setup. To create RAID, set this section may differ from the exact settings...

Manual
Page 87
... Rights Reserved. Intel(R) Matrix Storage Manager option ROM v8.9.0.1023 PCH-D wRAID5 Copyright(C) 2003-09 Intel Corporation. All Rights Reserved. [ MAIN MENU ] 1. Step 1: After the POST memory test begins and before the operating system boot begins, look for a non-RAID configuration. Appendix C. Delete RAID Volume 5. Reset Disks to enter Configuration Utility...
... Rights Reserved. Intel(R) Matrix Storage Manager option ROM v8.9.0.1023 PCH-D wRAID5 Copyright(C) 2003-09 Intel Corporation. All Rights Reserved. [ MAIN MENU ] 1. Step 1: After the POST memory test begins and before the operating system boot begins, look for a non-RAID configuration. Appendix C. Delete RAID Volume 5. Reset Disks to enter Configuration Utility...
Manual
Page 93
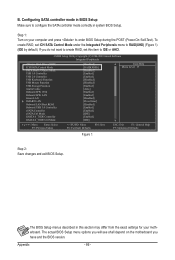
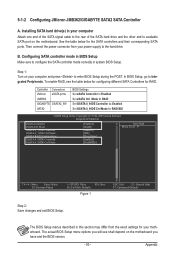
5-1-2 Configuring JMicron JMB362/GIGABYTE SATA2 SATA Controller A. Then connect the power connector from the exact settings for your computer Attach one end of the SATA signal cable to the ... menus described in this section may differ from your computer and press to enter BIOS Setup during the POST. Installing SATA hard drive(s) in system BIOS Setup. Controller Connectors JMicron eSATA ports JMB362 GIGABYTE GSATA2_8/9 SATA2 BIOS Settings Set eSATA Controller to Enabled Set eSATA Ctrl Mode to RAID Set GSATA 8_9...
5-1-2 Configuring JMicron JMB362/GIGABYTE SATA2 SATA Controller A. Then connect the power connector from the exact settings for your computer Attach one end of the SATA signal cable to the ... menus described in this section may differ from your computer and press to enter BIOS Setup during the POST. Installing SATA hard drive(s) in system BIOS Setup. Controller Connectors JMicron eSATA ports JMB362 GIGABYTE GSATA2_8/9 SATA2 BIOS Settings Set eSATA Controller to Enabled Set eSATA Ctrl Mode to RAID Set GSATA 8_9...

Manual
Page 94
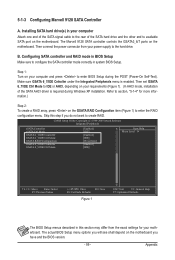
... to the installation of the RAID setup utility (Figure 3), use the up or down arrow key to execute and press . GIGABYTE Technology Corp. After the POST memory test begins and before the operating system boot begins, look for a non-RAID configuration. Figure 2 In the main screen... to highlight through choices in the Main Menu block. PCI Express to SATAII HOST Controller ROM v1.07.06 Copyright (C) 2005-2009 Gigabyte Technology Corp. (http://www.gigabyte.com) HDD0 : HDD1 : ST3120026AS ST3120026AS 120 GB 120 GB Non-RAID Non-RAID Press to configure a RAID array. Appendix -...
... to the installation of the RAID setup utility (Figure 3), use the up or down arrow key to execute and press . GIGABYTE Technology Corp. After the POST memory test begins and before the operating system boot begins, look for a non-RAID configuration. Figure 2 In the main screen... to highlight through choices in the Main Menu block. PCI Express to SATAII HOST Controller ROM v1.07.06 Copyright (C) 2005-2009 Gigabyte Technology Corp. (http://www.gigabyte.com) HDD0 : HDD1 : ST3120026AS ST3120026AS 120 GB 120 GB Non-RAID Non-RAID Press to configure a RAID array. Appendix -...
Manual
Page 99
... Configuration item (Figure 1) to available SATA port on the motherboard. Make sure GSATA 6_7/IDE Cntroller under the Integrated Peripherals menu is required during the POST (Power-On Self-Test). Installing SATA hard drive(s) in BIOS Setup Make sure to create RAID.
... Configuration item (Figure 1) to available SATA port on the motherboard. Make sure GSATA 6_7/IDE Cntroller under the Integrated Peripherals menu is required during the POST (Power-On Self-Test). Installing SATA hard drive(s) in BIOS Setup Make sure to create RAID.

Manual
Page 127
... volume? Q: Why cannot I clear the CMOS values? eral > System). If not, please update it from GIGABYTE's website to install. Step 4: In Device Manager, right-click on GIGABYTE's website. A: The following Award BIOS beep code descriptions may help you identify possible computer problems. (For reference ... program. When the Add New Hardware Wizard appears, click Cancel. In the Main Menu, press + to enter BIOS Setup during the POST mean? A: Some motherboards provide a small amount of my keyboard/optical mouse still on . Appendix A: For motherboards that 's why the...
... volume? Q: Why cannot I clear the CMOS values? eral > System). If not, please update it from GIGABYTE's website to install. Step 4: In Device Manager, right-click on GIGABYTE's website. A: The following Award BIOS beep code descriptions may help you identify possible computer problems. (For reference ... program. When the Add New Hardware Wizard appears, click Cancel. In the Main Menu, press + to enter BIOS Setup during the POST mean? A: Some motherboards provide a small amount of my keyboard/optical mouse still on . Appendix A: For motherboards that 's why the...


