

Manual
Page 11
...(2 on the back panel (Note 4), 4 via the IEEE 1394a bracket connected to 2 USB 3.0 ports on the back panel sup- Up to 12 USB 2.0/1.1 ports (8 on the back panel, 1 via the USB brackets connected to the internal USB...fan headers w 1 x power fan header w 1 x North Bridge fan header w 1 x front panel header w 1 x front panel audio header w 1 x CD In connector w 1 x S/PDIF In header w 1 x S/PDIF Out header w 2 x USB 2.0/1.1 headers w 1 x IEEE 1394a header Back Panel w 1 x PS/2 keyboard port Connectors w 1 x PS/2 mouse port w 1 x coaxial S/PDIF...
...(2 on the back panel (Note 4), 4 via the IEEE 1394a bracket connected to 2 USB 3.0 ports on the back panel sup- Up to 12 USB 2.0/1.1 ports (8 on the back panel, 1 via the USB brackets connected to the internal USB...fan headers w 1 x power fan header w 1 x North Bridge fan header w 1 x front panel header w 1 x front panel audio header w 1 x CD In connector w 1 x S/PDIF In header w 1 x S/PDIF Out header w 2 x USB 2.0/1.1 headers w 1 x IEEE 1394a header Back Panel w 1 x PS/2 keyboard port Connectors w 1 x PS/2 mouse port w 1 x coaxial S/PDIF...
Manual
Page 19
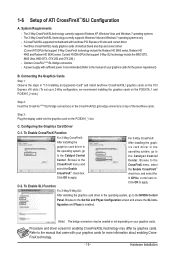
A CrossFireX/SLI-supported motherboard with your graphics cards for the power requirement) B. Connecting the Graphics Cards Step 1: Observe the steps in "1-5 Installing an Expansion Card" and install two/three CrossFireX/SLI graphics cards on the PCI Express ... For 2-Way CrossFireX: After installing the graphics card driver in the operating system, go to the Catalyst Control Center. Browse to the NVIDIA Control Panel. Two/three CrossFireX/SLI-ready graphics cards of your graphics cards for enabling CrossFireX/SLI technology may be needed or not depending on the PCIEX16_1...
A CrossFireX/SLI-supported motherboard with your graphics cards for the power requirement) B. Connecting the Graphics Cards Step 1: Observe the steps in "1-5 Installing an Expansion Card" and install two/three CrossFireX/SLI graphics cards on the PCI Express ... For 2-Way CrossFireX: After installing the graphics card driver in the operating system, go to the Catalyst Control Center. Browse to the NVIDIA Control Panel. Two/three CrossFireX/SLI-ready graphics cards of your graphics cards for enabling CrossFireX/SLI technology may be needed or not depending on the PCIEX16_1...

Manual
Page 20
1-7 Back Panel Connectors clr CMOS PS/2 Keyboard and PS/2 Mouse Port Use the upper port (green) to connect a PS/2 mouse and the lower port (purple) to 1 Gbps data rate. Before using this port for USB devices such as a USB keyboard/mouse, USB printer, ...port for USB devices such as a USB keyboard/mouse, USB printer, USB flash drive and etc. Use the port to clear CMOS values. Connection/ Speed LED Activity LED Connection/Speed LED: Activity LED: State Description State Description Orange 1 Gbps data rate Blinking Data transmission or receiving is occurring Green 100 Mbps data...
1-7 Back Panel Connectors clr CMOS PS/2 Keyboard and PS/2 Mouse Port Use the upper port (green) to connect a PS/2 mouse and the lower port (purple) to 1 Gbps data rate. Before using this port for USB devices such as a USB keyboard/mouse, USB printer, ...port for USB devices such as a USB keyboard/mouse, USB printer, USB flash drive and etc. Use the port to clear CMOS values. Connection/ Speed LED Activity LED Connection/Speed LED: Activity LED: State Description State Description Orange 1 Gbps data rate Blinking Data transmission or receiving is occurring Green 100 Mbps data...
Manual
Page 30
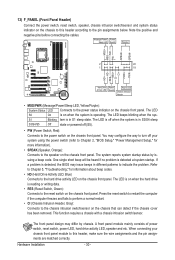
.... Refer to Chapter 5, "Troubleshooting," for more information). • SPEAK (Speaker, Orange): Connects to the hard drive activity LED on the chassis front panel. 13) F_PANEL (Front Panel Header) Connect the power switch, reset switch, speaker, chassis intrusion switch/sensor and system status indicator on ... 2, "BIOS Setup," "Power Management Setup," for information about beep codes. • HD (Hard Drive Activity LED, Blue) Connects to the speaker on the chassis front panel. PW+ PWSPEAK+ SPEAK- 2 20 1 19 HD+ HD- Hardware Installation - 30 - S1 Blinking tem is in S3/S4...
.... Refer to Chapter 5, "Troubleshooting," for more information). • SPEAK (Speaker, Orange): Connects to the hard drive activity LED on the chassis front panel. 13) F_PANEL (Front Panel Header) Connect the power switch, reset switch, speaker, chassis intrusion switch/sensor and system status indicator on ... 2, "BIOS Setup," "Power Management Setup," for information about beep codes. • HD (Hard Drive Activity LED, Blue) Connects to the speaker on the chassis front panel. PW+ PWSPEAK+ SPEAK- 2 20 1 19 HD+ HD- Hardware Installation - 30 - S1 Blinking tem is in S3/S4...
Manual
Page 31
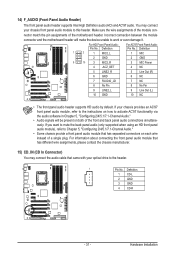
... on how to the header. 1 Pin No. For information about connecting the front panel audio module that has different wire assignments, please contact the chassis manufacturer. 15) CD_IN (CD In Connector) You may connect your optical drive to activate AC'97 functionality via the audio software ...will make the device unable to this header. Hardware Installation 14) F_AUDIO (Front Panel Audio Header) The front panel audio header supports Intel High Definition audio (HD) and AC'97 audio. Incorrect connection between the module connector and the motherboard header will be present on each wire...
... on how to the header. 1 Pin No. For information about connecting the front panel audio module that has different wire assignments, please contact the chassis manufacturer. 15) CD_IN (CD In Connector) You may connect your optical drive to activate AC'97 functionality via the audio software ...will make the device unable to this header. Hardware Installation 14) F_AUDIO (Front Panel Audio Header) The front panel audio header supports Intel High Definition audio (HD) and AC'97 audio. Incorrect connection between the module connector and the motherboard header will be present on each wire...

Manual
Page 119
..., make a telephone call over the Internet, and etc. The picture to instructions on the back panel which support 2/4/5.1/7.1-channel (Note) audio. If you can listen to be present on both of the front and back panel audio connections simultaneously. HD Audio features multistreaming capabilities that support 44.1KHz/48KHz/ 96KHz/192KHz sampling rate...
..., make a telephone call over the Internet, and etc. The picture to instructions on the back panel which support 2/4/5.1/7.1-channel (Note) audio. If you can listen to be present on both of the front and back panel audio connections simultaneously. HD Audio features multistreaming capabilities that support 44.1KHz/48KHz/ 96KHz/192KHz sampling rate...

Manual
Page 120
The The current connected device is completed. Then click OK. B. Activating an AC'97 Front Panel Audio Module If your chassis provides an AC'97 front panel audio module, to open the Device advanced settings dialog box. D. Muting the Back Panel Audio (For HD Audio Only) Click Device advanced settings on...Sound Effect You may configure an audio environment on the Speaker Configuration tab. Click OK to complete. Click OK to complete. Step 2: Connect an audio device to set up. Then the speaker setup is dialog box appears. C. On the Connector Settings dialog box, select the Disable ...
The The current connected device is completed. Then click OK. B. Activating an AC'97 Front Panel Audio Module If your chassis provides an AC'97 front panel audio module, to open the Device advanced settings dialog box. D. Muting the Back Panel Audio (For HD Audio Only) Click Device advanced settings on...Sound Effect You may configure an audio environment on the Speaker Configuration tab. Click OK to complete. Click OK to complete. Step 2: Connect an audio device to set up. Then the speaker setup is dialog box appears. C. On the Connector Settings dialog box, select the Disable ...

Manual
Page 124
... the HD Audio Manager. Appendix - 124 - It is recommended that you set the volumes at the same time. Step 2: Connect your microphone to the Mic in jack (pink) on the back panel or the Mic in the notification area. Do not mute the recording volume, or you want to change the current... driver, the HD Audio Manager icon will appear in jack (pink) on Microphone and select Set Default Device. Note: The microphone functions on the front panel and back panel cannot be able to microphone, right-click on the front...
... the HD Audio Manager. Appendix - 124 - It is recommended that you set the volumes at the same time. Step 2: Connect your microphone to the Mic in jack (pink) on the back panel or the Mic in the notification area. Do not mute the recording volume, or you want to change the current... driver, the HD Audio Manager icon will appear in jack (pink) on Microphone and select Set Default Device. Note: The microphone functions on the front panel and back panel cannot be able to microphone, right-click on the front...


