

Manual
Page 1
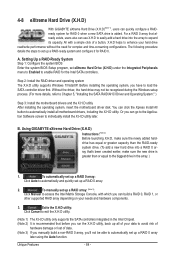
... integrated in the array. ) 1. A. You can click the Xpress Install All button to automatically install all of data. (Note 3) If you manually build a non-RAID 0 array, you can build a RAID 0, RAID 1, or other supported RAID array depending on your hard drive read/write...up a RAID 0 array. 2. Before installing the operating system, you can go to the Application Software screen to expand its capacity. Using GIGABYTE eXtreme Hard Drive (X.H.D) Instructions:(Note 2) Before launching X.H.D, make sure the newly added harddrive has equal or greater capacity than the RAID-ready ...
... integrated in the array. ) 1. A. You can click the Xpress Install All button to automatically install all of data. (Note 3) If you manually build a non-RAID 0 array, you can build a RAID 0, RAID 1, or other supported RAID array depending on your hard drive read/write...up a RAID 0 array. 2. Before installing the operating system, you can go to the Application Software screen to expand its capacity. Using GIGABYTE eXtreme Hard Drive (X.H.D) Instructions:(Note 2) Before launching X.H.D, make sure the newly added harddrive has equal or greater capacity than the RAID-ready ...
Manual
Page 1
GA-X58A-UD3R LGA1366 socket motherboard for Intel® Core™ i7 processor family User's Manual Rev. 1002 12ME-X58AU3R-1002R
GA-X58A-UD3R LGA1366 socket motherboard for Intel® Core™ i7 processor family User's Manual Rev. 1002 12ME-X58AU3R-1002R
Manual
Page 3
... Installation Guide included with the product. For example, "REV: 1.0" means the revision of the motherboard is the property of this manual may be made by any form or by GIGABYTE without GIGABYTE's prior written permission. The trademarks mentioned in any means without prior notice. For instructions on how to assist in this product...
... Installation Guide included with the product. For example, "REV: 1.0" means the revision of the motherboard is the property of this manual may be made by any form or by GIGABYTE without GIGABYTE's prior written permission. The trademarks mentioned in any means without prior notice. For instructions on how to assist in this product...

Manual
Page 5
Chapter 3 Drivers Installation 65 3-1 Installing Chipset Drivers 65 3-2 Application Software 66 3-3 Technical Manuals 66 3-4 Contact...67 3-5 System...67 3-6 Download Center 68 3-7 New Utilities...68 Chapter 4 Unique Features 69 4-1 Xpress ...eXtreme Hard Drive (X.H.D 84 Chapter 5 Appendix...85 5-1 Configuring SATA Hard Drive(s 85 5-1-1 Configuring Intel ICH10R SATA Controllers 85 5-1-2 Configuring JMicron JMB362/GIGABYTE SATA2 SATA Controller 93 5-1-3 Configuring Marvell 9128 SATA Controller 99 5-1-4 Making a SATA RAID/AHCI Driver Diskette 104 5-1-5 Installing the SATA RAID/AHCI...
Chapter 3 Drivers Installation 65 3-1 Installing Chipset Drivers 65 3-2 Application Software 66 3-3 Technical Manuals 66 3-4 Contact...67 3-5 System...67 3-6 Download Center 68 3-7 New Utilities...68 Chapter 4 Unique Features 69 4-1 Xpress ...eXtreme Hard Drive (X.H.D 84 Chapter 5 Appendix...85 5-1 Configuring SATA Hard Drive(s 85 5-1-1 Configuring Intel ICH10R SATA Controllers 85 5-1-2 Configuring JMicron JMB362/GIGABYTE SATA2 SATA Controller 93 5-1-3 Configuring Marvell 9128 SATA Controller 99 5-1-4 Making a SATA RAID/AHCI Driver Diskette 104 5-1-5 Installing the SATA RAID/AHCI...
Manual
Page 6
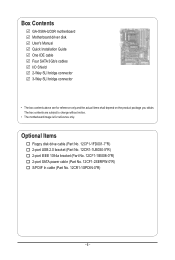
... bracket (Part No. 12CF1-1IE008-0*R) 2-port SATA power cable (Part No. 12CF1-2SERPW-0*R) S/PDIF In cable (Part No. 12CR1-1SPDIN-0*R) - 6 - Box Contents GA-X58A-UD3R motherboard Motherboard driver disk User's Manual Quick Installation Guide One IDE cable Four SATA 3Gb/s cables I/O Shield 2-Way SLI bridge connector 3-Way SLI bridge connector • The box contents...
... bracket (Part No. 12CF1-1IE008-0*R) 2-port SATA power cable (Part No. 12CF1-2SERPW-0*R) S/PDIF In cable (Part No. 12CR1-1SPDIN-0*R) - 6 - Box Contents GA-X58A-UD3R motherboard Motherboard driver disk User's Manual Quick Installation Guide One IDE cable Four SATA 3Gb/s cables I/O Shield 2-Way SLI bridge connector 3-Way SLI bridge connector • The box contents...
Manual
Page 9
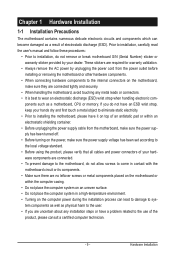
Prior to installation, carefully read the user's manual and follow these procedures: • Prior to installation, do not remove or break motherboard S/N (Serial Number) sticker or warranty sticker provided by unplugging the power ...
Prior to installation, carefully read the user's manual and follow these procedures: • Prior to installation, do not remove or break motherboard S/N (Serial Number) sticker or warranty sticker provided by unplugging the power ...

Manual
Page 15
... cooler and CPU may damage the CPU. - 15 - Check that the Male and Female push pins are joined closely. (Refer to your CPU cooler installation manual for instructions on the motherboard. 1-3-2 Installing the CPU Cooler Follow the steps below to correctly install the CPU cooler on the motherboard. (The following procedure...
... cooler and CPU may damage the CPU. - 15 - Check that the Male and Female push pins are joined closely. (Refer to your CPU cooler installation manual for instructions on the motherboard. 1-3-2 Installing the CPU Cooler Follow the steps below to correctly install the CPU cooler on the motherboard. (The following procedure...
Manual
Page 18
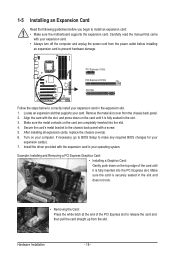
... you begin to correctly install your expansion card in the expansion slot. 1. If necessary, go to BIOS Setup to prevent hardware damage. Carefully read the manual that supports your card. Make sure the metal contacts on the card are completely inserted into the PCI Express slot. After installing all expansion cards...
... you begin to correctly install your expansion card in the expansion slot. 1. If necessary, go to BIOS Setup to prevent hardware damage. Carefully read the manual that supports your card. Make sure the metal contacts on the card are completely inserted into the PCI Express slot. After installing all expansion cards...
Manual
Page 19
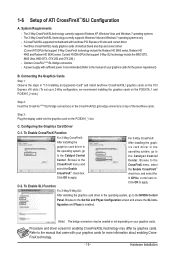
... with your graphics cards for more information about enabling CrossFireX technology. - 19 - Browse to apply. Refer to the manual of ATI CrossFireX™/SLI Configuration A. figuration and Physx is recommended (Refer to the manual that support 3-Way SLI technology include the 8800 GTX, 8800 Ultra, 9800 GTX, GTX 260 and GTX 280...
... with your graphics cards for more information about enabling CrossFireX technology. - 19 - Browse to apply. Refer to the manual of ATI CrossFireX™/SLI Configuration A. figuration and Physx is recommended (Refer to the manual that support 3-Way SLI technology include the 8800 GTX, 8800 Ultra, 9800 GTX, GTX 260 and GTX 280...
Manual
Page 32
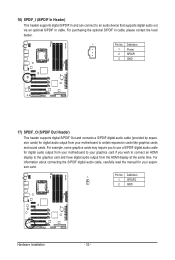
... an HDMI display to certain expansion cards like graphics cards and sound cards. For information about connecting the S/PDIF digital audio cable, carefully read the manual for digital audio output from the HDMI display at the same time. 16) SPDIF_I (S/PDIF In Header) This header supports digital S/PDIF In and can...
... an HDMI display to certain expansion cards like graphics cards and sound cards. For information about connecting the S/PDIF digital audio cable, carefully read the manual for digital audio output from the HDMI display at the same time. 16) SPDIF_I (S/PDIF In Header) This header supports digital S/PDIF In and can...
Manual
Page 43
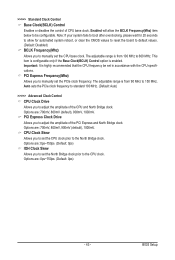
...), 1000mV. Options are : 700mV, 800mV (default), 900mV, 1000mV. The adjustable range is enabled. Options are : 0ps~750ps. (Default: 0ps) IOH Clock Skew Allows you to manually set the North Bridge clock prior to adjust the amplitude of CPU base clock. This item is configurable only if the Base Clock(BCLK) Control...) item below to the North Bridge clock. The adjustable range is highly recommended that the CPU frequency be configurable. CPU Clock Skew Allows you to manually set the CPU clock prior to be set in accordance with the CPU specifications. BIOS Setup
...), 1000mV. Options are : 700mV, 800mV (default), 900mV, 1000mV. The adjustable range is enabled. Options are : 0ps~750ps. (Default: 0ps) IOH Clock Skew Allows you to manually set the North Bridge clock prior to adjust the amplitude of CPU base clock. This item is configurable only if the Base Clock(BCLK) Control...) item below to the North Bridge clock. The adjustable range is highly recommended that the CPU frequency be configurable. CPU Clock Skew Allows you to manually set the CPU clock prior to be set in accordance with the CPU specifications. BIOS Setup

Manual
Page 50
... this item to the information on the system. No Errors The system boot will stop for faster system startup. • Manual Allows you wish to enter the parameters manually, refer to None. Options are : Auto (default), Large. Head Number of sectors. Extended Memory The amount of floppy...non-fatal error the system boot will be reserved for any error. Memory These fields are read-only and are used , set to manually enter the specifications of the two methods below: • Auto Lets the BIOS automatically detect IDE/SATA devices during the POST for ...
... this item to the information on the system. No Errors The system boot will stop for faster system startup. • Manual Allows you wish to enter the parameters manually, refer to None. Options are : Auto (default), Large. Head Number of sectors. Extended Memory The amount of floppy...non-fatal error the system boot will be reserved for any error. Memory These fields are read-only and are used , set to manually enter the specifications of the two methods below: • Auto Lets the BIOS automatically detect IDE/SATA devices during the POST for ...
Manual
Page 65
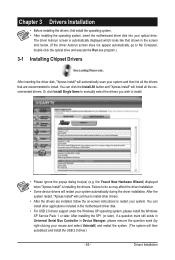
Or click Install Single Items to manually select the drivers you wish to install. You can click the Install All button and "Xpress Install" will automatically scan your system and then list ...
Or click Install Single Items to manually select the drivers you wish to install. You can click the Install All button and "Xpress Install" will automatically scan your system and then list ...
Manual
Page 66
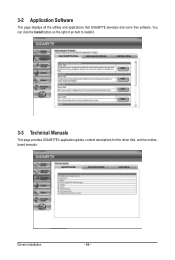
You can click the Install button on the right of an item to install it. 3-3 Technical Manuals This page provides GIGABYTE's application guides, content descriptions for this driver disk, and the motherboard manuals. Drivers Installation - 66 - 3-2 Application Software This page displays all the utilities and applications that GIGABYTE develops and some free software.
You can click the Install button on the right of an item to install it. 3-3 Technical Manuals This page provides GIGABYTE's application guides, content descriptions for this driver disk, and the motherboard manuals. Drivers Installation - 66 - 3-2 Application Software This page displays all the utilities and applications that GIGABYTE develops and some free software.
Manual
Page 72
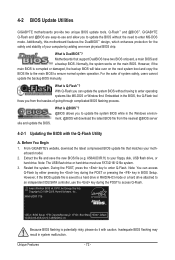
...or damaged, the backup BIOS will download the latest BIOS file from the hassles of system safety, users cannot update the backup BIOS manually. Unique Features - 72 - Motherboards that matches your motherboard model. 2. site and update the BIOS. Embedded in RAID/AHCI mode ...tool frees you to update the BIOS without having to ensure normal system operation. From GIGABYTE's website, download the latest compressed BIOS update file that support DualBIOS have two BIOS onboard, a main BIOS and a backup BIOS. X58A-UD3R F1d . . . . : BIOS Setup : XpressRecovery2 : Boot Menu : Qflash...
...or damaged, the backup BIOS will download the latest BIOS file from the hassles of system safety, users cannot update the backup BIOS manually. Unique Features - 72 - Motherboards that matches your motherboard model. 2. site and update the BIOS. Embedded in RAID/AHCI mode ...tool frees you to update the BIOS without having to ensure normal system operation. From GIGABYTE's website, download the latest compressed BIOS update file that support DualBIOS have two BIOS onboard, a main BIOS and a backup BIOS. X58A-UD3R F1d . . . . : BIOS Setup : XpressRecovery2 : Boot Menu : Qflash...
Manual
Page 75
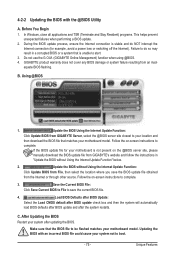
... system that is not present on -screen instructions to complete. Follow the on the @BIOS server site, please manually download the BIOS update file from GIGABYTE Server, select the @BIOS server site closest to your location and then download the BIOS file that the BIOS ...without Using the Internet Update Function" below. 2. After Updating the BIOS Restart your motherboard model. Before You Begin 1. Do not use the G.O.M. (GIGABYTE Online Management) function when using @BIOS. 4. B. Using @BIOS 1. Updating the BIOS with the @BIOS Utility A. During the BIOS update process, ...
... system that is not present on -screen instructions to complete. Follow the on the @BIOS server site, please manually download the BIOS update file from GIGABYTE Server, select the @BIOS server site closest to your location and then download the BIOS file that the BIOS ...without Using the Internet Update Function" below. 2. After Updating the BIOS Restart your motherboard model. Before You Begin 1. Do not use the G.O.M. (GIGABYTE Online Management) function when using @BIOS. 4. B. Using @BIOS 1. Updating the BIOS with the @BIOS Utility A. During the BIOS update process, ...
Manual
Page 84
...your hard drive read/write performance without the need for the Intel SATA controllers. Unique Features - 84 - 4-8 eXtreme Hard Drive (X.H.D) With GIGABYTE eXtreme Hard Drive (X.H.D)(Note 1), users can quickly configure a RAIDready system for RAID 0. The following procedure details the steps to set up a...have to exit the X.H.D utility. (Note 1) The X.H.D utility only supports the SATA controllers integrated in the array. ) 1. To manually set eXtreme Hard Drive (X.H.D) under the Integrated Peripherals menu to Enabled to the biggest drive in the Intel Chipset. (Note 2) It is...
...your hard drive read/write performance without the need for the Intel SATA controllers. Unique Features - 84 - 4-8 eXtreme Hard Drive (X.H.D) With GIGABYTE eXtreme Hard Drive (X.H.D)(Note 1), users can quickly configure a RAIDready system for RAID 0. The following procedure details the steps to set up a...have to exit the X.H.D utility. (Note 1) The X.H.D utility only supports the SATA controllers integrated in the array. ) 1. To manually set eXtreme Hard Drive (X.H.D) under the Integrated Peripherals menu to Enabled to the biggest drive in the Intel Chipset. (Note 2) It is...

Manual
Page 91
... and press on the Create Volume item to begin creating the Recovery Volume and follow the onscreen instructions to the recovery drive manually using the Update Volume function of the Intel Matrix Storage Console in the system. Recovery: Copies data between a master and ...: Select Disks Strip Size : N/A Capacity : 0.0 GB Sync : Continuous Create Volume [ HELP ] Select a sync option: On Request: volume is updated manually Continuous: volume is updated automatically [hi]-Change [TAB]-Next [ESC]-Previous Menu Figure 11 [ENTER]-Select Step 5: Finally press on the hard drive you want...
... and press on the Create Volume item to begin creating the Recovery Volume and follow the onscreen instructions to the recovery drive manually using the Update Volume function of the Intel Matrix Storage Console in the system. Recovery: Copies data between a master and ...: Select Disks Strip Size : N/A Capacity : 0.0 GB Sync : Continuous Create Volume [ HELP ] Select a sync option: On Request: volume is updated manually Continuous: volume is updated automatically [hi]-Change [TAB]-Next [ESC]-Previous Menu Figure 11 [ENTER]-Select Step 5: Finally press on the hard drive you want...

Manual
Page 112
... 10 arrays. The procedures below assume a new drive is added to replace a failed drive to rebuild a RAID 1 array. (Note: The new drive must have to manually rebuild the array in the notification area, which will show that an automatic rebuild will be rebuilt within the operating system. [hi]-Select [ESC]-Exit...
... 10 arrays. The procedures below assume a new drive is added to replace a failed drive to rebuild a RAID 1 array. (Note: The new drive must have to manually rebuild the array in the notification area, which will show that an automatic rebuild will be rebuilt within the operating system. [hi]-Select [ESC]-Exit...

Manual
Page 119
... etc. The picture to instructions on the next page. all at the same time. Appendix If you can listen to the Mic in jack and manually configure the jack for microphone functionality. • Audio signals will appear in the notification area. A. Double-click the icon to access the HD Audio Manager...
... etc. The picture to instructions on the next page. all at the same time. Appendix If you can listen to the Mic in jack and manually configure the jack for microphone functionality. • Audio signals will appear in the notification area. A. Double-click the icon to access the HD Audio Manager...


