

Manual
Page 14
... the power cord from the CPU socket. Step 3: Use your thumb and index fingers. To protect the CPU socket, always replace the protective socket cover when the CPU is properly inserted, replace the load plate and push the CPU socket lever back into its locked position. Align the CPU pin one marking...
... the power cord from the CPU socket. Step 3: Use your thumb and index fingers. To protect the CPU socket, always replace the protective socket cover when the CPU is properly inserted, replace the load plate and push the CPU socket lever back into its locked position. Align the CPU pin one marking...
Manual
Page 18
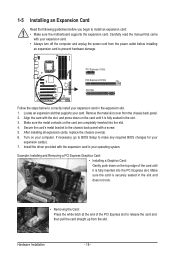
... PCI Express slot. 1-5 Installing an Expansion Card Read the following guidelines before installing an expansion card to prevent hardware damage. After installing all expansion cards, replace the chassis cover(s). 6.
... PCI Express slot. 1-5 Installing an Expansion Card Read the following guidelines before installing an expansion card to prevent hardware damage. After installing all expansion cards, replace the chassis cover(s). 6.
Manual
Page 29
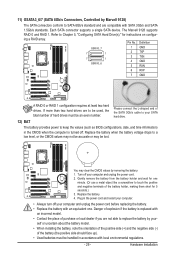
...the positive and negative terminals of explosion if the battery is turned off your computer and unplug the power cord before replacing the battery. • Replace the battery with an incorrect model. • Contact the place of purchase or local dealer if you are compatible with... local environmental regulations. - 29 - Danger of the battery holder, making them short for 5 seconds.) 3. Refer to replace the battery by your- Turn off . Gently remove the battery from the battery holder and wait for instructions on configur- Each SATA connector supports...
...the positive and negative terminals of explosion if the battery is turned off your computer and unplug the power cord before replacing the battery. • Replace the battery with an incorrect model. • Contact the place of purchase or local dealer if you are compatible with... local environmental regulations. - 29 - Danger of the battery holder, making them short for 5 seconds.) 3. Refer to replace the battery by your- Turn off . Gently remove the battery from the battery holder and wait for instructions on configur- Each SATA connector supports...
Manual
Page 101
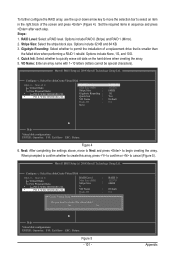
...whether to quickly erase old data on the hard drives when creating the array. 5. Set the required items in the right block of a replacement drive that is smaller than the failed drive when performing a RAID 1 rebuild. Steps: 1. Options include RAID 0 (Stripe) and RAID 1...Save ESC: Return Figure 4 6. Yes No RAID 0 152378 64KB Default 0 8 Help Virtual disk configurations. RAID Level: Select a RAID level. Gigabyte Rounding: Select whether to permit the installation of the screen and press (Figure 4). Configure -> Select free disksCreate Virtual Disk HBA 0 : Marvell 0...
...whether to quickly erase old data on the hard drives when creating the array. 5. Set the required items in the right block of a replacement drive that is smaller than the failed drive when performing a RAID 1 rebuild. Steps: 1. Options include RAID 0 (Stripe) and RAID 1...Save ESC: Return Figure 4 6. Yes No RAID 0 152378 64KB Default 0 8 Help Virtual disk configurations. RAID Level: Select a RAID level. Gigabyte Rounding: Select whether to permit the installation of the screen and press (Figure 4). Configure -> Select free disksCreate Virtual Disk HBA 0 : Marvell 0...

Manual
Page 112
... Configuration Utility. Rebuilding applies only to Non-RAID "Degrad2e.d DvoeluetmeeRaAnIdDdVisokluamvaeilable for the Intel Storage Console icon in the array. Restart your computer and replace the failed hard drive with a new one. All Rights Reserved. [ MAIN MENU ] 1. Delete RAID Volume 5. Exit 3. Rebuilding an...array to manually rebuild the array in the operating system. The following screen appears, indicating that a RAID volume is added to replace a failed drive to a hard drive from other drives in the notification area, which will be performed after you enter the ...
... Configuration Utility. Rebuilding applies only to Non-RAID "Degrad2e.d DvoeluetmeeRaAnIdDdVisokluamvaeilable for the Intel Storage Console icon in the array. Restart your computer and replace the failed hard drive with a new one. All Rights Reserved. [ MAIN MENU ] 1. Delete RAID Volume 5. Exit 3. Rebuilding an...array to manually rebuild the array in the operating system. The following screen appears, indicating that a RAID volume is added to replace a failed drive to a hard drive from other drives in the notification area, which will be performed after you enter the ...

Manual
Page 115
.... Use either the RAID setup utility or the GIGABYTE RAID CONFIGURER utility in the Hard Disk Drive List block. When done, the status of the screen. RAID Setup Utility v1.07.06 [ Main Menu ] ... Corp. In the Main Menu block, select Rebuild Mirror Drive and press . For the JMicron JMB362/GIGABYTE SATA2: Turn off your computer and replace the failed hard drive with the RAID setup utility Step 1: When the message "Press to enter RAID Setup Utility" appears, press + to Non-RAID Solve ...
.... Use either the RAID setup utility or the GIGABYTE RAID CONFIGURER utility in the Hard Disk Drive List block. When done, the status of the screen. RAID Setup Utility v1.07.06 [ Main Menu ] ... Corp. In the Main Menu block, select Rebuild Mirror Drive and press . For the JMicron JMB362/GIGABYTE SATA2: Turn off your computer and replace the failed hard drive with the RAID setup utility Step 1: When the message "Press to enter RAID Setup Utility" appears, press + to Non-RAID Solve ...

Manual
Page 117
... RAID Mode : RAID1 Size : 75776MB BGA Status : N/A Number of PDs : 1 Numbers : 8 Help Rebuilding with a new one. For the Marvell 9128: Turn off your computer and replace the failed hard drive with selected physical disk on GSATA RAID Configuration to be rebuilt (for example, VD 0: New_VD) and press and then select Rebuild...
... RAID Mode : RAID1 Size : 75776MB BGA Status : N/A Number of PDs : 1 Numbers : 8 Help Rebuilding with a new one. For the Marvell 9128: Turn off your computer and replace the failed hard drive with selected physical disk on GSATA RAID Configuration to be rebuilt (for example, VD 0: New_VD) and press and then select Rebuild...

