
Manual
Page 12
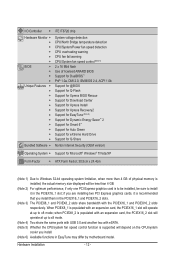
...bandwidth with the PCIEX16_1 and PCIEX16_2 slots respectively. I/O Controller w Hardware Monitor w w w w w w BIOS w w w w Unique Features w w w w w w w w w w w w Bundled ...BIOS Rescue Support for Download Center Support for Xpress Install Support for Xpress Recovery2 Support for EasyTune (Note 6) Support for Dynamic Energy Saver™ 2 Support for Smart 6™ Support for Auto Green Support for eXtreme Hard Drive Support for Q-Share Norton Internet Security (OEM version...
...bandwidth with the PCIEX16_1 and PCIEX16_2 slots respectively. I/O Controller w Hardware Monitor w w w w w w BIOS w w w w Unique Features w w w w w w w w w w w w Bundled ...BIOS Rescue Support for Download Center Support for Xpress Install Support for Xpress Recovery2 Support for EasyTune (Note 6) Support for Dynamic Energy Saver™ 2 Support for Smart 6™ Support for Auto Green Support for eXtreme Hard Drive Support for Q-Share Norton Internet Security (OEM version...
Manual
Page 35
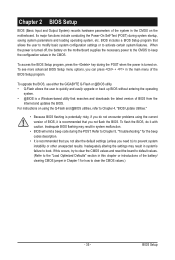
...version of BIOS from the Internet and updates the BIOS. Refer to Chapter 5, "Troubleshooting," for how to clear the CMOS values.) - 35 - Inadequate BIOS flashing may result in this chapter or introductions of the BIOS Setup program. When the power is turned off, the battery on . To upgrade the BIOS, use either the GIGABYTE Q-Flash or @BIOS... utility. • Q-Flash allows the user to Chapter 4, "BIOS Update Utilities." • Because BIOS flashing is potentially risky, if you do it is ...
...version of BIOS from the Internet and updates the BIOS. Refer to Chapter 5, "Troubleshooting," for how to clear the CMOS values.) - 35 - Inadequate BIOS flashing may result in this chapter or introductions of the BIOS Setup program. When the power is turned off, the battery on . To upgrade the BIOS, use either the GIGABYTE Q-Flash or @BIOS... utility. • Q-Flash allows the user to Chapter 4, "BIOS Update Utilities." • Because BIOS flashing is potentially risky, if you do it is ...
Manual
Page 36
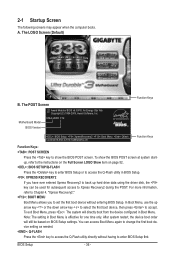
... access to accept. After system restart, the device boot order will directly boot from the device configured in Boot Menu. A. To show the BIOS POST screen. Motherboard Model BIOS Version X58A-UD3R F1d . . . . : BIOS Setup : XpressRecovery2 : Boot Menu : Qflash 12/23/2009-X58-ICH10-7A89QG0KC-00 Function Keys Function Keys Function Keys: : POST SCREEN Press the...
... access to accept. After system restart, the device boot order will directly boot from the device configured in Boot Menu. A. To show the BIOS POST screen. Motherboard Model BIOS Version X58A-UD3R F1d . . . . : BIOS Setup : XpressRecovery2 : Boot Menu : Qflash 12/23/2009-X58-ICH10-7A89QG0KC-00 Function Keys Function Keys Function Keys: : POST SCREEN Press the...
Manual
Page 37
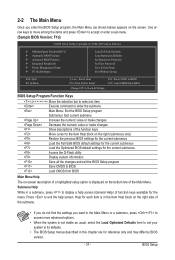
Submenu Help While in this chapter are for reference only and may differ by BIOS version. - 37 - BIOS Setup 2-2 The Main Menu Once you want in the Main Menu or a submenu, press + to its defaults. • The BIOS Setup menus described in a submenu, press to exit the help screen (General Help)...Press to display a help screen. Use arrow keys to move among the items and press to accept or enter a sub-menu. (Sample BIOS Version: F1d) CMOS Setup Utility-Copyright (C) 1984-2009 Award Software MB Intelligent Tweaker(M.I.T.) Standard CMOS Features Advanced...
Submenu Help While in this chapter are for reference only and may differ by BIOS version. - 37 - BIOS Setup 2-2 The Main Menu Once you want in the Main Menu or a submenu, press + to its defaults. • The BIOS Setup menus described in a submenu, press to exit the help screen (General Help)...Press to display a help screen. Use arrow keys to move among the items and press to accept or enter a sub-menu. (Sample BIOS Version: F1d) CMOS Setup Utility-Copyright (C) 1984-2009 Award Software MB Intelligent Tweaker(M.I.T.) Standard CMOS Features Advanced...

Manual
Page 68
Drivers Installation - 68 - The latest version of an item to install. You can click the Install button on the right of the BIOS, drivers, or applications will be displayed. 3-7 New Utilities This page provides a quick link to GIGABYTE's lately developed utilities for users to install it. 3-6 Download Center To update the BIOS, drivers, or applications, click the Download Center button to link to the GIGABYTE website.
Drivers Installation - 68 - The latest version of an item to install. You can click the Install button on the right of the BIOS, drivers, or applications will be displayed. 3-7 New Utilities This page provides a quick link to GIGABYTE's lately developed utilities for users to install it. 3-6 Download Center To update the BIOS, drivers, or applications, click the Download Center button to link to the GIGABYTE website.
Manual
Page 74
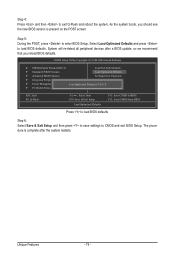
.... The procedure is present on the POST screen. System will re-detect all peripheral devices after a BIOS update, so we recommend that you should see the new BIOS version is complete after the system restarts. CMOS Setup Utility-Copyright (C) 1984-2009 Award Software MB Intelligent Tweaker(M.I.T.) Load Fail-Safe Defaults Standard...
.... The procedure is present on the POST screen. System will re-detect all peripheral devices after a BIOS update, so we recommend that you should see the new BIOS version is complete after the system restarts. CMOS Setup Utility-Copyright (C) 1984-2009 Award Software MB Intelligent Tweaker(M.I.T.) Load Fail-Safe Defaults Standard...
Manual
Page 78
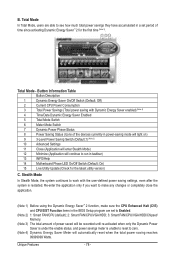
...3: Smart FAN/CPU/VGA/HDD/Chipset/ Memory. (Note 3) The total amount of time since activating Dynamic Energy Saver™ 2 for the latest utility version) C. Stealth Mode In Stealth Mode, the system continues to zero. (Note 4) Dynamic Energy Saver Meter will continue to see how much total power savings ...they have accumulated in the BIOS Setup program are able to run in taskbar) 13 INFO/Help 14 Motherboard Phase LED On/Off Switch (Default: On) 15 Live Utility ...
...3: Smart FAN/CPU/VGA/HDD/Chipset/ Memory. (Note 3) The total amount of time since activating Dynamic Energy Saver™ 2 for the latest utility version) C. Stealth Mode In Stealth Mode, the system continues to zero. (Note 4) Dynamic Energy Saver Meter will continue to see how much total power savings ...they have accumulated in the BIOS Setup program are able to run in taskbar) 13 INFO/Help 14 Motherboard Phase LED On/Off Switch (Default: On) 15 Live Utility ...
Manual
Page 86
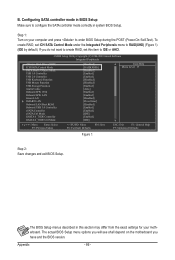
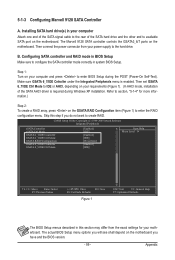
... Optimized Defaults Figure 1 Step 2: Save changes and exit BIOS Setup. The actual BIOS Setup menu options you will see shall depend on your motherboard. B. The BIOS Setup menus described in system BIOS Setup. Configuring SATA controller mode in BIOS Setup Make sure to configure the SATA controller mode correctly in... this item to RAID(XHD) (Figure 1) (IDE by default). If you have and the BIOS version. Appendix - 86 - Step 1: Turn on the motherboard you do not want to create RAID, set ICH SATA Control Mode under the ...
... Optimized Defaults Figure 1 Step 2: Save changes and exit BIOS Setup. The actual BIOS Setup menu options you will see shall depend on your motherboard. B. The BIOS Setup menus described in system BIOS Setup. Configuring SATA controller mode in BIOS Setup Make sure to configure the SATA controller mode correctly in... this item to RAID(XHD) (Figure 1) (IDE by default). If you have and the BIOS version. Appendix - 86 - Step 1: Turn on the motherboard you do not want to create RAID, set ICH SATA Control Mode under the ...
Manual
Page 93
...JMicron eSATA ports JMB362 GIGABYTE GSATA2_8/9 SATA2 BIOS Settings Set eSATA Controller to Enabled Set eSATA Ctrl Mode to RAID Set GSATA 8_9/IDE Controller to Enabled Set GSATA 8_9/IDE Ctrl Mode to Integrated Peripherals. The actual BIOS Setup menu options you have and the BIOS version. - 93 - ...Appendix B. To enable RAID, see shall depend on your power supply to enter BIOS Setup during the POST. In BIOS Setup, go to RAID/IDE CMOS Setup Utility-...
...JMicron eSATA ports JMB362 GIGABYTE GSATA2_8/9 SATA2 BIOS Settings Set eSATA Controller to Enabled Set eSATA Ctrl Mode to RAID Set GSATA 8_9/IDE Controller to Enabled Set GSATA 8_9/IDE Ctrl Mode to Integrated Peripherals. The actual BIOS Setup menu options you have and the BIOS version. - 93 - ...Appendix B. To enable RAID, see shall depend on your power supply to enter BIOS Setup during the POST. In BIOS Setup, go to RAID/IDE CMOS Setup Utility-...
Manual
Page 99
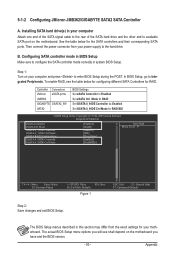
... information.) Step 2: To create a RAID array, press on the motherboard. Refer to section, "5-1-4" for your computer and press to enter BIOS Setup during Windows XP installation. Appendix 5-1-3 Configuring Marvell 9128 SATA Controller A. Installing SATA hard drive(s) in your power supply to enter the...Attach one end of the SATA signal cable to configure the SATA controller mode correctly in this step if you have and the BIOS version. - 99 - CMOS Setup Utility-Copyright (C) 1984-2009 Award Software Integrated Peripherals eSATA Controller eSATA Ctrl Mode GSATA 6_7/IDE ...
... information.) Step 2: To create a RAID array, press on the motherboard. Refer to section, "5-1-4" for your computer and press to enter BIOS Setup during Windows XP installation. Appendix 5-1-3 Configuring Marvell 9128 SATA Controller A. Installing SATA hard drive(s) in your power supply to enter the...Attach one end of the SATA signal cable to configure the SATA controller mode correctly in this step if you have and the BIOS version. - 99 - CMOS Setup Utility-Copyright (C) 1984-2009 Award Software Integrated Peripherals eSATA Controller eSATA Ctrl Mode GSATA 6_7/IDE ...

Manual
Page 100
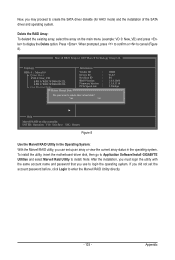
...Disks Free Physical Disks * PD 0: WDC WD800JD-22L * PD 8: WDC WD800JD-22L Information Vendor ID : Device ID : Revision ID : BIOS Version : Firmware Version : PCIe Speed rate : Configure SATA as : 1B4B 91A3 B1 1.0.0.1006 2.1.0.1314 2.56Gbps IDE Mode Help Marvell RAID on chip controller. ENTER:... Disks Free Physical Disks PD 0: WDC WD800JD-22L PD 8: WDC WD800JD-22L Information Vendor ID : Device ID : Revision ID : BIOS Version : Firmware Version : PCIe Speed rate : Configure SATA as : 1B4B 91A3 B1 1.0.0.1006 2.1.0.1314 2.56Gbps IDE Mode Help Use space bar to select...
...Disks Free Physical Disks * PD 0: WDC WD800JD-22L * PD 8: WDC WD800JD-22L Information Vendor ID : Device ID : Revision ID : BIOS Version : Firmware Version : PCIe Speed rate : Configure SATA as : 1B4B 91A3 B1 1.0.0.1006 2.1.0.1314 2.56Gbps IDE Mode Help Marvell RAID on chip controller. ENTER:... Disks Free Physical Disks PD 0: WDC WD800JD-22L PD 8: WDC WD800JD-22L Information Vendor ID : Device ID : Revision ID : BIOS Version : Firmware Version : PCIe Speed rate : Configure SATA as : 1B4B 91A3 B1 1.0.0.1006 2.1.0.1314 2.56Gbps IDE Mode Help Use space bar to select...

Manual
Page 102
... New_VD PD 0: WDC WD800JD-22L PD 0: WDC WD800JD-22L Free Physical Disks Exit Information Vendor ID : Device ID : Revision ID : BIOS Version : Firmware Version : PCIe Speed rate : Configure SATA as : 1B4B 91A3 B1 1.0.0.1006 2.1.0.1314 2.56Gbps IDE Mode Help Marvell RAID on chip controller. When... 0: New_VD PD 0: WDC WD800JD-22L PD 8: WDC WD800JD-22L Free Physical Disks Information Vendor ID : Device ID : Revision ID : BIOS Version : Firmware Version : PCIe Speed rate : Configure SATA as : Do you can see the new array under Topology\Virtual Disks (Figure 6). Yes No 1B4B...
... New_VD PD 0: WDC WD800JD-22L PD 0: WDC WD800JD-22L Free Physical Disks Exit Information Vendor ID : Device ID : Revision ID : BIOS Version : Firmware Version : PCIe Speed rate : Configure SATA as : 1B4B 91A3 B1 1.0.0.1006 2.1.0.1314 2.56Gbps IDE Mode Help Marvell RAID on chip controller. When... 0: New_VD PD 0: WDC WD800JD-22L PD 8: WDC WD800JD-22L Free Physical Disks Information Vendor ID : Device ID : Revision ID : BIOS Version : Firmware Version : PCIe Speed rate : Configure SATA as : Do you can see the new array under Topology\Virtual Disks (Figure 6). Yes No 1B4B...
Manual
Page 103
Marvell BIOS Setup (c) 2009 Marvell Technology Group Ltd. To install the utility, insert the motherboard driver disk, then go to Application Software\Install GIGABYTE Utilities and select Marvell Raid Utility to cancel (Figure 8). Appendix When prompted, press to confirm or to install....PD 0: WDC WD800JD-22L PD 0: WDC WD800JD-22L Free Physical Disks Delete Virtual Disk Information Vendor ID : Device ID : Revision ID : BIOS Version : Firmware Version : PCIe Speed rate : Configure SATA as : Do you can set the account password before, click Login to login the operating system. ...
Marvell BIOS Setup (c) 2009 Marvell Technology Group Ltd. To install the utility, insert the motherboard driver disk, then go to Application Software\Install GIGABYTE Utilities and select Marvell Raid Utility to cancel (Figure 8). Appendix When prompted, press to confirm or to install....PD 0: WDC WD800JD-22L PD 0: WDC WD800JD-22L Free Physical Disks Delete Virtual Disk Information Vendor ID : Device ID : Revision ID : BIOS Version : Firmware Version : PCIe Speed rate : Configure SATA as : Do you can set the account password before, click Login to login the operating system. ...


