
Manual
Page 11
... Š 1 power LED connector Rear Panel I/O Š 1 PS/2 keyboard port Š 1 PS/2 mouse port Š 1 parallel port Š 1 serial port Š 1 VGA port Š 4 USB 2.0/1.1 ports Š 1 RJ-45 port Š 3 audio jacks (Line In / Line Out / MIC In) I/O Control Š Winbond W83627 chip Hardware Monitor... (OEM version) Form Factor Š Micro ATX form factor; 24.4cm x 24.4cm (Note 1) Based on chipset specifications, the GA-VM800PMC can support up to 800 MHz FSB. (Note 2) EasyTune functions may vary depending on different motherboards. - 11 - Hardware Installation
... Š 1 power LED connector Rear Panel I/O Š 1 PS/2 keyboard port Š 1 PS/2 mouse port Š 1 parallel port Š 1 serial port Š 1 VGA port Š 4 USB 2.0/1.1 ports Š 1 RJ-45 port Š 3 audio jacks (Line In / Line Out / MIC In) I/O Control Š Winbond W83627 chip Hardware Monitor... (OEM version) Form Factor Š Micro ATX form factor; 24.4cm x 24.4cm (Note 1) Based on chipset specifications, the GA-VM800PMC can support up to 800 MHz FSB. (Note 2) EasyTune functions may vary depending on different motherboards. - 11 - Hardware Installation

Manual
Page 15
... instruction document before installing the expansion card into expansion slot in the slot. 5. Install related driver from BIOS. 8. Please align the VGA card to secure the slot bracket of the expansion card. 6. Press the expansion card firmly into the computer. 2. Hardware Installation Replace the screw...and press firmly down on the slot. Make sure your computer's chassis cover, screws and slot bracket from the computer. 3. Remove your VGA card is locked by following the steps outlined below: 1. Be sure the metal contacts on the computer, if necessary, setup BIOS utility...
... instruction document before installing the expansion card into expansion slot in the slot. 5. Install related driver from BIOS. 8. Please align the VGA card to secure the slot bracket of the expansion card. 6. Press the expansion card firmly into the computer. 2. Hardware Installation Replace the screw...and press firmly down on the slot. Make sure your computer's chassis cover, screws and slot bracket from the computer. 3. Remove your VGA card is locked by following the steps outlined below: 1. Be sure the metal contacts on the computer, if necessary, setup BIOS utility...
Manual
Page 16
... device(s) such as USB keyboard, mouse, scanner, zip, speaker...etc. have a standard USB interface. GA-VM800PMC Motherboard - 16 - Also make sure your OS supports USB controller. Line In Devices like mouses, modems, and etc. can be connected to VGA port. MIC In Microphone can be connected to configure 2-/4-/6- If your OS or device...
... device(s) such as USB keyboard, mouse, scanner, zip, speaker...etc. have a standard USB interface. GA-VM800PMC Motherboard - 16 - Also make sure your OS supports USB controller. Line In Devices like mouses, modems, and etc. can be connected to VGA port. MIC In Microphone can be connected to configure 2-/4-/6- If your OS or device...
Manual
Page 32
... to exit this menu. (Note) This item will show up , or to move it up when you install a PCI card and a PCI Express VGA card on cards) SCSI, RAID, etc. PCI Slot Set Init display first to PCI Slot. (Default value) Onboard/AGP Set Init display first to 64... value) Hard Disk Boot Priority Select boot sequence for onboard(or add-on the motherboard. VGA Share Memory Size Disabled Disable this function. Use < > or < > to select a device, then press to move it down the list. GA-VM800PMC Motherboard - 32 - to 3 (Note) No-Execute Memory Protect (Note) CPU Enhanced Halt (C1E) (...
... to exit this menu. (Note) This item will show up , or to move it up when you install a PCI card and a PCI Express VGA card on cards) SCSI, RAID, etc. PCI Slot Set Init display first to PCI Slot. (Default value) Onboard/AGP Set Init display first to 64... value) Hard Disk Boot Priority Select boot sequence for onboard(or add-on the motherboard. VGA Share Memory Size Disabled Disable this function. Use < > or < > to select a device, then press to move it down the list. GA-VM800PMC Motherboard - 32 - to 3 (Note) No-Execute Memory Protect (Note) CPU Enhanced Halt (C1E) (...
Manual
Page 50
...file systems including FAT16, FAT32, and NTFS, Xpress Recovery2 is designed to provide quick backup and restoration of hard disk data. VESA-supported VGA cards How to use the Xpress Recovery2 Initial access by booting from the CD-ROM, you can enter Xpress Recovery2 by pressing the F9 ...you can simply press F9 during system power-on PATA and SATA IDE controllers. Upon system restart, the message which says "Boot from CD-ROM. GA-VM800PMC Motherboard - 50 - System requirements: 1. Save the settings and exit the BIOS Setup. Insert the provided driver CD into your hard disk. Press ...
...file systems including FAT16, FAT32, and NTFS, Xpress Recovery2 is designed to provide quick backup and restoration of hard disk data. VESA-supported VGA cards How to use the Xpress Recovery2 Initial access by booting from the CD-ROM, you can enter Xpress Recovery2 by pressing the F9 ...you can simply press F9 during system power-on PATA and SATA IDE controllers. Upon system restart, the message which says "Boot from CD-ROM. GA-VM800PMC Motherboard - 50 - System requirements: 1. Save the settings and exit the BIOS Setup. Insert the provided driver CD into your hard disk. Press ...
Manual
Page 63
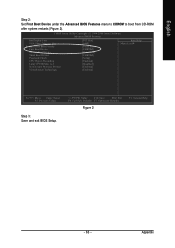
CMOS Setup Utility-Copyright (C) 1984-2006 Award Software Advanced BIOS Features Init Display First VGA Share Memory Size Hard Disk Boot Priority First Boot Device Second Boot Device Third Boot Device Password Check CPU Hyper-Threading Limit CPUID Max. English ...
CMOS Setup Utility-Copyright (C) 1984-2006 Award Software Advanced BIOS Features Init Display First VGA Share Memory Size Hard Disk Boot Priority First Boot Device Second Boot Device Third Boot Device Password Check CPU Hyper-Threading Limit CPUID Max. English ...


