
Manual
Page 1
... installing the operating system, insert the motherboard driver disk. B. Without the driver, the hard drive may not be able to automatically set up a RAID 0 array later using the Auto function. A. Step 2: Install the RAID driver and operating system The X.H.D utility supports Windows 7/Vista/XP. eXtreme Hard Drive (X.H.D) With GIGABYTE eXtreme Hard Drive (X.H.D)(Note 1), users can...
... installing the operating system, insert the motherboard driver disk. B. Without the driver, the hard drive may not be able to automatically set up a RAID 0 array later using the Auto function. A. Step 2: Install the RAID driver and operating system The X.H.D utility supports Windows 7/Vista/XP. eXtreme Hard Drive (X.H.D) With GIGABYTE eXtreme Hard Drive (X.H.D)(Note 1), users can...
Manual
Page 3
...be made by any means without prior notice. Changes to their respective owners. For instructions on your motherboard revision before updating motherboard BIOS, drivers, or when looking for technical information. All rights reserved. Documentation Classifications In order to use of this... product. For product-related information, check on our website at: http://www.gigabyte.com.tw Identifying Your Motherboard Revision The revision number on how to assist in any form or by GIGABYTE without GIGABYTE's prior written permission. For example, "REV: 1.0" means the revision of ...
...be made by any means without prior notice. Changes to their respective owners. For instructions on your motherboard revision before updating motherboard BIOS, drivers, or when looking for technical information. All rights reserved. Documentation Classifications In order to use of this... product. For product-related information, check on our website at: http://www.gigabyte.com.tw Identifying Your Motherboard Revision The revision number on how to assist in any form or by GIGABYTE without GIGABYTE's prior written permission. For example, "REV: 1.0" means the revision of ...
Manual
Page 4
Table of Contents Box Contents...6 Optional Items...6 GA-P55A-UD3P/GA-P55A-UD3R Motherboard Layout 7 Block Diagram...8 Chapter 1 Hardware Installation 9 1-1 Installation Precautions 9 1-2 Product Specifications 10 1-3 Installing the CPU and CPU Cooler 13 1-3-1 Installing the CPU 13 1-3-2 Installing the CPU ...Optimized Defaults 58 2-11 Set Supervisor/User Password 59 2-12 Save & Exit Setup 60 2-13 Exit Without Saving 60 2-14 Security Chip Configuration j 61 Chapter 3 Drivers Installation 63 3-1 Installing Chipset Drivers 63 3-2 Application Software 64 3-3 Technical Manuals 64 - 4 -
Table of Contents Box Contents...6 Optional Items...6 GA-P55A-UD3P/GA-P55A-UD3R Motherboard Layout 7 Block Diagram...8 Chapter 1 Hardware Installation 9 1-1 Installation Precautions 9 1-2 Product Specifications 10 1-3 Installing the CPU and CPU Cooler 13 1-3-1 Installing the CPU 13 1-3-2 Installing the CPU ...Optimized Defaults 58 2-11 Set Supervisor/User Password 59 2-12 Save & Exit Setup 60 2-13 Exit Without Saving 60 2-14 Security Chip Configuration j 61 Chapter 3 Drivers Installation 63 3-1 Installing Chipset Drivers 63 3-2 Application Software 64 3-3 Technical Manuals 64 - 4 -
Manual
Page 6
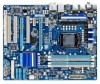
Box Contents GA-P55A-UD3P or GA-P55A-UD3R motherboard Motherboard driver disk User's Manual Quick Installation Guide One IDE cable Four SATA 3Gb/s cables I/O Shield • The box contents above are subject to change without notice. • The motherboard image is for reference only and the actual items shall depend on the product package you obtain. The box contents...
Box Contents GA-P55A-UD3P or GA-P55A-UD3R motherboard Motherboard driver disk User's Manual Quick Installation Guide One IDE cable Four SATA 3Gb/s cables I/O Shield • The box contents above are subject to change without notice. • The motherboard image is for reference only and the actual items shall depend on the product package you obtain. The box contents...
Manual
Page 18
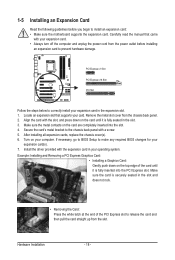
... After installing all expansion cards, replace the chassis cover(s). 6. If necessary, go to BIOS Setup to prevent hardware damage. Install the driver provided with the expansion card in the expansion slot. 1. Locate an expansion slot that came with the slot, and press down on your... read the manual that supports your operating system. Secure the card's metal bracket to install an expansion card: • Make sure the motherboard supports the expansion card. Turn on the top edge of the PCI Express slot to correctly install your expansion card in your card. PCI...
... After installing all expansion cards, replace the chassis cover(s). 6. If necessary, go to BIOS Setup to prevent hardware damage. Install the driver provided with the expansion card in the expansion slot. 1. Locate an expansion slot that came with the slot, and press down on your... read the manual that supports your operating system. Secure the card's metal bracket to install an expansion card: • Make sure the motherboard supports the expansion card. Turn on the top edge of the PCI Express slot to correctly install your expansion card in your card. PCI...
Manual
Page 63
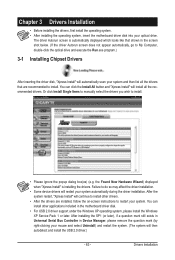
...question mark (by right-clicking your optical drive. Chapter 3 Drivers Installation • Before installing the drivers, first install the operating system. • After installing the operating system, insert the motherboard driver disk into your mouse and select Uninstall) and restart the ... looks like that shown in the motherboard driver disk. • For USB 2.0 driver support under the Windows XP operating system, please install the Windows XP Service Pack 1 or later. The driver Autorun screen is installing the drivers. Drivers Installation Failure to install. •...
...question mark (by right-clicking your optical drive. Chapter 3 Drivers Installation • Before installing the drivers, first install the operating system. • After installing the operating system, insert the motherboard driver disk into your mouse and select Uninstall) and restart the ... looks like that shown in the motherboard driver disk. • For USB 2.0 driver support under the Windows XP operating system, please install the Windows XP Service Pack 1 or later. The driver Autorun screen is installing the drivers. Drivers Installation Failure to install. •...
Manual
Page 68
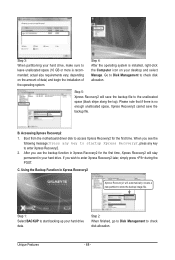
B. Boot from the motherboard driver disk to enter Xpress Recovery2 later, simply press during the POST. Unique Features - 68 - actual size requirements vary, depending on your desktop and select Manage. ...
B. Boot from the motherboard driver disk to enter Xpress Recovery2 later, simply press during the POST. Unique Features - 68 - actual size requirements vary, depending on your desktop and select Manage. ...
Manual
Page 77
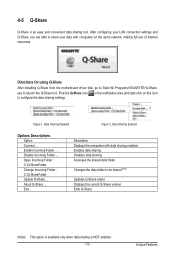
... the data sharing settings. Data Sharing Enabled Options Descriptions Option Connect ... Directions for using Q-Share After installing Q-Share from the motherboard driver disk, go to be shared (Note) Updates Q-Share online Displays the current Q-Share version Exits Q-Share (Note) This option... enabled Enables data sharing Disables data sharing Accesses the shared data folder Changes the data folder to Start>All Programs>GIGABYTE>Q-Share. in the notification area and right-click on the same network, making full use of Internet resources. 4-5 Q-...
... the data sharing settings. Data Sharing Enabled Options Descriptions Option Connect ... Directions for using Q-Share After installing Q-Share from the motherboard driver disk, go to be shared (Note) Updates Q-Share online Displays the current Q-Share version Exits Q-Share (Note) This option... enabled Enables data sharing Disables data sharing Accesses the shared data folder Changes the data folder to Start>All Programs>GIGABYTE>Q-Share. in the notification area and right-click on the same network, making full use of Internet resources. 4-5 Q-...
Manual
Page 81
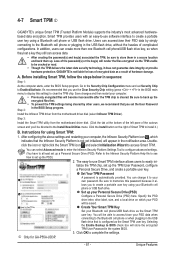
...it does not guarantee data integrity or provide hardware protection. Install the Infineon TPM driver from the motherboard driver disk. (Click the tab at least set up the PSD.) 2. After ... Click OK to access Smart TPM. A. Set Your TPM Password A password is not liable for GA-P55A-UD3P. - 81 - Before installing Smart TPM, follow the steps below in the system BIOS. ...: Step 1: As the computer starts, enter the BIOS Setup program. 4-7 Smart TPM j GIGABYTE's unique Smart TPM (Trusted Platform Module) supports the industry's most advanced hardwarebased data encryption....
...it does not guarantee data integrity or provide hardware protection. Install the Infineon TPM driver from the motherboard driver disk. (Click the tab at least set up the PSD.) 2. After ... Click OK to access Smart TPM. A. Set Your TPM Password A password is not liable for GA-P55A-UD3P. - 81 - Before installing Smart TPM, follow the steps below in the system BIOS. ...: Step 1: As the computer starts, enter the BIOS Setup program. 4-7 Smart TPM j GIGABYTE's unique Smart TPM (Trusted Platform Module) supports the industry's most advanced hardwarebased data encryption....
Manual
Page 83
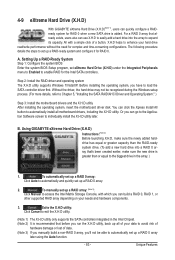
...to expand its capacity. Exits the X.H.D utility: Click Cancel to automatically set up a RAID 0 array. 2. 4-9 eXtreme Hard Drive (X.H.D) With GIGABYTE eXtreme Hard Drive (X.H.D)(Note 1), users can build a RAID 0, RAID 1, or other supported RAID array depending on your needs and hardware components.... for complex and time-consuming configurations. The following procedure details the steps to load the SATA controller driver first. Or you have to set up all motherboard drivers, including the X.H.D utility. B. To automatically set up a RAID 0 array: Click Auto to ...
...to expand its capacity. Exits the X.H.D utility: Click Cancel to automatically set up a RAID 0 array. 2. 4-9 eXtreme Hard Drive (X.H.D) With GIGABYTE eXtreme Hard Drive (X.H.D)(Note 1), users can build a RAID 0, RAID 1, or other supported RAID array depending on your needs and hardware components.... for complex and time-consuming configurations. The following procedure details the steps to load the SATA controller driver first. Or you have to set up all motherboard drivers, including the X.H.D utility. B. To automatically set up a RAID 0 array: Click Auto to ...
Manual
Page 85
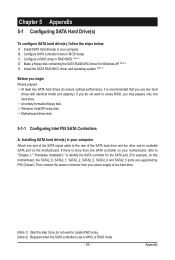
.... • An empty formatted floppy disk. • Windows Vista/XP setup disk. • Motherboard driver disk. 5-1-1 Configuring Intel P55 SATA Controllers A. Appendix Make a floppy disk containing the SATA RAID/AHCI driver for the SATA port. (For example, on the motherboard. Install SATA hard drive(s) in your computer Attach one end of the SATA signal...
.... • An empty formatted floppy disk. • Windows Vista/XP setup disk. • Motherboard driver disk. 5-1-1 Configuring Intel P55 SATA Controllers A. Appendix Make a floppy disk containing the SATA RAID/AHCI driver for the SATA port. (For example, on the motherboard. Install SATA hard drive(s) in your computer Attach one end of the SATA signal...
Manual
Page 103
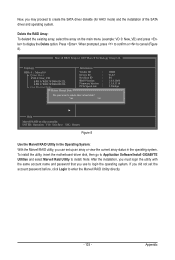
... Version : Firmware Version : PCIe Speed rate : Configure SATA as : Do you want to create the SATA driver diskette (for AHCI mode) and the installation of the SATA driver and operating system. To install the utility, insert the motherboard driver disk, then go to Application Software\Install GIGABYTE Utilities and select Marvell Raid Utility to install.
... Version : Firmware Version : PCIe Speed rate : Configure SATA as : Do you want to create the SATA driver diskette (for AHCI mode) and the installation of the SATA driver and operating system. To install the utility, insert the motherboard driver disk, then go to Application Software\Install GIGABYTE Utilities and select Marvell Raid Utility to install.
Manual
Page 104
...formatted floppy disk. See the instructions below about how to \win64 for copying the Windows 64-bit driver. (Note 2) Change the directory from the motherboard driver disk to a USB flash drive. Steps: 1: Boot from the motherboard driver disk to a floppy disk. In MS-DOS mode: Prepare a startup disk that is D:\). 3: ...to RAID/AHCI mode, you also can copy the SATA controller driver from the startup disk. 2: Remove the startup disk and insert the prepared floppy disk and the motherboard driver disk (here we as- Without the driver, the hard drive may not be recognized during the OS ...
...formatted floppy disk. See the instructions below about how to \win64 for copying the Windows 64-bit driver. (Note 2) Change the directory from the motherboard driver disk to a USB flash drive. Steps: 1: Boot from the motherboard driver disk to a floppy disk. In MS-DOS mode: Prepare a startup disk that is D:\). 3: ...to RAID/AHCI mode, you also can copy the SATA controller driver from the startup disk. 2: Remove the startup disk and insert the prepared floppy disk and the motherboard driver disk (here we as- Without the driver, the hard drive may not be recognized during the OS ...
Manual
Page 105
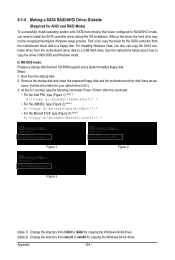
...4 Figure 5 - 105 - Appendix tem. • For the JMicron JMB362, select 3) GIGABYTE GSATA driver for 32bit system for Windows 32-bit op- Press any key to be installed, select the controller driver by pressing the corresponding letter from the menu in the BootDrv folder (Figure 4). Depending on the... operating system to exit when finished. In Windows mode: Steps: 1: Use an alternative system and insert the motherboard driver disk. 2: From your optical drive folder, double click the Menu.exe file in Figure 5, • For the Intel P55, select 1) Intel ...
...4 Figure 5 - 105 - Appendix tem. • For the JMicron JMB362, select 3) GIGABYTE GSATA driver for 32bit system for Windows 32-bit op- Press any key to be installed, select the controller driver by pressing the corresponding letter from the menu in the BootDrv folder (Figure 4). Depending on the... operating system to exit when finished. In Windows mode: Steps: 1: Use an alternative system and insert the motherboard driver disk. 2: From your optical drive folder, double click the Menu.exe file in Figure 5, • For the Intel P55, select 1) Intel ...
Manual
Page 108
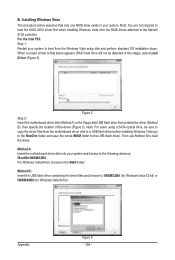
...below assumes that contains the driver (Method B), then specify the location of the driver (Figure 5). Method B: Insert the USB flash drive containing the driver files and browse to the Marvell 9128 controller. For the Intel P55: Step 1: Restart your system to boot from the motherboard driver disk to a USB ...flash drive before installing Windows Vista (go to the BootDrv folder and save the whole iMSM folder to load the driver. Note: For users using a SATA optical drive, be detected at this...
...below assumes that contains the driver (Method B), then specify the location of the driver (Figure 5). Method B: Insert the USB flash drive containing the driver files and browse to the Marvell 9128 controller. For the Intel P55: Step 1: Restart your system to boot from the motherboard driver disk to a USB ...flash drive before installing Windows Vista (go to the BootDrv folder and save the whole iMSM folder to load the driver. Note: For users using a SATA optical drive, be detected at this...

Manual
Page 110
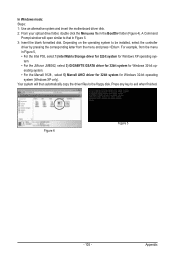
...GSATA\64Bit (for Windows Vista 64-bit). Method B: Insert the USB flash drive containing the driver files and browse to load the driver. Appendix Figure 10 - 110 - Figure 9 Step 2: Insert the motherboard driver disk (Method A) or the floppy disk/USB flash drive that below appears (RAID/AHCI hard.... Note: For users using a SATA optical drive, be detected at this stage), select Load Driver (Figure 9). Method A: Insert the motherboard driver disk into your system to boot from the motherboard driver disk to a USB flash drive before installing Windows Vista (go to the BootDrv folder and save...
...GSATA\64Bit (for Windows Vista 64-bit). Method B: Insert the USB flash drive containing the driver files and browse to load the driver. Appendix Figure 10 - 110 - Figure 9 Step 2: Insert the motherboard driver disk (Method A) or the floppy disk/USB flash drive that below appears (RAID/AHCI hard.... Note: For users using a SATA optical drive, be detected at this stage), select Load Driver (Figure 9). Method A: Insert the motherboard driver disk into your system to boot from the motherboard driver disk to a USB flash drive before installing Windows Vista (go to the BootDrv folder and save...

Manual
Page 113
• Performing the Rebuild in the Operating System While in the operating system, make sure the chipset driver has been installed from All Programs in the information pane will display as Normal. - 113 - Right-click on the new hard drive and select Rebuild ... under Non-RAID Hard Drive. Follow the on the rebuild volume and select Show Rebuild Progress. Then launch the Intel Matrix Storage Console from the motherboard driver disk. Step 5: When the message "The rebuild was completed successfully," appears, click OK to complete.
• Performing the Rebuild in the Operating System While in the operating system, make sure the chipset driver has been installed from All Programs in the information pane will display as Normal. - 113 - Right-click on the new hard drive and select Rebuild ... under Non-RAID Hard Drive. Follow the on the rebuild volume and select Show Rebuild Progress. Then launch the Intel Matrix Storage Console from the motherboard driver disk. Step 5: When the message "The rebuild was completed successfully," appears, click OK to complete.

Manual
Page 116
... the Rebuilding RAID Wizard appears, click Next. Step 5: The rebuilding progress is displayed at the bottom of the screen. Launch the GIGABYTE RAID CONFIGURER from the motherboard driver disk. Step 1: In the GIGABYTE RAID CONFIGURER screen, right-click on the array to rebuild the array and click Next. Appendix - 116 - Step 4: Click Finish to...
... the Rebuilding RAID Wizard appears, click Next. Step 5: The rebuilding progress is displayed at the bottom of the screen. Launch the GIGABYTE RAID CONFIGURER from the motherboard driver disk. Step 1: In the GIGABYTE RAID CONFIGURER screen, right-click on the array to rebuild the array and click Next. Appendix - 116 - Step 4: Click Finish to...

Manual
Page 123
... 7.1-speaker configuration as an example.) . Click the Start icon Programs, Dolby Control Center to get only 2-channel playback output (from the motherboard driver disk. The system will expand 2-channel audio for a 7.1-channel surround sound playback. 2. : Click Natural Bass to All 1. : Click..., you will be transformed into multi-channel audio, creating a virtual surround sound environment . (Note) Install the Dolby GUI Software driver from the front speakers) when playing 2-channel stereo sources. You must play 4-, 5.1-, or 7.1- 5-2-3 Enabling the Dolby Home Theater...
... 7.1-speaker configuration as an example.) . Click the Start icon Programs, Dolby Control Center to get only 2-channel playback output (from the motherboard driver disk. The system will expand 2-channel audio for a 7.1-channel surround sound playback. 2. : Click Natural Bass to All 1. : Click..., you will be transformed into multi-channel audio, creating a virtual surround sound environment . (Note) Install the Dolby GUI Software driver from the front speakers) when playing 2-channel stereo sources. You must play 4-, 5.1-, or 7.1- 5-2-3 Enabling the Dolby Home Theater...

Manual
Page 127
... Manager > System Devices). You can temporarily remove the battery from GIGABYTE's website to install. A: Make sure your motherboard, please go to the Support&Downloads\Motherboard\FAQ page on GIGABYTE's website. Then install the onboard HD audio driver from the motherboard driver disk or download the audio driver from the battery holder to stop supplying power to the CMOS...
... Manager > System Devices). You can temporarily remove the battery from GIGABYTE's website to install. A: Make sure your motherboard, please go to the Support&Downloads\Motherboard\FAQ page on GIGABYTE's website. Then install the onboard HD audio driver from the motherboard driver disk or download the audio driver from the battery holder to stop supplying power to the CMOS...


