Manual
Page 3
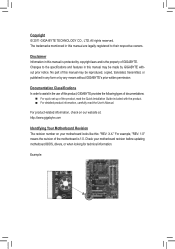
... 1.0. Documentation Classifications In order to assist in this product, GIGABYTE provides the following types of documentations: For quick set-up of the motherboard is protected by GIGABYTE without GIGABYTE's prior written permission. All rights reserved. For example, "...our website at: http://www.gigabyte.com Identifying Your Motherboard Revision The revision number on your motherboard revision before updating motherboard BIOS, drivers, or when looking for technical information. The trademarks mentioned in the use of GIGABYTE. Changes to their respective ...
... 1.0. Documentation Classifications In order to assist in this product, GIGABYTE provides the following types of documentations: For quick set-up of the motherboard is protected by GIGABYTE without GIGABYTE's prior written permission. All rights reserved. For example, "...our website at: http://www.gigabyte.com Identifying Your Motherboard Revision The revision number on your motherboard revision before updating motherboard BIOS, drivers, or when looking for technical information. The trademarks mentioned in the use of GIGABYTE. Changes to their respective ...
Manual
Page 6
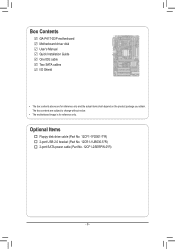
Box Contents GA-P41T-D3P motherboard Motherboard driver disk User's Manual Quick Installation Guide One IDE cable Two SATA cables I/O Shield • The box contents above are subject to change without notice. • The motherboard image is for reference only and the actual items shall depend on the product package you obtain. The box contents are for reference only. Optional Items Floppy disk drive cable (Part No. 12CF1-1FD001-7*R) 2-port USB 2.0 bracket (Part No. 12CR1-1UB030-5*R) 2-port SATA power cable (Part No. 12CF1-2SERPW-0*R) - 6 -
Box Contents GA-P41T-D3P motherboard Motherboard driver disk User's Manual Quick Installation Guide One IDE cable Two SATA cables I/O Shield • The box contents above are subject to change without notice. • The motherboard image is for reference only and the actual items shall depend on the product package you obtain. The box contents are for reference only. Optional Items Floppy disk drive cable (Part No. 12CF1-1FD001-7*R) 2-port USB 2.0 bracket (Part No. 12CR1-1UB030-5*R) 2-port SATA power cable (Part No. 12CF1-2SERPW-0*R) - 6 -
Manual
Page 18
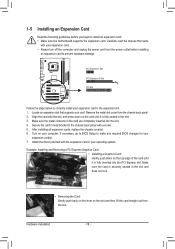
Secure the card's metal bracket to the chassis back panel with the expansion card in the slot. 3. Install the driver provided with a screw. 5. 1-5 Installing an Expansion Card Read the following guidelines before installing an expansion card to prevent hardware damage. Remove the metal slot ...turn off the computer and unplug the power cord from the power outlet before you begin to install an expansion card: • Make sure the motherboard supports the expansion card. Make sure the metal contacts on the top edge of the card until it is securely seated in the expansion slot...
Secure the card's metal bracket to the chassis back panel with the expansion card in the slot. 3. Install the driver provided with a screw. 5. 1-5 Installing an Expansion Card Read the following guidelines before installing an expansion card to prevent hardware damage. Remove the metal slot ...turn off the computer and unplug the power cord from the power outlet before you begin to install an expansion card: • Make sure the motherboard supports the expansion card. Make sure the metal contacts on the top edge of the card until it is securely seated in the expansion slot...

Manual
Page 30
... drive data using the driver disk, the key can access Boot Menu again to change the first boot device setting as needed. : Q-FLASH Press the key to access the Q-Flash utility directly without entering BIOS Setup. Note: The setting in Boot Menu. BIOS Setup - 30 - Motherboard Model BIOS Version P41T-D3P E4c . . . . : BIOS Setup...
... drive data using the driver disk, the key can access Boot Menu again to change the first boot device setting as needed. : Q-FLASH Press the key to access the Q-Flash utility directly without entering BIOS Setup. Note: The setting in Boot Menu. BIOS Setup - 30 - Motherboard Model BIOS Version P41T-D3P E4c . . . . : BIOS Setup...
Manual
Page 55
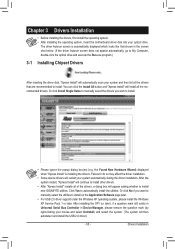
...(The system will appear asking whether to install new GIGABYTE utilities. You can click the Install All button and "Xpress Install" will install all of the drivers, a dialog box will then autodetect and install the USB 2.0 driver.) - 55 - Click Yes to install. •...XP Service Pack 1 or later. Drivers Installation Chapter 3 Drivers Installation • Before installing the drivers, first install the operating system. • After installing the operating system, insert the motherboard driver disk into your system and then list all the drivers that shown in Device Manager, please...
...(The system will appear asking whether to install new GIGABYTE utilities. You can click the Install All button and "Xpress Install" will install all of the drivers, a dialog box will then autodetect and install the USB 2.0 driver.) - 55 - Click Yes to install. •...XP Service Pack 1 or later. Drivers Installation Chapter 3 Drivers Installation • Before installing the drivers, first install the operating system. • After installing the operating system, insert the motherboard driver disk into your system and then list all the drivers that shown in Device Manager, please...
Manual
Page 56
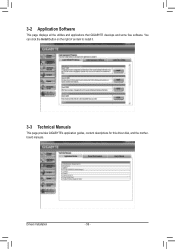
Drivers Installation - 56 - 3-2 Application Software This page displays all the utilities and applications that GIGABYTE develops and some free software. You can click the Install button on the right of an item to install it. 3-3 Technical Manuals This page provides GIGABYTE's application guides, content descriptions for this driver disk, and the motherboard manuals.
Drivers Installation - 56 - 3-2 Application Software This page displays all the utilities and applications that GIGABYTE develops and some free software. You can click the Install button on the right of an item to install it. 3-3 Technical Manuals This page provides GIGABYTE's application guides, content descriptions for this driver disk, and the motherboard manuals.

Manual
Page 60
... 2: When finished, go to Disk Management to check disk allocation. Step 5: Xpress Recovery2 will automatically create a new partition to enter Xpress Recovery2. 2. Boot from the motherboard driver disk to leave unallocated space (10 GB or more is recommended; Please note that if there is installed, click Start, right-click the Computer and...
... 2: When finished, go to Disk Management to check disk allocation. Step 5: Xpress Recovery2 will automatically create a new partition to enter Xpress Recovery2. 2. Boot from the motherboard driver disk to leave unallocated space (10 GB or more is recommended; Please note that if there is installed, click Start, right-click the Computer and...

Manual
Page 69
Find the Q-Share icon to Start>All Programs>GIGABYTE>Q-Share. Unique Features Directions for using Q-Share After installing Q-Share from the motherboard driver disk, go to configure the data sharing settings. Enable Incoming Folder ... Exit... Open Incoming Folder : C:\Q-ShareFolder Change Incoming Folder : C:\Q-ShareFolder Update Q-Share ... Description Displays the ...
Find the Q-Share icon to Start>All Programs>GIGABYTE>Q-Share. Unique Features Directions for using Q-Share After installing Q-Share from the motherboard driver disk, go to configure the data sharing settings. Enable Incoming Folder ... Exit... Open Incoming Folder : C:\Q-ShareFolder Change Incoming Folder : C:\Q-ShareFolder Update Q-Share ... Description Displays the ...
Manual
Page 71
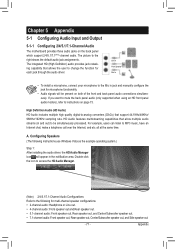
...high quality digital-to the right shows the default audio jack assignments. Configuring Speakers (The following for each jack through the audio driver. The picture to -analog converters (DACs) that support 44.1KHz/48KHz/ 96KHz/192KHz sampling rate. HD Audio features multistreaming ... the back panel which support 2/4/5.1/7.1(Note)-channel audio. Chapter 5 Appendix 5-1 Configuring Audio Input and Output 5-1-1 Configuring 2/4/5.1/7.1-Channel Audio The motherboard provides three audio jacks on page 73. If you want to mute the back panel audio (only supported when using an HD front...
...high quality digital-to the right shows the default audio jack assignments. Configuring Speakers (The following for each jack through the audio driver. The picture to -analog converters (DACs) that support 44.1KHz/48KHz/ 96KHz/192KHz sampling rate. HD Audio features multistreaming ... the back panel which support 2/4/5.1/7.1(Note)-channel audio. Chapter 5 Appendix 5-1 Configuring Audio Input and Output 5-1-1 Configuring 2/4/5.1/7.1-Channel Audio The motherboard provides three audio jacks on page 73. If you want to mute the back panel audio (only supported when using an HD front...
Manual
Page 78
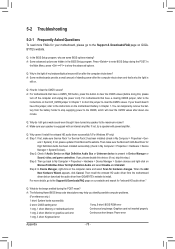
... program. You can temporarily remove the battery from Microsoft's website. A: Make sure your motherboard, please go to the Support & Downloads\FAQ page on GIGABYTE's website. Then install the onboard HD audio driver from the motherboard driver disk or download the audio driver from GIGABYTE's website to show the advanced options. A: The following Award BIOS beep code descriptions...
... program. You can temporarily remove the battery from Microsoft's website. A: Make sure your motherboard, please go to the Support & Downloads\FAQ page on GIGABYTE's website. Then install the onboard HD audio driver from the motherboard driver disk or download the audio driver from GIGABYTE's website to show the advanced options. A: The following Award BIOS beep code descriptions...


